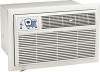
Installation Instructions
Page 1
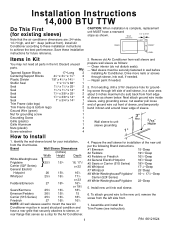
... Items in Kit You may not need all parts in a clear area about 3 inches maximum (to mount the new Air Conditioner must be in wall before installing Air Conditioner. Remove old Air Conditioner from wall sleeve and prepare wall sleeve as shown. If not existing, drill a 3/16"clearance hole for the Air Conditioner. 4. Brand Wall Sleeve Dimensions (inches) Width Height Depth } White-Westinghouse Frigidaire 251...
... Items in Kit You may not need all parts in a clear area about 3 inches maximum (to mount the new Air Conditioner must be in wall before installing Air Conditioner. Remove old Air Conditioner from wall sleeve and prepare wall sleeve as shown. If not existing, drill a 3/16"clearance hole for the Air Conditioner. 4. Brand Wall Sleeve Dimensions (inches) Width Height Depth } White-Westinghouse Frigidaire 251...
Installation Instructions
Page 10
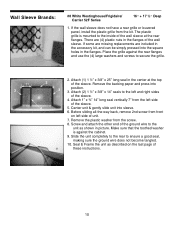
...x 25" long seal in the flanges. Attach 1" x ¾" 14" long seal vertically 7" from front on the last page of the ground wire to the unit as described on left side of the wall sleeve at the top of the wall sleeve. Center unit & gently slide unit into the square holes in...the sleeve. 5. Remove the plastic washer from the kit. Remove the backing paper and press into 3 position. 3. Wall Sleeve Brands: #8 White Westinghouse/Frigidaire/ Carrier 52F Series 16" + 17 ½" Deep 1. Make sure that the toothed washer is mounted to the left side of the sleeve. 4. ...
...x 25" long seal in the flanges. Attach 1" x ¾" 14" long seal vertically 7" from front on the last page of the ground wire to the unit as described on left side of the wall sleeve at the top of the wall sleeve. Center unit & gently slide unit into the square holes in...the sleeve. 5. Remove the plastic washer from the kit. Remove the backing paper and press into 3 position. 3. Wall Sleeve Brands: #8 White Westinghouse/Frigidaire/ Carrier 52F Series 16" + 17 ½" Deep 1. Make sure that the toothed washer is mounted to the left side of the sleeve. 4. ...
Installation Instructions
Page 11
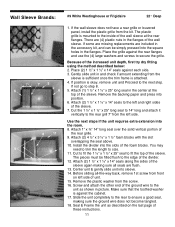
Wall Sleeve Brands: #9 White Westinghouse or Frigidaire 22" Deep ←7→ " 7 5 6 6 8 11 9 12 1. Attach (1) 1 ½" x 1 ½" x 25" ... rear grille. 9. Remove the plastic washer from the kit. If position is mounted to the left side. Attach 1" x ¾" 14" long seal over the solid vertical portion of the wall sleeve at the top of unit. 15. The plastic.... 11. If not go to secure the grille. The pieces must be simply pressed into sleeve. 14. If the wall sleeve does not have a rear grille or louvered panel, install the plastic grille from the screw. ...
Wall Sleeve Brands: #9 White Westinghouse or Frigidaire 22" Deep ←7→ " 7 5 6 6 8 11 9 12 1. Attach (1) 1 ½" x 1 ½" x 25" ... rear grille. 9. Remove the plastic washer from the kit. If position is mounted to the left side. Attach 1" x ¾" 14" long seal over the solid vertical portion of the wall sleeve at the top of unit. 15. The plastic.... 11. If not go to secure the grille. The pieces must be simply pressed into sleeve. 14. If the wall sleeve does not have a rear grille or louvered panel, install the plastic grille from the screw. ...


