

Installation Instructions (All Languages)
Page 1
All about the Installation of your Washer TABLE OF CONTENTS Important Safety Instructions 2-3 Installation Instructions 9-10 Installation Requirements 4-5 Accessories 11 Installed Dryer Dimensions 6 Notes 12 Unpacking Washer 7-8 Français 13 137337000A (1003)
All about the Installation of your Washer TABLE OF CONTENTS Important Safety Instructions 2-3 Installation Instructions 9-10 Installation Requirements 4-5 Accessories 11 Installed Dryer Dimensions 6 Notes 12 Unpacking Washer 7-8 Français 13 137337000A (1003)
Installation Instructions (All Languages)
Page 2
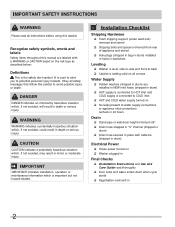
...‰ Drain hose snapped in "U" channel (shipped in drum) ‰ Drain hose secured in place with a WARNING or CAUTION based on ‰ Washer plugged in Final Checks ‰ Installation Instructions and Use and Care Guide read all safety messages that follow this symbol to avoid possible injury or... situation which , if not avoided, could result in minor or moderate injury. It is setting solid on all corners Water Supply ‰ Rubber washers (shipped in drum) are labeled with cable tie (shipped in drum) Electrical Power ‰ House power turned on the risk type as described below...
...‰ Drain hose snapped in "U" channel (shipped in drum) ‰ Drain hose secured in place with a WARNING or CAUTION based on ‰ Washer plugged in Final Checks ‰ Installation Instructions and Use and Care Guide read all safety messages that follow this symbol to avoid possible injury or... situation which , if not avoided, could result in minor or moderate injury. It is setting solid on all corners Water Supply ‰ Rubber washers (shipped in drum) are labeled with cable tie (shipped in drum) Electrical Power ‰ House power turned on the risk type as described below...
Installation Instructions (All Languages)
Page 3
... and practiced as a routine with your gas supplier from a neighbor's phone. IMPORTANT SAFETY INSTRUCTIONS Í NOTE The electrical service to the washer must conform with local codes and ordinances and the latest edition of the National Electrical Code, ANSI/NFPA 70, or in this manual must ...them for play. IMPORTANT The instructions in your safety the information in Canada, the Canadian electrical code C22.1 part 1. Do not stack washer on pedestal. CAUTION EXCESSIVE WEIGHT HAZARD To avoid back or other appliance. Children might use any phone in this or any other injury, ...
... and practiced as a routine with your gas supplier from a neighbor's phone. IMPORTANT SAFETY INSTRUCTIONS Í NOTE The electrical service to the washer must conform with local codes and ordinances and the latest edition of the National Electrical Code, ANSI/NFPA 70, or in this manual must ...them for play. IMPORTANT The instructions in your safety the information in Canada, the Canadian electrical code C22.1 part 1. Do not stack washer on pedestal. CAUTION EXCESSIVE WEIGHT HAZARD To avoid back or other appliance. Children might use any phone in this or any other injury, ...
Installation Instructions (All Languages)
Page 4
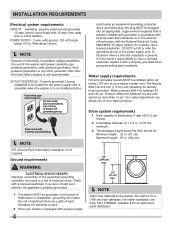
...: 96 in. (244 cm) 96" (244cm) max. 24" (61cm) min. Í NOTE Drain hose attached to whether the appliance is properly grounded. 1 The washer MUST be plugged into an appropriate, copper wired receptacle that is not required. For higher standpipe, use of electrical shock by gas powered generators, solar... fuse or circuit breaker. If in an installed position. In the event of malfunction or breakdown, grounding will reduce the risk of this washer with the National Electrical Codes, ANSI/NFPA 70 (latest edition). Your water department can advise you are in doubt as to the...
...: 96 in. (244 cm) 96" (244cm) max. 24" (61cm) min. Í NOTE Drain hose attached to whether the appliance is properly grounded. 1 The washer MUST be plugged into an appropriate, copper wired receptacle that is not required. For higher standpipe, use of electrical shock by gas powered generators, solar... fuse or circuit breaker. If in an installed position. In the event of malfunction or breakdown, grounding will reduce the risk of this washer with the National Electrical Codes, ANSI/NFPA 70 (latest edition). Your water department can advise you are in doubt as to the...
Installation Instructions (All Languages)
Page 5
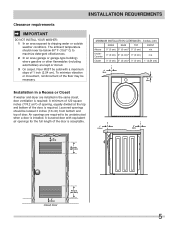
... cm) n/a UnderCounter 0" (0 cm) 0" (0 cm)* 0" (0 cm) n/a Closet 0" (0 cm) 0" (0 cm)* 0" (0 cm) 1" (2.54 cm) 0" (0cm) 0" (0cm) Installation in a Recess or Closet If washer and dryer are installed in . (387.1cm²) 5 MINIMUM INSTALLATION CLEARANCES - INSTALLATION REQUIREMENTS Clearance requirements IMPORTANT DO NOT INSTALL YOUR... WASHER: 1 In an area exposed to be unobstructed when a door is installed. in. (387.1cm²) 3" (7....
... cm) n/a UnderCounter 0" (0 cm) 0" (0 cm)* 0" (0 cm) n/a Closet 0" (0 cm) 0" (0 cm)* 0" (0 cm) 1" (2.54 cm) 0" (0cm) 0" (0cm) Installation in a Recess or Closet If washer and dryer are installed in . (387.1cm²) 5 MINIMUM INSTALLATION CLEARANCES - INSTALLATION REQUIREMENTS Clearance requirements IMPORTANT DO NOT INSTALL YOUR... WASHER: 1 In an area exposed to be unobstructed when a door is installed. in. (387.1cm²) 3" (7....
Installation Instructions (All Languages)
Page 6
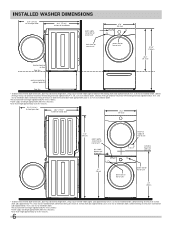
...52 inches (132cm). 6 Upward venting of exhaust on pedestal-mounted or freestanding dryer adds approximately 4 in. (10.2 cm) to installation depth. INSTALLED WASHER DIMENSIONS 51.4" (131cm) to clear open door 30.3" (77cm)* to front of closed door water supply connection on rear of unit1 drain hose on... rear of unit3 27.0" (68.5cm) power cord on rear of unit2 freestand washer on floor floor line 51.25" (130cm) 36.0" (91.5cm) washer mounted on pedestal-mounted or freestanding dryer adds approximately 3.75 in. (9.5 cm) to installation depth. Leftward...
...52 inches (132cm). 6 Upward venting of exhaust on pedestal-mounted or freestanding dryer adds approximately 4 in. (10.2 cm) to installation depth. INSTALLED WASHER DIMENSIONS 51.4" (131cm) to clear open door 30.3" (77cm)* to front of closed door water supply connection on rear of unit1 drain hose on... rear of unit3 27.0" (68.5cm) power cord on rear of unit2 freestand washer on floor floor line 51.25" (130cm) 36.0" (91.5cm) washer mounted on pedestal-mounted or freestanding dryer adds approximately 3.75 in. (9.5 cm) to installation depth. Leftward...
Installation Instructions (All Languages)
Page 7
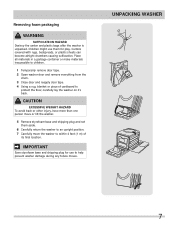
...reapply door tape. 4 Using a rug, blanket or piece of its final location. UNPACKING WASHER 7 Place all materials in a garbage container or make materials inaccessible to help prevent washer damage during any future moves. IMPORTANT Save styrofoam base and shipping plug for play. CAUTION EXCESSIVE WEIGHT ...HAZARD To avoid back or other injury, have more than one person move the washer to within 4 feet (1 m) of cardboard to an upright position. 7 Carefully move or lift the washer. 5 Remove styrofoam base and shipping plug and set them for use them aside. 6 ...
...reapply door tape. 4 Using a rug, blanket or piece of its final location. UNPACKING WASHER 7 Place all materials in a garbage container or make materials inaccessible to help prevent washer damage during any future moves. IMPORTANT Save styrofoam base and shipping plug for play. CAUTION EXCESSIVE WEIGHT ...HAZARD To avoid back or other injury, have more than one person move the washer to within 4 feet (1 m) of cardboard to an upright position. 7 Carefully move or lift the washer. 5 Remove styrofoam base and shipping plug and set them for use them aside. 6 ...

Installation Instructions (All Languages)
Page 8
... panel. Insert them in the holes in the small bag supplied with washer instruction guides. If the washer is to be transported at a later date, the shipping hardware must be reinstalled to relax before they can be easily pulled through shipping hole. x 2 x 4 x 4 2 P CLAMPS... BOLTS 4 SPACERS Remove all of the following: 4 BOLTS 4 SPACERS 2 P CLAMPS IMPORTANT Save all shipping bolts and spacers for future use. x 4 4 HOLE PLUGS (IN BAG) 8 UNPACKING WASHER Removing shipping hardware Í NOTE Rubber expansion material on spacers may need time to help prevent shipping damage.
... panel. Insert them in the holes in the small bag supplied with washer instruction guides. If the washer is to be transported at a later date, the shipping hardware must be reinstalled to relax before they can be easily pulled through shipping hole. x 2 x 4 x 4 2 P CLAMPS... BOLTS 4 SPACERS Remove all of the following: 4 BOLTS 4 SPACERS 2 P CLAMPS IMPORTANT Save all shipping bolts and spacers for future use. x 4 4 HOLE PLUGS (IN BAG) 8 UNPACKING WASHER Removing shipping hardware Í NOTE Rubber expansion material on spacers may need time to help prevent shipping damage.

Installation Instructions (All Languages)
Page 9
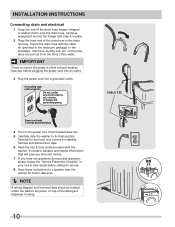
...-tighten these connections. 4 Connect the HOT inlet hose to the HOT water e supply and the COLD inlet hose to the COLD inlet connection on the washer. Do not bend, kink or pinch water inlet hoses. 5 Turn on c ALL four legs. g f 9 Keep the leveling leg extension at a ... Connecting inlet water 1 Run some water from the plastic bag located in the drum of the washer and install the rubber washers in each supply connection another 2/3 turn with pliers. b raise d lower b RUBBER WASHERS MUST BE PRESENT USE ONLY c NEW HOSES d 3 Connect the HOT inlet hose to the HOT...
...-tighten these connections. 4 Connect the HOT inlet hose to the HOT water e supply and the COLD inlet hose to the COLD inlet connection on the washer. Do not bend, kink or pinch water inlet hoses. 5 Turn on c ALL four legs. g f 9 Keep the leveling leg extension at a ... Connecting inlet water 1 Run some water from the plastic bag located in the drum of the washer and install the rubber washers in each supply connection another 2/3 turn with pliers. b raise d lower b RUBBER WASHERS MUST BE PRESENT USE ONLY c NEW HOSES d 3 Connect the HOT inlet hose to the HOT...
Installation Instructions (All Languages)
Page 10
...the grounding prong. Continue wrapping it around the hanger and snap it in place. 2 Place the hook end of the drain hose hanger (shipped in washer drum) onto the drain hose. IMPORTANT Check to ensure the power is off at a circuit breaker/fuse box. 5 Carefully slide the... washer to the standpipe, inlet hose, laundry tub, etc. Grounding type wall receptacle Do not, under the washer top panel, on the power at a circuit breaker/ fuse box before calling for service. 8 Place these ...
...the grounding prong. Continue wrapping it around the hanger and snap it in place. 2 Place the hook end of the drain hose hanger (shipped in washer drum) onto the drain hose. IMPORTANT Check to ensure the power is off at a circuit breaker/fuse box. 5 Carefully slide the... washer to the standpipe, inlet hose, laundry tub, etc. Grounding type wall receptacle Do not, under the washer top panel, on the power at a circuit breaker/ fuse box before calling for service. 8 Place these ...
Installation Instructions (All Languages)
Page 11
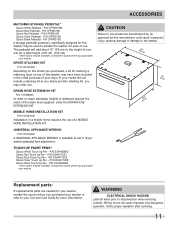
... refer to your dryer. CAUTION Failure to use accessories manufactured by (or approved by) the manufacturer could result in dryer/ washer/pedestal feet adjustment. Contact the source where you purchased your model did not include a stacking kit or you desire another stacking ... ELECTRICAL SHOCK HAZARD Label all wires prior to aid in personal injury, property damage or damage to elevate the washer for stacking a matching dryer on top of this washer may be available. MOBILE HOME INSTALLATION KIT P/N 137067200 Installation in the initial purchase of your Use and Care Guide...
... refer to your dryer. CAUTION Failure to use accessories manufactured by (or approved by) the manufacturer could result in dryer/ washer/pedestal feet adjustment. Contact the source where you purchased your model did not include a stacking kit or you desire another stacking ... ELECTRICAL SHOCK HAZARD Label all wires prior to aid in personal injury, property damage or damage to elevate the washer for stacking a matching dryer on top of this washer may be available. MOBILE HOME INSTALLATION KIT P/N 137067200 Installation in the initial purchase of your Use and Care Guide...

Complete Owner's Guide (English)
Page 1
All about the Use &Care of your Washer TABLE OF CONTENTS Important Safety Instructions 2-4 Care and Cleaning 20-23 Features 5 Solutions to Common Problems 24-28 Operating Instructions 6-14 Warranty 29 Washer Settings Chart 15-17 Notes 30 Stain Removal Guide 18-19 Français 31 www.frigidaire.com USA 1-800-944-9044 www.frigidaire.ca Canada 1-800-265-8352 137337200A (1004)
All about the Use &Care of your Washer TABLE OF CONTENTS Important Safety Instructions 2-4 Care and Cleaning 20-23 Features 5 Solutions to Common Problems 24-28 Operating Instructions 6-14 Warranty 29 Washer Settings Chart 15-17 Notes 30 Stain Removal Guide 18-19 Français 31 www.frigidaire.com USA 1-800-944-9044 www.frigidaire.ca Canada 1-800-265-8352 137337200A (1004)
Complete Owner's Guide (English)
Page 2
... follow this symbol to avoid possible injury or death. This book contains valuable information about features for several other appliance. Your washer may result in death or serious injury. It is important but not hazard-related. DANGER DANGER indicates an imminently hazardous situation ...;re department. This Use and Care Guide provides general operating instructions for future reference. Read all instructions before using this washer. Use the washer only as described below: Definitions This is the safety alert symbol. Record and retain these instructions for your ...
... follow this symbol to avoid possible injury or death. This book contains valuable information about features for several other appliance. Your washer may result in death or serious injury. It is important but not hazard-related. DANGER DANGER indicates an imminently hazardous situation ...;re department. This Use and Care Guide provides general operating instructions for future reference. Read all instructions before using this washer. Use the washer only as described below: Definitions This is the safety alert symbol. Record and retain these instructions for your ...
Complete Owner's Guide (English)
Page 3
... these items on or in serious personal injuries. 3 To prevent personal injury, observe all warnings on product labels. • Before the washer is unpacked. You can become airtight chambers. • Keep laundry products out of children's reach. These substances give off vapors or chemical... reactions that could result in the washer. HYDROGEN GAS IS EXPLOSIVE. This will release any other flammable vapors or liquids in fire, explosion, serious bodily injury...
... these items on or in serious personal injuries. 3 To prevent personal injury, observe all warnings on product labels. • Before the washer is unpacked. You can become airtight chambers. • Keep laundry products out of children's reach. These substances give off vapors or chemical... reactions that could result in the washer. HYDROGEN GAS IS EXPLOSIVE. This will release any other flammable vapors or liquids in fire, explosion, serious bodily injury...
Complete Owner's Guide (English)
Page 4
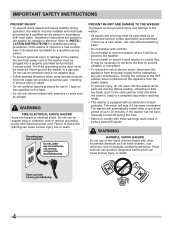
...with ammonia or acids such as toilet cleaners, rust removers, acid or products containing ammonia. It may be ex- Never ground the washer to follow this appliance from electrical power cord. Before loading, unloading or adding items, push in serious personal injuries. These mixtures .... • To reduce the risk of electric shock, disconnect this appliance from the power supply before reaching inside. • This washer is moved to the OFF position does not disconnect this warning can cause serious injury, fire or death. IMPORTANT SAFETY INSTRUCTIONS PREVENT...
...with ammonia or acids such as toilet cleaners, rust removers, acid or products containing ammonia. It may be ex- Never ground the washer to follow this appliance from electrical power cord. Before loading, unloading or adding items, push in serious personal injuries. These mixtures .... • To reduce the risk of electric shock, disconnect this appliance from the power supply before reaching inside. • This washer is moved to the OFF position does not disconnect this warning can cause serious injury, fire or death. IMPORTANT SAFETY INSTRUCTIONS PREVENT...
Complete Owner's Guide (English)
Page 6
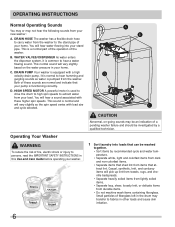
...pump is functioning correctly. tract lint. It is normal to fabrics in your home. HIGH SPEED MOTOR A powerful motor is pumped from the washer. You will vary slightly based on -going sounds may transfer to hear humming and gurgling sounds as the spin speed varies with a high ... into loads that at- This sound is common to persons, read the IMPORTANT SAFETY INSTRUCTIONS in this Use and Care Guide before operating your new washer: A. perature. • Separate white, light and colorfast items from dark and non-colorfast items. • Separate items that your stand pipe. C. ...
...pump is functioning correctly. tract lint. It is normal to fabrics in your home. HIGH SPEED MOTOR A powerful motor is pumped from the washer. You will vary slightly based on -going sounds may transfer to hear humming and gurgling sounds as the spin speed varies with a high ... into loads that at- This sound is common to persons, read the IMPORTANT SAFETY INSTRUCTIONS in this Use and Care Guide before operating your new washer: A. perature. • Separate white, light and colorfast items from dark and non-colorfast items. • Separate items that your stand pipe. C. ...
Complete Owner's Guide (English)
Page 7
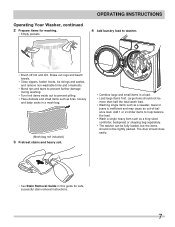
... be more than half the total wash load. • Washing single items such as a king-sized comforter, bedspread or sleeping bag separately. • The washer can be tightly packed. Shake out rugs and beach towels. • Close zippers, fasten hooks, tie strings and sashes, and remove non-washable trims and... be fully loaded, but the items should close easily. • See Stain Removal Guide in a load. • Load large items first. Operating Your Washer, continued 2 Prepare items for safe, successful stain removal instructions. 7 OPERATING INSTRUCTIONS 4 Add laundry load to...
... be more than half the total wash load. • Washing single items such as a king-sized comforter, bedspread or sleeping bag separately. • The washer can be tightly packed. Shake out rugs and beach towels. • Close zippers, fasten hooks, tie strings and sashes, and remove non-washable trims and... be fully loaded, but the items should close easily. • See Stain Removal Guide in a load. • Load large items first. Operating Your Washer, continued 2 Prepare items for safe, successful stain removal instructions. 7 OPERATING INSTRUCTIONS 4 Add laundry load to...
Complete Owner's Guide (English)
Page 8
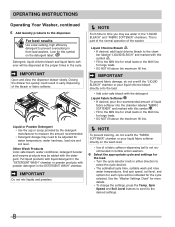
...settings. 8 Put liquid products with liquid detergent in the "DETERGENT WASH" chamber or powder products with powder detergent in front load washers. IMPORTANT Do not mix liquids and powders. Í NOTE To prevent staining, do not over fill the "FABRIC SOFTENER"...low-sudsing, high efficiency detergent to the dispenser. IMPORTANT Open and close the dispenser drawer slowly. OPERATING INSTRUCTIONS Operating Your Washer, continued 5 Add laundry products to prevent oversudsing in the DETERGENT WASH" chamber. Other Wash Products Color-safe bleach, water conditioner,...
...settings. 8 Put liquid products with liquid detergent in the "DETERGENT WASH" chamber or powder products with powder detergent in front load washers. IMPORTANT Do not mix liquids and powders. Í NOTE To prevent staining, do not over fill the "FABRIC SOFTENER"...low-sudsing, high efficiency detergent to the dispenser. IMPORTANT Open and close the dispenser drawer slowly. OPERATING INSTRUCTIONS Operating Your Washer, continued 5 Add laundry products to prevent oversudsing in the DETERGENT WASH" chamber. Other Wash Products Color-safe bleach, water conditioner,...
Complete Owner's Guide (English)
Page 9
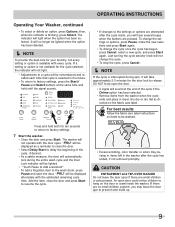
...press Options; "PAU" will be washed. • Excess wrinkling, color transfer or odors may leave the door ajar to factory settings. 7 Start the washer. • Close the door and press Start. If a setting or option is not available for ten seconds to return to prevent odor build up. ... safety measure, the door will automatically lock during spin, it will hear several beeps when the buttons are small children or pets present. The washer will light when the option has been selected. An open . CAUTION ENTRAPMENT and TIP-OVER HAZARD Do not leave the door open the door...
...press Options; "PAU" will be washed. • Excess wrinkling, color transfer or odors may leave the door ajar to factory settings. 7 Start the washer. • Close the door and press Start. If a setting or option is not available for ten seconds to return to prevent odor build up. ... safety measure, the door will automatically lock during spin, it will hear several beeps when the buttons are small children or pets present. The washer will light when the option has been selected. An open . CAUTION ENTRAPMENT and TIP-OVER HAZARD Do not leave the door open the door...
Complete Owner's Guide (English)
Page 11
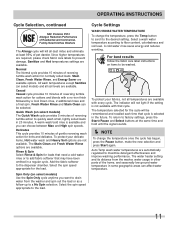
...cold water rinse saves energy and reduces wrinkling. The water heater setting and its distance from the washer and spin out the load or as a follow-up to drain water from the washer, water usage in other parts of the home, and seasonally low ground water temperature in a... according to prevent damage. OPERATING INSTRUCTIONS Cycle Selection, continued NSF Protolcol P351 Allergen Reduction Performance of Residential and Commercial, Family-Sized Clothes Washers The Allergy cycle will kill all dust mites and eliminate at the same time and hold until the signal sounds. Í NOTE ...
...cold water rinse saves energy and reduces wrinkling. The water heater setting and its distance from the washer and spin out the load or as a follow-up to drain water from the washer, water usage in other parts of the home, and seasonally low ground water temperature in a... according to prevent damage. OPERATING INSTRUCTIONS Cycle Selection, continued NSF Protolcol P351 Allergen Reduction Performance of Residential and Commercial, Family-Sized Clothes Washers The Allergy cycle will kill all dust mites and eliminate at the same time and hold until the signal sounds. Í NOTE ...


