
Use and Care Manual
Page 9
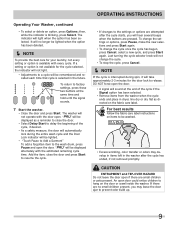
...the cycle if the Signal option has been selected. • Remove items from the washer when the cycle ends and place in dryer, line dry or dry flat the same time and hold until the signal sounds.... 7 Start the washer. • Close the door and press Start. For best ...a setting or option is not available for your laundry, not every setting or option is selected in the washer after the cycle starts, you may develop in items left in the future. To return to factory settings, ...
...the cycle if the Signal option has been selected. • Remove items from the washer when the cycle ends and place in dryer, line dry or dry flat the same time and hold until the signal sounds.... 7 Start the washer. • Close the door and press Start. For best ...a setting or option is not available for your laundry, not every setting or option is selected in the washer after the cycle starts, you may develop in items left in the future. To return to factory settings, ...

Use and Care Manual
Page 22
... detergent residue. • Add liquid fabric softener to final rinse. • Dry load in pocket. • Overloading the washer. • Not enough detergent. • Undissolved detergent has left in dryer. • Remove lint with 1 quart (.95 L) water in a plastic container. See ...Operating Your, steps 2 and 5. • Reduce load size. See Operating Your, step 5. • May...
... detergent residue. • Add liquid fabric softener to final rinse. • Dry load in pocket. • Overloading the washer. • Not enough detergent. • Undissolved detergent has left in dryer. • Remove lint with 1 quart (.95 L) water in a plastic container. See ...Operating Your, steps 2 and 5. • Reduce load size. See Operating Your, step 5. • May...
Installation Instructions
Page 3
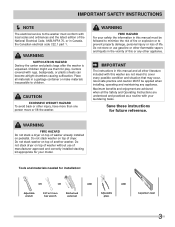
... possible condition and situation that may occur. WARNING FIRE HAZARD Do not stack a dryer on top of washer already installed on top of another washer. Save these instructions for play. Do not stack washer on pedestal. Maximum benefits and enjoyment are achieved when all materials in ...edition of the National Electrical Code, ANSI/NFPA 70, or in the vicinity of this washer are understood and practiced as a routine with your model. Do not stack dryer on top of dryer. CAUTION EXCESSIVE WEIGHT HAZARD To avoid back or other flammable vapors and liquids in ...
... possible condition and situation that may occur. WARNING FIRE HAZARD Do not stack a dryer on top of washer already installed on top of another washer. Save these instructions for play. Do not stack washer on pedestal. Maximum benefits and enjoyment are achieved when all materials in ...edition of the National Electrical Code, ANSI/NFPA 70, or in the vicinity of this washer are understood and practiced as a routine with your model. Do not stack dryer on top of dryer. CAUTION EXCESSIVE WEIGHT HAZARD To avoid back or other flammable vapors and liquids in ...

Installation Instructions
Page 5
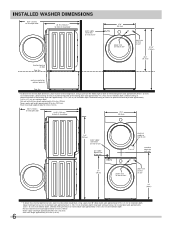
... water or outside weather conditions. Floor MUST be necessary. Inches (cm) SIDES REAR TOP FRONT Alcove 0" (0 cm) 0" (0 cm)* 0" (0 cm) n/a UnderCounter 0" (0 cm) 0" (0 cm)* 0" (0 cm) n/a Closet 0" (0 cm) 0" (0 cm)* 0" (0 cm) 1" (2.5 cm) 0" (0cm) 0" (0cm) Installation in a Recess or Closet If washer and dryer are kept or stored. 3 On carpet. in the same closet, door ventilation is required...
... water or outside weather conditions. Floor MUST be necessary. Inches (cm) SIDES REAR TOP FRONT Alcove 0" (0 cm) 0" (0 cm)* 0" (0 cm) n/a UnderCounter 0" (0 cm) 0" (0 cm)* 0" (0 cm) n/a Closet 0" (0 cm) 0" (0 cm)* 0" (0 cm) 1" (2.5 cm) 0" (0cm) 0" (0cm) Installation in a Recess or Closet If washer and dryer are kept or stored. 3 On carpet. in the same closet, door ventilation is required...
Installation Instructions
Page 6
...) to clear open door 29.75" (75.5cm)* to front of closed door water supply connection on rear of unit1 freestand washer on floor floor line 27.0" (68.5cm) power cord on rear of unit2 drain hose on rear of exhaust on freestanding dryer) adds approximately 0.75 in . (9.5 cm) to installation depth...
...) to clear open door 29.75" (75.5cm)* to front of closed door water supply connection on rear of unit1 freestand washer on floor floor line 27.0" (68.5cm) power cord on rear of unit2 drain hose on rear of exhaust on freestanding dryer) adds approximately 0.75 in . (9.5 cm) to installation depth...
Installation Instructions
Page 11
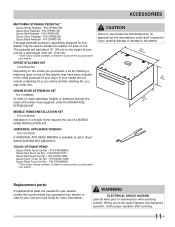
... order one. CAUTION Failure to use accessories manufactured by (or approved by) the manufacturer could result in dryer/ washer/pedestal feet adjustment. MOBILE HOME INSTALLATION KIT P/N 137067200 Installation in the initial purchase of the drain hose supplied, order the ...Red Touch Up Pen - WARNING ELECTRICAL SHOCK HAZARD Label all wires prior to the height of your unit for stacking a matching dryer on the model you purchased your washer. P/N CFPWD15W Classic Blue Pedestal - ACCESSORIES MATCHING STORAGE PEDESTAL* Classic White Pedestal - This pedestal will add about 15" (38...
... order one. CAUTION Failure to use accessories manufactured by (or approved by) the manufacturer could result in dryer/ washer/pedestal feet adjustment. MOBILE HOME INSTALLATION KIT P/N 137067200 Installation in the initial purchase of the drain hose supplied, order the ...Red Touch Up Pen - WARNING ELECTRICAL SHOCK HAZARD Label all wires prior to the height of your unit for stacking a matching dryer on the model you purchased your washer. P/N CFPWD15W Classic Blue Pedestal - ACCESSORIES MATCHING STORAGE PEDESTAL* Classic White Pedestal - This pedestal will add about 15" (38...


