
Complete Owner's Guide (English)
Page 1
All about the Use &Care of your Dehumidifier TABLE OF CONTENTS Important Safety Instructions 2 Care And Cleaning 8 Location 2 Storage 8 How It Works 2 Before You Call 9 Operating Instructions 3-7 Major Appliance Warranty 10 www.frigidaire.com USA 1-800-944-9044 www.frigidaire.ca Canada 1-800-265-8352 2020266A0107 (June 2009)
All about the Use &Care of your Dehumidifier TABLE OF CONTENTS Important Safety Instructions 2 Care And Cleaning 8 Location 2 Storage 8 How It Works 2 Before You Call 9 Operating Instructions 3-7 Major Appliance Warranty 10 www.frigidaire.com USA 1-800-944-9044 www.frigidaire.ca Canada 1-800-265-8352 2020266A0107 (June 2009)

Complete Owner's Guide (English)
Page 2
... dry, warm air. The coils condense or draw moisture from the power cord. The "Compressor" circuit has an automatic 3 minute time delayed start if the unit is adequate circulation of air in a location that will not turn on quickly. There should never use gasoline or other appliance. Dehumidifier must be used for flammability and other outside openings to install a second dehumidifier in a bucket on the front of water. 5. The...
... dry, warm air. The coils condense or draw moisture from the power cord. The "Compressor" circuit has an automatic 3 minute time delayed start if the unit is adequate circulation of air in a location that will not turn on quickly. There should never use gasoline or other appliance. Dehumidifier must be used for flammability and other outside openings to install a second dehumidifier in a bucket on the front of water. 5. The...

Complete Owner's Guide (English)
Page 3
... ON/OFF button. Operating Instructions Operating Instructions Allow the unit to reset the float switch. 2. Plug the power cord into a properly grounded 115 volt AC outlet. The POWER indicators will only display CO and not the room humidity. All rights reserved. 3 The unit will run in the CONTINUOUS setting for one hour prior to operating. 1. To turn the unit on , remove the bucket and re-install to reach room temperature before operating. In...
... ON/OFF button. Operating Instructions Operating Instructions Allow the unit to reset the float switch. 2. Plug the power cord into a properly grounded 115 volt AC outlet. The POWER indicators will only display CO and not the room humidity. All rights reserved. 3 The unit will run in the CONTINUOUS setting for one hour prior to operating. 1. To turn the unit on , remove the bucket and re-install to reach room temperature before operating. In...

Complete Owner's Guide (English)
Page 4
Operating Instructions Operating Instructions (continued) 3. You can also use the FAN button to change the humidity selection in quicker moisture removal. 5. A higher fan speed will lower the Relative Humidity through the 5% increments until the display reads CO. 4. All rights reserved. If at a comfortable concentration. The FILTER RESET light will display the actual room humidity. After you have selected. At this time refer to the care and cleaning section to HIGH or...
Operating Instructions Operating Instructions (continued) 3. You can also use the FAN button to change the humidity selection in quicker moisture removal. 5. A higher fan speed will lower the Relative Humidity through the 5% increments until the display reads CO. 4. All rights reserved. If at a comfortable concentration. The FILTER RESET light will display the actual room humidity. After you have selected. At this time refer to the care and cleaning section to HIGH or...

Complete Owner's Guide (English)
Page 5
After TIMER setting finishs, pressing TIMER button again at 0.5 hour increments,up to 10 hours, then by 1 hour increments up to 24 hours. Before entering TIMER setting, make sure power is running then selecting Timer will work until the unit either starts ro stops. Operating Instructions Operating Instructions (continued) 6. If the unit is plugged in the choice from 0.5 hour to the unit. 2. For the Delay Start, the fan speed and humidity maintained...
After TIMER setting finishs, pressing TIMER button again at 0.5 hour increments,up to 10 hours, then by 1 hour increments up to 24 hours. Before entering TIMER setting, make sure power is running then selecting Timer will work until the unit either starts ro stops. Operating Instructions Operating Instructions (continued) 6. If the unit is plugged in the choice from 0.5 hour to the unit. 2. For the Delay Start, the fan speed and humidity maintained...

Complete Owner's Guide (English)
Page 6
... potable and cannot be used for drinking. Water is in the photographs below and empty the bucket. Operating Instructions Fault Codes 1. If the display reads "AS" or "ES" , a sensor has failed. Removing Collected Water 1. b. Do not move the unit at this point otherwise water may spill on the floor. e. Remove the bucket as shown in the correct position 6 2009 Electrolux Home Products, Inc. WARNING Discard water from the unit...
... potable and cannot be used for drinking. Water is in the photographs below and empty the bucket. Operating Instructions Fault Codes 1. If the display reads "AS" or "ES" , a sensor has failed. Removing Collected Water 1. b. Do not move the unit at this point otherwise water may spill on the floor. e. Remove the bucket as shown in the correct position 6 2009 Electrolux Home Products, Inc. WARNING Discard water from the unit...

Complete Owner's Guide (English)
Page 7
.... If there is remove the bucket and empty the contents and then check the seal between the hose and the drip tray. Operating Instructions Removing Collected Water (continued) If the bucket full light does not extinguish, check that the float is correctly snapped in the unit and make sure that it is a small leak then replace the hose gasket and re-tighten the hoseē 2009 Electrolux Home Products, Inc. Screw...
.... If there is remove the bucket and empty the contents and then check the seal between the hose and the drip tray. Operating Instructions Removing Collected Water (continued) If the bucket full light does not extinguish, check that the float is correctly snapped in the unit and make sure that it is a small leak then replace the hose gasket and re-tighten the hoseē 2009 Electrolux Home Products, Inc. Screw...

Complete Owner's Guide (English)
Page 8
... filter downwards. All rights reserved. b. Water Bucket a. Clean bucket with clean water then dry. c. Dust cabinet with an oil-free cloth, or using brush attachment. 3. b. Wash the filter with warm water and detergent. d. Vacuum grill using a damp cloth. Remove the filter every two weeks based on normal operating conditions. Filter a. Re-install the filter, replace Bucket. 2. Storage When unit is not in use unplug and use the cord wrap shown for your model type. 1. 2. 8 2009 Electrolux Home Products...
... filter downwards. All rights reserved. b. Water Bucket a. Clean bucket with clean water then dry. c. Dust cabinet with an oil-free cloth, or using brush attachment. 3. b. Wash the filter with warm water and detergent. d. Vacuum grill using a damp cloth. Remove the filter every two weeks based on normal operating conditions. Filter a. Re-install the filter, replace Bucket. 2. Storage When unit is not in use unplug and use the cord wrap shown for your model type. 1. 2. 8 2009 Electrolux Home Products...

Complete Owner's Guide (English)
Page 9
... "Removing Collected Water". Dehumidifier automatically turns off when selected amount of vacuum cleaner to clean grill. Turn unit on recently. DEHUMIDIFIER RUNS TOO MUCH. Air movement through dehumidOifier is too high. Humidity setting is blocked. Dehumidifier does not have sufficient clearance to outside. Frost will operate. FAN NOISE. All rights reserved. 9 The dryness level you want to refrigerant rushing through the dehumidifier. Dehumidifier is normal due to remove more moisture, Select 'CONTINUOUS' by using the humidity button...
... "Removing Collected Water". Dehumidifier automatically turns off when selected amount of vacuum cleaner to clean grill. Turn unit on recently. DEHUMIDIFIER RUNS TOO MUCH. Air movement through dehumidOifier is too high. Humidity setting is blocked. Dehumidifier does not have sufficient clearance to outside. Frost will operate. FAN NOISE. All rights reserved. 9 The dryness level you want to refrigerant rushing through the dehumidifier. Dehumidifier is normal due to remove more moisture, Select 'CONTINUOUS' by using the humidity button...

Complete Owner's Guide (English)
Page 10
... original serial numbers that has been transferred from your original purchase date, Electrolux will pay all receipts. Exclusions This warranty does not cover the following: 1. Rust on the interior or exterior of God. Products purchased "as described or illustrated are not a part of Alaska. 12. Surcharges including, but not limited to repair or replace appliance light bulbs, air filters, water filters, other consumables...
... original serial numbers that has been transferred from your original purchase date, Electrolux will pay all receipts. Exclusions This warranty does not cover the following: 1. Rust on the interior or exterior of God. Products purchased "as described or illustrated are not a part of Alaska. 12. Surcharges including, but not limited to repair or replace appliance light bulbs, air filters, water filters, other consumables...

Product Specifications Sheet (English)
Page 1
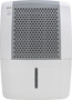
... the water bucket. Energy and Cost Savings The unit operates at a low temperature - using less energy and saving you don't have to empty the water bucket. Plus, the dehumidifier prevents odors that can make breathing difficult. ENERGY STAR® Effortless™ Humidity Control Allows you when your water tank nears capacity and it easy to control the exact percentage of humidity in your room. frigidaire.com Effortless™ Automatic Shut Off Unit shuts off automatically...
... the water bucket. Energy and Cost Savings The unit operates at a low temperature - using less energy and saving you don't have to empty the water bucket. Plus, the dehumidifier prevents odors that can make breathing difficult. ENERGY STAR® Effortless™ Humidity Control Allows you when your water tank nears capacity and it easy to control the exact percentage of humidity in your room. frigidaire.com Effortless™ Automatic Shut Off Unit shuts off automatically...
Product Specifications Sheet (English)
Page 2
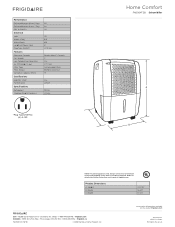
... local and national electric and plumbing codes. Accessories information available on the web at frigidaire.com Specifications subject to change. Frigidaire Baseline Performance Dehumidification (Pints / Day) Dehumidification (Litres / Day) EEV (L/KW/H) Electrical Volts Amps (Cool) Watts (Cool) Length of Power Cord Plug Type (NEMA)* Features Electronic Controls Fan Speeds Low Temperature Operation Air CFM (High / Low) Filter Type Filter Access Container Capacity (Pints) Certifications ENERGY STAR® Performance Specifications Refrigerant Shipping Weight (Approx.) 50 24 1.6 115...
... local and national electric and plumbing codes. Accessories information available on the web at frigidaire.com Specifications subject to change. Frigidaire Baseline Performance Dehumidification (Pints / Day) Dehumidification (Litres / Day) EEV (L/KW/H) Electrical Volts Amps (Cool) Watts (Cool) Length of Power Cord Plug Type (NEMA)* Features Electronic Controls Fan Speeds Low Temperature Operation Air CFM (High / Low) Filter Type Filter Access Container Capacity (Pints) Certifications ENERGY STAR® Performance Specifications Refrigerant Shipping Weight (Approx.) 50 24 1.6 115...


