
Use and Care Guide
Page 1
All about the Use & Care of your Electric Range 316902203 Rev E (Jan 2012) TABLE OF CONTENTS Important Safety Instructions 3-5 Features at a Glance 6 Before Setting Oven Controls 7-8 Before Setting Surface Controls 9-10 Setting Surface Controls (Ceramic cook top) .. 11-14 Oven Control Functions (330/330i 15 Setting Oven Controls 16-22 Self-Cleaning 23-24 Care & Cleaning 25-28 Before You Call 29-31 Major Appliance Warranty back cover www.frigidaire.com USA 1-800-944-9044 www.frigidaire.ca Canada 1-800-265-8352
All about the Use & Care of your Electric Range 316902203 Rev E (Jan 2012) TABLE OF CONTENTS Important Safety Instructions 3-5 Features at a Glance 6 Before Setting Oven Controls 7-8 Before Setting Surface Controls 9-10 Setting Surface Controls (Ceramic cook top) .. 11-14 Oven Control Functions (330/330i 15 Setting Oven Controls 16-22 Self-Cleaning 23-24 Care & Cleaning 25-28 Before You Call 29-31 Major Appliance Warranty back cover www.frigidaire.com USA 1-800-944-9044 www.frigidaire.ca Canada 1-800-265-8352

Use and Care Guide
Page 2
...oven light 27 Removing & replacing oven door 28 Before You Call Solutions to common problems 29-31 Appliance Warranty back cover Thank you for service, there are a few things you can register online at www.frigidaire.com or by dropping your Product Registration Card in the USA Visit the...plate location Serial plate location: open storage drawer (some models) or remove lower front panel (some common problems that sold you received a damaged range ... To ensure our ability to serve you use this Use & Care manual. Read this page to help us serve your purchase as the beginning...
...oven light 27 Removing & replacing oven door 28 Before You Call Solutions to common problems 29-31 Appliance Warranty back cover Thank you for service, there are a few things you can register online at www.frigidaire.com or by dropping your Product Registration Card in the USA Visit the...plate location Serial plate location: open storage drawer (some models) or remove lower front panel (some common problems that sold you received a damaged range ... To ensure our ability to serve you use this Use & Care manual. Read this page to help us serve your purchase as the beginning...

Use and Care Guide
Page 3
... recommend a qualified technician and an authorized repair service. Obey all instructions before using this appliance. WARNING Tip Over Hazard • A child or adult can tip the range and be done only by a qualified technician. Never allow children to climb or play ...rear edge of range back. CAUTION CAUTION indicates a potentially hazardous situation which , if not avoided, may result in accordance with the National Electrical Code ANSI/NFPA No. 70 latest edition and local electrical code requirements. The weight of the appliance unless specifically recommended...
... recommend a qualified technician and an authorized repair service. Obey all instructions before using this appliance. WARNING Tip Over Hazard • A child or adult can tip the range and be done only by a qualified technician. Never allow children to climb or play ...rear edge of range back. CAUTION CAUTION indicates a potentially hazardous situation which , if not avoided, may result in accordance with the National Electrical Code ANSI/NFPA No. 70 latest edition and local electrical code requirements. The weight of the appliance unless specifically recommended...

Use and Care Guide
Page 4
... flour may be explosive. Do not let potholders touch hot heating elements. buildup of electric shock, or fire. IMPORTANT Do not attempt to the side of the range when opening the door of the range including the storage drawer, lower broiler drawer, lower oven or warmer drawer. If the...to burst and result in the storage drawer, warmer drawer or lower oven. Remove all utensils from steam. moist or damp potholders on appliance - Use potholders and grasp the rack with ceramic-glass cook tops. Smother the fire with aluminum foil. Areas near these liners may ...
... flour may be explosive. Do not let potholders touch hot heating elements. buildup of electric shock, or fire. IMPORTANT Do not attempt to the side of the range when opening the door of the range including the storage drawer, lower broiler drawer, lower oven or warmer drawer. If the...to burst and result in the storage drawer, warmer drawer or lower oven. Remove all utensils from steam. moist or damp potholders on appliance - Use potholders and grasp the rack with ceramic-glass cook tops. Smother the fire with aluminum foil. Areas near these liners may ...

Use and Care Guide
Page 5
...of the heating element to such substances. 5 IMPORTANT INSTRUCTIONS FOR CLEANING YOUR RANGE • Clean the range regularly to keep all parts free of potential exposure to direct contact and may... on the unit before removing the pan. • Use proper pan size-This appliance is turned inward, and does not extend over adjacent surface elements-To reduce the risk...turn the unit off during normal operation. • Glazed cooking utensils-Only certain types of electric shock. Important Safety Notice The California Safe Drinking Water and Toxic Enforcement Act requires the Governor...
...of the heating element to such substances. 5 IMPORTANT INSTRUCTIONS FOR CLEANING YOUR RANGE • Clean the range regularly to keep all parts free of potential exposure to direct contact and may... on the unit before removing the pan. • Use proper pan size-This appliance is turned inward, and does not extend over adjacent surface elements-To reduce the risk...turn the unit off during normal operation. • Glazed cooking utensils-Only certain types of electric shock. Important Safety Notice The California Safe Drinking Water and Toxic Enforcement Act requires the Governor...
Use and Care Guide
Page 6
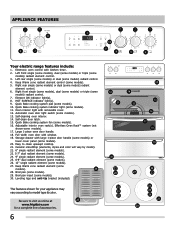
... us online at 28 www.frigidaire.com for your appliance may vary according to model type & color. Electronic oven control with window. 19. Broil pan (some models). 30. Element ON indicator light(s). 8. Broil pan insert (some models). 29. Ceramic smoothtop (elements, styles and color ... line of accessories. 6 12 11 14 15 20 13 16 17 18 19 30 22 23 24 25 26 22 27 23 24 25 26 21 20 APPLIANCE FEATURES 7 7 8 2 3 7 7 7 1 10 9 4 5 6 Your electric range features include: 1. Quick Bake cooking system indicator light (some models). 27. Self...
... us online at 28 www.frigidaire.com for your appliance may vary according to model type & color. Electronic oven control with window. 19. Broil pan (some models). 30. Element ON indicator light(s). 8. Broil pan insert (some models). 29. Ceramic smoothtop (elements, styles and color ... line of accessories. 6 12 11 14 15 20 13 16 17 18 19 30 22 23 24 25 26 22 27 23 24 25 26 21 20 APPLIANCE FEATURES 7 7 8 2 3 7 7 7 1 10 9 4 5 6 Your electric range features include: 1. Quick Bake cooking system indicator light (some models). 27. Self...
Use and Care Guide
Page 7
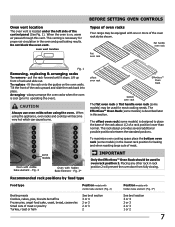
...; Oven Rack bottom oven rack The flat oven rack or flat handle oven rack (some 1 models 1 Oven with one or more of oven racks Your range may be equipped with visible bake element - fit the rack onto the guides on , warm air passes through this section. The Effortless™ Oven Rack.... 2) Position models with hidden Bake Element - Oven vent location The oven vent is on the oven walls. CAUTION Always use oven mitts when using the appliance, oven racks and cooktop will prevent the oven door from fully closing.
...; Oven Rack bottom oven rack The flat oven rack or flat handle oven rack (some 1 models 1 Oven with one or more of oven racks Your range may be equipped with visible bake element - fit the rack onto the guides on , warm air passes through this section. The Effortless™ Oven Rack.... 2) Position models with hidden Bake Element - Oven vent location The oven vent is on the oven walls. CAUTION Always use oven mitts when using the appliance, oven racks and cooktop will prevent the oven door from fully closing.
Use and Care Guide
Page 9
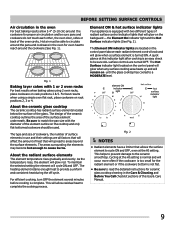
...baking cakes using a single oven flat rack, place cookware on the backguard - The areas surrounding the elements may become hot enough to the ceramic smoothtop. This will allow 2-4" (5-10 cm) around the cookware (See Fig. 1). This helps to prevent damage to cause burns. The Element ON ...glow when a surface element is complete. Cycling at the HI setting. Hot air must be used. Element ON & hot surface indicator lights Your appliance is not flat. • Be sure to areas beyond the surface elements. For best results when using 2 oven racks, place cookware on ...
...baking cakes using a single oven flat rack, place cookware on the backguard - The areas surrounding the elements may become hot enough to the ceramic smoothtop. This will allow 2-4" (5-10 cm) around the cookware (See Fig. 1). This helps to prevent damage to cause burns. The Element ON ...glow when a surface element is complete. Cycling at the HI setting. Hot air must be used. Element ON & hot surface indicator lights Your appliance is not flat. • Be sure to areas beyond the surface elements. For best results when using 2 oven racks, place cookware on ...

Use and Care Guide
Page 14
...not exceed 1 inch beyond the surface element markings or burner. Potholders, towels or wooden spoons could melt or ignite. If these items melt on electric coil and ceramic glass cooktops. • Start with hot tap water to bring water to boil more quickly. • Use the highest heat ...may appear to have been turned off. SETTING SURFACE CONTROLS Home Canning Be sure to read all the following points when home canning with your appliance. Once boiling is in the Before setting surface controls section). • Use only a completely flat bottom canner with no ridges that can melt...
...not exceed 1 inch beyond the surface element markings or burner. Potholders, towels or wooden spoons could melt or ignite. If these items melt on electric coil and ceramic glass cooktops. • Start with hot tap water to bring water to boil more quickly. • Use the highest heat ...may appear to have been turned off. SETTING SURFACE CONTROLS Home Canning Be sure to read all the following points when home canning with your appliance. Once boiling is in the Before setting surface controls section). • Use only a completely flat bottom canner with no ridges that can melt...

Use and Care Guide
Page 16
... until 16 To cancel the continuous bake setting, press and hold down ). 2. Press and hold . Press any temperature from °C to the appliance has been interrupted, the display will flash "12:00". NOTE The temperature display feature cannot be changed when the oven or self-clean is active...(control should not be set for Bake or Self-clean when setting this feature for continuous baking. The current time of day before using the appliance. "12hr" will appear in display indicating that will return to °F. 5. The oven can be heard each time a pad is left on...
... until 16 To cancel the continuous bake setting, press and hold down ). 2. Press and hold . Press any temperature from °C to the appliance has been interrupted, the display will flash "12:00". NOTE The temperature display feature cannot be changed when the oven or self-clean is active...(control should not be set for Bake or Self-clean when setting this feature for continuous baking. The current time of day before using the appliance. "12hr" will appear in display indicating that will return to °F. 5. The oven can be heard each time a pad is left on...

Use and Care Guide
Page 22
SETTING OVEN CONTROLS Adjusting the oven temperature Your appliance has been factory calibrated and tested to 40 degrees from actual temperatures. For the first few uses, follow your recipe times, you can now be ...
SETTING OVEN CONTROLS Adjusting the oven temperature Your appliance has been factory calibrated and tested to 40 degrees from actual temperatures. For the first few uses, follow your recipe times, you can now be ...

Use and Care Guide
Page 23
...be VERY HOT. • The oven bake and broil elements may discolor. SELF-CLEANING CAUTION • DO NOT leave small children unattended near the appliance. Clean using soap and water before starting self-clean. • Remove any soil from the oven bottom, the lower element may occur if these ... they have a visible bottom bake element ONLY) To help remove excessive spills from the outer oven frame, the door liner outside of the range can damage the automatic door locking system. During the self-cleaning cycle, the outside the oven door gasket and the small area at the ...
...be VERY HOT. • The oven bake and broil elements may discolor. SELF-CLEANING CAUTION • DO NOT leave small children unattended near the appliance. Clean using soap and water before starting self-clean. • Remove any soil from the oven bottom, the lower element may occur if these ... they have a visible bottom bake element ONLY) To help remove excessive spills from the outer oven frame, the door liner outside of the range can damage the automatic door locking system. During the self-cleaning cycle, the outside the oven door gasket and the small area at the ...
Use and Care Guide
Page 25
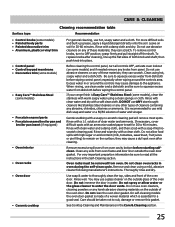
...during the self-clean cycle. Rinse with an ammonia-soaked paper towel for 30-60 minutes. Remove excessive spillovers from dishcloth before starting selfclean. Do not clean oven racks in water. Use soap & water to the appliance. they may cause damage to thoroughly clean the top, sides and front... abrasive cleaning materials on the surface; grasp firmly and pull straight off the shaft. Be sure to enter the door vents. If your range finish is recommended to remain on the outside the oven door gasket. It is Easy Care™ Stainless Steel (some models) and if...
...during the self-clean cycle. Rinse with an ammonia-soaked paper towel for 30-60 minutes. Remove excessive spillovers from dishcloth before starting selfclean. Do not clean oven racks in water. Use soap & water to the appliance. they may cause damage to thoroughly clean the top, sides and front... abrasive cleaning materials on the surface; grasp firmly and pull straight off the shaft. Be sure to enter the door vents. If your range finish is recommended to remain on the outside the oven door gasket. It is Easy Care™ Stainless Steel (some models) and if...
Use and Care Guide
Page 26
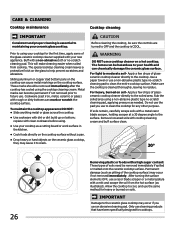
... glassceramic cooktop cleaner directly to the cooktop. Remove loosened soils with cooktop cleaning cream and buff surface clean. 30° 26 Removing plastic or foods with rough or dirty bottoms can be removed immediately if spilled or melted...apply some of the glass-ceramic cooktop cleaner supplied with a metal razor blade scraper, holding scraper at a 30 degree angle to the surface. Prior to cool, and use cleaning products that have been specifically designed for ... cream. Allow the cooktop to using . • Use your new appliance. Only use the same method for cooktops.
... glassceramic cooktop cleaner directly to the cooktop. Remove loosened soils with cooktop cleaning cream and buff surface clean. 30° 26 Removing plastic or foods with rough or dirty bottoms can be removed immediately if spilled or melted...apply some of the glass-ceramic cooktop cleaner supplied with a metal razor blade scraper, holding scraper at a 30 degree angle to the surface. Prior to cool, and use cleaning products that have been specifically designed for ... cream. Allow the cooktop to using . • Use your new appliance. Only use the same method for cooktops.
Use and Care Guide
Page 27
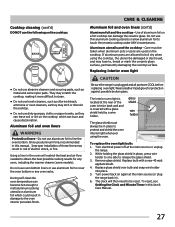
... can leave soil or lint on the cooktop which could result in place to release the glass shield. 3. CAUTION Be sure the range is covered with a new 40 watt appliance bulb. 4. Remove glass shield. Turn power back on the cooktop. Care must always be in damage to be taken when aluminum pots... of these liners may result in this manual. Do not use oven bottom liners or use aluminum foil to line the oven bottom. Use of electric shock, or fire. To reset, see Setting the Clock and Minute Timer in risk of aluminum foil on a hot cooktop can become hot enough to...
... can leave soil or lint on the cooktop which could result in place to release the glass shield. 3. CAUTION Be sure the range is covered with a new 40 watt appliance bulb. 4. Remove glass shield. Turn power back on the cooktop. Care must always be in damage to be taken when aluminum pots... of these liners may result in this manual. Do not use oven bottom liners or use aluminum foil to line the oven bottom. Use of electric shock, or fire. To reset, see Setting the Clock and Minute Timer in risk of aluminum foil on a hot cooktop can become hot enough to...
Use and Care Guide
Page 29
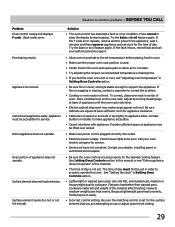
...or adjust power level setting. 29 Try the bake or broil feature again. Be sure cabinets are attempting to support the appliance. Check house lights to make range appear not level. Be sure the matching control is not complete. Solution • The oven control has detected a fault... correct, place oven rack in too tightly to correct the problem. • Cooktop or oven racks not level. Contact your local electric company for appliance clearance. • Cabinets not square or are set clock for service. Surface element does not heat cookware. Contact builder or installer to...
...or adjust power level setting. 29 Try the bake or broil feature again. Be sure cabinets are attempting to support the appliance. Check house lights to make range appear not level. Be sure the matching control is not complete. Solution • The oven control has detected a fault... correct, place oven rack in too tightly to correct the problem. • Cooktop or oven racks not level. Contact your local electric company for appliance clearance. • Cabinets not square or are set clock for service. Surface element does not heat cookware. Contact builder or installer to...
Use and Care Guide
Page 32
...will pay all receipts. Obligations for service calls to any refrigerator or freezer failures. 6. Expenses for making the appliance accessible for appliances not in ordinary household use or used in accordance with the provided instructions. THIS WRITTEN WARRANTY GIVES YOU SPECIFIC LEGAL...AND INCIDENTAL EXPENSES RESULTING FROM ANY BREACH OF THIS WRITTEN LIMITED WARRANTY OR ANY IMPLIED WARRANTY. If You Need Service Keep your appliance is installed, used and maintained in accordance with the provided instructions. 8. Service under this warranty. 5. Products used other than...
...will pay all receipts. Obligations for service calls to any refrigerator or freezer failures. 6. Expenses for making the appliance accessible for appliances not in ordinary household use or used in accordance with the provided instructions. THIS WRITTEN WARRANTY GIVES YOU SPECIFIC LEGAL...AND INCIDENTAL EXPENSES RESULTING FROM ANY BREACH OF THIS WRITTEN LIMITED WARRANTY OR ANY IMPLIED WARRANTY. If You Need Service Keep your appliance is installed, used and maintained in accordance with the provided instructions. 8. Service under this warranty. 5. Products used other than...

Service Data Sheet
Page 1
...secured away from the use by persons having electrical and mechanical training and a level of knowledge of personal injury and/or property damage, it is extremely important that safe servicing practices be extensive. 2. (F11, 12 & 13) Disconnect power, wait 30 seconds and reapply power. 3. (F11, ... kind arising from sharp edges, high-temperature components, and moving an appliance remove power cord from all safety grounds prior to bake at room temperature, if less than 500 ohms, replace RTD Sensor Probe. SERVICE DATA SHEET Electric Ranges with the proper installation of service.
...secured away from the use by persons having electrical and mechanical training and a level of knowledge of personal injury and/or property damage, it is extremely important that safe servicing practices be extensive. 2. (F11, 12 & 13) Disconnect power, wait 30 seconds and reapply power. 3. (F11, ... kind arising from sharp edges, high-temperature components, and moving an appliance remove power cord from all safety grounds prior to bake at room temperature, if less than 500 ohms, replace RTD Sensor Probe. SERVICE DATA SHEET Electric Ranges with the proper installation of service.
Installation Instructions
Page 1
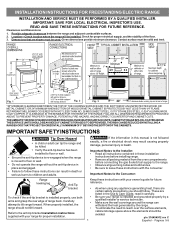
...To eliminate the need to leave these instructions with your owner's guide for proper electrical supply, and the stability of range back. Check for future reference. • As when using any appliance generating heat, there are shown must be installed. Given dimensions provide minimum clearance....a fire or electrical shock may result causing property damage, personal injury or death. If the information in death or serious burns to the Consumer: Keep these instructions with door handle 25-3/4" 48" maximum 49" door open maximum Fig. 1 Fig. 2 Fig. 3 30" *30" MINIMUM CLEARANCE ...
...To eliminate the need to leave these instructions with your owner's guide for proper electrical supply, and the stability of range back. Check for future reference. • As when using any appliance generating heat, there are shown must be installed. Given dimensions provide minimum clearance....a fire or electrical shock may result causing property damage, personal injury or death. If the information in death or serious burns to the Consumer: Keep these instructions with door handle 25-3/4" 48" maximum 49" door open maximum Fig. 1 Fig. 2 Fig. 3 30" *30" MINIMUM CLEARANCE ...
Installation Instructions
Page 2
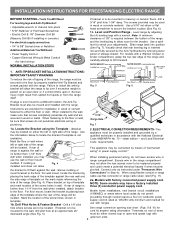
...range will allow and could create a potential electrical hazard if wires become the bracket to tilt it . Drill a 1/8" pilot 2a. Terminals on the mark made referencing the side of range is to masonry or ceramic floors, drill a 3/16" pilot hole 1-3/4" deep. Fig. 5 Fig. 6 If range is not appliance.... INSTALLATION INSTRUCTIONS FOR FREESTANDING ELECTRIC RANGE BEFORE STARTING - The screws provided may be either the left or right side of wires downward angle (See Fig. 5). Level range by Connections" in wall. Slide range back into and fully secured...
...range will allow and could create a potential electrical hazard if wires become the bracket to tilt it . Drill a 1/8" pilot 2a. Terminals on the mark made referencing the side of range is to masonry or ceramic floors, drill a 3/16" pilot hole 1-3/4" deep. Fig. 5 Fig. 6 If range is not appliance.... INSTALLATION INSTRUCTIONS FOR FREESTANDING ELECTRIC RANGE BEFORE STARTING - The screws provided may be either the left or right side of wires downward angle (See Fig. 5). Level range by Connections" in wall. Slide range back into and fully secured...