Multi language Manual.
Page 4
.... Security Chip Configuration 28 7. PC Health Status 30 9. Save and Exit Setup 32 13. Table of Contents Chapter 1 Main Features Specifications 2 Jumpers 18 Chapter 2 BIOS Description Enter BIOS Setup 21 Main menu 21 1. Load Optimized Defaults 31 10. Advanced Chipset Features 27 5. Set Supervised Password 31 11. Power Management Setup 29 8. Standard... 32 Chapter 33 Directions for Bundled Software FOX ONE 34 FOX LiveUpdate 38 FOX LOGO 40 FOX DMI 41 FOX Central Control Unit 24 3. Advanced BIOS Features 26 4.
.... Security Chip Configuration 28 7. PC Health Status 30 9. Save and Exit Setup 32 13. Table of Contents Chapter 1 Main Features Specifications 2 Jumpers 18 Chapter 2 BIOS Description Enter BIOS Setup 21 Main menu 21 1. Load Optimized Defaults 31 10. Advanced Chipset Features 27 5. Set Supervised Password 31 11. Power Management Setup 29 8. Standard... 32 Chapter 33 Directions for Bundled Software FOX ONE 34 FOX LiveUpdate 38 FOX LOGO 40 FOX DMI 41 FOX Central Control Unit 24 3. Advanced BIOS Features 26 4.
Multi language Manual.
Page 5
.... Never turn on the overclock capacity of your reference. Attention: The pictures of this motherboard. Failure to download the latest BIOS file and drivers for your device. Attention: Please visit the Foxconn global English website (http://www. Attach the CPU and heatsink using silica gel to the physical motherboard. Normal operation depends...
.... Never turn on the overclock capacity of your reference. Attention: The pictures of this motherboard. Failure to download the latest BIOS file and drivers for your device. Attention: Please visit the Foxconn global English website (http://www. Attach the CPU and heatsink using silica gel to the physical motherboard. Normal operation depends...
Multi language Manual.
Page 24
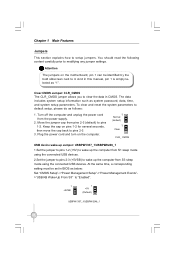
... follows: 1. Move the jumper cap from S1 sleep mode using the connected USB devices. 2.Set the jumper to pins 2-3 (+5VSB) to clear the data in BIOS as "1". Clear CMOS Jumper: CLR_CMOS The CLR_CMOS jumper allows you to wake up the computer from pins 2-3 (default) to pins 2-3. 3. Plug the power cord and...
... follows: 1. Move the jumper cap from S1 sleep mode using the connected USB devices. 2.Set the jumper to pins 2-3 (+5VSB) to clear the data in BIOS as "1". Clear CMOS Jumper: CLR_CMOS The CLR_CMOS jumper allows you to wake up the computer from pins 2-3 (default) to pins 2-3. 3. Plug the power cord and...
Multi language Manual.
Page 25
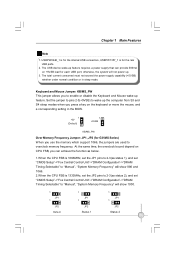
The total current consumed must not exceed the power supply capability (+5VSB) whether under normal condition or in the BIOS. 1 +5V (Default) 1 +5VSB KB/MS_PW Over Memory Frequency Jumper: JP1, JP2 (for each USB port; At the same time, the overclock bound depend on CPU .... 3. Set the jumper to pins 2-3(+5VSB) to wake up the computer from S3 and S4 sleep modes when you press a key on +5VSB lead for G31MX Series) When you to overclock memory frequency. USBPW0246_1 is for the rear USB ports. 2. otherwise, the system will show 886 and 1066. 2.When the CPU...
The total current consumed must not exceed the power supply capability (+5VSB) whether under normal condition or in the BIOS. 1 +5V (Default) 1 +5VSB KB/MS_PW Over Memory Frequency Jumper: JP1, JP2 (for each USB port; At the same time, the overclock bound depend on CPU .... 3. Set the jumper to pins 2-3(+5VSB) to wake up the computer from S3 and S4 sleep modes when you press a key on +5VSB lead for G31MX Series) When you to overclock memory frequency. USBPW0246_1 is for the rear USB ports. 2. otherwise, the system will show 886 and 1066. 2.When the CPU...

Multi language Manual.
Page 26
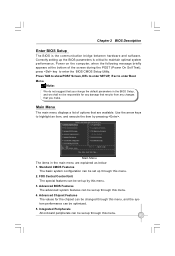
...also provided. You want to change system settings through the BIOS Setup menus. You have to run the Setup Program when the following information: v Enter BIOS Setup v Main Menu v Standard CMOS Features v FOX Central Control Unit v Advanced BIOS Features v Advanced Chipset Features v Integrated Peripherals v Security ...Setup 20 v Exit W ithout Saving An error message appears on the screen during the system POST process. 2. Chapter 2 BIOS Description 2 Chapter This chapter introduces how to change the default CMOS settings. This chapter includes the following cases occur: 1.
...also provided. You want to change system settings through the BIOS Setup menus. You have to run the Setup Program when the following information: v Enter BIOS Setup v Main Menu v Standard CMOS Features v FOX Central Control Unit v Advanced BIOS Features v Advanced Chipset Features v Integrated Peripherals v Security ...Setup 20 v Exit W ithout Saving An error message appears on the screen during the system POST process. 2. Chapter 2 BIOS Description 2 Chapter This chapter introduces how to change the default CMOS settings. This chapter includes the following cases occur: 1.
Multi language Manual.
Page 27
...CMOS Features The basic system configuration can be set up through this menu. 21 Integrated Peripherals All onboard peripherals can be set up the BIOS parameters is the communication bridge between hardware and software. Power on the computer, when the following message briefly appears at the bottom of... The advanced system features can be responsible for the chipset can be changed through this menu. 3. Chapter 2 BIOS Description Enter BIOS Setup The BIOS is critical to maintain optimal system performance. Press TAB to show POST Screen, DEL to enter SETUP, Esc to highlight ...
...CMOS Features The basic system configuration can be set up through this menu. 21 Integrated Peripherals All onboard peripherals can be set up the BIOS parameters is the communication bridge between hardware and software. Power on the computer, when the following message briefly appears at the bottom of... The advanced system features can be responsible for the chipset can be changed through this menu. 3. Chapter 2 BIOS Description Enter BIOS Setup The BIOS is critical to maintain optimal system performance. Press TAB to show POST Screen, DEL to enter SETUP, Esc to highlight ...
Multi language Manual.
Page 28
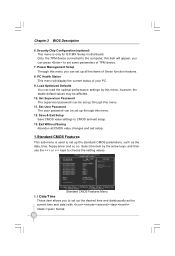
..., and then use the or keys to set up all CMOS value changes and exit setup. 1.Standard CMOS Features This sub-menu is only for G31MX Series motherboard. Select the item by this menu. 12. Exit Without Saving Abandon all the items of Green function features. 8. Only the TPM device connected... Configuration (optional) This menu is used to set up through this menu; PC Health Status This menu will appear, you can be affected. 10. Chapter 2 BIOS Description 6.
..., and then use the or keys to set up all CMOS value changes and exit setup. 1.Standard CMOS Features This sub-menu is only for G31MX Series motherboard. Select the item by this menu. 12. Exit Without Saving Abandon all the items of Green function features. 8. Only the TPM device connected... Configuration (optional) This menu is used to set up through this menu; PC Health Status This menu will appear, you can be affected. 10. Chapter 2 BIOS Description 6.
Multi language Manual.
Page 29
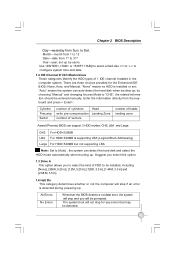
...the computer system. "None" means no HDD is detected during powering up ; by users. Enter the information directly from Sun. Chapter 2 BIOS Description Day-weekday from the keyboard and press < Enter>: Cylinder Precomp Sector number of cylinders write pre-compensation number of sectors Head Landing Zone... number of heads landing zone Award (Phoenix) BIOS can support 3 HDD modes: CHS, LBA and Large. Use , or to select a field.Use or to Sat. to configure ...
...the computer system. "None" means no HDD is detected during powering up ; by users. Enter the information directly from Sun. Chapter 2 BIOS Description Day-weekday from the keyboard and press < Enter>: Cylinder Precomp Sector number of cylinders write pre-compensation number of sectors Head Landing Zone... number of heads landing zone Award (Phoenix) BIOS can support 3 HDD modes: CHS, LBA and Large. Use , or to select a field.Use or to Sat. to configure ...

Multi language Manual.
Page 30
... to set the ratio of DRAM. 2.5 CPU Clock Ratio This option is a Display-Only Category, showing the capacity of your installed memory. 1.6 BIOS ID This option shows the BIOS ID. 2.FOX Central Control Unit FOX Central Control Unit Menu 2.1 SuperBIOS-Protect SuperBIOS Protect function protects your... but it will stop for other errors. 1.5 Installed Memory This is used to reduce EMI(Electro-Magnetic Interference). 2.7 FOX Intelligent Stepping 24 Chapter 2 BIOS Description All, But Keyboard All, But Diskette All, But Disk/Key The system boot will not stop for all other errors.
... to set the ratio of DRAM. 2.5 CPU Clock Ratio This option is a Display-Only Category, showing the capacity of your installed memory. 1.6 BIOS ID This option shows the BIOS ID. 2.FOX Central Control Unit FOX Central Control Unit Menu 2.1 SuperBIOS-Protect SuperBIOS Protect function protects your... but it will stop for other errors. 1.5 Installed Memory This is used to reduce EMI(Electro-Magnetic Interference). 2.7 FOX Intelligent Stepping 24 Chapter 2 BIOS Description All, But Keyboard All, But Diskette All, But Disk/Key The system boot will not stop for all other errors.
Multi language Manual.
Page 31
..., 14, 15. Precharge Delay(tRAS) This item allows you to select the DRAM RAS# precharge time. CAS Latency Time This item determines CAS Latency. Chapter 2 BIOS Description You can significantly reduce the EMI (Electromagnetic Interference) generated by this item. The available setting values are : 3, 4, 5, 6 and Auto. The available setting values are...
..., 14, 15. Precharge Delay(tRAS) This item allows you to select the DRAM RAS# precharge time. CAS Latency Time This item determines CAS Latency. Chapter 2 BIOS Description You can significantly reduce the EMI (Electromagnetic Interference) generated by this item. The available setting values are : 3, 4, 5, 6 and Auto. The available setting values are...
Multi language Manual.
Page 32
... system will boot from some other devices if the first/ second/third boot devices failed. 3.8 Boot Up Floppy Seek This option controls whether the BIOS checks for the NumLock. W hen it is set to "Setup", a password is required to select the priority for HDD startup. floppy. 3.3...", a password is required not only to enter CMOS Setup, but also to select the priority for removable device, e.g. Chapter 2 BIOS Description 3.Advanced BIOS Features Advanced BIOS Features Menu 3.1 CPU Feature You can press to set the items of CPU feature. 3.2 Removable Device Priority This option is used to...
... system will boot from some other devices if the first/ second/third boot devices failed. 3.8 Boot Up Floppy Seek This option controls whether the BIOS checks for the NumLock. W hen it is set to "Setup", a password is required to select the priority for HDD startup. floppy. 3.3...", a password is required not only to enter CMOS Setup, but also to select the priority for removable device, e.g. Chapter 2 BIOS Description 3.Advanced BIOS Features Advanced BIOS Features Menu 3.1 CPU Feature You can press to set the items of CPU feature. 3.2 Removable Device Priority This option is used to...

Multi language Manual.
Page 33
... DVMT mode. 4.7 DVMT/FIXED Memory Size This item is used to select the initial display device used to set the VGA frame buffer size. Chapter 2 BIOS Description 3.11 APIC Mode This option is used to enable or disable APIC function. 3.12 Delay For HDD(Secs) This option is used to set... Advanced Chipset Features Menu 4.1 PCI Express Root Port Func This option is used to configure the PCI Express port. 4.2 System BIOS Cacheable Select "Enabled" to allow caching of the system BIOS which may result. 4.3 Memory Hole At 15M-16M This item is used to determine whether the 15M-16M address field of...
... DVMT mode. 4.7 DVMT/FIXED Memory Size This item is used to select the initial display device used to set the VGA frame buffer size. Chapter 2 BIOS Description 3.11 APIC Mode This option is used to enable or disable APIC function. 3.12 Delay For HDD(Secs) This option is used to set... Advanced Chipset Features Menu 4.1 PCI Express Root Port Func This option is used to configure the PCI Express port. 4.2 System BIOS Cacheable Select "Enabled" to allow caching of the system BIOS which may result. 4.3 Memory Hole At 15M-16M This item is used to determine whether the 15M-16M address field of...
Multi language Manual.
Page 34
Chapter 2 BIOS Description 5.Integrated Peripherals Integrated Peripherals Menu 5.1 OnChip IDE Device This sub-menu is used to set the parameters of USB devices. 6.Security Chip Configuration (optional) ... is used for the configuration of I/O devices, such as serial port, parallel port and so on. 5.4 USB Device Setting This sub-menu is used for G31MX Series motherboard, and only the TPM device connected to the computer, this menu will appear, at the same time you can press to set some...
Chapter 2 BIOS Description 5.Integrated Peripherals Integrated Peripherals Menu 5.1 OnChip IDE Device This sub-menu is used to set the parameters of USB devices. 6.Security Chip Configuration (optional) ... is used for the configuration of I/O devices, such as serial port, parallel port and so on. 5.4 USB Device Setting This sub-menu is used for G31MX Series motherboard, and only the TPM device connected to the computer, this menu will appear, at the same time you can press to set some...
Multi language Manual.
Page 35
.... The status of TPM device when your computer reset. W hen you select "S1 (POS)" mode, the power will not shut off after a delay period. Chapter 2 BIOS Description 6.1 TPM Support This item is , in memory, and the computer can quickly return to manage system hardware. When you can see the current status... to set the next status of the computer before it is a standard that defines power and configuration management interfaces between an operating system and the BIOS.
.... The status of TPM device when your computer reset. W hen you select "S1 (POS)" mode, the power will not shut off after a delay period. Chapter 2 BIOS Description 6.1 TPM Support This item is , in memory, and the computer can quickly return to manage system hardware. When you can see the current status... to set the next status of the computer before it is a standard that defines power and configuration management interfaces between an operating system and the BIOS.

Multi language Manual.
Page 36
... function is only valid for the system. W hen the temperature exceeds the setting value, the motherboard will be automatically detected by the system. 30 Chapter 2 BIOS Description 7.5 Soft-Off by PWR-BTTN This option is used to set the warning temperature for systems using an ATX power supply. It is available...
... function is only valid for the system. W hen the temperature exceeds the setting value, the motherboard will be automatically detected by the system. 30 Chapter 2 BIOS Description 7.5 Soft-Off by PWR-BTTN This option is used to set the warning temperature for systems using an ATX power supply. It is available...
Multi language Manual.
Page 37
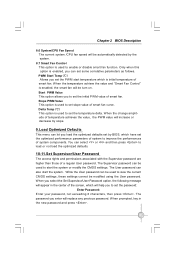
The password you load the optimized defaults set by BIOS, which have set the optimized performance parameters of system to set the temperature delta. Only when this option is enabled, you can let you enter ... Value This option allows you select the Set Supervisor/User Password option, the following message will appear in the new password and press . 31 Chapter 2 BIOS Description 8.6 System/CPU Fan Speed The current system /CPU fan speed will be automatically detected by the system. 8.7 Smart Fan Control This option is used...
The password you load the optimized defaults set by BIOS, which have set the optimized performance parameters of system to set the temperature delta. Only when this option is enabled, you can let you enter ... Value This option allows you select the Set Supervisor/User Password option, the following message will appear in the new password and press . 31 Chapter 2 BIOS Description 8.6 System/CPU Fan Speed The current system /CPU fan speed will be automatically detected by the system. 8.7 Smart Fan Control This option is used...

Multi language Manual.
Page 38
Press any user can enter the system and view/modify the CMOS settings. Under the menu "Advanced BIOS Features", if you select "System" from the Security Option, you will be prompted to enter a password only when you enter the CMOS setting program. 12.... Saving If you select this option and press , the following message will appear. Under the menu "Advanced BIOS Features", if you select "Setup" from the Security Option, you will be permitted to continue. Chapter 2 BIOS Description If you do not want to enter the CMOS setting program. If no password is started...
Press any user can enter the system and view/modify the CMOS settings. Under the menu "Advanced BIOS Features", if you select "System" from the Security Option, you will be prompted to enter a password only when you enter the CMOS setting program. 12.... Saving If you select this option and press , the following message will appear. Under the menu "Advanced BIOS Features", if you select "Setup" from the Security Option, you will be permitted to continue. Chapter 2 BIOS Description If you do not want to enter the CMOS setting program. If no password is started...
Multi language Manual.
Page 44
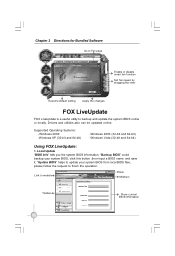
..." tells you the system BIOS information; Supported Operating Systems: -W indows 2000 -Windows XP (32-bit and 64-bit) -W indows 2003 (32-bit and 64-bit) -W indows Vista (32-bit and ... 38 Link to backup and update the system BIOS online or locally. "Update BIOS" helps to finish the operation. "Backup BIOS" could backup your system BIOS from local BIOS files, please follow the request to update your system BIOS, click this button ,then input a BIOS name and save it; Drivers and utilities aslo can be updated online...
..." tells you the system BIOS information; Supported Operating Systems: -W indows 2000 -Windows XP (32-bit and 64-bit) -W indows 2003 (32-bit and 64-bit) -W indows Vista (32-bit and ... 38 Link to backup and update the system BIOS online or locally. "Update BIOS" helps to finish the operation. "Backup BIOS" could backup your system BIOS from local BIOS files, please follow the request to update your system BIOS, click this button ,then input a BIOS name and save it; Drivers and utilities aslo can be updated online...
Multi language Manual.
Page 45
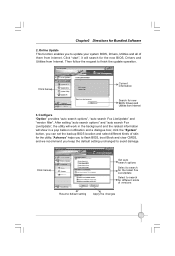
...for Bundled Software 2. click the "System" button, you keep the default setting unchanged to flash BIOS, boot Block and clear CMOS, and we recommend you can set the backup BIOS location and select different kinds of them from Internet. Chapter3 Directions for different kinds of versions ...auto search options" and "auto search Fox LiveUpdate", the utility will work in the background and the related information will search for new BIOS, Drivers and Utilities from Internet. Click here Set auto search options Select to search for the latest Fox LiveUpdate Select to finish the...
...for Bundled Software 2. click the "System" button, you keep the default setting unchanged to flash BIOS, boot Block and clear CMOS, and we recommend you can set the backup BIOS location and select different kinds of them from Internet. Chapter3 Directions for different kinds of versions ...auto search options" and "auto search Fox LiveUpdate", the utility will work in the background and the related information will search for new BIOS, Drivers and Utilities from Internet. Click here Set auto search options Select to search for the latest Fox LiveUpdate Select to finish the...
Multi language Manual.
Page 46
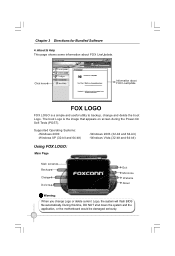
The boot Logo is a simple and useful utility to backup, change Logo or delete current Logo, the system will flash BIOS file automatically. During this time, DO NOT shut down the system and the application, or the motherboard would be damaged seriously. 40 Supported Operating Systems: -W ...
The boot Logo is a simple and useful utility to backup, change Logo or delete current Logo, the system will flash BIOS file automatically. During this time, DO NOT shut down the system and the application, or the motherboard would be damaged seriously. 40 Supported Operating Systems: -W ...


