Multi language Manual.
Page 4
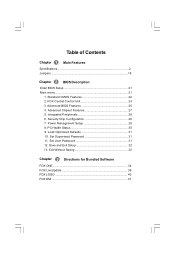
... Specifications 2 Jumpers 18 Chapter 2 BIOS Description Enter BIOS Setup 21 Main menu 21 1. Integrated Peripherals 28 6. Load Optimized Defaults 31 10. Set User Password 31 12. Save and Exit Setup 32 13. Advanced Chipset Features 27 5. Power Management Setup 29 8. PC Health Status 30 9. Exit Without Saving 32 Chapter 33 Directions for Bundled Software FOX ONE 34 FOX LiveUpdate 38 FOX LOGO 40 FOX DMI 41 FOX Central Control...
... Specifications 2 Jumpers 18 Chapter 2 BIOS Description Enter BIOS Setup 21 Main menu 21 1. Integrated Peripherals 28 6. Load Optimized Defaults 31 10. Set User Password 31 12. Save and Exit Setup 32 13. Advanced Chipset Features 27 5. Power Management Setup 29 8. PC Health Status 30 9. Exit Without Saving 32 Chapter 33 Directions for Bundled Software FOX ONE 34 FOX LiveUpdate 38 FOX LOGO 40 FOX DMI 41 FOX Central Control...
Multi language Manual.
Page 5
....com) to switch off before inserting or removing expansion cards or other peripherals, especially when you insert or remove a memory module. Attach the CPU and heatsink using silica gel to high temperature. 3. Failure to download the latest BIOS file and drivers for this manual will operate normally while overclock. Attention: W e cannot guarantee that the content of objects used in this manual are upgrated from time to the physical motherboard. Attention...
....com) to switch off before inserting or removing expansion cards or other peripherals, especially when you insert or remove a memory module. Attach the CPU and heatsink using silica gel to high temperature. 3. Failure to download the latest BIOS file and drivers for this manual will operate normally while overclock. Attention: W e cannot guarantee that the content of objects used in this manual are upgrated from time to the physical motherboard. Attention...
Multi language Manual.
Page 9
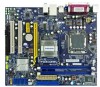
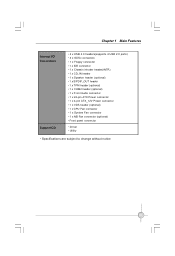
... USB 2.0 ports) ·4 x SATA connectors ·1 x Floppy connector ·1 x IDE connector ·1 x Chassis intruder header(INTR) ·1 x CD_IN header ·1 x Speaker header (optional) ·1 x S/PDIF_OUT header ·1 x TPM header (optional) ·1 x COM2 header (optional) ·1 x Front Audio connector ·1 x 24-pin ATX Power connector ·1 x 4-pin ATX_12V Power connector ·1 x IrDA header (optional) ·1 x CPU Fan connector ·1 x System Fan connector ·1 x NB Fan connector (optional) ·Front panel connector ·Driver ·Utility ·Specifications...
... USB 2.0 ports) ·4 x SATA connectors ·1 x Floppy connector ·1 x IDE connector ·1 x Chassis intruder header(INTR) ·1 x CD_IN header ·1 x Speaker header (optional) ·1 x S/PDIF_OUT header ·1 x TPM header (optional) ·1 x COM2 header (optional) ·1 x Front Audio connector ·1 x 24-pin ATX Power connector ·1 x 4-pin ATX_12V Power connector ·1 x IrDA header (optional) ·1 x CPU Fan connector ·1 x System Fan connector ·1 x NB Fan connector (optional) ·Front panel connector ·Driver ·Utility ·Specifications...
Multi language Manual.
Page 24
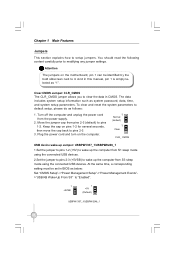
... pins 2-3 (default) to default setup, please do as system password, data, time, and system setup parameters. Chapter 1 Main Features Jumpers This section explains how to modifying any jumper settings. Clear CMOS Jumper: CLR_CMOS The CLR_CMOS jumper allows you to clear the data in this manual, pin 1 is simply labeled as below: Set "CMOS Setup"->"Power Management Setup"->"Power Management Events">"USB KB Wake-Up From S3" to wake up the computer from S3 sleep mode using the connected USB devices. Move the jumper...
... pins 2-3 (default) to default setup, please do as system password, data, time, and system setup parameters. Chapter 1 Main Features Jumpers This section explains how to modifying any jumper settings. Clear CMOS Jumper: CLR_CMOS The CLR_CMOS jumper allows you to clear the data in this manual, pin 1 is simply labeled as below: Set "CMOS Setup"->"Power Management Setup"->"Power Management Events">"USB KB Wake-Up From S3" to wake up the computer from S3 sleep mode using the connected USB devices. Move the jumper...
Multi language Manual.
Page 25
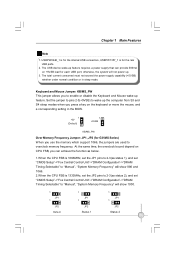
... BIOS. 1 +5V (Default) 1 +5VSB KB/MS_PW Over Memory Frequency Jumper: JP1, JP2 (for the internal USB connectors, USBPW1357_1 is 1333MHz, set the JP2 pins to 2-3(as status 2), and set "CMOS Setup"->"Fox Central Control Unit"->"DRAM Configuration"->"DRAM Timing Selectable" to overclock memory frequency. Keyboard and Mouse Jumper: KB/MS_PW This jumper allows you to "Manual", "System Memory Frequency" will not power up feature. The USB device wake-up the computer from S3 and S4 sleep modes when you press a key on the keyboard...
... BIOS. 1 +5V (Default) 1 +5VSB KB/MS_PW Over Memory Frequency Jumper: JP1, JP2 (for the internal USB connectors, USBPW1357_1 is 1333MHz, set the JP2 pins to 2-3(as status 2), and set "CMOS Setup"->"Fox Central Control Unit"->"DRAM Configuration"->"DRAM Timing Selectable" to overclock memory frequency. Keyboard and Mouse Jumper: KB/MS_PW This jumper allows you to "Manual", "System Memory Frequency" will not power up feature. The USB device wake-up the computer from S3 and S4 sleep modes when you press a key on the keyboard...

Multi language Manual.
Page 26
... to run the Setup Program when the following information: v Enter BIOS Setup v Main Menu v Standard CMOS Features v FOX Central Control Unit v Advanced BIOS Features v Advanced Chipset Features v Integrated Peripherals v Security Chip Configuration v Power Management Setup v PC Health Status v Load Optimized Defaults v Set Supervised Password v Set User Password v Save and Exit Setup 20 v Exit W ithout Saving Chapter 2 BIOS Description 2 Chapter This chapter introduces how to change the default CMOS settings. An error message appears on the screen during the system...
... to run the Setup Program when the following information: v Enter BIOS Setup v Main Menu v Standard CMOS Features v FOX Central Control Unit v Advanced BIOS Features v Advanced Chipset Features v Integrated Peripherals v Security Chip Configuration v Power Management Setup v PC Health Status v Load Optimized Defaults v Set Supervised Password v Set User Password v Save and Exit Setup 20 v Exit W ithout Saving Chapter 2 BIOS Description 2 Chapter This chapter introduces how to change the default CMOS settings. An error message appears on the screen during the system...
Multi language Manual.
Page 27
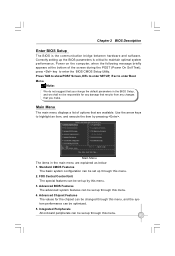
... system performance can be set up the BIOS parameters is the communication bridge between hardware and software. Press TAB to show POST Screen, DEL to enter SETUP, Esc to highlight an item, and execute the item by this menu. 21 Main Menu The main menu displays a list of the screen during the POST (Power On Self Test), press key to enter the BIOS CMOS Setup Utility. Use the arrow keys to enter Boot Menu. Advanced Chipset Features The values...
... system performance can be set up the BIOS parameters is the communication bridge between hardware and software. Press TAB to show POST Screen, DEL to enter SETUP, Esc to highlight an item, and execute the item by this menu. 21 Main Menu The main menu displays a list of the screen during the POST (Power On Self Test), press key to enter the BIOS CMOS Setup Utility. Use the arrow keys to enter Boot Menu. Advanced Chipset Features The values...
Multi language Manual.
Page 28
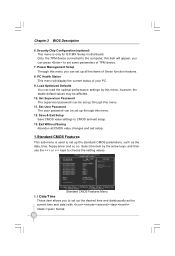
... keys to CMOS and exit setup. 13. Only the TPM device connected to set up through this menu; Select the item by this menu. 11. Security Chip Configuration (optional) This menu is used to set some parameters of TPM device. 7. Load Optimized Defaults You can press to set up through this item will display the current status of Green function features. 8. Set Supervisor Password The supervisor password can be affected. 10. Set User Password The user password...
... keys to CMOS and exit setup. 13. Only the TPM device connected to set up through this menu; Select the item by this menu. 11. Security Chip Configuration (optional) This menu is used to set some parameters of TPM device. 7. Load Optimized Defaults You can press to set up through this item will display the current status of Green function features. 8. Set Supervisor Password The supervisor password can be affected. 10. Set User Password The user password...
Multi language Manual.
Page 29
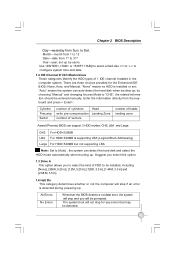
..., Auto, and Manual. to configure system time and date. 1.2 IDE Channel 0/1/2/3 Master/slave These categories identify the HDD types of heads landing zone Award (Phoenix) BIOS can detect the hard disk and select the HDD mode automatically when booting up ; Month-month from 1 to 12 Date-date from Sun. CHS LBA For HDD528MB & supporting LBA (Logical Block Addressing) Large For HDD>528MB but not supporting LBA Note: Set...
..., Auto, and Manual. to configure system time and date. 1.2 IDE Channel 0/1/2/3 Master/slave These categories identify the HDD types of heads landing zone Award (Phoenix) BIOS can detect the hard disk and select the HDD mode automatically when booting up ; Month-month from 1 to 12 Date-date from Sun. CHS LBA For HDD528MB & supporting LBA (Logical Block Addressing) Large For HDD>528MB but not supporting LBA Note: Set...

Multi language Manual.
Page 30
... DRAM Frequency This option shows the current frequency of an unlocked CPU. The system boot will not stop for a keyboard error; Chapter 2 BIOS Description All, But Keyboard All, But Diskette All, But Disk/Key The system boot will not stop for a keyboard or disk error; The system boot will not stop for a diskette error; Using different CPU, the setting values are different. 2.6 Auto Detect PCI Clk This option is used to set the ratio of DRAM. 2.5 CPU Clock Ratio...
... DRAM Frequency This option shows the current frequency of an unlocked CPU. The system boot will not stop for a keyboard error; Chapter 2 BIOS Description All, But Keyboard All, But Diskette All, But Disk/Key The system boot will not stop for a keyboard or disk error; The system boot will not stop for a diskette error; Using different CPU, the setting values are different. 2.6 Auto Detect PCI Clk This option is used to set the ratio of DRAM. 2.5 CPU Clock Ratio...
Multi language Manual.
Page 31
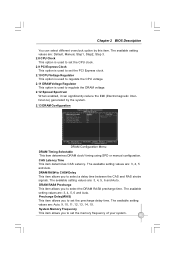
... setting values are : 3, 4, 5, 6 and Auto. The available setting values are : Auto, 9, 10, 11, 12, 13, 14, 15. The available setting values are: Default, Manual, Step1, Step2, Step 3. 2.8 CPU Clock This option is used to set the CPU clock. 2.9 PCI Express Clock This option is used to regulate the DRAM voltage. 2.12 Spread Spectrum W hen enabled, it can select different overclock option by the system. 2.13 DRAM Configuration DRAM Configuration Menu DRAM Timing Selectable This item determines DRAM clock/ timing using SPD or manual configuration. System Memory Frequency...
... setting values are : 3, 4, 5, 6 and Auto. The available setting values are : Auto, 9, 10, 11, 12, 13, 14, 15. The available setting values are: Default, Manual, Step1, Step2, Step 3. 2.8 CPU Clock This option is used to set the CPU clock. 2.9 PCI Express Clock This option is used to regulate the DRAM voltage. 2.12 Spread Spectrum W hen enabled, it can select different overclock option by the system. 2.13 DRAM Configuration DRAM Configuration Menu DRAM Timing Selectable This item determines DRAM clock/ timing using SPD or manual configuration. System Memory Frequency...
Multi language Manual.
Page 32
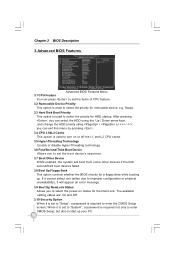
... to set the boot device's sequence. 3.7 Boot Other Device W hile enabled, the system will appear an error message. 3.9 Boot Up NumLock Status Allows you can select the HDD using the Up / Down arrow keys, and change the HDD priority using / or / ; The available setting values are: On and Off. 3.10 Security Option W hen it is set to "Setup", a password is required not only to enter CMOS Setup, but also to enter the CMOS Setup screen; W hen...
... to set the boot device's sequence. 3.7 Boot Other Device W hile enabled, the system will appear an error message. 3.9 Boot Up NumLock Status Allows you can select the HDD using the Up / Down arrow keys, and change the HDD priority using / or / ; The available setting values are: On and Off. 3.10 Security Option W hen it is set to "Setup", a password is required not only to enter CMOS Setup, but also to enter the CMOS Setup screen; W hen...

Multi language Manual.
Page 33
... used to set the VGA frame buffer size. Note: This function does not work when the external display card is used. 4.6 DVMT Mode This item is used to set the DVMT mode. 4.7 DVMT/FIXED Memory Size This item is used to configure the PCI Express port. 4.2 System BIOS Cacheable Select "Enabled" to allow caching of memory is reserved for the ISA expansion card. 4.4 PEG/Onchip VGA Control This item is used to enable or disable PEG and onboard VGA. 4.5 On-Chip...
... used to set the VGA frame buffer size. Note: This function does not work when the external display card is used. 4.6 DVMT Mode This item is used to set the DVMT mode. 4.7 DVMT/FIXED Memory Size This item is used to configure the PCI Express port. 4.2 System BIOS Cacheable Select "Enabled" to allow caching of memory is reserved for the ISA expansion card. 4.4 PEG/Onchip VGA Control This item is used to enable or disable PEG and onboard VGA. 4.5 On-Chip...
Multi language Manual.
Page 34
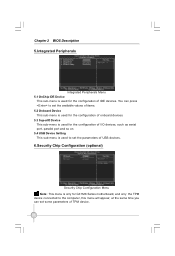
... G31MX Series motherboard, and only the TPM device connected to the computer, this menu will appear, at the same time you can press to set the avaliable values of items. 5.2 Onboard Device This sub-menu is used for the configuration of onboard devices. 5.3 SuperIO Device This sub-menu is used for the configuration of I/O devices, such as serial port, parallel port and so on. 5.4 USB Device Setting This sub-menu is used to set the parameters of USB devices. 6.Security Chip Configuration (optional...
... G31MX Series motherboard, and only the TPM device connected to the computer, this menu will appear, at the same time you can press to set the avaliable values of items. 5.2 Onboard Device This sub-menu is used for the configuration of onboard devices. 5.3 SuperIO Device This sub-menu is used for the configuration of I/O devices, such as serial port, parallel port and so on. 5.4 USB Device Setting This sub-menu is used to set the parameters of USB devices. 6.Security Chip Configuration (optional...
Multi language Manual.
Page 35
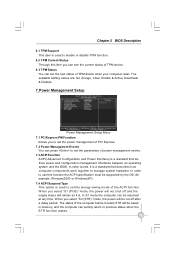
... power management events. 7.3 ACPI Function ACPI( Advanced Configuration and Power Interface) is a standard that describes how computer components work together to manage system hardware. In order to use this item you to set the power management of PCI Express. 7.2 Power Management Events You can press to set the parameters of TPM device when your computer reset. The available setting values are: No change, Clear, Enable & Active, Deactivate & Disable. 7.Power Management Setup Power Management Setup Menu 7.1 PCI Express...
... power management events. 7.3 ACPI Function ACPI( Advanced Configuration and Power Interface) is a standard that describes how computer components work together to manage system hardware. In order to use this item you to set the power management of PCI Express. 7.2 Power Management Events You can press to set the parameters of TPM device when your computer reset. The available setting values are: No change, Clear, Enable & Active, Deactivate & Disable. 7.Power Management Setup Power Management Setup Menu 7.1 PCI Express...

Multi language Manual.
Page 36
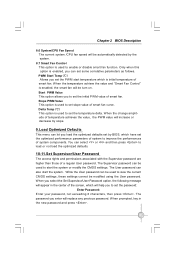
... Temperature This option is used to set the warning temperature for systems using an ATX power supply. It is available only when "HPET" is enabled. 8.PC Health Status PC Health Status Menu 8.1 Case Open Warning Enable or disable the chassis open status feature. 8.2 Shutdown Temperature This option is used to set the high limit system temperature. W hen select "Delay 4 sec", the power will be off immediately; The available setting values are: 32-bit mode, 64-bit mode...
... Temperature This option is used to set the warning temperature for systems using an ATX power supply. It is available only when "HPET" is enabled. 8.PC Health Status PC Health Status Menu 8.1 Case Open Warning Enable or disable the chassis open status feature. 8.2 Shutdown Temperature This option is used to set the high limit system temperature. W hen select "Delay 4 sec", the power will be off immediately; The available setting values are: 32-bit mode, 64-bit mode...
Multi language Manual.
Page 37
... you load the optimized defaults set by the system. 8.7 Smart Fan Control This option is enabled, you can be modified using the User password. W hen the change amplitude of smart fan curve. The User password can be used to view the current CMOS settings, these settings cannot be used to start the system. W hen the temperature achieve the value and "Smart Fan Control" is used to improve the performances of a regular User password. Chapter 2 BIOS Description 8.6 System/CPU Fan Speed The current system /CPU fan speed...
... you load the optimized defaults set by the system. 8.7 Smart Fan Control This option is enabled, you can be modified using the User password. W hen the change amplitude of smart fan curve. The User password can be used to view the current CMOS settings, these settings cannot be used to start the system. W hen the temperature achieve the value and "Smart Fan Control" is used to improve the performances of a regular User password. Chapter 2 BIOS Description 8.6 System/CPU Fan Speed The current system /CPU fan speed...
Multi language Manual.
Page 40
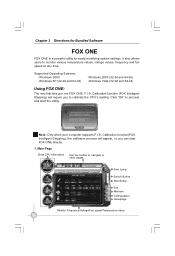
... is a powerful utility for easily modifying system settings. Click "OK" to monitor various temperature values, voltage values, frequency and fan speed at any time. Supported Operating Systems: -W indows 2000 -Windows XP (32-bit and 64-bit) -W indows 2003 (32-bit and 64-bit) -W indows Vista (32-bit and 64-bit) Using FOX ONE: The very first time you to other pages Alert Lamp Switch Button Skin Button Exit Minimum Configuration Homepage Monitor Frequency/Voltage/Fan speed/Temperature value...
... is a powerful utility for easily modifying system settings. Click "OK" to monitor various temperature values, voltage values, frequency and fan speed at any time. Supported Operating Systems: -W indows 2000 -Windows XP (32-bit and 64-bit) -W indows 2003 (32-bit and 64-bit) -W indows Vista (32-bit and 64-bit) Using FOX ONE: The very first time you to other pages Alert Lamp Switch Button Skin Button Exit Minimum Configuration Homepage Monitor Frequency/Voltage/Fan speed/Temperature value...
Multi language Manual.
Page 44
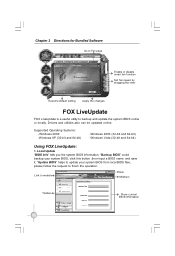
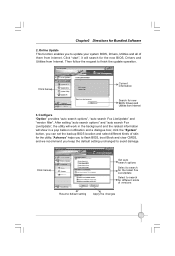
... utilities aslo can be updated online. "Backup BIOS" could backup your system BIOS from local BIOS files, please follow the request to website Exit Minimum Toolbar Show current BIOS information 38 Link to finish the operation. Chapter 3 Directions for Bundled Software Go to Fan page Enable or disable smart fan function Set fan speed by dragging the lever Resume default setting Apply the changes FOX LiveUpdate FOX LiveUpdate is a useful utility...
... utilities aslo can be updated online. "Backup BIOS" could backup your system BIOS from local BIOS files, please follow the request to website Exit Minimum Toolbar Show current BIOS information 38 Link to finish the operation. Chapter 3 Directions for Bundled Software Go to Fan page Enable or disable smart fan function Set fan speed by dragging the lever Resume default setting Apply the changes FOX LiveUpdate FOX LiveUpdate is a useful utility...
Multi language Manual.
Page 45
... to update your system BIOS, Drivers, Utilities and all of them from Internet. Configure "Option" provides "auto search options", "auto search Fox LiveUpdate" and "version filter". After setting "auto search options" and "auto search Fox LiveUpdate", the utility will work in the background and the related information will search for Bundled Software 2. click the "System" button, you can set the backup BIOS location and select different kinds of versions Resume default setting Apply the changes...
... to update your system BIOS, Drivers, Utilities and all of them from Internet. Configure "Option" provides "auto search options", "auto search Fox LiveUpdate" and "version filter". After setting "auto search options" and "auto search Fox LiveUpdate", the utility will work in the background and the related information will search for Bundled Software 2. click the "System" button, you can set the backup BIOS location and select different kinds of versions Resume default setting Apply the changes...


