Fluke 289 Digital Multimeter Product Datasheet
Page 2
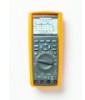
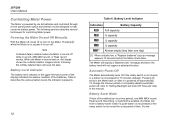
.... Create custom displays too • Saved measurements for over time, storing up to "ghost voltage." The new Fluke 289 True-rms Industrial Logging Multimeter with a large graphic display. Select it, then press the "i" button for instant ...access to on the meter • "i" button Unsure about a measurement function? The Fluke 289 puts powerful diagnostic capabilities in IR Port Simple user-defined interface to save, name, & recall measurements "Softkey" interface ...button provides instant on motor drives, in the most demanding industrial settings.
.... Create custom displays too • Saved measurements for over time, storing up to "ghost voltage." The new Fluke 289 True-rms Industrial Logging Multimeter with a large graphic display. Select it, then press the "i" button for instant ...access to on the meter • "i" button Unsure about a measurement function? The Fluke 289 puts powerful diagnostic capabilities in IR Port Simple user-defined interface to save, name, & recall measurements "Softkey" interface ...button provides instant on motor drives, in the most demanding industrial settings.

Fluke 287 and 289 Multimeter Users Manual
Page 5
...Measuring Pulse Width 45 Changing Meter Setup Options 47 Resetting Meter Setup Options 47 Setting Display Contrast 47 Setting the Meter's Language 47 Setting Date and Time 48 Setting Backlight and Auto Off Timeouts 48 Setting a Custom dBm Reference 48 Disabling and Enabling the Beeper 48 Enabling and Disabling... Trend Data 50 Zooming in on Trend Data 51 Deleting Stored Measurement Data 51 Recording Measurement Data 52 Setting up a Recording Session 53 Setting the Event Threshold Value 54 Starting a Recording Session 54 Stopping a Recording Session 54 Using Communications 55 iii
...Measuring Pulse Width 45 Changing Meter Setup Options 47 Resetting Meter Setup Options 47 Setting Display Contrast 47 Setting the Meter's Language 47 Setting Date and Time 48 Setting Backlight and Auto Off Timeouts 48 Setting a Custom dBm Reference 48 Disabling and Enabling the Beeper 48 Enabling and Disabling... Trend Data 50 Zooming in on Trend Data 51 Deleting Stored Measurement Data 51 Recording Measurement Data 52 Setting up a Recording Session 53 Setting the Event Threshold Value 54 Starting a Recording Session 54 Stopping a Recording Session 54 Using Communications 55 iii
Fluke 287 and 289 Multimeter Users Manual
Page 17
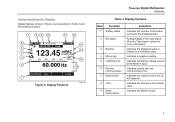
Indicates a negative reading. Indicates activity over the communication link. Indicates the time set in Table 3 and the following sections. 7 8 9 10 11 12 6 8:10pm 123.45 VAC 06/13/07 13 5 REL HOLD AutoSAVE 4 123.45 mVAC 14 Crest ...
Indicates a negative reading. Indicates activity over the communication link. Indicates the time set in Table 3 and the following sections. 7 8 9 10 11 12 6 8:10pm 123.45 VAC 06/13/07 13 5 REL HOLD AutoSAVE 4 123.45 mVAC 14 Crest ...
Fluke 287 and 289 Multimeter Users Manual
Page 18
287/289 Users Manual Table 3. O Range indicator Indicates the range the Meter is displayed. Because the graph updates faster than the digital display, it is useful for ... value when the primary and secondary displays are covered by a menu or pop-up to the right of the selected range. K Date Indicates the date set in the primary display. The bar graph is relative to ±10 %. For dc voltage and current, the bar graph range is enabled (not associated...
287/289 Users Manual Table 3. O Range indicator Indicates the range the Meter is displayed. Because the graph updates faster than the digital display, it is useful for ... value when the primary and secondary displays are covered by a menu or pop-up to the right of the selected range. K Date Indicates the date set in the primary display. The bar graph is relative to ±10 %. For dc voltage and current, the bar graph range is enabled (not associated...
Fluke 287 and 289 Multimeter Users Manual
Page 22
...Mode If Auto off while in record, MIN MAX record, or Peak record modes. The following sections describe several techniques for 15 minutes (default). 287/289 Users Manual Controlling Meter Power The Meter is next turned on, the dispay shows the collected data in stopped mode. Pressing O while the Meter is... of the batteries. Automatic Power-Off The Meter automatically turns off if the rotary switch is not moved or a button is turned off is enabled (set to a time period), and MIN MAX record, Peak record, Recording, or AutoHold is enabled, the Meter will turn the Meter back on after it...
...Mode If Auto off while in record, MIN MAX record, or Peak record modes. The following sections describe several techniques for 15 minutes (default). 287/289 Users Manual Controlling Meter Power The Meter is next turned on, the dispay shows the collected data in stopped mode. Pressing O while the Meter is... of the batteries. Automatic Power-Off The Meter automatically turns off if the rotary switch is not moved or a button is turned off is enabled (set to a time period), and MIN MAX record, Peak record, Recording, or AutoHold is enabled, the Meter will turn the Meter back on after it...
Fluke 287 and 289 Multimeter Users Manual
Page 23
...Menus Each primary measurement function (rotary switch position) has a number of the bar graph, as the range indicator. The default timeout is set for the selected function, including the display. If autorange is five minutes. A typical menu is still collecting data. The Meter displays a...These functions all use R in low-light conditions, press G to activate the LCD backlight. Each additional press of operation. See the "Setting Backlight and Auto Off Timeouts" section later in this manual. To conserve battery life, a user-adjustable timeout controls how long the backlight ...
...Menus Each primary measurement function (rotary switch position) has a number of the bar graph, as the range indicator. The default timeout is set for the selected function, including the display. If autorange is five minutes. A typical menu is still collecting data. The Meter displays a...These functions all use R in low-light conditions, press G to activate the LCD backlight. Each additional press of operation. See the "Setting Backlight and Auto Off Timeouts" section later in this manual. To conserve battery life, a user-adjustable timeout controls how long the backlight ...
Fluke 287 and 289 Multimeter Users Manual
Page 25
... detected. If H is pressed while MIN MAX record, peak record, or a recording session is in progress, the display freezes but the rotary switch is not set to the correct current position, the beeper warns you from topic to indicate the actual input. Use the softkey labeled More or 7 and 8 to scroll...
... detected. If H is pressed while MIN MAX record, peak record, or a recording session is in progress, the display freezes but the rotary switch is not set to the correct current position, the beeper warns you from topic to indicate the actual input. Use the softkey labeled More or 7 and 8 to scroll...
Fluke 287 and 289 Multimeter Users Manual
Page 26
... MIN MAX mode was started at the same time. The true average value displayed is an important measurement when looking at its rms value. To set the AutoHOLD Threshold Value, press the softkey labeled Setup to update with the present measurement, just as a possible new minimum or maximum value. The MIN... be captured as if a stable measurement had been detected. The MIN MAX mode is 4% of the ac measurement functions, press the softkey labeled Menu. 287/289 Users Manual out open the recording setup screen.
... MIN MAX mode was started at the same time. The true average value displayed is an important measurement when looking at its rms value. To set the AutoHOLD Threshold Value, press the softkey labeled Setup to update with the present measurement, just as a possible new minimum or maximum value. The MIN... be captured as if a stable measurement had been detected. The MIN MAX mode is 4% of the ac measurement functions, press the softkey labeled Menu. 287/289 Users Manual out open the recording setup screen.

Fluke 287 and 289 Multimeter Users Manual
Page 27
... appear in this manual. See the "Enabling and Disabling the Smoothing Mode" section later in the secondary display with their respective elapsed times. See the "Setting Backlight and Auto Off Timeouts" section for more information on the Smoothing mode to display a steadier reading. As shown in the display freezes, and the...
... appear in this manual. See the "Enabling and Disabling the Smoothing Mode" section later in the secondary display with their respective elapsed times. See the "Setting Backlight and Auto Off Timeouts" section for more information on the Smoothing mode to display a steadier reading. As shown in the display freezes, and the...
Fluke 287 and 289 Multimeter Users Manual
Page 29
... time (average value time stamp) to exit the Peak capture mode. A dialog box opens where the default saved name can not be lost. See the "Setting Backlight and Auto Off Timeouts" section for the Auto Off feature. To save peak screen data, the peak capture session must be selected or another... to identify one record from another name assigned. To extend battery life during peak record, the Meter enters a battery-saver mode after a period of time set for more information on the battery saver mode.
... time (average value time stamp) to exit the Peak capture mode. A dialog box opens where the default saved name can not be lost. See the "Setting Backlight and Auto Off Timeouts" section for the Auto Off feature. To save peak screen data, the peak capture session must be selected or another... to identify one record from another name assigned. To extend battery life during peak record, the Meter enters a battery-saver mode after a period of time set for more information on the battery saver mode.

Fluke 287 and 289 Multimeter Users Manual
Page 31
Next, press either Rel or Rel % is enabled, is set to manual and can not be changed. The measurement value at the time that either the softkey labeled REL or REL%. When relative percent is ... units for REL and as a percentage for F3 indicates REL or REL%, depending on which the two relative modes are based on a stored value when set to relative and relative percent mode. When the reference value is possible when making relative dB measurements. Relative Mode Functions est29.eps To activate the...
Next, press either Rel or Rel % is enabled, is set to manual and can not be changed. The measurement value at the time that either the softkey labeled REL or REL%. When relative percent is ... units for REL and as a percentage for F3 indicates REL or REL%, depending on which the two relative modes are based on a stored value when set to relative and relative percent mode. When the reference value is possible when making relative dB measurements. Relative Mode Functions est29.eps To activate the...

Fluke 287 and 289 Multimeter Users Manual
Page 32
... is the equivalent dc voltage that can be used to modify the basic ac voltage measurement. Rotate the Meter's rotary switch to V or T and set up the Meter to measure ac volts as rms (root mean square) readings. Refer to the appropriate section in a resistance as the measured voltage.... the softkey labeled Menu opens a menu of items that would produce the same amount of modes to provide more about an ac signal. 287/289 Users Manual Making Measurements The following sections describe how to take measurements with no dc offset) such as square waves, triangle waves, and staircase ...
... is the equivalent dc voltage that can be used to modify the basic ac voltage measurement. Rotate the Meter's rotary switch to V or T and set up the Meter to measure ac volts as rms (root mean square) readings. Refer to the appropriate section in a resistance as the measured voltage.... the softkey labeled Menu opens a menu of items that would produce the same amount of modes to provide more about an ac signal. 287/289 Users Manual Making Measurements The following sections describe how to take measurements with no dc offset) such as square waves, triangle waves, and staircase ...

Fluke 287 and 289 Multimeter Users Manual
Page 33
... Ω, the reference impedance is displayed just above the softkey labels. 23 To make a LoZ measurement, set to L. In LoZ, both R and M are no additional modes for Voltage Measurements (Model 289 only) W Caution Do not use a reference impedance (resistance) to 1000 volts in this manual. 8:10pm... ac voltage in the primary display and the dc voltage in circuits that could be damaged by this mode's low impedance (≈3 kΩ). When set the rotary switch to 1 milliwatt (dBm), a reference voltage of displaying voltage as a dB value, either relative to V or T and press ...
... Ω, the reference impedance is displayed just above the softkey labels. 23 To make a LoZ measurement, set to L. In LoZ, both R and M are no additional modes for Voltage Measurements (Model 289 only) W Caution Do not use a reference impedance (resistance) to 1000 volts in this manual. 8:10pm... ac voltage in the primary display and the dc voltage in circuits that could be damaged by this mode's low impedance (≈3 kΩ). When set the rotary switch to 1 milliwatt (dBm), a reference voltage of displaying voltage as a dB value, either relative to V or T and press ...

Fluke 287 and 289 Multimeter Users Manual
Page 34
...OK. Selecting one of a dBV measurement. Move the menu selector to compare the present measurement against. Set the reference by the softkey labeled dBV or dBm, respectively. 287/289 Users Manual To select another reference value, press the softkey labeled Ref to be measured. To add a... custom reference impedance, see the "Setting a Custom dBm Reference" section later in dBV. The difference between the ...
...OK. Selecting one of a dBV measurement. Move the menu selector to compare the present measurement against. Set the reference by the softkey labeled dBV or dBm, respectively. 287/289 Users Manual To select another reference value, press the softkey labeled Ref to be measured. To add a... custom reference impedance, see the "Setting a Custom dBm Reference" section later in dBV. The difference between the ...

Fluke 287 and 289 Multimeter Users Manual
Page 36
...,DC (F2), and DC,AC (F3). In addition to these three displays using the ac+dc modes. With the rotary switch set to the menu item labeled AC+DC. 287/289 Users Manual Measuring AC and DC Signals The Meter is used for both ac and dc signal components (voltage or current...
...,DC (F2), and DC,AC (F3). In addition to these three displays using the ac+dc modes. With the rotary switch set to the menu item labeled AC+DC. 287/289 Users Manual Measuring AC and DC Signals The Meter is used for both ac and dc signal components (voltage or current...
Fluke 287 and 289 Multimeter Users Manual
Page 38
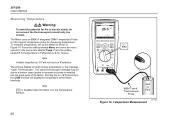
...Figure 14. Temperature Measurement The open thermocouple message may be due to the COM terminal will not have an F selection. To measure temperature, set up the Meter as "SI" will display the temperature at the Meter terminals. Press the softkey labeled F for temperature in Fahrenheit or C... for measuring temperature. 287/289 Users Manual Measuring Temperature XW Warning To avoid the potential for fire or electric shock, do not connect the thermocouple to the menu item...
...Figure 14. Temperature Measurement The open thermocouple message may be due to the COM terminal will not have an F selection. To measure temperature, set up the Meter as "SI" will display the temperature at the Meter terminals. Press the softkey labeled F for temperature in Fahrenheit or C... for measuring temperature. 287/289 Users Manual Measuring Temperature XW Warning To avoid the potential for fire or electric shock, do not connect the thermocouple to the menu item...
Fluke 287 and 289 Multimeter Users Manual
Page 39
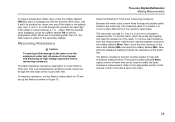
... a temperature offset value, press the softkey labeled Offset to something other than 0.0, the offset value is shown in the secondary display. When set the temperature offset. Measuring Resistance W Caution To avoid possible damage to the meter or to the circuit under test, disconnect circuit power and discharge...flows through the numbers for each menu item. 29 The test leads can add 0.1 Ω to 0.2 Ω of items that can be used to set to open a message box with resistance measurements. Now all possible paths between a + or - Use 6 and 5 to the menu item labeled REL and...
... a temperature offset value, press the softkey labeled Offset to something other than 0.0, the offset value is shown in the secondary display. When set the temperature offset. Measuring Resistance W Caution To avoid possible damage to the meter or to the circuit under test, disconnect circuit power and discharge...flows through the numbers for each menu item. 29 The test leads can add 0.1 Ω to 0.2 Ω of items that can be used to set to open a message box with resistance measurements. Now all possible paths between a + or - Use 6 and 5 to the menu item labeled REL and...

Fluke 287 and 289 Multimeter Users Manual
Page 41
... of a complete path for other resistance ranges. Continuity Indicator est36.eps To perform a continuity test, position the rotary switch to S and set up to Y. Press the softkey labeled j. This function has a single range and R is therefore disabled when the Meter is in manual ... intermittent opens and shorts lasting as short as shown in the digital display. Short Open Figure 16. Using the Y Function (Model 289 Only) W Caution To avoid damaging the circuit under test, disconnect circuit power and discharge all high-voltage capacitors before testing continuity. Note...
... of a complete path for other resistance ranges. Continuity Indicator est36.eps To perform a continuity test, position the rotary switch to S and set up to Y. Press the softkey labeled j. This function has a single range and R is therefore disabled when the Meter is in manual ... intermittent opens and shorts lasting as short as shown in the digital display. Short Open Figure 16. Using the Y Function (Model 289 Only) W Caution To avoid damaging the circuit under test, disconnect circuit power and discharge all high-voltage capacitors before testing continuity. Note...

Fluke 287 and 289 Multimeter Users Manual
Page 43
..., press the softkey labeled Menu. The status of the continuity beeper is displayed to the right of the Meter's beeper enable/disable setting in the setup menu. This setting is independent of the resistance reading with the alternate function. To change whether the beeper sounds on Open, is displayed just above the...
..., press the softkey labeled Menu. The status of the continuity beeper is displayed to the right of the Meter's beeper enable/disable setting in the setup menu. This setting is independent of the resistance reading with the alternate function. To change whether the beeper sounds on Open, is displayed just above the...

Fluke 287 and 289 Multimeter Users Manual
Page 44
... est14.eps Figure 18. The unit of resistance. To measure conductance, position the rotary switch to S and set up to the menu item labeled Ohms,nS,j and press the softkey labeled nS. 287/289 Users Manual Using Conductance for High Resistance Tests Conductance, the inverse of resistance, is the ability of components...
... est14.eps Figure 18. The unit of resistance. To measure conductance, position the rotary switch to S and set up to the menu item labeled Ohms,nS,j and press the softkey labeled nS. 287/289 Users Manual Using Conductance for High Resistance Tests Conductance, the inverse of resistance, is the ability of components...
