User Manual
Page 3
... 27 Connecting to an S-Video Video Source 28 Connecting to Go for Sound 29 Installing Batteries in the Remote Control 29 3 Rear ...13 Projector Parts - Contents Introduction to Your Projector ...7 Projector Features...7 Product Box Contents...8 Additional Components ...8 Optional Equipment and Replacement Parts 9 Warranty and Registration Information 10 Notations Used in the Documentation 10...
... 27 Connecting to an S-Video Video Source 28 Connecting to Go for Sound 29 Installing Batteries in the Remote Control 29 3 Rear ...13 Projector Parts - Contents Introduction to Your Projector ...7 Projector Features...7 Product Box Contents...8 Additional Components ...8 Optional Equipment and Replacement Parts 9 Warranty and Registration Information 10 Notations Used in the Documentation 10...

User Manual
Page 4
Opening the Lens Cover ...31 Using Basic Projector Features ...32 Turning On the Projector ...32 Turning Off the Projector ...34 Selecting the Language for the Projector Menus 36 Adjusting the Image Height ...36 Image Shape...38 Correcting Image Shape With the Keystone Buttons 38 Resizing the Image...39 ... the Color Mode...49 Available Color Modes...50 Turning On Auto Iris...51 Controlling the Volume With the Volume Buttons 51 Adjusting Projector Features ...53 Shutting Off the Picture and Sound Temporarily 53 Stopping Video Action Temporarily ...53 Zooming Into and Out of Images ...54...
Opening the Lens Cover ...31 Using Basic Projector Features ...32 Turning On the Projector ...32 Turning Off the Projector ...34 Selecting the Language for the Projector Menus 36 Adjusting the Image Height ...36 Image Shape...38 Correcting Image Shape With the Keystone Buttons 38 Resizing the Image...39 ... the Color Mode...49 Available Color Modes...50 Turning On Auto Iris...51 Controlling the Volume With the Volume Buttons 51 Adjusting Projector Features ...53 Shutting Off the Picture and Sound Temporarily 53 Stopping Video Action Temporarily ...53 Zooming Into and Out of Images ...54...
User Manual
Page 5
... Cable ...62 Adjusting the Menu Settings ...63 Using the Projector's Menus...63 Image Quality Settings - Reset Menu 74 Maintaining and Transporting the Projector 76 Projector Maintenance ...76 Cleaning the Lens...76 Cleaning the Projector Case...77 Air Filter and Vent Maintenance ...77 Cleaning the...81 Resetting the Lamp Timer...86 Replacing the Remote Control Batteries 87 Transporting the Projector...89 Solving Problems ...90 Projection Problem Tips ...90 Projector Light Status ...90 Using the Projector Help Displays ...93 Solving Image or Sound Problems ...93 Solutions When No Image ...
... Cable ...62 Adjusting the Menu Settings ...63 Using the Projector's Menus...63 Image Quality Settings - Reset Menu 74 Maintaining and Transporting the Projector 76 Projector Maintenance ...76 Cleaning the Lens...76 Cleaning the Projector Case...77 Air Filter and Vent Maintenance ...77 Cleaning the...81 Resetting the Lamp Timer...86 Replacing the Remote Control Batteries 87 Transporting the Projector...89 Solving Problems ...90 Projection Problem Tips ...90 Projector Light Status ...90 Using the Projector Help Displays ...93 Solving Image or Sound Problems ...93 Solutions When No Image ...
User Manual
Page 6
... Incorrect 99 Solutions When There is No Sound or Low Volume 100 Solving Projector or Remote Control Operation Problems 100 Solutions to Projector Power or Shut-Off Problems 100 Solutions to Problems With the Remote Control...to Get Help...102 Technical Specifications ...104 General Projector Specifications ...104 Projector Lamp Specifications...106 Remote Control Specifications ...107 Projector Dimension Specifications 107 Projector Electrical Specifications ...107 Projector Environmental Specifications 108 Projector Safety and Approvals Specifications 108 Supported Video Display Formats...
... Incorrect 99 Solutions When There is No Sound or Low Volume 100 Solving Projector or Remote Control Operation Problems 100 Solutions to Projector Power or Shut-Off Problems 100 Solutions to Problems With the Remote Control...to Get Help...102 Technical Specifications ...104 General Projector Specifications ...104 Projector Lamp Specifications...106 Remote Control Specifications ...107 Projector Dimension Specifications 107 Projector Electrical Specifications ...107 Projector Environmental Specifications 108 Projector Safety and Approvals Specifications 108 Supported Video Display Formats...
User Manual
Page 7
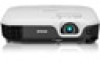
... of ownership with longer lamp life • 1.2× optical zoom ratio for improved zooming capability (VS310/VS315W) • Built-in closed captioning decoder • Epson Instant Off and Direct Power On features for Additional Information Projector Part Locations Projector Features The VS210, VS310, and VS315W projectors include these sections to Your Projector Related concepts Projector Part Locations 7
... of ownership with longer lamp life • 1.2× optical zoom ratio for improved zooming capability (VS310/VS315W) • Built-in closed captioning decoder • Epson Instant Off and Direct Power On features for Additional Information Projector Part Locations Projector Features The VS210, VS310, and VS315W projectors include these sections to Your Projector Related concepts Projector Part Locations 7
User Manual
Page 8
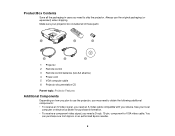
... Epson or an authorized Epson reseller. 8 Always use the projector, you may need to use the original packaging (or equivalent) when shipping. Product Box Contents Save all of these parts: 1 Projector 2 Remote control 3 Remote control batteries (two AA alkaline) 4 Power cord 5 VGA computer cable 6 Projector documentation CD Parent topic: Projector ... dealer for purchase information. • To receive a component video signal, you need a D-sub, 15-pin, component-to ship the projector. See your projector box included all the packaging in case you need to -VGA video cable.
... Epson or an authorized Epson reseller. 8 Always use the projector, you may need to use the original packaging (or equivalent) when shipping. Product Box Contents Save all of these parts: 1 Projector 2 Remote control 3 Remote control batteries (two AA alkaline) 4 Power cord 5 VGA computer cable 6 Projector documentation CD Parent topic: Projector ... dealer for purchase information. • To receive a component video signal, you need a D-sub, 15-pin, component-to ship the projector. See your projector box included all the packaging in case you need to -VGA video cable.
User Manual
Page 9
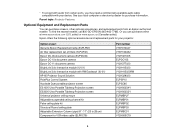
... screens, other optional accessories, and replacement parts from an Epson authorized reseller. ELPAF32) Epson DC-06 document camera (ELPDC06) Epson DC-10s document camera Epson DC-11 document camera BrightLink Solo interactive module (IU-01) BrightLink Solo interactive module with your projector: Option or part Genuine Epson Replacement lamp (ELPLP67) Air filter replacement set (2 filters; sales...
... screens, other optional accessories, and replacement parts from an Epson authorized reseller. ELPAF32) Epson DC-06 document camera (ELPDC06) Epson DC-10s document camera Epson DC-11 document camera BrightLink Solo interactive module (IU-01) BrightLink Solo interactive module with your projector: Option or part Genuine Epson Replacement lamp (ELPLP67) Air filter replacement set (2 filters; sales...
User Manual
Page 10
...injury. • Cautions must be repaired. Parent topic: Introduction to your equipment. • Notes contain important information about your projector. In addition, Epson offers free Extra Care Road Service. Depot Service 2-Year Extended Service Program - Depot Service 2-Year Extended Service Program - Register ...unit anywhere in these notations as you read your product online using the projector CD or at this site: www.epson.com/webreg Registering also lets you project with your projector. • Tips contain additional projection information. For details, see the warranty...
...injury. • Cautions must be repaired. Parent topic: Introduction to your equipment. • Notes contain important information about your projector. In addition, Epson offers free Extra Care Road Service. Depot Service 2-Year Extended Service Program - Depot Service 2-Year Extended Service Program - Register ...unit anywhere in these notations as you read your product online using the projector CD or at this site: www.epson.com/webreg Registering also lets you project with your projector. • Tips contain additional projection information. For details, see the warranty...

User Manual
Page 11
... - Remote Control Parent topic: Introduction to Get Help". Projector Parts - Control Panel Projector Parts - Rear Projector Parts - Here's where to look for Additional Information Need quick help fast. Base Projector Parts - Where to get quick solutions to common problems. • www.epson.com/support (U.S) or www.epson.ca/support (Canada) View FAQs (frequently asked questions) and...
... - Remote Control Parent topic: Introduction to Get Help". Projector Parts - Control Panel Projector Parts - Rear Projector Parts - Here's where to look for Additional Information Need quick help fast. Base Projector Parts - Where to get quick solutions to common problems. • www.epson.com/support (U.S) or www.epson.ca/support (Canada) View FAQs (frequently asked questions) and...
User Manual
Page 12
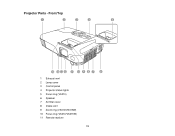
Projector Parts - Front/Top 1 Exhaust vent 2 Lamp cover 3 Control panel 4 Projector status lights 5 Focus ring (VS210) 6 Speaker 7 Air filter cover 8 Intake vent 9 Zoom ring (VS310/VS315W) 10 Focus ring (VS310/VS315W) 11 Remote receiver 12
Projector Parts - Front/Top 1 Exhaust vent 2 Lamp cover 3 Control panel 4 Projector status lights 5 Focus ring (VS210) 6 Speaker 7 Air filter cover 8 Intake vent 9 Zoom ring (VS310/VS315W) 10 Focus ring (VS310/VS315W) 11 Remote receiver 12
User Manual
Page 13
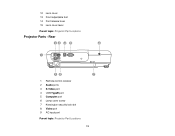
Rear 1 Remote control receiver 2 Audio ports 3 S-Video port 4 USB TypeB port 5 Computer port 6 Lamp cover screw 7 Kensington security lock slot 8 Video port 9 AC input port Parent topic: Projector Part Locations 13 12 Lens cover 13 Front adjustable foot 14 Foot release lever 15 Lens cover lever Parent topic: Projector Part Locations Projector Parts -
Rear 1 Remote control receiver 2 Audio ports 3 S-Video port 4 USB TypeB port 5 Computer port 6 Lamp cover screw 7 Kensington security lock slot 8 Video port 9 AC input port Parent topic: Projector Part Locations 13 12 Lens cover 13 Front adjustable foot 14 Foot release lever 15 Lens cover lever Parent topic: Projector Part Locations Projector Parts -
User Manual
Page 14
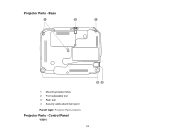
Projector Parts - Base 1 Mounting bracket holes 2 Front adjustable foot 3 Rear feet 4 Security cable attachment point Parent topic: Projector Part Locations Projector Parts - Control Panel VS210 14
Projector Parts - Base 1 Mounting bracket holes 2 Front adjustable foot 3 Rear feet 4 Security cable attachment point Parent topic: Projector Part Locations Projector Parts - Control Panel VS210 14

User Manual
Page 15
1 Power button 2 Source Search button (searches for connected sources) 3 Menu button (accesses projector menu system) 4 Enter button (selects options) 5 Wide/Tele buttons (adjust projected image size) and arrow buttons 6 Vertical keystone adjustment buttons (adjust screen shape) and arrow buttons 7 Esc button (cancels/exits functions) 8 Help button (accesses projector help information) VS310/VS315W 15
1 Power button 2 Source Search button (searches for connected sources) 3 Menu button (accesses projector menu system) 4 Enter button (selects options) 5 Wide/Tele buttons (adjust projected image size) and arrow buttons 6 Vertical keystone adjustment buttons (adjust screen shape) and arrow buttons 7 Esc button (cancels/exits functions) 8 Help button (accesses projector help information) VS310/VS315W 15

User Manual
Page 16
1 Power button 2 Source Search button (searches for connected sources) 3 Menu button (accesses projector menu system) 4 Enter button (selects options) 5 Volume control buttons and arrow buttons 6 Vertical keystone adjustment buttons (adjust screen shape) and arrow buttons 7 Esc button (cancels/exits functions) 8 Help button (accesses projector help information) Parent topic: Projector Part Locations Related references Projector Light Status 16
1 Power button 2 Source Search button (searches for connected sources) 3 Menu button (accesses projector menu system) 4 Enter button (selects options) 5 Volume control buttons and arrow buttons 6 Vertical keystone adjustment buttons (adjust screen shape) and arrow buttons 7 Esc button (cancels/exits functions) 8 Help button (accesses projector help information) Parent topic: Projector Part Locations Related references Projector Light Status 16

User Manual
Page 18
... functions) 10 Enter button (selects options and controls wireless mouse functions) 11 User button (customizable for connected sources) Parent topic: Projector Part Locations 18 2 Computer button (cycles through connected computer sources) 3 Video button (cycles through connected video sources) 4 Numeric buttons... (selects the image aspect ratio) 7 Num button (when held down, switches numeric buttons to number function) 8 Menu button (accesses projector menu system) 9 Arrow buttons (move through on -screen pointer) 19 Esc button (cancels/exits functions and controls wireless mouse functions) ...
... functions) 10 Enter button (selects options and controls wireless mouse functions) 11 User button (customizable for connected sources) Parent topic: Projector Part Locations 18 2 Computer button (cycles through connected computer sources) 3 Video button (cycles through connected video sources) 4 Numeric buttons... (selects the image aspect ratio) 7 Num button (when held down, switches numeric buttons to number function) 8 Menu button (accesses projector menu system) 9 Arrow buttons (move through on -screen pointer) 19 Esc button (cancels/exits functions and controls wireless mouse functions) ...
User Manual
Page 21
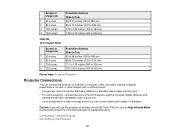
... cm) 21 Extended Menu Projection Distance The distance at which you place the projector from the screen, but can vary depending on the size of the image. The image size increases the farther the projector is from the screen determines the approximate size of the projected image. (Conversion... figures may have been rounded up or down.) VS210 4:3 Aspect Ratio Screen or image size 1 50 inches 2 80 inches 3 100 ...
... cm) 21 Extended Menu Projection Distance The distance at which you place the projector from the screen, but can vary depending on the size of the image. The image size increases the farther the projector is from the screen determines the approximate size of the projected image. (Conversion... figures may have been rounded up or down.) VS210 4:3 Aspect Ratio Screen or image size 1 50 inches 2 80 inches 3 100 ...
User Manual
Page 22
Caution: If you can connect audio input cables, if necessary. Connecting to Computer Sources Connecting to ensure the projector's internal temperature is regulated properly. Screen or image size 1 50 inches 2 80 inches 3 100 inches 4 150 inches Projection distance Wide to Tele 59 to...(225 to 270 cm) 111 to 133 inches (281 to 338 cm) 167 to 200 inches (424 to 509 cm) Parent topic: Projector Placement Projector Connections You can connect the projector to a variety of computer, video, and audio sources to display presentations, movies, or other images, with or without sound. • Connect...
Caution: If you can connect audio input cables, if necessary. Connecting to Computer Sources Connecting to ensure the projector's internal temperature is regulated properly. Screen or image size 1 50 inches 2 80 inches 3 100 inches 4 150 inches Projection distance Wide to Tele 59 to...(225 to 270 cm) 111 to 133 inches (281 to 338 cm) 167 to 200 inches (424 to 509 cm) Parent topic: Projector Placement Projector Connections You can connect the projector to a variety of computer, video, and audio sources to display presentations, movies, or other images, with or without sound. • Connect...

User Manual
Page 23
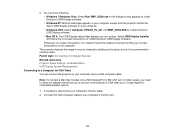
...Connecting to a Computer for VGA Video Connecting to a Computer for USB Mouse Control Connecting to a Computer for Sound Parent topic: Projector Connections Connecting to a Computer for USB Video and Audio If your computer meets the system requirements, you can send video and audio... output to your computer. 3. Parent topic: Setting Up the Projector Related references Projector Setup Settings - Connect the cable to the projector through the computer's USB port (preferably USB 2.0). Extended Menu Product Box Contents Connecting to Computer Sources ...
...Connecting to a Computer for VGA Video Connecting to a Computer for USB Mouse Control Connecting to a Computer for Sound Parent topic: Projector Connections Connecting to a Computer for USB Video and Audio If your computer meets the system requirements, you can send video and audio... output to your computer. 3. Parent topic: Setting Up the Projector Related references Projector Setup Settings - Connect the cable to the projector through the computer's USB port (preferably USB 2.0). Extended Menu Product Box Contents Connecting to Computer Sources ...
User Manual
Page 24
...'s monitor cable. 2. You need to obtain an adapter that appears to install the Epson USB Display software. • Windows XP: Wait as messages appear on your computer screen and the projector installs the Epson USB Display software on your computer. • Windows 2000: Select Computer, EPSON_PJ_UD, and...Do one of the following: • Windows 7/Windows Vista: Select Run EMP_UDSe.exe in the dialog box that allows you connect the projector to install the Epson USB Display software. Follow any on -screen instructions to the computer. Contact Apple for VGA Video You can connect the...
...'s monitor cable. 2. You need to obtain an adapter that appears to install the Epson USB Display software. • Windows XP: Wait as messages appear on your computer screen and the projector installs the Epson USB Display software on your computer. • Windows 2000: Select Computer, EPSON_PJ_UD, and...Do one of the following: • Windows 7/Windows Vista: Select Run EMP_UDSe.exe in the dialog box that allows you connect the projector to install the Epson USB Display software. Follow any on -screen instructions to the computer. Contact Apple for VGA Video You can connect the...

User Manual
Page 25
... using a USB cable, if it is not connected already. 1. Connect the USB cable to a Computer or USB TypeB port on the projector. 1 Computer port 4. 3. To do this, connect the projector to a Computer port on the projector, you control computer presentations at a distance from your computer. 25 Connect the other end to your... projector's USB TypeB port. 1 USB TypeB port 2. Connect the other end to act as a wireless mouse. This lets you can set up the remote control ...
... using a USB cable, if it is not connected already. 1. Connect the USB cable to a Computer or USB TypeB port on the projector. 1 Computer port 4. 3. To do this, connect the projector to a Computer port on the projector, you control computer presentations at a distance from your computer. 25 Connect the other end to your... projector's USB TypeB port. 1 USB TypeB port 2. Connect the other end to act as a wireless mouse. This lets you can set up the remote control ...


