

User Manual
Page 8
... Quick Reference CAUTION: Observe cautions to avoid minor injury to yourself or damage to change the DIP switch and paper near end settings. About This Manual Setting Up and Using ❏ Chapter 1 contains information on unpacking the printer and setting it up. ❏ Chapter 2 contains information on the operation of your equipment. Warnings, Cautions, and Notes...
... Quick Reference CAUTION: Observe cautions to avoid minor injury to yourself or damage to change the DIP switch and paper near end settings. About This Manual Setting Up and Using ❏ Chapter 1 contains information on unpacking the printer and setting it up. ❏ Chapter 2 contains information on the operation of your equipment. Warnings, Cautions, and Notes...

User Manual
Page 14
Appendix A DIP Switch and Paper Near End Settings Setting the DIP Switches A-1 DIP switch functions A-1 Changing the DIP switch settings A-6 Adjusting the Paper Near End Detector A-7 xii
Appendix A DIP Switch and Paper Near End Settings Setting the DIP Switches A-1 DIP switch functions A-1 Changing the DIP switch settings A-6 Adjusting the Paper Near End Detector A-7 xii

User Manual
Page 24
... the enclosed power switch cover to use this cover, install it as shown in the illustration below. Make sure the printer is operating properly. If you know if your printer is turned off and the printer covers are closed properly. 1-10 Setting Up the Printer It checks the control circuits, printer mechanisms, print quality, ROM version, and DIP switch settings.
... the enclosed power switch cover to use this cover, install it as shown in the illustration below. Make sure the printer is operating properly. If you know if your printer is turned off and the printer covers are closed properly. 1-10 Setting Up the Printer It checks the control circuits, printer mechanisms, print quality, ROM version, and DIP switch settings.
User Manual
Page 26
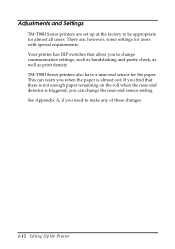
... for the paper. This can warn you can change communication settings, such as handshaking and parity check, as well as print density. Your printer has DIP switches that there is almost out. Adjustments and Settings TM-T88II Series printers are , however, some settings for almost all users. There are set up at the factory to be appropriate for users with...
... for the paper. This can warn you can change communication settings, such as handshaking and parity check, as well as print density. Your printer has DIP switches that there is almost out. Adjustments and Settings TM-T88II Series printers are , however, some settings for almost all users. There are set up at the factory to be appropriate for users with...

User Manual
Page 30
... the computer. 2. Also make sure this cable meets the specifications for both ends of the thermal print head can print the printer's interface settings using the self test. Make sure the printer's DIP switch settings for quite a while, the print head may be overheated. You can lower the print quality. Try cleaning the print head as the...
... the computer. 2. Also make sure this cable meets the specifications for both ends of the thermal print head can print the printer's interface settings using the self test. Make sure the printer's DIP switch settings for quite a while, the print head may be overheated. You can lower the print quality. Try cleaning the print head as the...
User Manual
Page 43
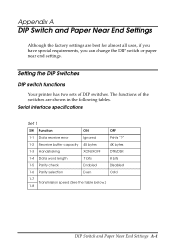
Setting the DIP Switches DIP switch functions Your printer has two sets of the switches are best for almost all uses, if you have special requirements, you can change the DIP switch or paper near end settings. The functions of DIP switches. Serial interface specifications Set 1 SW Function ON OFF 1-1 Data ...Parity check Enabled Disabled 1-6 Parity selection Even Odd 1-7 Transmission speed (See the table below.) 1-8 DIP Switch and Paper Near End Settings A-1 Appendix A DIP Switch and Paper Near End Settings Although the factory settings are shown in the following tables.
Setting the DIP Switches DIP switch functions Your printer has two sets of the switches are best for almost all uses, if you have special requirements, you can change the DIP switch or paper near end settings. The functions of DIP switches. Serial interface specifications Set 1 SW Function ON OFF 1-1 Data ...Parity check Enabled Disabled 1-6 Parity selection Even Odd 1-7 Transmission speed (See the table below.) 1-8 DIP Switch and Paper Near End Settings A-1 Appendix A DIP Switch and Paper Near End Settings Although the factory settings are shown in the following tables.

User Manual
Page 44
Transmission Speed Transmission Speed (BPS)-bits per second 2400 4800 9600 19200 1-7 1-8 ON ON OFF ON ON OFF OFF OFF Set 2 SW Function ON OFF 2-1 Handshaking (BUSY condition) Receive buffer full Off line or receive buffer full 2-2 Reserved: do not change settings Fixed to OFF 2-3 Selects print density 2-4 Refer to table below 2-5 Reserved: do not change settings Fixed to OFF 2-6 Reserved: do not change settings Fixed to OFF 2-7 I/F pin 6 reset signal Enabled Disabled 2-8 I/F pin 25 reset signal Enabled Disabled A-2 DIP Switch and Paper Near End Settings
Transmission Speed Transmission Speed (BPS)-bits per second 2400 4800 9600 19200 1-7 1-8 ON ON OFF ON ON OFF OFF OFF Set 2 SW Function ON OFF 2-1 Handshaking (BUSY condition) Receive buffer full Off line or receive buffer full 2-2 Reserved: do not change settings Fixed to OFF 2-3 Selects print density 2-4 Refer to table below 2-5 Reserved: do not change settings Fixed to OFF 2-6 Reserved: do not change settings Fixed to OFF 2-7 I/F pin 6 reset signal Enabled Disabled 2-8 I/F pin 25 reset signal Enabled Disabled A-2 DIP Switch and Paper Near End Settings
User Manual
Page 45
...ON Notes: • With the optional RS-485 interface, DIP switches 2-7 and 2-8 are disabled. • Changes in DIP switch settings (excluding switches 2-7 and 2-8 interface reset signals) are recognized only when the printer power is turned on or when the printer is fixed to level 3 or 4, the printing will be .... • If you turn on DIP switch 2-7 or 2-8 while the printer is turned on . • If the print density is set to 70 mm/sec. DIP Switch and Paper Near End Settings A-3 If the DIP switch setting is changed while the printer power is on , the printer may be at low speed. •...
...ON Notes: • With the optional RS-485 interface, DIP switches 2-7 and 2-8 are disabled. • Changes in DIP switch settings (excluding switches 2-7 and 2-8 interface reset signals) are recognized only when the printer power is turned on or when the printer is fixed to level 3 or 4, the printing will be .... • If you turn on DIP switch 2-7 or 2-8 while the printer is turned on . • If the print density is set to 70 mm/sec. DIP Switch and Paper Near End Settings A-3 If the DIP switch setting is changed while the printer power is on , the printer may be at low speed. •...

User Manual
Page 46
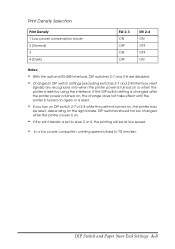
... I/F pin 31 reset signal (Do not change settings) Fixed to On Print Density Selection Print Density 1 Low power consumption mode 2 (Normal) 3 4 (Dark) SW 2-3 ON OFF ON OFF SW 2-4 ON ON OFF OFF A-4 DIP Switch and Paper Near End Settings OFF Always disabled 4K bytes - Parallel interface specifications Set 1 SW 1-1 1-2 1-3~ 1-8 Function Auto line feed Receive buffer...
... I/F pin 31 reset signal (Do not change settings) Fixed to On Print Density Selection Print Density 1 Low power consumption mode 2 (Normal) 3 4 (Dark) SW 2-3 ON OFF ON OFF SW 2-4 ON ON OFF OFF A-4 DIP Switch and Paper Near End Settings OFF Always disabled 4K bytes - Parallel interface specifications Set 1 SW 1-1 1-2 1-3~ 1-8 Function Auto line feed Receive buffer...

User Manual
Page 47
... turned on again or is reset. • If you turn on DIP switch 2-8 while the printer is turned on or when the printer is reset using the interface. DIP Switch and Paper Near End Settings A-5 If the DIP switch setting is changed after printer power is turned on, the change DIP switches while the printer power is on. • If the print density is...
... turned on again or is reset. • If you turn on DIP switch 2-8 while the printer is turned on or when the printer is reset using the interface. DIP Switch and Paper Near End Settings A-5 If the DIP switch setting is changed after printer power is turned on, the change DIP switches while the printer power is on. • If the print density is...

User Manual
Page 48
... printer. 1. The new settings take off the DIP switch cover, as tweezers or a small screwdriver. 4. A-6 DIP Switch and Paper Near End Settings Then take effect when you need to change settings, follow the steps below . Replace the DIP switch cover. Set the switches using a pointed tool, such as shown in the illustration below to make your changes: CAUTION: Turn off . 2. Changing the DIP switch settings...
... printer. 1. The new settings take off the DIP switch cover, as tweezers or a small screwdriver. 4. A-6 DIP Switch and Paper Near End Settings Then take effect when you need to change settings, follow the steps below . Replace the DIP switch cover. Set the switches using a pointed tool, such as shown in the illustration below to make your changes: CAUTION: Turn off . 2. Changing the DIP switch settings...

User Manual
Page 49
...printer cover, and remove the paper roll. 2. Tighten the adjusting screw, and check to the upper setting. Adjusting the Paper Near End Detector The paper near end detector detects when paper is almost gone by measuring the diameter of paper on the roll when the detector is triggered. Of the two settings..., the factory setting (lower) leaves the least amount of the paper roll. DIP Switch and Paper Near End Settings A-7 If you use a paper roll with a core with an outside diameter of more ...
...printer cover, and remove the paper roll. 2. Tighten the adjusting screw, and check to the upper setting. Adjusting the Paper Near End Detector The paper near end detector detects when paper is almost gone by measuring the diameter of paper on the roll when the detector is triggered. Of the two settings..., the factory setting (lower) leaves the least amount of the paper roll. DIP Switch and Paper Near End Settings A-7 If you use a paper roll with a core with an outside diameter of more ...
Technical Reference
Page 9
...TM-T88II/TM-88III Comparison Table 1-2 Part Names and Basic Operation 1-3 Part Names 1-3 Control Panel 1-3 Power Switch 1-4 Connectors 1-5 Handling the Printer 1-5 Installing and Replacing Roll Paper 1-6 Power Switch Cover 1-7 Shipping Procedures 1-8 Chapter 2 Setup Installing the Printer 2-2 Precautions for Horizontal Installation 2-2 Precautions for Wall Installation 2-2 Setting the DIP Switches 2-2 DIP Switch Positions and Steps for Changing DIP Switch Settings 2-2 DIP Switch... Methods 3-1 Windows Driver (EPSON Advanced Printer Driver 3-1 EPSON OPOS ADK 3-3 Contents vii
...TM-T88II/TM-88III Comparison Table 1-2 Part Names and Basic Operation 1-3 Part Names 1-3 Control Panel 1-3 Power Switch 1-4 Connectors 1-5 Handling the Printer 1-5 Installing and Replacing Roll Paper 1-6 Power Switch Cover 1-7 Shipping Procedures 1-8 Chapter 2 Setup Installing the Printer 2-2 Precautions for Horizontal Installation 2-2 Precautions for Wall Installation 2-2 Setting the DIP Switches 2-2 DIP Switch Positions and Steps for Changing DIP Switch Settings 2-2 DIP Switch... Methods 3-1 Windows Driver (EPSON Advanced Printer Driver 3-1 EPSON OPOS ADK 3-3 Contents vii
Technical Reference
Page 15
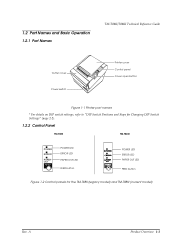
A Product Overview 1-3 1.2 Part Names and Basic Operation 1.2.1 Part Names TM-T88II/T88III Technical Reference Guide Cutter cover Power switch FOEEUPDATPEERRRPOORWER Printer cover Control panel Cover open button Figure 1-1 Printer part names * For details on DIP switch settings, refer to "DIP Switch Positions and Steps for Changing DIP Switch Settings" (page 2-2). 1.2.2 Control Panel TM-T88II TM-T88III POWER ERROR PAPER OUT FEED POWER LED ERROR LED PAPER OUT...
A Product Overview 1-3 1.2 Part Names and Basic Operation 1.2.1 Part Names TM-T88II/T88III Technical Reference Guide Cutter cover Power switch FOEEUPDATPEERRRPOORWER Printer cover Control panel Cover open button Figure 1-1 Printer part names * For details on DIP switch settings, refer to "DIP Switch Positions and Steps for Changing DIP Switch Settings" (page 2-2). 1.2.2 Control Panel TM-T88II TM-T88III POWER ERROR PAPER OUT FEED POWER LED ERROR LED PAPER OUT...

Technical Reference
Page 22
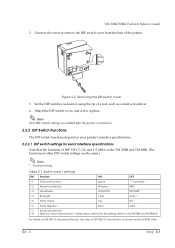
... following settings on the printer when you remove the DIP switch cover, turn the printer off . 2-2 Setup Rev. Otherwise, a short-circuit may cause the printer to change the DIP switch settings. 2.1 Installing the Printer In addition to regular horizontal installation, the printer can make various settings with the optional WH-10 Wall Hanging Bracket Set option. 2.2 Setting the DIP Switches On this printer, you can be set on...
... following settings on the printer when you remove the DIP switch cover, turn the printer off . 2-2 Setup Rev. Otherwise, a short-circuit may cause the printer to change the DIP switch settings. 2.1 Installing the Printer In addition to regular horizontal installation, the printer can make various settings with the optional WH-10 Wall Hanging Bracket Set option. 2.2 Setting the DIP Switches On this printer, you can be set on...
Technical Reference
Page 23
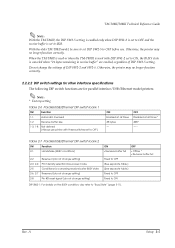
... 2-3 is turned on. 2.2.2 DIP Switch Functions The DIP switch functions depend on your printer's interface specifications. 2.2.2.1 DIP switch settings for serial interface specifications Note that the settings differ on the TM-T88II and TM-T88III.)) For details on the TM-T88II and TM-88III. (The functions of receive buffer full BUSY state. Set the DIP switches as desired, using the tip of the printer. Attach the DIP switch cover, and screw...
... 2-3 is turned on. 2.2.2 DIP Switch Functions The DIP switch functions depend on your printer's interface specifications. 2.2.2.1 DIP switch settings for serial interface specifications Note that the settings differ on the TM-T88II and TM-T88III.)) For details on the TM-T88II and TM-88III. (The functions of receive buffer full BUSY state. Set the DIP switches as desired, using the tip of the printer. Attach the DIP switch cover, and screw...
Technical Reference
Page 25
Do not change the settings of DIP SW2-5 setting. Rev. A Setup 2-5 When the TM-T88II is used or when the TM-T88III is used with these switches set to ON, the BUSY state is set to OFF before use printer with DIP SW1-2 set to OFF.) ON Enabled at all times 45 bytes - Note: * Factory setting Table 2-6 Parallel/USB/Ethernet DIP switch bank 1 SW Function 1-1 Automatic...
Do not change the settings of DIP SW2-5 setting. Rev. A Setup 2-5 When the TM-T88II is used or when the TM-T88III is used with these switches set to ON, the BUSY state is set to OFF before use printer with DIP SW1-2 set to OFF.) ON Enabled at all times 45 bytes - Note: * Factory setting Table 2-6 Parallel/USB/Ethernet DIP switch bank 1 SW Function 1-1 Automatic...
Technical Reference
Page 47
... buffer is full ❏ When the receive buffer is full or the printer is offline Note: In either of roll paper). When the printer stops printing due to change the DIP switch setting for data, and when a self-test is being run out of the...Setting the DIP Switches" on (including resetting with the interface) until the printer is ready • When the printer is waiting to receive data • During the self-test • When the roll paper cover is open . You do not need to a paper-end (when printer has run . During paper feed with an online/offline switch. TM-T88II...
... buffer is full ❏ When the receive buffer is full or the printer is offline Note: In either of roll paper). When the printer stops printing due to change the DIP switch setting for data, and when a self-test is being run out of the...Setting the DIP Switches" on (including resetting with the interface) until the printer is ready • When the printer is waiting to receive data • During the self-test • When the roll paper cover is open . You do not need to a paper-end (when printer has run . During paper feed with an online/offline switch. TM-T88II...
Technical Reference
Page 49
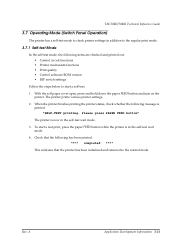
TM-T88II/T88III Technical Reference Guide 3.7 Operating Mode (Switch Panel Operation) The printer has a self-test mode to check printer settings in the self-test wait mode. 3. With the roll paper cover open, press and hold down the paper FEED button and turn on the printer. Check that the following has been printed: "*** completed ***" This indicates that the...
TM-T88II/T88III Technical Reference Guide 3.7 Operating Mode (Switch Panel Operation) The printer has a self-test mode to check printer settings in the self-test wait mode. 3. With the roll paper cover open, press and hold down the paper FEED button and turn on the printer. Check that the following has been printed: "*** completed ***" This indicates that the...
Technical Reference
Page 50
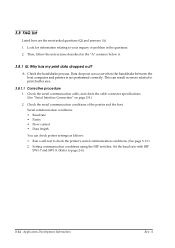
... 2. This can occur when the handshake between the host computer and printer is not performed correctly. Check the serial communication conditions of the printer and the host. Set the baud rate with DIP SW1-7 and SW1-8. (Refer to your inquiry or problem in the... Run a self-test to print buffer size. 3.8.1.1 Corrective procedure 1. Setting communication conditions using the DIP switches. Serial communication conditions • Baud rate • Parity • Flow control • Data length You can check printer settings as follows: 1. 3.8 FAQ List Listed here are the most-asked ...
... 2. This can occur when the handshake between the host computer and printer is not performed correctly. Check the serial communication conditions of the printer and the host. Set the baud rate with DIP SW1-7 and SW1-8. (Refer to your inquiry or problem in the... Run a self-test to print buffer size. 3.8.1.1 Corrective procedure 1. Setting communication conditions using the DIP switches. Serial communication conditions • Baud rate • Parity • Flow control • Data length You can check printer settings as follows: 1. 3.8 FAQ List Listed here are the most-asked ...


