

User Manual
Page 8
... injury to yourself or damage to change the DIP switch and paper near end settings. Note: Notes have important information and useful tips on using the printer. ❏ Chapter 3 contains troubleshooting information. About This Manual Setting Up and Using ❏ Chapter 1 contains information on unpacking the printer and setting it up. ❏ Chapter 2 contains information on the...
... injury to yourself or damage to change the DIP switch and paper near end settings. Note: Notes have important information and useful tips on using the printer. ❏ Chapter 3 contains troubleshooting information. About This Manual Setting Up and Using ❏ Chapter 1 contains information on unpacking the printer and setting it up. ❏ Chapter 2 contains information on the...

User Manual
Page 14
Appendix A DIP Switch and Paper Near End Settings Setting the DIP Switches A-1 DIP switch functions A-1 Changing the DIP switch settings A-6 Adjusting the Paper Near End Detector A-7 xii
Appendix A DIP Switch and Paper Near End Settings Setting the DIP Switches A-1 DIP switch functions A-1 Changing the DIP switch settings A-6 Adjusting the Paper Near End Detector A-7 xii

User Manual
Page 24
... independent of any other equipment or software. If you know if your printer is turned off and the printer covers are closed properly. 1-10 Setting Up the Printer Running the self test 1. It checks the control circuits, printer mechanisms, print quality, ROM version, and DIP switch settings. This test is attached, unplug the power supply cord from the...
... independent of any other equipment or software. If you know if your printer is turned off and the printer covers are closed properly. 1-10 Setting Up the Printer Running the self test 1. It checks the control circuits, printer mechanisms, print quality, ROM version, and DIP switch settings. This test is attached, unplug the power supply cord from the...
User Manual
Page 26
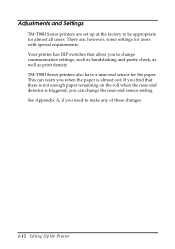
... for the paper. There are set up at the factory to make any of these changes. 1-12 Setting Up the Printer See Appendix A, if you to change the near-end sensor setting. Your printer has DIP switches that there is almost out. If... you find that allow you need to be appropriate for users with special requirements. This can warn you can change communication settings, such as handshaking and parity check, as well as print density. Adjustments and Settings TM-T88II Series printers are , however, some settings...
... for the paper. There are set up at the factory to make any of these changes. 1-12 Setting Up the Printer See Appendix A, if you to change the near-end sensor setting. Your printer has DIP switches that there is almost out. If... you find that allow you need to be appropriate for users with special requirements. This can warn you can change communication settings, such as handshaking and parity check, as well as print density. Adjustments and Settings TM-T88II Series printers are , however, some settings...

User Manual
Page 30
... does not print, contact your dealer or a qualified service person. The data transmission settings may be different between the printer and the computer. Make sure the printer's DIP switch settings for both ends of the thermal print head can print the printer's interface settings using the self test. Paper dust on after about 10 seconds. Printing is overheated, the...
... does not print, contact your dealer or a qualified service person. The data transmission settings may be different between the printer and the computer. Make sure the printer's DIP switch settings for both ends of the thermal print head can print the printer's interface settings using the self test. Paper dust on after about 10 seconds. Printing is overheated, the...
User Manual
Page 43
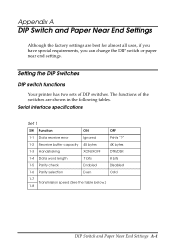
... Enabled Disabled 1-6 Parity selection Even Odd 1-7 Transmission speed (See the table below.) 1-8 DIP Switch and Paper Near End Settings A-1 Appendix A DIP Switch and Paper Near End Settings Although the factory settings are shown in the following tables. Setting the DIP Switches DIP switch functions Your printer has two sets of the switches are best for almost all uses, if you have special requirements, you can...
... Enabled Disabled 1-6 Parity selection Even Odd 1-7 Transmission speed (See the table below.) 1-8 DIP Switch and Paper Near End Settings A-1 Appendix A DIP Switch and Paper Near End Settings Although the factory settings are shown in the following tables. Setting the DIP Switches DIP switch functions Your printer has two sets of the switches are best for almost all uses, if you have special requirements, you can...

User Manual
Page 44
Transmission Speed Transmission Speed (BPS)-bits per second 2400 4800 9600 19200 1-7 1-8 ON ON OFF ON ON OFF OFF OFF Set 2 SW Function ON OFF 2-1 Handshaking (BUSY condition) Receive buffer full Off line or receive buffer full 2-2 Reserved: do not change settings Fixed to OFF 2-3 Selects print density 2-4 Refer to table below 2-5 Reserved: do not change settings Fixed to OFF 2-6 Reserved: do not change settings Fixed to OFF 2-7 I/F pin 6 reset signal Enabled Disabled 2-8 I/F pin 25 reset signal Enabled Disabled A-2 DIP Switch and Paper Near End Settings
Transmission Speed Transmission Speed (BPS)-bits per second 2400 4800 9600 19200 1-7 1-8 ON ON OFF ON ON OFF OFF OFF Set 2 SW Function ON OFF 2-1 Handshaking (BUSY condition) Receive buffer full Off line or receive buffer full 2-2 Reserved: do not change settings Fixed to OFF 2-3 Selects print density 2-4 Refer to table below 2-5 Reserved: do not change settings Fixed to OFF 2-6 Reserved: do not change settings Fixed to OFF 2-7 I/F pin 6 reset signal Enabled Disabled 2-8 I/F pin 25 reset signal Enabled Disabled A-2 DIP Switch and Paper Near End Settings
User Manual
Page 45
... optional RS-485 interface, DIP switches 2-7 and 2-8 are disabled. • Changes in DIP switch settings (excluding switches 2-7 and 2-8 interface reset signals) are recognized only when the printer power is turned on or when the printer is turned on, the printer may be reset, depending on the signal state. If the DIP switch setting is changed after the printer power is turned on, the...
... optional RS-485 interface, DIP switches 2-7 and 2-8 are disabled. • Changes in DIP switch settings (excluding switches 2-7 and 2-8 interface reset signals) are recognized only when the printer power is turned on or when the printer is turned on, the printer may be reset, depending on the signal state. If the DIP switch setting is changed after the printer power is turned on, the...

User Manual
Page 46
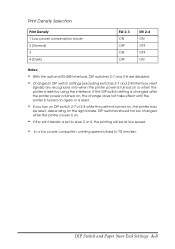
... I/F pin 31 reset signal (Do not change settings) Fixed to On Print Density Selection Print Density 1 Low power consumption mode 2 (Normal) 3 4 (Dark) SW 2-3 ON OFF ON OFF SW 2-4 ON ON OFF OFF A-4 DIP Switch and Paper Near End Settings OFF Always disabled 4K bytes - Parallel interface specifications Set 1 SW 1-1 1-2 1-3~ 1-8 Function Auto line feed Receive buffer...
... I/F pin 31 reset signal (Do not change settings) Fixed to On Print Density Selection Print Density 1 Low power consumption mode 2 (Normal) 3 4 (Dark) SW 2-3 ON OFF ON OFF SW 2-4 ON ON OFF OFF A-4 DIP Switch and Paper Near End Settings OFF Always disabled 4K bytes - Parallel interface specifications Set 1 SW 1-1 1-2 1-3~ 1-8 Function Auto line feed Receive buffer...

User Manual
Page 47
... reset using the interface. Notes: • Changes in DIP switch settings (excluding switch 2-8 interface reset signal) are recognized only when printer power is turned on or when the printer is fixed to 70 mm/sec. If the DIP switch setting is changed after printer power is turned on, the change DIP switches while the printer power is on. • If the print density...
... reset using the interface. Notes: • Changes in DIP switch settings (excluding switch 2-8 interface reset signal) are recognized only when printer power is turned on or when the printer is fixed to 70 mm/sec. If the DIP switch setting is changed after printer power is turned on, the change DIP switches while the printer power is on. • If the print density...

User Manual
Page 48
... effect when you need to change settings, follow the steps below . Then secure it with the screw. Replace the DIP switch cover. Make sure the printer is turned off the printer before removing the DIP switch cover to prevent an electric short, which can damage the printer. 1. Changing the DIP switch settings If you turn on the printer. A-6 DIP Switch and Paper Near End...
... effect when you need to change settings, follow the steps below . Then secure it with the screw. Replace the DIP switch cover. Make sure the printer is turned off the printer before removing the DIP switch cover to prevent an electric short, which can damage the printer. 1. Changing the DIP switch settings If you turn on the printer. A-6 DIP Switch and Paper Near End...

User Manual
Page 49
...near end detector detects when paper is almost gone by measuring the diameter of 12 mm (0.47"). Open the printer cover, and remove the paper roll. 2. The detector has two settings. Note: The factory setting is based on a paper roll core with an outside diameter of 18 mm (0.71") and an inside ...) leaves the least amount of more paper left on the roll when the sensor is triggered. Replace the paper roll. DIP Switch and Paper Near End Settings A-7 If you use a paper roll with a core with an outside diameter of paper on the roll when the detector is triggered. If you want ...
...near end detector detects when paper is almost gone by measuring the diameter of 12 mm (0.47"). Open the printer cover, and remove the paper roll. 2. The detector has two settings. Note: The factory setting is based on a paper roll core with an outside diameter of 18 mm (0.71") and an inside ...) leaves the least amount of more paper left on the roll when the sensor is triggered. Replace the paper roll. DIP Switch and Paper Near End Settings A-7 If you use a paper roll with a core with an outside diameter of paper on the roll when the detector is triggered. If you want ...
Technical Reference
Page 9
...TM-T88II/TM-88III Comparison Table 1-2 Part Names and Basic Operation 1-3 Part Names 1-3 Control Panel 1-3 Power Switch 1-4 Connectors 1-5 Handling the Printer 1-5 Installing and Replacing Roll Paper 1-6 Power Switch Cover 1-7 Shipping Procedures 1-8 Chapter 2 Setup Installing the Printer 2-2 Precautions for Horizontal Installation 2-2 Precautions for Wall Installation 2-2 Setting the DIP Switches 2-2 DIP Switch Positions and Steps for Changing DIP Switch Settings 2-2 DIP Switch... Methods 3-1 Windows Driver (EPSON Advanced Printer Driver 3-1 EPSON OPOS ADK 3-3 Contents vii
...TM-T88II/TM-88III Comparison Table 1-2 Part Names and Basic Operation 1-3 Part Names 1-3 Control Panel 1-3 Power Switch 1-4 Connectors 1-5 Handling the Printer 1-5 Installing and Replacing Roll Paper 1-6 Power Switch Cover 1-7 Shipping Procedures 1-8 Chapter 2 Setup Installing the Printer 2-2 Precautions for Horizontal Installation 2-2 Precautions for Wall Installation 2-2 Setting the DIP Switches 2-2 DIP Switch Positions and Steps for Changing DIP Switch Settings 2-2 DIP Switch... Methods 3-1 Windows Driver (EPSON Advanced Printer Driver 3-1 EPSON OPOS ADK 3-3 Contents vii
Technical Reference
Page 15
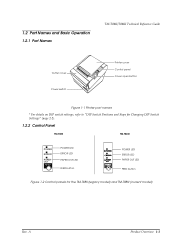
1.2 Part Names and Basic Operation 1.2.1 Part Names TM-T88II/T88III Technical Reference Guide Cutter cover Power switch FOEEUPDATPEERRRPOORWER Printer cover Control panel Cover open button Figure 1-1 Printer part names * For details on DIP switch settings, refer to "DIP Switch Positions and Steps for Changing DIP Switch Settings" (page 2-2). 1.2.2 Control Panel TM-T88II TM-T88III POWER ERROR PAPER OUT FEED POWER LED ERROR LED PAPER OUT LED FEED...
1.2 Part Names and Basic Operation 1.2.1 Part Names TM-T88II/T88III Technical Reference Guide Cutter cover Power switch FOEEUPDATPEERRRPOORWER Printer cover Control panel Cover open button Figure 1-1 Printer part names * For details on DIP switch settings, refer to "DIP Switch Positions and Steps for Changing DIP Switch Settings" (page 2-2). 1.2.2 Control Panel TM-T88II TM-T88III POWER ERROR PAPER OUT FEED POWER LED ERROR LED PAPER OUT LED FEED...

Technical Reference
Page 22
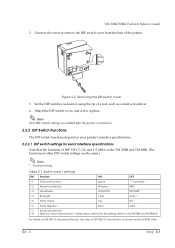
... the installation manual provided with the optional WH-10 Wall Hanging Bracket Set option. 2.2 Setting the DIP Switches On this printer, you remove the DIP switch cover, turn the printer off . 2-2 Setup Rev. For details, refer to change the DIP switch settings. Make sure the power supply for the printer is not exposed to strong impact during operation. ❏ Avoid placing the...
... the installation manual provided with the optional WH-10 Wall Hanging Bracket Set option. 2.2 Setting the DIP Switches On this printer, you remove the DIP switch cover, turn the printer off . 2-2 Setup Rev. For details, refer to change the DIP switch settings. Make sure the power supply for the printer is not exposed to strong impact during operation. ❏ Avoid placing the...
Technical Reference
Page 23
... other DIP switch settings are the same.) Note: * Factory setting Table 2-1 Switch bank 1 settings SW Function ON OFF 1-1 Data receive error Ignore "?" is turned on. 2.2.2 DIP Switch Functions The DIP switch functions depend on your printer's interface specifications. 2.2.2.1 DIP switch settings for serial interface specifications Note that the settings differ on the TM-T88II and TM-T88III.)) For details on the TM-T88II and TM-88III. (The functions of the printer. Set the DIP switches...
... other DIP switch settings are the same.) Note: * Factory setting Table 2-1 Switch bank 1 settings SW Function ON OFF 1-1 Data receive error Ignore "?" is turned on. 2.2.2 DIP Switch Functions The DIP switch functions depend on your printer's interface specifications. 2.2.2.1 DIP switch settings for serial interface specifications Note that the settings differ on the TM-T88II and TM-T88III.)) For details on the TM-T88II and TM-88III. (The functions of the printer. Set the DIP switches...
Technical Reference
Page 25
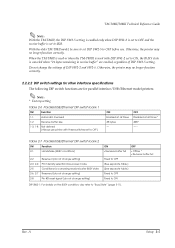
... refer to "Busy State" (page 3-11). Otherwise, the printer may no longer function correctly. 2.2.2.2 DIP switch settings for other interface specifications The following DIP switch functions are reached, regardless of DIP SW2-2 and SW2-6. TM-T88II/T88III Technical Reference Guide Note: With the TM-T88III, the DIP SW2-5 setting is enabled only when DIP SW1-2 is set to OFF and the receive buffer is...
... refer to "Busy State" (page 3-11). Otherwise, the printer may no longer function correctly. 2.2.2.2 DIP switch settings for other interface specifications The following DIP switch functions are reached, regardless of DIP SW2-2 and SW2-6. TM-T88II/T88III Technical Reference Guide Note: With the TM-T88III, the DIP SW2-5 setting is enabled only when DIP SW1-2 is set to OFF and the receive buffer is...
Technical Reference
Page 47
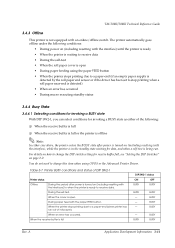
...set to receive data • During the self-test • When the roll paper cover is open . When an error has occurred. TM-T88II/T88III Technical Reference Guide 3.4.3 Offline This printer is not equipped with the interface) to when the printer is ready to receive data. For details on (including resetting with an online/offline switch.... A Application Development Information 3-11 You do not need to a paper-end (when printer has run . When the printer stops printing due to change the DIP switch setting for data, and when a self-test is turned on page 2-2. BUSY BUSY BUSY ...
...set to receive data • During the self-test • When the roll paper cover is open . When an error has occurred. TM-T88II/T88III Technical Reference Guide 3.4.3 Offline This printer is not equipped with the interface) to when the printer is ready to receive data. For details on (including resetting with an online/offline switch.... A Application Development Information 3-11 You do not need to a paper-end (when printer has run . When the printer stops printing due to change the DIP switch setting for data, and when a self-test is turned on page 2-2. BUSY BUSY BUSY ...
Technical Reference
Page 49
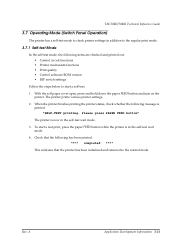
...3-13 The printer prints various printer settings. 2. To start a self-test: 1. TM-T88II/T88III Technical Reference Guide 3.7 Operating Mode (Switch Panel Operation) The printer has a self-test mode to check printer settings in the self-test wait mode. 4. Please press PAPER FEED button" The printer is in ... items are checked and printed out: • Control circuit functions • Printer mechanism functions • Print quality • Control software ROM version • DIP switch settings Follow the steps below to the normal mode. Check that the following message...
...3-13 The printer prints various printer settings. 2. To start a self-test: 1. TM-T88II/T88III Technical Reference Guide 3.7 Operating Mode (Switch Panel Operation) The printer has a self-test mode to check printer settings in the self-test wait mode. 4. Please press PAPER FEED button" The printer is in ... items are checked and printed out: • Control circuit functions • Printer mechanism functions • Print quality • Control software ROM version • DIP switch settings Follow the steps below to the normal mode. Check that the following message...
Technical Reference
Page 50
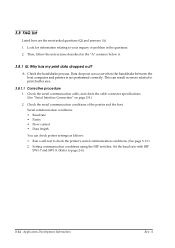
...-test to page 2-4.) 3-14 Application Development Information Rev. A Look for information relating to print buffer size. 3.8.1.1 Corrective procedure 1. Setting communication conditions using the DIP switches. Set the baud rate with DIP SW1-7 and SW1-8. (Refer to check the printer's serial communication conditions. (See page 3-13.) 2. A: Check the handshake process. Check the serial communication conditions of the...
...-test to page 2-4.) 3-14 Application Development Information Rev. A Look for information relating to print buffer size. 3.8.1.1 Corrective procedure 1. Setting communication conditions using the DIP switches. Set the baud rate with DIP SW1-7 and SW1-8. (Refer to check the printer's serial communication conditions. (See page 3-13.) 2. A: Check the handshake process. Check the serial communication conditions of the...


