

User Manual
Page 2
Printer Parts and Labels Cutter cover Printer cover FOEEUPDTAPEERRRPOORWER Control panel POWER ERROR PAPER OUT FFEEEEDD Cover open button Caution Labels Labels CAUTION: Thermal head is hot. ATTENTION: La téte thermique est chaude. Label inside cutter section Label inside printer cover Caution label above for the drawer kick-out connector. VORSICHT: Der Thermalkopf ist heiß.
Printer Parts and Labels Cutter cover Printer cover FOEEUPDTAPEERRRPOORWER Control panel POWER ERROR PAPER OUT FFEEEEDD Cover open button Caution Labels Labels CAUTION: Thermal head is hot. ATTENTION: La téte thermique est chaude. Label inside cutter section Label inside printer cover Caution label above for the drawer kick-out connector. VORSICHT: Der Thermalkopf ist heiß.

User Manual
Page 3
For a complete listing of this Operator's Manual. Installing and Replacing Paper page 1-7 How to order paper. Printer Parts and Labels inside front cover Ordering Paper page ix Where to load or change the paper roll. Solving Problems page 3-1 How to set up the printer. Setting Up the Printer page 1-1 How to correct problems. i Quick Reference This Quick Reference will direct you to key areas of topics, see the Contents.
For a complete listing of this Operator's Manual. Installing and Replacing Paper page 1-7 How to order paper. Printer Parts and Labels inside front cover Ordering Paper page ix Where to load or change the paper roll. Solving Problems page 3-1 How to set up the printer. Setting Up the Printer page 1-1 How to correct problems. i Quick Reference This Quick Reference will direct you to key areas of topics, see the Contents.

User Manual
Page 4
... damages resulting from the use of any options or any damages or problems arising from the use of Seiko Epson Corporation. ii No part of this publication may be liable to this book, Seiko Epson Corporation assumes no responsibility for errors or omissions. No patent liability is any liability assumed for damages, losses...
... damages resulting from the use of any options or any damages or problems arising from the use of Seiko Epson Corporation. ii No part of this publication may be liable to this book, Seiko Epson Corporation assumes no responsibility for errors or omissions. No patent liability is any liability assumed for damages, losses...

User Manual
Page 6
... This Class A digital apparatus complies with the instruction manual, may cause harmful interference to radio communications. CE Marking The printer conforms to the following Directives and Norms Directive 89/336/EEC EN 55022 Class B EN 55024 IEC 61000-4-2 IEC 61000-4-3 IEC 61000-4-4 IEC 61000-4-5 IEC 61000-4-6... IEC 61000-4-11 Directive 90/384/EEC EN45501 FCC Compliance Statement For American Users This equipment has been tested and found to comply with the limits for a Class A digital device, pursuant to Part 15 of this equipment in a residential area is...
... This Class A digital apparatus complies with the instruction manual, may cause harmful interference to radio communications. CE Marking The printer conforms to the following Directives and Norms Directive 89/336/EEC EN 55022 Class B EN 55024 IEC 61000-4-2 IEC 61000-4-3 IEC 61000-4-4 IEC 61000-4-5 IEC 61000-4-6... IEC 61000-4-11 Directive 90/384/EEC EN45501 FCC Compliance Statement For American Users This equipment has been tested and found to comply with the limits for a Class A digital device, pursuant to Part 15 of this equipment in a residential area is...

Technical Reference
Page 3
... any damages or problems arising from the use of the information contained herein. ❏ Neither Seiko Epson Corporation nor its own POS printer command system (ESC/POS). Revision History Rev. TM-T88II/T88III Technical Reference Guide Cautions ❏ No part of this document may be reproduced, stored in a retrieval system, or transmitted in any form...
... any damages or problems arising from the use of the information contained herein. ❏ Neither Seiko Epson Corporation nor its own POS printer command system (ESC/POS). Revision History Rev. TM-T88II/T88III Technical Reference Guide Cautions ❏ No part of this document may be reproduced, stored in a retrieval system, or transmitted in any form...

Technical Reference
Page 6
...cartridge holder. Modular Connectors The printer uses the modular connectors specifically designed for supplying ink to insert fingers or any part of this equipment. iv Rev. Do not connect these connectors to leaving it unused for an extended period. ❏ Parts on this equipment. Wait approximately... 10 minutes after turning the power off before touching them. ❏ To avoid injury, take care not to the printer is installed. ❏ Do not open the roll paper ...
...cartridge holder. Modular Connectors The printer uses the modular connectors specifically designed for supplying ink to insert fingers or any part of this equipment. iv Rev. Do not connect these connectors to leaving it unused for an extended period. ❏ Parts on this equipment. Wait approximately... 10 minutes after turning the power off before touching them. ❏ To avoid injury, take care not to the printer is installed. ❏ Do not open the roll paper ...
Technical Reference
Page 9
... Documents v Chapter 1 Product Overview Product Structure 1-1 Model 1-1 Accessories 1-1 Options 1-1 Consumable products 1-1 TM-T88II/TM-88III Comparison Table 1-2 Part Names and Basic Operation 1-3 Part Names 1-3 Control Panel 1-3 Power Switch 1-4 Connectors 1-5 Handling the Printer 1-5 Installing and Replacing Roll Paper 1-6 Power Switch Cover 1-7 Shipping Procedures 1-8 Chapter 2 Setup Installing ... Driver 2-16 Chapter 3 Application Development Information Introducing the Control Methods 3-1 Windows Driver (EPSON Advanced Printer Driver 3-1 EPSON OPOS ADK 3-3 Contents vii
... Documents v Chapter 1 Product Overview Product Structure 1-1 Model 1-1 Accessories 1-1 Options 1-1 Consumable products 1-1 TM-T88II/TM-88III Comparison Table 1-2 Part Names and Basic Operation 1-3 Part Names 1-3 Control Panel 1-3 Power Switch 1-4 Connectors 1-5 Handling the Printer 1-5 Installing and Replacing Roll Paper 1-6 Power Switch Cover 1-7 Shipping Procedures 1-8 Chapter 2 Setup Installing ... Driver 2-16 Chapter 3 Application Development Information Introducing the Control Methods 3-1 Windows Driver (EPSON Advanced Printer Driver 3-1 EPSON OPOS ADK 3-3 Contents vii
Technical Reference
Page 10
... 3-15 Q: I cannot print part of each Connector Pin A-2 XON...Printer Status 4-2 Precautions When the Printer Is Offline 4-2 Outputting Hex Dumps 4-2 Chapter 5 Product Specifications Product Specifications (TM-T88II/TM-T88III 5-1 Print Specifications (TM-T88II/TM-T88III 5-2 Character Specifications (TM-T88II/TM-T88III 5-3 Paper Specifications (TM-T88II/TM-T88III 5-3 Printable Area (TM-T88II/TM-T88III 5-4 Print Position versus Cutter Position (TM-88II/TM88III 5-5 Overview of External Dimensions (TM-T88II/TM-T88III 5-6 External Dimensions 5-6 Operating Specifications (TM-T88II/TM...
... 3-15 Q: I cannot print part of each Connector Pin A-2 XON...Printer Status 4-2 Precautions When the Printer Is Offline 4-2 Outputting Hex Dumps 4-2 Chapter 5 Product Specifications Product Specifications (TM-T88II/TM-T88III 5-1 Print Specifications (TM-T88II/TM-T88III 5-2 Character Specifications (TM-T88II/TM-T88III 5-3 Paper Specifications (TM-T88II/TM-T88III 5-3 Printable Area (TM-T88II/TM-T88III 5-4 Print Position versus Cutter Position (TM-88II/TM88III 5-5 Overview of External Dimensions (TM-T88II/TM-T88III 5-6 External Dimensions 5-6 Operating Specifications (TM-T88II/TM...
Technical Reference
Page 15
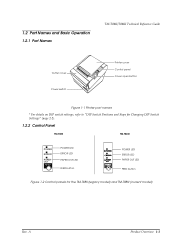
...Cutter cover Power switch FOEEUPDATPEERRRPOORWER Printer cover Control panel Cover open button Figure 1-1 Printer part names * For details on DIP switch settings, refer to "DIP Switch Positions and Steps for Changing DIP Switch Settings" (page 2-2). 1.2.2 Control Panel TM-T88II TM-T88III POWER ERROR PAPER OUT... FEED POWER LED ERROR LED PAPER OUT LED FEED button POWER LED ERROR LED PAPER OUT LED FEED button Figure 1-2 Control panels for the TM-T88II (legacy model) and TM-T88III (current model) Rev. A ...
...Cutter cover Power switch FOEEUPDATPEERRRPOORWER Printer cover Control panel Cover open button Figure 1-1 Printer part names * For details on DIP switch settings, refer to "DIP Switch Positions and Steps for Changing DIP Switch Settings" (page 2-2). 1.2.2 Control Panel TM-T88II TM-T88III POWER ERROR PAPER OUT... FEED POWER LED ERROR LED PAPER OUT LED FEED button POWER LED ERROR LED PAPER OUT LED FEED button Figure 1-2 Control panels for the TM-T88II (legacy model) and TM-T88III (current model) Rev. A ...
Technical Reference
Page 16
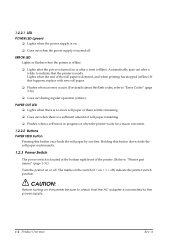
...). Automatically goes out after a reset (offline). Lights when the end of the printer. (Refer to the power supply. 1-4 Product Overview Rev. CAUTION: Before turning on the printer be sure to check that the printer is connected to "Printer part names" (page 1-3).) Turn the printer on or off. A PAPER OUT LED ❏ Lights when there is no...
...). Automatically goes out after a reset (offline). Lights when the end of the printer. (Refer to the power supply. 1-4 Product Overview Rev. CAUTION: Before turning on the printer be sure to check that the printer is connected to "Printer part names" (page 1-3).) Turn the printer on or off. A PAPER OUT LED ❏ Lights when there is no...
Technical Reference
Page 36
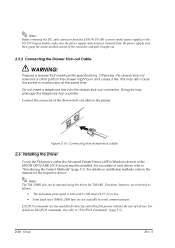
Otherwise, the drawer kick-out solenoid or other parts in serial communications. Doing so may also cause the printer to 120 mm/s {4.72"/s} or less. • Some baud rates (38400, 2400 bps) are also available for TM-88II. For an outline of a driver. ESC/POS commands...3-1). Figure 2-16 Connecting the drawer-kick cable 2.6 Installing the Driver To use the TM printer, either the Advanced Printer Driver (APD) (Windows driver) or the EPSON OPOS ADK (OCX driver) must be operated using the driver for directly controlling the printer without the user of each driver, refer to the...
Otherwise, the drawer kick-out solenoid or other parts in serial communications. Doing so may also cause the printer to 120 mm/s {4.72"/s} or less. • Some baud rates (38400, 2400 bps) are also available for TM-88II. For an outline of a driver. ESC/POS commands...3-1). Figure 2-16 Connecting the drawer-kick cable 2.6 Installing the Driver To use the TM printer, either the Advanced Printer Driver (APD) (Windows driver) or the EPSON OPOS ADK (OCX driver) must be operated using the driver for directly controlling the printer without the user of each driver, refer to the...

Technical Reference
Page 51
... the warranty. A Application Development Information 3-15 A: Drawer specifications differ depending on the manufacturer and the part number. TM-T88II/T88III Technical Reference Guide 3.8.2 Q: Why does the drawer kick-out not operate properly? These conditions also... apply to the drawer kick-out connector. Cannot print a part of Page 0 in Visual Basic. Make sure the specifications of 24 Ω or higher. (*3) NOTES (*1) (*2) (*3) Operating the printer...
... the warranty. A Application Development Information 3-15 A: Drawer specifications differ depending on the manufacturer and the part number. TM-T88II/T88III Technical Reference Guide 3.8.2 Q: Why does the drawer kick-out not operate properly? These conditions also... apply to the drawer kick-out connector. Cannot print a part of Page 0 in Visual Basic. Make sure the specifications of 24 Ω or higher. (*3) NOTES (*1) (*2) (*3) Operating the printer...
Technical Reference
Page 53
... an average of ten times per day. 4.1.1 Using NV Memory You can be made by changing these values. TM-T88II/T88III Technical Reference Guide Chapter 4 ESC/POS Command-related Information This chapter introduces the printer operation settings, which can use of the functions for writing data to and deleting data from NV memory...; The following areas are in NV memory for writing memos, for other character information, for product information (This area cannot be roughly divided into three parts: • Firmware program area • NV memory area for anything you turn off the power.
... an average of ten times per day. 4.1.1 Using NV Memory You can be made by changing these values. TM-T88II/T88III Technical Reference Guide Chapter 4 ESC/POS Command-related Information This chapter introduces the printer operation settings, which can use of the functions for writing data to and deleting data from NV memory...; The following areas are in NV memory for writing memos, for other character information, for product information (This area cannot be roughly divided into three parts: • Firmware program area • NV memory area for anything you turn off the power.

