
User Manual
Page 5
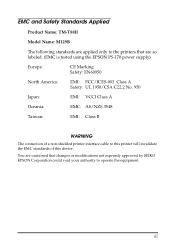
... using the EPSON PS-170 power supply) Europe: CE Marking Safety: EN60950 North America: EMI: FCC/ICES-003 Class A Safety: UL 1950/CSA C22.2 No. 950 Japan: EMI: VCCI Class A Oceania: EMC: AS/NZS 3548 Taiwan: EMI: Class B WARNING The connection of this device. iii EMC and Safety Standards Applied Product Name: TM-T88II Model...
... using the EPSON PS-170 power supply) Europe: CE Marking Safety: EN60950 North America: EMI: FCC/ICES-003 Class A Safety: UL 1950/CSA C22.2 No. 950 Japan: EMI: VCCI Class A Oceania: EMC: AS/NZS 3548 Taiwan: EMI: Class B WARNING The connection of this device. iii EMC and Safety Standards Applied Product Name: TM-T88II Model...

User Manual
Page 10
Options and Accessories ❏ EPSON power supply unit, PS-170. ❏ Affixing tapes (model: DF-10). ❏ RS-485 interface board can be installed as a dealer option. ❏ Wall hanging bracket set (WH-10). viii Introduction
Options and Accessories ❏ EPSON power supply unit, PS-170. ❏ Affixing tapes (model: DF-10). ❏ RS-485 interface board can be installed as a dealer option. ❏ Wall hanging bracket set (WH-10). viii Introduction

User Manual
Page 13
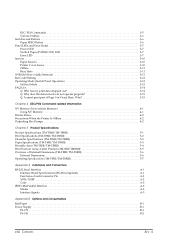
Contents Chapter 1 Setting Up the Printer Unpacking 1-1 Connecting the Cables and Grounding the Printer 1-2 Connecting the Drawer 1-3 Grounding the Printer 1-5 Connecting the Power Supply 1-5 Installing or Replacing the Paper Roll 1-7 Using the Power Switch Cover 1-10 Self Test 1-10 Running the self test 1-10 Adjustments and Settings 1-12 Chapter 2 Using the Printer Operating the Control Panel 2-1 Control Panel...
Contents Chapter 1 Setting Up the Printer Unpacking 1-1 Connecting the Cables and Grounding the Printer 1-2 Connecting the Drawer 1-3 Grounding the Printer 1-5 Connecting the Power Supply 1-5 Installing or Replacing the Paper Roll 1-7 Using the Power Switch Cover 1-10 Self Test 1-10 Running the self test 1-10 Adjustments and Settings 1-12 Chapter 2 Using the Printer Operating the Control Panel 2-1 Control Panel...
User Manual
Page 16
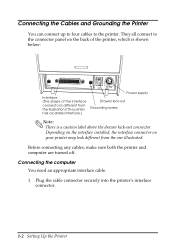
... You need an appropriate interface cable. 1. Connecting the Cables and Grounding the Printer You can connect up to four cables to the connector panel on your printer may look different from the illustration if the printer has a parallel interface.) FG DK DC24V Power supply Drawer kick-out Grounding screw Note: There is a caution label above...
... You need an appropriate interface cable. 1. Connecting the Cables and Grounding the Printer You can connect up to four cables to the connector panel on your printer may look different from the illustration if the printer has a parallel interface.) FG DK DC24V Power supply Drawer kick-out Grounding screw Note: There is a caution label above...

User Manual
Page 19
Connect the ground wire to ground your printer. Grounding the Printer You need a ground wire to the printer using one of the FG screws on the back of the printer, as shown. Setting Up the Printer 1-5 Make sure the wire is turned off. 2. Be sure the printer is AWG 18 or equivalent. 1. Das Kabel der Schublade an die Schnappsteckerbuchse hinten am Drucker neben dem Netßzanschluß anschließen. FG FG DK DC24V Connecting the Power Supply Use the optional EPSON PS-170 or equivalent power supply for your printer.
Connect the ground wire to ground your printer. Grounding the Printer You need a ground wire to the printer using one of the FG screws on the back of the printer, as shown. Setting Up the Printer 1-5 Make sure the wire is turned off. 2. Be sure the printer is AWG 18 or equivalent. 1. Das Kabel der Schublade an die Schnappsteckerbuchse hinten am Drucker neben dem Netßzanschluß anschließen. FG FG DK DC24V Connecting the Power Supply Use the optional EPSON PS-170 or equivalent power supply for your printer.

User Manual
Page 20
...; Otherwise, you may cause fire or electrical shock. Do not plug in the power supply's cable as shown below. WARNING: Make sure you use the EPSON PS-170 power supply or equivalent. Using an incorrect power supply may damage the power supply or the printer. If the power supply's rated voltage and your outlet's voltage do not match, contact your electrical outlet...
...; Otherwise, you may cause fire or electrical shock. Do not plug in the power supply's cable as shown below. WARNING: Make sure you use the EPSON PS-170 power supply or equivalent. Using an incorrect power supply may damage the power supply or the printer. If the power supply's rated voltage and your outlet's voltage do not match, contact your electrical outlet...

User Manual
Page 24
..., and DIP switch settings. Make sure the printer is attached, unplug the power supply cord from the outlet immediately. Using the Power Switch Cover WARNING: If an accident occurs when the power switch cover is turned off and the printer covers are closed properly. 1-10 Setting Up the Printer FFEOEEEUDPDTAPEERRRPOORWER Self Test The self test lets you...
..., and DIP switch settings. Make sure the printer is attached, unplug the power supply cord from the outlet immediately. Using the Power Switch Cover WARNING: If an accident occurs when the power switch cover is turned off and the printer covers are closed properly. 1-10 Setting Up the Printer FFEOEEEUDPDTAPEERRRPOORWER Self Test The self test lets you...

User Manual
Page 29
...PAPER OUT light is at or near the end. First, turn off , make sure the printer cover is blinking and the printer does not print. Make sure the power supply cables are correctly plugged into the printer, the power unit, and into place. Install a new paper roll. If the PAPER OUT light is ...off the printer and check for instructions. The ERROR light is properly closed. General problems ...
...PAPER OUT light is at or near the end. First, turn off , make sure the printer cover is blinking and the printer does not print. Make sure the power supply cables are correctly plugged into the printer, the power unit, and into place. Install a new paper roll. If the PAPER OUT light is ...off the printer and check for instructions. The ERROR light is properly closed. General problems ...

User Manual
Page 40
Electrical Characteristics Supply voltage: +24 VDC ± 7% (optional power supply: EPSON PS-170) Current High-speed consumption: (at mode: 24V) Mean: Approximately 1.7A (character font A α-N all columns printing) Peak: Approximately 7.7A Low-powerconsumption mode: Mean: Approximately 1.2A (Character font A α-N all columns printing) Peak: Approximately 6.6A Standby: Mean: Approximately 0.2A Note: Maximum 1A for drawer kick-out driving 4-4 Reference Information
Electrical Characteristics Supply voltage: +24 VDC ± 7% (optional power supply: EPSON PS-170) Current High-speed consumption: (at mode: 24V) Mean: Approximately 1.7A (character font A α-N all columns printing) Peak: Approximately 7.7A Low-powerconsumption mode: Mean: Approximately 1.2A (Character font A α-N all columns printing) Peak: Approximately 6.6A Standby: Mean: Approximately 0.2A Note: Maximum 1A for drawer kick-out driving 4-4 Reference Information

Technical Reference
Page 5
...power source may lead to fire or electric shock. • Do not modify or attempt to repair the cable. • Do not place any heavy object on top of electric shock, do not set this manual. Excessive humidity and dust may lead to fire. Warnings TM-T88II...equipment, turn off the power supply switch and unplug the power cable immediately. Cautions CAUTION: ❏ Be sure to the unit. Rev. A iii Continued use in this equipment on power outlet. Always supply power directly from a standard 100 VAC domestic power outlet. ❏ Handle the power cable with wet hands...
...power source may lead to fire or electric shock. • Do not modify or attempt to repair the cable. • Do not place any heavy object on top of electric shock, do not set this manual. Excessive humidity and dust may lead to fire. Warnings TM-T88II...equipment, turn off the power supply switch and unplug the power cable immediately. Cautions CAUTION: ❏ Be sure to the unit. Rev. A iii Continued use in this equipment on power outlet. Always supply power directly from a standard 100 VAC domestic power outlet. ❏ Handle the power cable with wet hands...
Technical Reference
Page 7
..., the power supply that was created to provide all the information necessary for system planning, design, installation, and application of the printer for the purpose of document TM-T88II User's Manual TM-T88III User's Manual ESC/POS Application Programming Guide TM-T88II/T88III Technical Reference Guide EPSON OPOS ADK Description Provides information to enable POS operators to the TM-T88II/TM-T88III...
..., the power supply that was created to provide all the information necessary for system planning, design, installation, and application of the printer for the purpose of document TM-T88II User's Manual TM-T88III User's Manual ESC/POS Application Programming Guide TM-T88II/T88III Technical Reference Guide EPSON OPOS ADK Description Provides information to enable POS operators to the TM-T88II/TM-T88III...
Technical Reference
Page 9
... 1-1 TM-T88II/TM-88III Comparison Table 1-2 Part Names and Basic Operation 1-3 Part Names 1-3 Control Panel 1-3 Power Switch 1-4 Connectors 1-5 Handling the Printer 1-5 Installing and Replacing Roll Paper 1-6 Power Switch Cover 1-7 Shipping Procedures 1-8 Chapter 2 Setup Installing the Printer 2-2 ...Power Supply Unit and Cash Drawer 2-15 Connecting the Power Supply Unit 2-15 Connecting the Drawer Kick-out Cable 2-16 Installing the Driver 2-16 Chapter 3 Application Development Information Introducing the Control Methods 3-1 Windows Driver (EPSON Advanced Printer Driver 3-1 EPSON...
... 1-1 TM-T88II/TM-88III Comparison Table 1-2 Part Names and Basic Operation 1-3 Part Names 1-3 Control Panel 1-3 Power Switch 1-4 Connectors 1-5 Handling the Printer 1-5 Installing and Replacing Roll Paper 1-6 Power Switch Cover 1-7 Shipping Procedures 1-8 Chapter 2 Setup Installing the Printer 2-2 ...Power Supply Unit and Cash Drawer 2-15 Connecting the Power Supply Unit 2-15 Connecting the Drawer Kick-out Cable 2-16 Installing the Driver 2-16 Chapter 3 Application Development Information Introducing the Control Methods 3-1 Windows Driver (EPSON Advanced Printer Driver 3-1 EPSON...
Technical Reference
Page 10
... B-1 Power Supply B-1 PS-170 B-1 PS-180 B-2 viii Contents Rev. Why 3-15 Chapter 4 ESC/POS Command-related Information NV Memory (Non-volatile Memory 4-1 Using NV Memory 4-1 Printer Status 4-2 Precautions When the Printer Is Offline 4-2 Outputting Hex Dumps 4-2 Chapter 5 Product Specifications Product Specifications (TM-T88II/TM-T88III 5-1 Print Specifications (TM-T88II/TM-T88III 5-2 Character Specifications (TM-T88II/TM-T88III 5-3 Paper Specifications (TM-T88II/TM-T88III 5-3 Printable Area (TM-T88II/TM-T88III...
... B-1 Power Supply B-1 PS-170 B-1 PS-180 B-2 viii Contents Rev. Why 3-15 Chapter 4 ESC/POS Command-related Information NV Memory (Non-volatile Memory 4-1 Using NV Memory 4-1 Printer Status 4-2 Precautions When the Printer Is Offline 4-2 Outputting Hex Dumps 4-2 Chapter 5 Product Specifications Product Specifications (TM-T88II/TM-T88III 5-1 Print Specifications (TM-T88II/TM-T88III 5-2 Character Specifications (TM-T88II/TM-T88III 5-3 Paper Specifications (TM-T88II/TM-T88III 5-3 Printable Area (TM-T88II/TM-T88III...
Technical Reference
Page 13
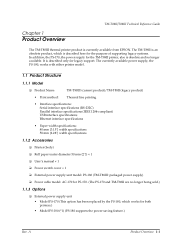
...EPSON. The TM-T88II is an obsolete product, which is described here for the purpose of supporting legacy systems. In addition, the PS-170, the power supply for the TM-T88II printer, also is obsolete and no longer being sold.) 1.1.3 Options ❏ External power supply...; Power switch cover × 1 ❏ External power supply unit model: PS-180 (TM-T88III: packaged power supply) ❏ Power cable model: AC-170 for PS-170. (The PS-170 and TM-T88II are no longer available. Chapter 1 Product Overview TM-T88II/T88III Technical Reference Guide The TM-T88III thermal printer product...
...EPSON. The TM-T88II is an obsolete product, which is described here for the purpose of supporting legacy systems. In addition, the PS-170, the power supply for the TM-T88II printer, also is obsolete and no longer being sold.) 1.1.3 Options ❏ External power supply...; Power switch cover × 1 ❏ External power supply unit model: PS-180 (TM-T88III: packaged power supply) ❏ Power cable model: AC-170 for PS-170. (The PS-170 and TM-T88II are no longer available. Chapter 1 Product Overview TM-T88II/T88III Technical Reference Guide The TM-T88III thermal printer product...
Technical Reference
Page 14
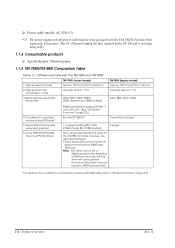
...-170 power supply has been replaced by the driver for canceling receive buffer BUSY state * 5. High-speed power consumption mode Average approx. 1.8 A 3. TM-T88II (legacy model) Approx. 120 mm/s (4.72") maximum Average approx. 1.7 A 2400, 4800, 9600, 19200 4. Driver (EPSON OPOS ADK, Advanced Printer Driver) 38400 is no longer being sold.) 1.1.4 Consumable products ❏ Specified paper: Thermal paper 1.1.5 TM-T88II/TM-88III...
...-170 power supply has been replaced by the driver for canceling receive buffer BUSY state * 5. High-speed power consumption mode Average approx. 1.8 A 3. TM-T88II (legacy model) Approx. 120 mm/s (4.72") maximum Average approx. 1.7 A 2400, 4800, 9600, 19200 4. Driver (EPSON OPOS ADK, Advanced Printer Driver) 38400 is no longer being sold.) 1.1.4 Consumable products ❏ Specified paper: Thermal paper 1.1.5 TM-T88II/TM-88III...
Technical Reference
Page 16
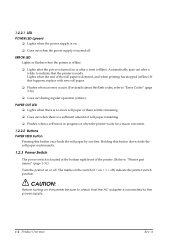
... on. ❏ Goes out when the power supply is connected to the power supply. 1-4 Product Overview Rev. If this button down feeds the roll paper continuously. 1.2.3 Power Switch The power switch is detected, and when printing has stopped (offline). CAUTION: Before turning on or after a while to check that the printer is in progress or when the...
... on. ❏ Goes out when the power supply is connected to the power supply. 1-4 Product Overview Rev. If this button down feeds the roll paper continuously. 1.2.3 Power Switch The power switch is detected, and when printing has stopped (offline). CAUTION: Before turning on or after a while to check that the printer is in progress or when the...
Technical Reference
Page 17
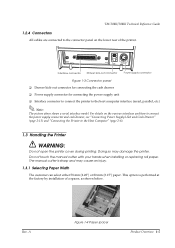
... panel ❏ Drawer kick-out connector for connecting the cash drawer ❏ Power supply connector for connecting the power supply unit ❏ Interface connector to connect the printer to the Host Computer" (page 2-8). 1.3 Handling the Printer WARNING: Do not open the printer cover during printing. TM-T88II/T88III Technical Reference Guide 1.2.4 Connectors All cables are connected to the connector...
... panel ❏ Drawer kick-out connector for connecting the cash drawer ❏ Power supply connector for connecting the power supply unit ❏ Interface connector to connect the printer to the Host Computer" (page 2-8). 1.3 Handling the Printer WARNING: Do not open the printer cover during printing. TM-T88II/T88III Technical Reference Guide 1.2.4 Connectors All cables are connected to the connector...

Technical Reference
Page 20
1.3.4 Shipping Procedures Do the following before shipping the printer. 1. Make sure the POWER LED is out. 3. Remove the power supply connector. 4. Pack the printer, keeping the top and bottom correctly oriented. 1-8 Product Overview Rev. Press the power switch to turn the power off. 2. A
1.3.4 Shipping Procedures Do the following before shipping the printer. 1. Make sure the POWER LED is out. 3. Remove the power supply connector. 4. Pack the printer, keeping the top and bottom correctly oriented. 1-8 Product Overview Rev. Press the power switch to turn the power off. 2. A
Technical Reference
Page 21
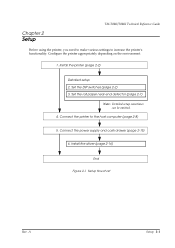
... setup sometimes can be omitted. 4. Install the printer (page 2-2) Detailed setup 2. Install the driver (page 2-16) End Figure 2-1 Setup flowchart Rev. A Setup 2-1 Connect the power supply and cash drawer (page 2-15) 6. Set the DIP switches (page 2-2) 3. Chapter 2 Setup TM-T88II/T88III Technical Reference Guide Before using the printer, you need to make various settings to the...
... setup sometimes can be omitted. 4. Install the printer (page 2-2) Detailed setup 2. Install the driver (page 2-16) End Figure 2-1 Setup flowchart Rev. A Setup 2-1 Connect the power supply and cash drawer (page 2-15) 6. Set the DIP switches (page 2-2) 3. Chapter 2 Setup TM-T88II/T88III Technical Reference Guide Before using the printer, you need to make various settings to the...

Technical Reference
Page 22
...Hanging Bracket Set. • Install the roll paper stopper • Adjust of the power supply or other cables or other objects. 2.1.2 Precautions for Wall Installation ❏ Make the following settings on the printer when you hang it on a wall. Note: Serial interface communication conditions must be... settings. CAUTION: Before you remove the DIP switch cover, turn the printer off . 2-2 Setup Rev. Make sure the power supply for the printer is not exposed to strong impact during operation. ❏ Avoid placing the printer on top of near-end detector • Install the WH-10 &#...
...Hanging Bracket Set. • Install the roll paper stopper • Adjust of the power supply or other cables or other objects. 2.1.2 Precautions for Wall Installation ❏ Make the following settings on the printer when you hang it on a wall. Note: Serial interface communication conditions must be... settings. CAUTION: Before you remove the DIP switch cover, turn the printer off . 2-2 Setup Rev. Make sure the power supply for the printer is not exposed to strong impact during operation. ❏ Avoid placing the printer on top of near-end detector • Install the WH-10 &#...


