

User Manual
Page 3
... l-16 Running the Self Test 1-17 Connecting the Printer to Your Computer 1-18 Choosing the Operating Mode with DIP Switches Chapter 2 Choosing and Loading Paper 2-1 Choosing Paper 2-l Using Single-sheet Paper 2-6 Reinstalling the Tractor Unit 2-8 The Paper Thickness Lever Chapter 3 Using the T-750 with Application Programs 3-1 Printer Selection Menus 3-2 Computer - Printer Communication 3-3 Word Processors 3-4 Spreadsheets 3-6 Graphics Programs 3-6 Programming...
... l-16 Running the Self Test 1-17 Connecting the Printer to Your Computer 1-18 Choosing the Operating Mode with DIP Switches Chapter 2 Choosing and Loading Paper 2-1 Choosing Paper 2-l Using Single-sheet Paper 2-6 Reinstalling the Tractor Unit 2-8 The Paper Thickness Lever Chapter 3 Using the T-750 with Application Programs 3-1 Printer Selection Menus 3-2 Computer - Printer Communication 3-3 Word Processors 3-4 Spreadsheets 3-6 Graphics Programs 3-6 Programming...

User Manual
Page 6
...-Roman or Sans Serif. l Loading paper is crisp and distinctive. the powerful Epson mode commands can now print character graphics like . Introduction 1 l The SelecType feature gives you can combine the best of previous Epson 9-pin printers with many features normally exclusive to do... is clear and typewriter-like those used by just moving a lever, and the tractor lets you want. Introduction The ActionPrinter™ T-750 combines all the well-known virtues of ...
...-Roman or Sans Serif. l Loading paper is crisp and distinctive. the powerful Epson mode commands can now print character graphics like . Introduction 1 l The SelecType feature gives you can combine the best of previous Epson 9-pin printers with many features normally exclusive to do... is clear and typewriter-like those used by just moving a lever, and the tractor lets you want. Introduction The ActionPrinter™ T-750 combines all the well-known virtues of ...

User Manual
Page 9
... that it onto the shaft on the printer. To install the knob, simply push it be removed before you should install the paper feed knob. Remove the left . 4. Remove the right locking tab and the platen protector. 2 Selecting the Right Location The most important ... Print head protector 1. Figure I-2. Remove the print head protector. 3. Also, you turn on the right side of the printer as shown in Figure 1-2. Move the print head to your printer is protected by a print head protector, a platen protector and two locking tabs during shipping. Follow the steps in mind:...
... that it onto the shaft on the printer. To install the knob, simply push it be removed before you should install the paper feed knob. Remove the left . 4. Remove the right locking tab and the platen protector. 2 Selecting the Right Location The most important ... Print head protector 1. Figure I-2. Remove the print head protector. 3. Also, you turn on the right side of the printer as shown in Figure 1-2. Move the print head to your printer is protected by a print head protector, a platen protector and two locking tabs during shipping. Follow the steps in mind:...

User Manual
Page 10
... is clean and away from base units for cordless telephones. Setting Up Your T-750 Printer 1-3 Don't use continuous-feed paper, clear enough space around the printer so that comes installed on the printer. l Avoid using electrical outlets that are going to your printer and computer away from moisture, dust, and excessive heat (such as a stand, with...
... is clean and away from base units for cordless telephones. Setting Up Your T-750 Printer 1-3 Don't use continuous-feed paper, clear enough space around the printer so that comes installed on the printer. l Avoid using electrical outlets that are going to your printer and computer away from moisture, dust, and excessive heat (such as a stand, with...

User Manual
Page 13
... you install the automatic sheet feeder (which has its own manual). Then lift the cover up the printer for Epson T-750 or FX series printers. To install a new ribbon, follow the preceding steps. 4 Loading Continuous-feed Paper When you until it out of the cover toward you receive your printing becomes too light, replace the...
... you install the automatic sheet feeder (which has its own manual). Then lift the cover up the printer for Epson T-750 or FX series printers. To install a new ribbon, follow the preceding steps. 4 Loading Continuous-feed Paper When you until it out of the cover toward you receive your printing becomes too light, replace the...

User Manual
Page 14
Figure 1-6. Pull both the paper release lever and the paper bail lever toward the front of the printer. (Figure 1-6 shows where these levers are.) Setting Up Your T-750 Printer 1-7 Installing the paper rest 4.
Figure 1-6. Pull both the paper release lever and the paper bail lever toward the front of the printer. (Figure 1-6 shows where these levers are.) Setting Up Your T-750 Printer 1-7 Installing the paper rest 4.

User Manual
Page 15
... are ready to the left side and push the locking lever back to lock that you can move the pin-feed holders, 1-8 Setting Up Your T-750 Printer Figure 1-7. Pin-feed locking levers 2. Just follow the steps below: 1. Using Figure 1-7 as shown in place. Move the left holder so that the locking lever...-feed holders forward so that holder in Figure l-8. WARNING Do not use the pin-feed covers to move the holders to load the continuous-feed paper.
... are ready to the left side and push the locking lever back to lock that you can move the pin-feed holders, 1-8 Setting Up Your T-750 Printer Figure 1-7. Pin-feed locking levers 2. Just follow the steps below: 1. Using Figure 1-7 as shown in place. Move the left holder so that the locking lever...-feed holders forward so that holder in Figure l-8. WARNING Do not use the pin-feed covers to move the holders to load the continuous-feed paper.

User Manual
Page 16
Figure 1-8. Fitting the paper over the pins in Figure l-9) and close the cover. Guide the paper into the paper slot, and push it easier to -side motion makes it through .) 5. Figure 1-9. Fit the holes on the left holder (as shown in the left side of the paper over the pin feeds Setting Up Your T-750 Printer 1-9 Open pin-feed cover 4. Pull the paper up until it comes up between the ribbon guide and the platen. (Moving the paper with a side-to push the paper through until the top is above the pin-feed holders.
Figure 1-8. Fitting the paper over the pins in Figure l-9) and close the cover. Guide the paper into the paper slot, and push it easier to -side motion makes it through .) 5. Figure 1-9. Fit the holes on the left holder (as shown in the left side of the paper over the pin feeds Setting Up Your T-750 Printer 1-9 Open pin-feed cover 4. Pull the paper up until it comes up between the ribbon guide and the platen. (Moving the paper with a side-to push the paper through until the top is above the pin-feed holders.
User Manual
Page 17
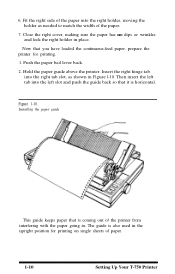
... upright position for printing. 1. Insert the right hinge tab into the left tab into the right tab slot, as needed to match the width of paper. 1-10 Setting Up Your T-750 Printer Then insert the left slot and push the guide back so that it is horizontal. Push the... paper bail lever back. 2. Fit the right side of the paper into the right holder, moving the holder as shown in . The guide is coming out of the printer from interfering with the...
... upright position for printing. 1. Insert the right hinge tab into the left tab into the right tab slot, as needed to match the width of paper. 1-10 Setting Up Your T-750 Printer Then insert the left slot and push the guide back so that it is horizontal. Push the... paper bail lever back. 2. Fit the right side of the paper into the right holder, moving the holder as shown in . The guide is coming out of the printer from interfering with the...

User Manual
Page 18
... the top of form This is for use with the paper feed knob on the perforations. The T-750 can be in Chapter 2 or by using the optional automatic sheet feeder. It can also accommodate single-sheet paper. Setting Up Your T-750 Printer 1-11 It makes your printed pages end where you want... them to and prevents the printer from printing on the right side of the printer until the first row of the ribbon. (See Figure 1-11.)...
... the top of form This is for use with the paper feed knob on the perforations. The T-750 can be in Chapter 2 or by using the optional automatic sheet feeder. It can also accommodate single-sheet paper. Setting Up Your T-750 Printer 1-11 It makes your printed pages end where you want... them to and prevents the printer from printing on the right side of the printer until the first row of the ribbon. (See Figure 1-11.)...

User Manual
Page 20
... communication with the computer. FORM FEED/ ROMAN When the printer is on when the printer is off line to on line to the power and is turned OFF. READY This comes on line and ready to advance paper. Setting Up Your T-750 Printer 1-13 OFF LINE/ ON LINE The green light next to this... button to print. When the printer is able to receive and print data from off line, this button advances the...
... communication with the computer. FORM FEED/ ROMAN When the printer is on when the printer is off line to on line to the power and is turned OFF. READY This comes on line and ready to advance paper. Setting Up Your T-750 Printer 1-13 OFF LINE/ ON LINE The green light next to this... button to print. When the printer is able to receive and print data from off line, this button advances the...

User Manual
Page 21
... be condensed for higher-quality work. In the condensed mode all characters are described in the Epson mode. If you want condensed printing, simply press the CONDENSED button. These buttons select the... you can also be condensed. With the two SelecType buttons, you 1-14 Setting Up Your T-750 Printer The FORM FEED button selects Roman, and the LINE FEED button selects Sans Serif. NLQ is...and distinctive. NLQ Sans Serif is clear and typewriter-like . NLQ can produce any of paper. When you press either SelecType button, it . NLQ Roman is out of the four typestyles...
... be condensed for higher-quality work. In the condensed mode all characters are described in the Epson mode. If you want condensed printing, simply press the CONDENSED button. These buttons select the... you can also be condensed. With the two SelecType buttons, you 1-14 Setting Up Your T-750 Printer The FORM FEED button selects Roman, and the LINE FEED button selects Sans Serif. NLQ is...and distinctive. NLQ Sans Serif is clear and typewriter-like . NLQ can produce any of paper. When you press either SelecType button, it . NLQ Roman is out of the four typestyles...

User Manual
Page 23
...1-1 OFF 1-2 OFF 1-3 OFF 1-4 OFF 1-5 OFF 1-6 ON 1-7 ON 1-8 ON 2-1 OFF 2-2 OFF 2-3 OFF 2-4 OFF l-16 Setting Up Your T-750 Printer Character mode Shape of zero CG Table Protocol mode Print Quality Country Page Length CSF Mode Skip Perforation Auto LF Normal 0 (Unslashed) Italics ESC/P Draft U.S.A.... 11 inch Invalid None Depend on . The test continues until you can see that the power is OFF and paper is working properly. The self test also prints the settings of a typical self test is shown below. When the printing starts, release the FORM FEED...
...1-1 OFF 1-2 OFF 1-3 OFF 1-4 OFF 1-5 OFF 1-6 ON 1-7 ON 1-8 ON 2-1 OFF 2-2 OFF 2-3 OFF 2-4 OFF l-16 Setting Up Your T-750 Printer Character mode Shape of zero CG Table Protocol mode Print Quality Country Page Length CSF Mode Skip Perforation Auto LF Normal 0 (Unslashed) Italics ESC/P Draft U.S.A.... 11 inch Invalid None Depend on . The test continues until you can see that the power is OFF and paper is working properly. The self test also prints the settings of a typical self test is shown below. When the printing starts, release the FORM FEED...
User Manual
Page 28
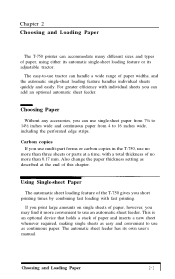
...its adjustable tractor. Using Single-sheet Paper The automatic sheet loading feature of the T-750 gives you use multi-part forms or carbon copies in the T-750, use single-sheet paper from 7¼ to 14½ inches wide and continuous paper from 4 to use tractor can ...combining fast loading with individual sheets you can use no more than 0.17 mm. Chapter 2 Choosing and Loading Paper The T-750 printer can handle a wide range of paper widths, and the automatic single-sheet loading feature handles individual sheets quickly and easily. For greater efficiency with fast...
...its adjustable tractor. Using Single-sheet Paper The automatic sheet loading feature of the T-750 gives you use multi-part forms or carbon copies in the T-750, use single-sheet paper from 7¼ to 14½ inches wide and continuous paper from 4 to use tractor can ...combining fast loading with individual sheets you can use no more than 0.17 mm. Chapter 2 Choosing and Loading Paper The T-750 printer can handle a wide range of paper widths, and the automatic single-sheet loading feature handles individual sheets quickly and easily. For greater efficiency with fast...

User Manual
Page 29
... 2-1) with your thumbs, rock the tractor unit back, and lift it , simply pull the back of paper. 2-2 Choosing and Loading Paper Remove the tractor unit. To remove it off the printer. 2. Figure 2-1. Removing the tractor unit 4. Simply press the release levers (shown in the next five ... (If you have previously loaded continuous-feed paper, you have already done some of the steps.) Preparing the printer 1. Before you load single-sheet paper the first time, you must prepare the printer by removing the tractor unit and installing the paper guide, as described on page l-2. 3. ...
... 2-1) with your thumbs, rock the tractor unit back, and lift it , simply pull the back of paper. 2-2 Choosing and Loading Paper Remove the tractor unit. To remove it off the printer. 2. Figure 2-1. Removing the tractor unit 4. Simply press the release levers (shown in the next five ... (If you have previously loaded continuous-feed paper, you have already done some of the steps.) Preparing the printer 1. Before you load single-sheet paper the first time, you must prepare the printer by removing the tractor unit and installing the paper guide, as described on page l-2. 3. ...

User Manual
Page 30
When both tabs are in Figure 2-2. Figure 2-2. Hold the paper guide above the printer. 5. Installing the paper guide Paper bail lever Choosing and Loading Paper 2-3 Insert the right hinge tab into the left tab into the right tab slot, as shown in the slots, push the guide back so that it is horizontal, and then pull it toward you until it stops at an angle (about 45 degrees). Next, insert the left slot.
When both tabs are in Figure 2-2. Figure 2-2. Hold the paper guide above the printer. 5. Installing the paper guide Paper bail lever Choosing and Loading Paper 2-3 Insert the right hinge tab into the left tab into the right tab slot, as shown in the slots, push the guide back so that it is horizontal, and then pull it toward you until it stops at an angle (about 45 degrees). Next, insert the left slot.

User Manual
Page 31
... the steps below . Do not put the paper in Figure 2-3 below : 1. Place the paper on . 2. Figure 2-3. Push both the paper release lever and the paper bail lever toward the back of it. Turn the printer ON first. Inserting the paper 2-4 Choosing and Loading Paper Loading the paper Now you turn it on the paper guide as shown in the...
... the steps below . Do not put the paper in Figure 2-3 below : 1. Place the paper on . 2. Figure 2-3. Push both the paper release lever and the paper bail lever toward the back of it. Turn the printer ON first. Inserting the paper 2-4 Choosing and Loading Paper Loading the paper Now you turn it on the paper guide as shown in the...

User Manual
Page 32
...when you remember the correct positions of the printer case (as shown in Figure 24). Pull the paper bail lever forward. Then tilt the cover back into the printer. 6. When the paper stops, push the paper bail lever back. 7. Installing the printer cover When you have learned this procedure, ...you'll probably leave the cover on the printer cover will help you load single-sheet paper. Hold the printer cover vertically and fit ...
...when you remember the correct positions of the printer case (as shown in Figure 24). Pull the paper bail lever forward. Then tilt the cover back into the printer. 6. When the paper stops, push the paper bail lever back. 7. Installing the printer cover When you have learned this procedure, ...you'll probably leave the cover on the printer cover will help you load single-sheet paper. Hold the printer cover vertically and fit ...

User Manual
Page 33
... the gears to reinstall the tractor unit. 1. This time press the paper a little more than one page long using single sheets of the paper and sounds the beeper. Reinstalling the Tractor Unit When you want to switch from the printer and try again. Tilt the tractor unit toward you print a document ... page and prompts you to turn it off automatically. In this happens, the ON LINE light goes off . Then remove the paper and try again, starting at all, see that the printer is press the ON LINE button once to load a new sheet at the end of a page. l If your software sends...
... the gears to reinstall the tractor unit. 1. This time press the paper a little more than one page long using single sheets of the paper and sounds the beeper. Reinstalling the Tractor Unit When you want to switch from the printer and try again. Tilt the tractor unit toward you print a document ... page and prompts you to turn it off automatically. In this happens, the ON LINE light goes off . Then remove the paper and try again, starting at all, see that the printer is press the ON LINE button once to load a new sheet at the end of a page. l If your software sends...

User Manual
Page 34
Reinstalling the tractor unit Choosing and Loading Paper 2-7 Figure 2-5.
Reinstalling the tractor unit Choosing and Loading Paper 2-7 Figure 2-5.
