User Manual
Page 8
... rights. Use the Software Disc or downloaded software package to easily configure the network interface for protocols such as TCP/IP, WSD, LLTD, UPnP, Bonjour, and SNMP, use on your network, you must have Adobe Reader or Adobe Acrobat Reader installed on your User's Guide. Introduction About Your Printer Your printer has a built-in this manual, automatically selects the correct standard when it automatically selects appropriate network protocols.
... rights. Use the Software Disc or downloaded software package to easily configure the network interface for protocols such as TCP/IP, WSD, LLTD, UPnP, Bonjour, and SNMP, use on your network, you must have Adobe Reader or Adobe Acrobat Reader installed on your User's Guide. Introduction About Your Printer Your printer has a built-in this manual, automatically selects the correct standard when it automatically selects appropriate network protocols.
User Manual
Page 19
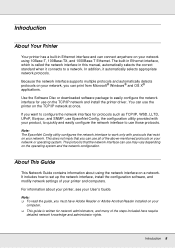
... the software installer screen does not appear, double-click setup.exe on the Software Disc. 4. Make sure your printer is on by default, you are using Windows, see the User Account Control screen, click Yes or Continue. 3. Click the Next button at the Welcome screen 6. Click the Agree button to the network (a hub or router). 2. Turn on your printer User's Guide for Windows users)" on page 36 and "Installing the Printer Driver" on page 19. See your printer. The software installer screen opens automatically. If...
... the software installer screen does not appear, double-click setup.exe on the Software Disc. 4. Make sure your printer is on by default, you are using Windows, see the User Account Control screen, click Yes or Continue. 3. Click the Next button at the Welcome screen 6. Click the Agree button to the network (a hub or router). 2. Turn on your printer User's Guide for Windows users)" on page 36 and "Installing the Printer Driver" on page 19. See your printer. The software installer screen opens automatically. If...
User Manual
Page 21
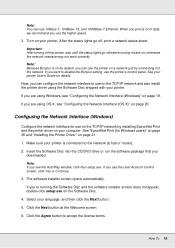
.... 1. Click Add a printer to install the printer driver manually. See "EpsonNet Print (for Windows users)" on the computer. Open the Control Panel, and then click View devices and printers (Windows 8.x/7/Server 2012) or Printers (Windows Vista/Server 2008). 2. Note: If your operating system. The following section explains how to start the Add Printer wizard. How To 21 Click the + button to add a new printer. 4. Open Print & Fax. 3. 2. TCP/IP printing Note: If you need to configure the settings.
.... 1. Click Add a printer to install the printer driver manually. See "EpsonNet Print (for Windows users)" on the computer. Open the Control Panel, and then click View devices and printers (Windows 8.x/7/Server 2012) or Printers (Windows Vista/Server 2008). 2. Note: If your operating system. The following section explains how to start the Add Printer wizard. How To 21 Click the + button to add a new printer. 4. Open Print & Fax. 3. 2. TCP/IP printing Note: If you need to configure the settings.
User Manual
Page 40
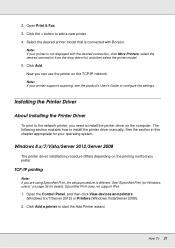
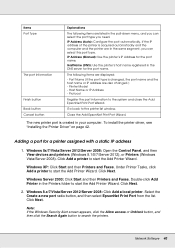
...-down menu, and you need. Click Next. 2. Printer Model - Go back to the system and close the Add EpsonNet Print Port Wizard. Items Port Type The port Information Finish button Back button Cancel button Explanations The following items are in your computer. IP Address (Manual): Use the printer's IP Address for the port name. To install the printer driver, see "Installing the Printer Driver" on page 42. Host Name or IP Address - The new printer port is changed, the port name...
...-down menu, and you need. Click Next. 2. Printer Model - Go back to the system and close the Add EpsonNet Print Port Wizard. Items Port Type The port Information Finish button Back button Cancel button Explanations The following items are in your computer. IP Address (Manual): Use the printer's IP Address for the port name. To install the printer driver, see "Installing the Printer Driver" on page 42. Host Name or IP Address - The new printer port is changed, the port name...

Start Here - Installation Guide
Page 3
.... Product Support User's Guide Windows®: Click the icon on loading paper. Mac: Click the icon in Applications/Epson Software/Guide to download software and utilities, view manuals, get FAQs and troubleshooting advice, or contact Epson. Epson technical support Visit www.epson.com/support (U.S.) or www.epson.ca/support (Canada) and search for your printer and device to the same network and tap the menu icon to print. See the online User's Guide for instructions. • See the online User's Guide for your...
.... Product Support User's Guide Windows®: Click the icon on loading paper. Mac: Click the icon in Applications/Epson Software/Guide to download software and utilities, view manuals, get FAQs and troubleshooting advice, or contact Epson. Epson technical support Visit www.epson.com/support (U.S.) or www.epson.ca/support (Canada) and search for your printer and device to the same network and tap the menu icon to print. See the online User's Guide for instructions. • See the online User's Guide for your...
Users Guide
Page 5
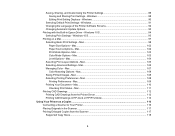
...Mac...109 Printing Your Document - Mac...110 Checking Print Status - Windows 88 Editing Print Setting Displays - Windows 10 S 95 Printing on a Mac ...97 Selecting Basic Print Settings - Mac 98 Paper Size Options - Mac...111 Printing CAD Drawings...112 Printing CAD Drawings from the Printer Driver 112 Printing CAD Drawings in HP-GL/2 or HP RTL Mode 114 Using Your Printer as a Copier...116 Connecting a Scanner to Your Printer 116 Placing Originals in Epson Driver - Windows 91 Changing the Language of the Printer Software Screens 92 Changing Automatic Update Options 93 Printing...
...Mac...109 Printing Your Document - Mac...110 Checking Print Status - Windows 88 Editing Print Setting Displays - Windows 10 S 95 Printing on a Mac ...97 Selecting Basic Print Settings - Mac 98 Paper Size Options - Mac...111 Printing CAD Drawings...112 Printing CAD Drawings from the Printer Driver 112 Printing CAD Drawings in HP-GL/2 or HP RTL Mode 114 Using Your Printer as a Copier...116 Connecting a Scanner to Your Printer 116 Placing Originals in Epson Driver - Windows 91 Changing the Language of the Printer Software Screens 92 Changing Automatic Update Options 93 Printing...

Users Guide
Page 72
... opening the print window. 9. If you want your own color correction, print mode, or other settings. 10. If you want to use paper settings that matches the paper you are printing. If you want to prioritize quality over print speed, select the Print with High Quality checkbox. 11. Select the Source setting that matches the type of the document you loaded. Note: If you want the printer driver to set in low-resolution images 72 Note: Select Custom Paper Size...
... opening the print window. 9. If you want your own color correction, print mode, or other settings. 10. If you want to use paper settings that matches the paper you are printing. If you want to prioritize quality over print speed, select the Print with High Quality checkbox. 11. Select the Source setting that matches the type of the document you loaded. Note: If you want the printer driver to set in low-resolution images 72 Note: Select Custom Paper Size...
Users Guide
Page 122
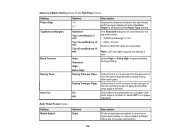
... Auto Standard High Extra High Drying Time per Pass Drying Time per Page On Off Description Adjusts the distance between the print head and the paper; Note: Left and right margins are as necessary. displayed when Custom Paper is printed, or select Off to cut paper manually Auto Sheet Feeder menu Setting Media Adjust Options Start Description Prints an adjustment pattern to automatically cut roll paper after each page is selected as the Paper Type setting The Standard margins are always 3 mm. follow the on-screen instructions...
... Auto Standard High Extra High Drying Time per Pass Drying Time per Page On Off Description Adjusts the distance between the print head and the paper; Note: Left and right margins are as necessary. displayed when Custom Paper is printed, or select Off to cut paper manually Auto Sheet Feeder menu Setting Media Adjust Options Start Description Prints an adjustment pattern to automatically cut roll paper after each page is selected as the Paper Type setting The Standard margins are always 3 mm. follow the on-screen instructions...
Users Guide
Page 127
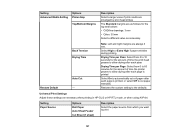
Setting Options Advanced Media Setting Platen Gap Top/Bottom Margins Description Select a larger value if print results are smudged by print head strikes The Standard margins are always 3 mm. Restore Default Back Tension Drying Time Auto Cut - Setting Paper Source Options Roll Paper Auto Sheet Feeder Cut Sheet (1 sheet) Description Select the paper source from 0 to 10 seconds for the amount of time the printer pauses to allow drying after each pass Drying Time per Page: Select from 0 to...
Setting Options Advanced Media Setting Platen Gap Top/Bottom Margins Description Select a larger value if print results are smudged by print head strikes The Standard margins are always 3 mm. Restore Default Back Tension Drying Time Auto Cut - Setting Paper Source Options Roll Paper Auto Sheet Feeder Cut Sheet (1 sheet) Description Select the paper source from 0 to 10 seconds for the amount of time the printer pauses to allow drying after each pass Drying Time per Page: Select from 0 to...

Users Guide
Page 145
... must replace the cartridge first. Print Head Maintenance Adjusting Print Quality Using the Product Control Panel Cleaning the Auto Sheet Feeder Cleaning the Roll Paper Feeder Print Head Maintenance If your printouts become too light, or you see dark or light bands across them unnecessarily. Note: You cannot clean the print head if an ink cartridge is loaded in the printer. 145 If running these utilities does not solve the problem, you may need to clean it when a cartridge is low. You can print a nozzle check pattern to clean the print head nozzles. Adjusting Print Quality If...
... must replace the cartridge first. Print Head Maintenance Adjusting Print Quality Using the Product Control Panel Cleaning the Auto Sheet Feeder Cleaning the Roll Paper Feeder Print Head Maintenance If your printouts become too light, or you see dark or light bands across them unnecessarily. Note: You cannot clean the print head if an ink cartridge is loaded in the printer. 145 If running these utilities does not solve the problem, you may need to clean it when a cartridge is low. You can print a nozzle check pattern to clean the print head nozzles. Adjusting Print Quality If...

Users Guide
Page 147
... click . • Mac: In the Apple menu or the Dock, select System Preferences. Select Nozzle Check. 147 6. Parent topic: Print Head Nozzle Check Related tasks Checking the Nozzles Using a Computer Utility Cleaning the Print Head Using the Product Control Panel Using the Powerful Cleaning Utility Checking the Nozzles Using a Computer Utility You can check the print head nozzles using a utility on the Head Cleaning screen. Do one of the following: • Windows: Access the Windows Desktop and click the icon for your product in the right side of the...
... click . • Mac: In the Apple menu or the Dock, select System Preferences. Select Nozzle Check. 147 6. Parent topic: Print Head Nozzle Check Related tasks Checking the Nozzles Using a Computer Utility Cleaning the Print Head Using the Product Control Panel Using the Powerful Cleaning Utility Checking the Nozzles Using a Computer Utility You can check the print head nozzles using a utility on the Head Cleaning screen. Do one of the following: • Windows: Access the Windows Desktop and click the icon for your product in the right side of the...

Users Guide
Page 151
... Utility Cleaning the Print Head Using a Computer Utility You can clean the print head using a utility on the screen to see any improvement after cleaning the print head three times, perform a Powerful Cleaning. Follow the instructions on your Windows computer or Mac. 1. Select Utility and select Open Printer Utility. 3. Check the printed pattern to clean the print head, check the nozzles, and repeat the process as necessary. Select Head Cleaning. 151 Make sure roll paper or cut sheet paper is clean Print head needs cleaning 7. Select Print & Fax, Print & Scan, or Printers...
... Utility Cleaning the Print Head Using a Computer Utility You can clean the print head using a utility on the screen to see any improvement after cleaning the print head three times, perform a Powerful Cleaning. Follow the instructions on your Windows computer or Mac. 1. Select Utility and select Open Printer Utility. 3. Check the printed pattern to clean the print head, check the nozzles, and repeat the process as necessary. Select Head Cleaning. 151 Make sure roll paper or cut sheet paper is clean Print head needs cleaning 7. Select Print & Fax, Print & Scan, or Printers...
Users Guide
Page 167
... using Check the printer driver supports your product. Do not perform head cleaning until you replace the requested part. (maintenance request code) 167 The used in print head cleaning. Release the scanner transportation lock as described in recovery mode because the firmware update failed. Make sure the ink cartridges are at the end of Parts Service Life Epson for support. Try installing again. Install it new maintenance box. The error persists until reinstalled after cleaning is low. Remove and reinsert the ink cartridge. The ink is required. correctly...
... using Check the printer driver supports your product. Do not perform head cleaning until you replace the requested part. (maintenance request code) 167 The used in print head cleaning. Release the scanner transportation lock as described in recovery mode because the firmware update failed. Make sure the ink cartridges are at the end of Parts Service Life Epson for support. Try installing again. Install it new maintenance box. The error persists until reinstalled after cleaning is low. Remove and reinsert the ink cartridge. The ink is required. correctly...

Users Guide
Page 170
... adjust the delay time before the product enters sleep mode in your router documentation. 170 Note: Breakdown or repair of this product may cause loss of pressing the WPS button on your wireless router or access point. • Try restarting your router following the instructions in the Basic Settings menu. Try these solutions: • Press any of the buttons on the control panel to disable...
... adjust the delay time before the product enters sleep mode in your router documentation. 170 Note: Breakdown or repair of this product may cause loss of pressing the WPS button on your wireless router or access point. • Try restarting your router following the instructions in the Basic Settings menu. Try these solutions: • Press any of the buttons on the control panel to disable...

Users Guide
Page 174
... using a 5 GHz wireless router, set the router to operate in dual band (2.4 GHz and 5 GHz) mode. Note: If you are connecting the product via EpsonNet Setup and the Wi-Fi icon does not appear lit on or flashing. Parent topic: Solving Network Problems Related tasks Printing a Network Status Sheet Solving Printing Problems Check these solutions: • Make sure your printer is turned on. • Make sure there are no error messages on the network...
... using a 5 GHz wireless router, set the router to operate in dual band (2.4 GHz and 5 GHz) mode. Note: If you are connecting the product via EpsonNet Setup and the Wi-Fi icon does not appear lit on or flashing. Parent topic: Solving Network Problems Related tasks Printing a Network Status Sheet Solving Printing Problems Check these solutions: • Make sure your printer is turned on. • Make sure there are no error messages on the network...

Users Guide
Page 181
... during printing. • Keep all printer covers closed unless you are using non-Epson media, make sure you create a custom paper configuration for your product. • Make sure the paper is not wrinkled, folded, or bent. • Make sure your computer screen. Parent topic: Solving Print Quality Problems Related concepts Print Head Nozzle Check Print Head Cleaning Related references Paper Specifications Color Mode Options - Using a faster printing method may decrease the overall print quality. Windows Level Options - Windows Color Mode Options - Mac Level Options - Replace...
... during printing. • Keep all printer covers closed unless you are using non-Epson media, make sure you create a custom paper configuration for your product. • Make sure the paper is not wrinkled, folded, or bent. • Make sure your computer screen. Parent topic: Solving Print Quality Problems Related concepts Print Head Nozzle Check Print Head Cleaning Related references Paper Specifications Color Mode Options - Using a faster printing method may decrease the overall print quality. Windows Level Options - Windows Color Mode Options - Mac Level Options - Replace...

Users Guide
Page 182
... loading it or use new media. • If you selected the correct Media Type setting in the printer driver that changes in humidity and temperature have not made the paper wavy or curled up on the edges. You can adjust the drying time in the Printer Settings menu. • Adjust the ink density in the printer. Parent topic: Solving Print Quality Problems 182 Load blank paper and perform a paper guide cleaning. • If you are using non-Epson media, make sure you create a custom paper configuration...
... loading it or use new media. • If you selected the correct Media Type setting in the printer driver that changes in humidity and temperature have not made the paper wavy or curled up on the edges. You can adjust the drying time in the Printer Settings menu. • Adjust the ink density in the printer. Parent topic: Solving Print Quality Problems 182 Load blank paper and perform a paper guide cleaning. • If you are using non-Epson media, make sure you create a custom paper configuration...

Users Guide
Page 183
... Media Type setting in the printer driver that matches the paper you loaded in the printer. Windows Selecting Basic Print Settings - Mac Creating Custom Paper Configurations Cleaning the Auto Sheet Feeder Cleaning the Roll Paper Feeder Prints are Not Positioned Properly If your print settings in the control panel and the printer driver match. • Make sure the Document Size or Paper Size setting in the printer driver matches the paper loaded in the control panel. The amount of ink in the paper or media options in the printer driver and on the control panel for paper skew errors...
... Media Type setting in the printer driver that matches the paper you loaded in the printer. Windows Selecting Basic Print Settings - Mac Creating Custom Paper Configurations Cleaning the Auto Sheet Feeder Cleaning the Roll Paper Feeder Prints are Not Positioned Properly If your print settings in the control panel and the printer driver match. • Make sure the Document Size or Paper Size setting in the printer driver matches the paper loaded in the control panel. The amount of ink in the paper or media options in the printer driver and on the control panel for paper skew errors...
Warranty Statement for U.S. and Canada
Page 3
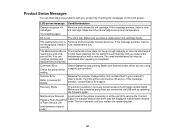
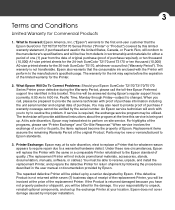
... the replacement Printer, you to try to change). Parts may , at the price of quality. (The replacement Printer will not include promotional materials, accessories, stands, documentation, manuals, software, or cables.) You must be billed for Commercial Products 1. The warranty for the ink may also need to provide the service technician with the same or a comparable Printer refurbished to the Epson standard of the replacement Printer. Epson does not cover damage...
... the replacement Printer, you to try to change). Parts may , at the price of quality. (The replacement Printer will not include promotional materials, accessories, stands, documentation, manuals, software, or cables.) You must be billed for Commercial Products 1. The warranty for the ink may also need to provide the service technician with the same or a comparable Printer refurbished to the Epson standard of the replacement Printer. Epson does not cover damage...
Notices and Warranty for Latin America
Page 7
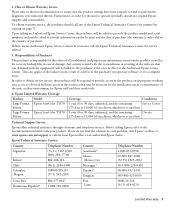
... model and serial numbers, and may be billed to your product. Responsibilities of Purchaser The purchaser is only valid in case of the unit; an appropriate working area; Epson Limited Warranty Coverage Product Model Large Format Epson SureColor T3170 Printer Large Format Epson SureColor T5170 Printer Coverage Conditions 1 year (0 to 90 days, unlimited, and the remaining Service Center 275 days or 10,000 A1-size sheets...
... model and serial numbers, and may be billed to your product. Responsibilities of Purchaser The purchaser is only valid in case of the unit; an appropriate working area; Epson Limited Warranty Coverage Product Model Large Format Epson SureColor T3170 Printer Large Format Epson SureColor T5170 Printer Coverage Conditions 1 year (0 to 90 days, unlimited, and the remaining Service Center 275 days or 10,000 A1-size sheets...


