
Warranty Statement for U.S. and Canada
Page 5
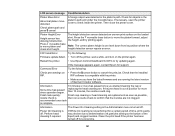
Refer to official Epson documentation, including your User's Guide for in-depth maintenance instruction. Product Specific Exclusions: 1) There is no warranty coverage once the printer...returning a product for repair or replacement. The user-level maintenance includes the following items: a) Clean suction caps (recommended: as needed) b) Replace head cleaning set (recommended: when notification appears on front panel) c) Clean around head (recommended: when replacing head cleaning set or as needed) d) Replace waste ink bottle (recommended: when notification appears on cartridges viii)...
Refer to official Epson documentation, including your User's Guide for in-depth maintenance instruction. Product Specific Exclusions: 1) There is no warranty coverage once the printer...returning a product for repair or replacement. The user-level maintenance includes the following items: a) Clean suction caps (recommended: as needed) b) Replace head cleaning set (recommended: when notification appears on front panel) c) Clean around head (recommended: when replacing head cleaning set or as needed) d) Replace waste ink bottle (recommended: when notification appears on cartridges viii)...

Users Guide
Page 5
... Disposal Guidelines ...102 Replacing the Waste Ink Bottle ...103 Cleaning the Suction Cap...107 Replacing the Head Cleaning Set ...113 Replacing the Wiper Unit and Anti-drying Caps 114 Replacing the Flushing Pad...119 Washing the Ink Tubes...124 Shaking and Replacing the Ink Cartridges 128 Cleaning the Encoder Strip (Carriage Scale) and Replacing the...
... Disposal Guidelines ...102 Replacing the Waste Ink Bottle ...103 Cleaning the Suction Cap...107 Replacing the Head Cleaning Set ...113 Replacing the Wiper Unit and Anti-drying Caps 114 Replacing the Flushing Pad...119 Washing the Ink Tubes...124 Shaking and Replacing the Ink Cartridges 128 Cleaning the Encoder Strip (Carriage Scale) and Replacing the...

Users Guide
Page 11
... (700 ml) Pre-treatment solution (20 liter) Printer maintenance kit Print head cleaning kit Waste ink bottle Printer air filter Large garment platen (16 × 20 inches [40.6 × 50.8 cm]) Medium garment platen (14 × 16 inches [... grip pad Medium platen grip pad Small platen grip pad Grip pad tool Pre-treatment roller set Replacement rollers (3) Hard roller UltraChrome DG ink cartridge - To find the nearest reseller, visit proimaging.epson.com (U.S.) or proimaging.epson.ca (Canada), select your product series and product, and click the Where to Your Printer Optional...
... (700 ml) Pre-treatment solution (20 liter) Printer maintenance kit Print head cleaning kit Waste ink bottle Printer air filter Large garment platen (16 × 20 inches [40.6 × 50.8 cm]) Medium garment platen (14 × 16 inches [... grip pad Medium platen grip pad Small platen grip pad Grip pad tool Pre-treatment roller set Replacement rollers (3) Hard roller UltraChrome DG ink cartridge - To find the nearest reseller, visit proimaging.epson.com (U.S.) or proimaging.epson.ca (Canada), select your product series and product, and click the Where to Your Printer Optional...
Users Guide
Page 18
8 Head cleaning set status 9 Ink cartridge status 10 Total prints (current print job) 11 Preview operation (when printing from a USB memory device and this icon is displayed, press the down arrow button to preview the image) 12 Time before next automatic cleaning Parent topic: Printer Part Locations 18
8 Head cleaning set status 9 Ink cartridge status 10 Total prints (current print job) 11 Preview operation (when printing from a USB memory device and this icon is displayed, press the down arrow button to preview the image) 12 Time before next automatic cleaning Parent topic: Printer Part Locations 18

Users Guide
Page 89
... or plastic tray (commercially available) for optimum results. Before cleaning the suction cap, replacing the head cleaning set, disposing of Used Consumables and Optional Parts Replacing the Waste Ink Bottle Cleaning the Suction Cap Replacing the Head Cleaning Set Washing the Ink Tubes Shaking and Replacing the Ink Cartridges Cleaning the Encoder Strip (Carriage Scale) and Replacing the Air...
... or plastic tray (commercially available) for optimum results. Before cleaning the suction cap, replacing the head cleaning set, disposing of Used Consumables and Optional Parts Replacing the Waste Ink Bottle Cleaning the Suction Cap Replacing the Head Cleaning Set Washing the Ink Tubes Shaking and Replacing the Ink Cartridges Cleaning the Encoder Strip (Carriage Scale) and Replacing the Air...
Users Guide
Page 90
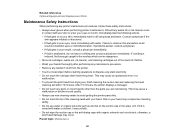
... • If fluid is mixed with water or alcohol, it off using soap and water. This may compromise cleaning ability. • Do not use new cleaning swabs to disperse any static electricity. • Do not touch the carriage shaft inside the printer. If vomiting ... contact with your skin, immediately wash it may occur. Should any loaded T-shirt from drying out, finish cleaning the suction cap and replacing the head cleaning set within 10 minutes. Failure to your hand. Related references Optional Equipment and Replacement Parts Maintenance Safety Instructions When ...
... • If fluid is mixed with water or alcohol, it off using soap and water. This may compromise cleaning ability. • Do not use new cleaning swabs to disperse any static electricity. • Do not touch the carriage shaft inside the printer. If vomiting ... contact with your skin, immediately wash it may occur. Should any loaded T-shirt from drying out, finish cleaning the suction cap and replacing the head cleaning set within 10 minutes. Failure to your hand. Related references Optional Equipment and Replacement Parts Maintenance Safety Instructions When ...

Users Guide
Page 94
... the gaps are adjacent to each other. Note: A complete nozzle cleaning is consumed for all colors or selective color channels, depending on the printer, it before using the printer's control panel settings. 1. Clean the print head only if print quality declines or image colors are faint or have ...gaps, you turn on the cleaning method selected. Note: The first several times, check the condition of the...
... the gaps are adjacent to each other. Note: A complete nozzle cleaning is consumed for all colors or selective color channels, depending on the printer, it before using the printer's control panel settings. 1. Clean the print head only if print quality declines or image colors are faint or have ...gaps, you turn on the cleaning method selected. Note: The first several times, check the condition of the...

Users Guide
Page 95
... see faint printing or gaps in a specific row of nozzles in the check pattern. Repeat for cleaning, press the up or down arrow button to select it is complete, the Settings menu closes. 6. Print a nozzle check pattern to select and then press the right arrow button.... or down arrow button to highlight Head Cleaning, and press the right arrow button to choose one of the media. 2. Head cleaning starts. This occurs due to the environmental temperature and humidity, inertial force of the print head movements, direction of the print head movement, and thickness and texture of...
... see faint printing or gaps in a specific row of nozzles in the check pattern. Repeat for cleaning, press the up or down arrow button to select it is complete, the Settings menu closes. 6. Print a nozzle check pattern to select and then press the right arrow button.... or down arrow button to highlight Head Cleaning, and press the right arrow button to choose one of the media. 2. Head cleaning starts. This occurs due to the environmental temperature and humidity, inertial force of the print head movements, direction of the print head movement, and thickness and texture of...
Users Guide
Page 113
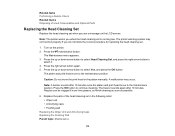
.... The buzzer sounds again after 10 minutes once the platen and print head move the print head or the platen manually. Replace the parts of Used Consumables and Optional Parts Replacing the Head Cleaning Set Replace the head cleaning set when you see a message on the printer. 2. Press the right ... screen. Press the maintenance button. A malfunction may not function properly if you do not follow the correct procedure for replacing the head cleaning set. 1. Press the up or down arrow button to the maintenance position. Note: A buzzer sounds after 10 minutes. Press the ...
.... The buzzer sounds again after 10 minutes once the platen and print head move the print head or the platen manually. Replace the parts of Used Consumables and Optional Parts Replacing the Head Cleaning Set Replace the head cleaning set when you see a message on the printer. 2. Press the right ... screen. Press the maintenance button. A malfunction may not function properly if you do not follow the correct procedure for replacing the head cleaning set. 1. Press the up or down arrow button to the maintenance position. Note: A buzzer sounds after 10 minutes. Press the ...

Users Guide
Page 114
Open the printer cover. 2. Unpack the new wiper unit and retain the packaging for disposing of the used wiper unit. 3. Put on the gloves supplied with replacing the wiper unit and the anti-drying caps. 1. Replacing the Wiper Unit and Anti-drying Caps When you replace the head cleaning set, begin with the head cleaning set. 114
Open the printer cover. 2. Unpack the new wiper unit and retain the packaging for disposing of the used wiper unit. 3. Put on the gloves supplied with replacing the wiper unit and the anti-drying caps. 1. Replacing the Wiper Unit and Anti-drying Caps When you replace the head cleaning set, begin with the head cleaning set. 114
Users Guide
Page 119
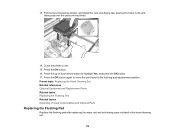
Close the printer cover. 15. Parent topic: Replacing the Head Cleaning Set Related references Optional Equipment and Replacement Parts Related tasks Replacing the Flushing Pad Related topics Disposing of Used Consumables and Optional Parts Replacing the Flushing ... button to the flushing pad replacement position. Press the OK button. 16. Press the OK button again to move the print head to highlight Yes, and press the OK button. 17. Pull the lever forward as shown, and install the new anti-drying cap, placing the holes in the head cleaning set. 119 13.
Close the printer cover. 15. Parent topic: Replacing the Head Cleaning Set Related references Optional Equipment and Replacement Parts Related tasks Replacing the Flushing Pad Related topics Disposing of Used Consumables and Optional Parts Replacing the Flushing ... button to the flushing pad replacement position. Press the OK button. 16. Press the OK button again to move the print head to highlight Yes, and press the OK button. 17. Pull the lever forward as shown, and install the new anti-drying cap, placing the holes in the head cleaning set. 119 13.
Users Guide
Page 123
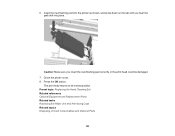
Close the printer cover. 8. Parent topic: Replacing the Head Cleaning Set Related references Optional Equipment and Replacement Parts Related tasks Replacing the Wiper Unit and Anti-drying Caps Related topics Disposing of Used Consumables and Optional Parts 123 Caution: Make sure you hear the pad click into place. Press the OK button. 6. The print head returns to its normal position. Insert the new flushing pad into the printer as shown, and press down on the tab until you insert the new flushing pad correctly or the print head could be damaged. 7.
Close the printer cover. 8. Parent topic: Replacing the Head Cleaning Set Related references Optional Equipment and Replacement Parts Related tasks Replacing the Wiper Unit and Anti-drying Caps Related topics Disposing of Used Consumables and Optional Parts 123 Caution: Make sure you hear the pad click into place. Press the OK button. 6. The print head returns to its normal position. Insert the new flushing pad into the printer as shown, and press down on the tab until you insert the new flushing pad correctly or the print head could be damaged. 7.

Users Guide
Page 153
... nozzles. Parent topic: Using the Control Panel Menus Maintenance Menu Settings Settings on the Maintenance menu let you need to clean the print head Select Selected Nozzles to clean specific nozzles indicated on the nozzle check print pattern. Setting Nozzle Check Head Cleaning Options - If there are additional settings, press the right or left arrow button as instructed on...
... nozzles. Parent topic: Using the Control Panel Menus Maintenance Menu Settings Settings on the Maintenance menu let you need to clean the print head Select Selected Nozzles to clean specific nozzles indicated on the nozzle check print pattern. Setting Nozzle Check Head Cleaning Options - If there are additional settings, press the right or left arrow button as instructed on...
Users Guide
Page 154
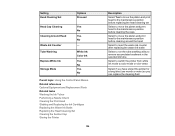
... Replacement Parts Related tasks Washing the Ink Tubes Performing a Nozzle Check Cleaning the Print Head Shaking and Replacing the Ink Cartridges Replacing the Waste Ink Bottle Replacing the Head Cleaning Set Cleaning the Suction Cap Storing the Printer 154 Description Select Yes to move ...(one month or more) so you can replace the cleaning fluid Select to switch the printer from white ink mode to remove accumulated sediment in the selected ink tube. Setting Head Cleaning Set Options Proceed Head Cap Cleaning Cleaning Around Head Waste Ink Counter Tube Washing Replace White Ink Storage Mode...
... Replacement Parts Related tasks Washing the Ink Tubes Performing a Nozzle Check Cleaning the Print Head Shaking and Replacing the Ink Cartridges Replacing the Waste Ink Bottle Replacing the Head Cleaning Set Cleaning the Suction Cap Storing the Printer 154 Description Select Yes to move ...(one month or more) so you can replace the cleaning fluid Select to switch the printer from white ink mode to remove accumulated sediment in the selected ink tube. Setting Head Cleaning Set Options Proceed Head Cap Cleaning Cleaning Around Head Waste Ink Counter Tube Washing Replace White Ink Storage Mode...

Users Guide
Page 155
... lines appear Parent topic: Using the Control Panel Menus Related tasks Aligning the Print Head Cleaning the Print Head Adjusting the Height of the garment. Printer Setup Menu Settings Settings on the Printer Setup menu let you print, delete, and control settings for example) is used to raise the flat surface of the Platen USB File...
... lines appear Parent topic: Using the Control Panel Menus Related tasks Aligning the Print Head Cleaning the Print Head Adjusting the Height of the garment. Printer Setup Menu Settings Settings on the Printer Setup menu let you print, delete, and control settings for example) is used to raise the flat surface of the Platen USB File...
Users Guide
Page 160
... to write to replace all components at the same time. Be sure to USB memory. Head Cleaning Set Life Replace head cleaning set is almost time to replace the head cleaning set handy. USB Memory Error Failed to clean scale and change air filter. Replace the head cleaning set (wiper unit, anti-drying caps, and flushing pad). One of saved files has reached...
... to write to replace all components at the same time. Be sure to USB memory. Head Cleaning Set Life Replace head cleaning set is almost time to replace the head cleaning set handy. USB Memory Error Failed to clean scale and change air filter. Replace the head cleaning set (wiper unit, anti-drying caps, and flushing pad). One of saved files has reached...
Users Guide
Page 161
... printer again. Note: The correct platen height is complete. Restart the printer. • Use Epson Control Dashboard for DTG to confirm that the installed RIP. replacing the head cleaning set replacement as soon as possible, nozzle check is turned off the printer, wait a while, and... turn on the loaded shirt. Finish cap cleaning or head cleaning set . Information The Power On Cleaning setting in the platen's path. If necessary, open the printer cover to cancel the print job. Information 10 minutes or...
... printer again. Note: The correct platen height is complete. Restart the printer. • Use Epson Control Dashboard for DTG to confirm that the installed RIP. replacing the head cleaning set replacement as soon as possible, nozzle check is turned off the printer, wait a while, and... turn on the loaded shirt. Finish cap cleaning or head cleaning set . Information The Power On Cleaning setting in the platen's path. If necessary, open the printer cover to cancel the print job. Information 10 minutes or...
Users Guide
Page 163
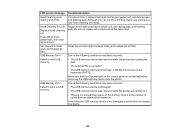
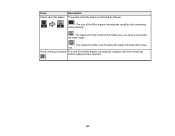
The waste ink bottle is full. Head cleaning set status The size of the filled square corresponds roughly to the time remaining before replacement is required. 163 Replace the waste ink bottle with a new one. The waste ink bottle is almost full. Icons Description Waste ink bottle status The waste ink bottle status is indicated as follows: The size of the filled square corresponds roughly to the remaining bottle capacity. Make sure you have a new waste ink bottle ready.
The waste ink bottle is full. Head cleaning set status The size of the filled square corresponds roughly to the time remaining before replacement is required. 163 Replace the waste ink bottle with a new one. The waste ink bottle is almost full. Icons Description Waste ink bottle status The waste ink bottle status is indicated as follows: The size of the filled square corresponds roughly to the remaining bottle capacity. Make sure you have a new waste ink bottle ready.
Users Guide
Page 165
... of the buttons on , try these sections if you have problems operating your product. Try these solutions: • Press any of the Platen Replacing the Head Cleaning Set Cleaning the Encoder Strip (Carriage Scale) and Replacing the Air Filter Related topics Printing from a USB Memory Device Solving Printer Problems Check these solutions: • Make...
... of the buttons on , try these sections if you have problems operating your product. Try these solutions: • Press any of the Platen Replacing the Head Cleaning Set Cleaning the Encoder Strip (Carriage Scale) and Replacing the Air Filter Related topics Printing from a USB Memory Device Solving Printer Problems Check these solutions: • Make...
Maintenance Guide
Page 5
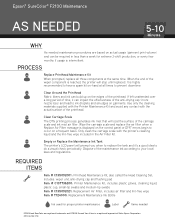
... Vision is a registered logomark of Seiko Epson Corporation. Only clean the carriage scale with the actual surface of the printhead. includes: wiper unit, anti-drying cap and flushing pad Item # C13T736200: Printer Maintenance Kit; Epson® SureColor® F2100 Maintenance AS NEEDED 5-10 Minutes WHY As...edges of the carriage scale and ink mist air filter. REQUIRED ITEMS Item # C13S092001: Printhead Maintenance Kit, also called the Head Cleaning Set; PROCESS Replace Printhead Maintenance Kit When prompted, replace all three components at all times to replace the tank and it can ...
... Vision is a registered logomark of Seiko Epson Corporation. Only clean the carriage scale with the actual surface of the printhead. includes: wiper unit, anti-drying cap and flushing pad Item # C13T736200: Printer Maintenance Kit; Epson® SureColor® F2100 Maintenance AS NEEDED 5-10 Minutes WHY As...edges of the carriage scale and ink mist air filter. REQUIRED ITEMS Item # C13S092001: Printhead Maintenance Kit, also called the Head Cleaning Set; PROCESS Replace Printhead Maintenance Kit When prompted, replace all three components at all times to replace the tank and it can ...


