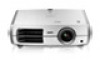
User's Guide
Page 3
... Manual Setting Up the Projector Choosing a Location Installing the Projector Connecting the Cables Connecting Video and Computer Equipment Making Other Connections Installing Batteries in the Remote Control Turning the Projector On and Off Turning On the Projector Turning Off the Projector Selecting the Image Source Positioning the Image Making Basic Adjustments...
... Manual Setting Up the Projector Choosing a Location Installing the Projector Connecting the Cables Connecting Video and Computer Equipment Making Other Connections Installing Batteries in the Remote Control Turning the Projector On and Off Turning On the Projector Turning Off the Projector Selecting the Image Source Positioning the Image Making Basic Adjustments...
User's Guide
Page 5
Limited Warranty 74 Index 76 Contents 5 Problem Solving 58 What To Do When the Lights Come On or Flash 58 Solving Picture Problems 60 Solving Remote Control Problems 63 Where to Get Help 64 Specifications 65 General 65 Lamp 65 Remote Control 66 Dimensions 66 Electrical 66 Environmental 67 Safety 67 Compatible Video Formats 67 ESC/VP21 Command Codes 69 Notices 71 Important Safety Information 71 FCC Compliance Statement 73 Declaration of Conformity 74 Epson America, Inc.
Limited Warranty 74 Index 76 Contents 5 Problem Solving 58 What To Do When the Lights Come On or Flash 58 Solving Picture Problems 60 Solving Remote Control Problems 63 Where to Get Help 64 Specifications 65 General 65 Lamp 65 Remote Control 66 Dimensions 66 Electrical 66 Environmental 67 Safety 67 Compatible Video Formats 67 ESC/VP21 Command Codes 69 Notices 71 Important Safety Information 71 FCC Compliance Statement 73 Declaration of Conformity 74 Epson America, Inc.
User's Guide
Page 9
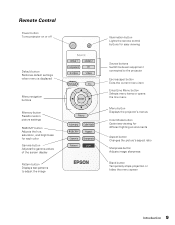
Remote Control Power button Turns projector on or off Default button Restores default settings when menu is displayed Menu navigation buttons Memory button Recalls custom picture ... each color Gamma button Adjusts the gamma values of the screen display Pattern button Displays test patterns to adjust the image Illumination button Lights the remote control buttons for easy viewing Source buttons Switch between equipment connected to the projector Esc (escape) button Exits the current menu item Enter/Line Menu...
Remote Control Power button Turns projector on or off Default button Restores default settings when menu is displayed Menu navigation buttons Memory button Recalls custom picture ... each color Gamma button Adjusts the gamma values of the screen display Pattern button Displays test patterns to adjust the image Illumination button Lights the remote control buttons for easy viewing Source buttons Switch between equipment connected to the projector Esc (escape) button Exits the current menu item Enter/Line Menu...

User's Guide
Page 16
Follow the instructions included with the projector, refer to the table of ESC/VP21 command codes on the remote control. 2. Open the Settings menu, then select Projection. 3. If you are planning to use an AV controller with the mount to install the projector. In ...addition, the projector's Trigger out port can rotate the Epson logo plate 180 degrees when suspending the projector from a ceiling. To suspend the projector from loosening and do not use any type of your screen...
Follow the instructions included with the projector, refer to the table of ESC/VP21 command codes on the remote control. 2. Open the Settings menu, then select Projection. 3. If you are planning to use an AV controller with the mount to install the projector. In ...addition, the projector's Trigger out port can rotate the Epson logo plate 180 degrees when suspending the projector from a ceiling. To suspend the projector from loosening and do not use any type of your screen...
User's Guide
Page 21
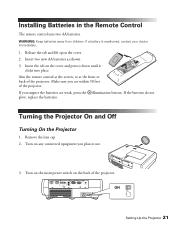
... from children. If you suspect the batteries are within 30 feet of the projector. If a battery is swallowed, contact your doctor immediately. 1. Aim the remote control at the screen, or at the front or back of the projector. Insert the tab on the back of the projector. Installing Batteries in... the Remote Control The remote control uses two AA batteries. Release the tab and lift open the cover. 2. Turn on the main power switch on the cover and ...
... from children. If you suspect the batteries are within 30 feet of the projector. If a battery is swallowed, contact your doctor immediately. 1. Aim the remote control at the screen, or at the front or back of the projector. Insert the tab on the back of the projector. Installing Batteries in... the Remote Control The remote control uses two AA batteries. Release the tab and lift open the cover. 2. Turn on the main power switch on the cover and ...
User's Guide
Page 22
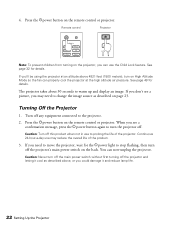
.... When you could damage it and reduce lamp life. 22 Setting Up the Projector Continuous 24-hour-a-day use to the projector. 2. Remote control Projector Note: To prevent children from turning on page 23. The projector takes about 30 seconds to change the image source as described... meters), turn off any equipment connected to prolong the life of the product. 3. Turning Off the Projector 1. Press the Ppower button on the remote control or projector. Caution: Turn off . Caution: Never turn the projector off this product when not in use may need to move the projector...
.... When you could damage it and reduce lamp life. 22 Setting Up the Projector Continuous 24-hour-a-day use to the projector. 2. Remote control Projector Note: To prevent children from turning on page 23. The projector takes about 30 seconds to change the image source as described... meters), turn off any equipment connected to prolong the life of the product. 3. Turning Off the Projector 1. Press the Ppower button on the remote control or projector. Caution: Turn off . Caution: Never turn the projector off this product when not in use may need to move the projector...

User's Guide
Page 23
Setting Up the Projector 23 Press the Source button on the remote control that corresponds to the port to move through the list and select the desired source. Press the source button to which your video source ... to normal viewing. To temporarily turn off the image and darken the screen, press the Blank button on the remote control. Selecting the Image Source The source buttons on the projector and remote control let you see "Problem Solving" on page 58. Press the Blank button again to return to the projector...
Setting Up the Projector 23 Press the Source button on the remote control that corresponds to the port to move through the list and select the desired source. Press the source button to which your video source ... to normal viewing. To temporarily turn off the image and darken the screen, press the Blank button on the remote control. Selecting the Image Source The source buttons on the projector and remote control let you see "Problem Solving" on page 58. Press the Blank button again to return to the projector...

User's Guide
Page 24
... adjust the position any further. If one side of the image is taller than the other, make sure the projector is not centered on the remote control. Positioning the Image If the image is parallel to the screen.
... adjust the position any further. If one side of the image is taller than the other, make sure the projector is not centered on the remote control. Positioning the Image If the image is parallel to the screen.
User's Guide
Page 27
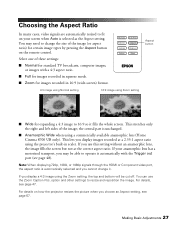
... ratio is unchanged. ■ Anamorphic Wide when using Zoom setting Aspect button ■ Wide for certain image types by pressing the Aspect button on the remote control. You may be cut off. This stretches only the right and left sides of these settings: ■ Normal for standard TV broadcasts, computer images... not at a 2.35:1 aspect ratio using the projector's built-in 16:9 (wide-screen) format. 4:3 image using Normal setting 16:9 image using a commercially available anamorphic lens (Home Cinema 8700 UB only). This lets you use the Zoom Caption Pos.
... ratio is unchanged. ■ Anamorphic Wide when using Zoom setting Aspect button ■ Wide for certain image types by pressing the Aspect button on the remote control. You may be cut off. This stretches only the right and left sides of these settings: ■ Normal for standard TV broadcasts, computer images... not at a 2.35:1 aspect ratio using the projector's built-in 16:9 (wide-screen) format. 4:3 image using Normal setting 16:9 image using a commercially available anamorphic lens (Home Cinema 8700 UB only). This lets you use the Zoom Caption Pos.
User's Guide
Page 28
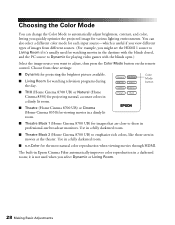
Color Mode button ■ THX (Home Cinema 8700 UB) or Natural (Home Cinema 8350) for projecting natural, accurate colors in a dimly lit room. ■ Theatre (Home Cinema 8700 UB) or Cinema (Home Cinema 8350) for viewing movies in a dimly lit room. ■ Theatre Black 1 (Home Cinema 8700 UB) for images that are close to emphasize... the remote control. Use in a darkened room; Choose from different sources. (For example, you might set the HDMI 1 source to Living Room if it is useful if you select Dynamic or Living Room. 28 Making Basic Adjustments The built-in Epson Cinema Filter ...
Color Mode button ■ THX (Home Cinema 8700 UB) or Natural (Home Cinema 8350) for projecting natural, accurate colors in a dimly lit room. ■ Theatre (Home Cinema 8700 UB) or Cinema (Home Cinema 8350) for viewing movies in a dimly lit room. ■ Theatre Black 1 (Home Cinema 8700 UB) for images that are close to emphasize... the remote control. Use in a darkened room; Choose from different sources. (For example, you might set the HDMI 1 source to Living Room if it is useful if you select Dynamic or Living Room. 28 Making Basic Adjustments The built-in Epson Cinema Filter ...

User's Guide
Page 29
... you have selected on a particular menu screen, you can adjust the gamma and individual RGBCMY color tones using the RGBCMY and Gamma buttons on the remote control. (Not available when x.v.Color is selected as the Color Mode.) RGBCMY Gamma Note: You can also save combinations of picture settings with the Memory...
... you have selected on a particular menu screen, you can adjust the gamma and individual RGBCMY color tones using the RGBCMY and Gamma buttons on the remote control. (Not available when x.v.Color is selected as the Color Mode.) RGBCMY Gamma Note: You can also save combinations of picture settings with the Memory...

User's Guide
Page 30
.... Press the Gamma button to mid-tone values. Use the arrow buttons to move the icon to the area of the following displayed on the remote control and press the Enter button. When the gamma graph appears, use the l or r button to select the point on the projected image. You see...
.... Press the Gamma button to mid-tone values. Use the arrow buttons to move the icon to the area of the following displayed on the remote control and press the Enter button. When the gamma graph appears, use the l or r button to select the point on the projected image. You see...

User's Guide
Page 31
... button. Note: You can also adjust the offset and gain using the RGB setting in the projector's menu system (see the following displayed on the remote control to select the color you want to exit. Adjusting RGBCMY Use this feature to make the adjustment. 4. Use the u or d button on the screen...
... button. Note: You can also adjust the offset and gain using the RGB setting in the projector's menu system (see the following displayed on the remote control to select the color you want to exit. Adjusting RGBCMY Use this feature to make the adjustment. 4. Use the u or d button on the screen...

User's Guide
Page 32
...seconds. (You can use the Ppower button to turn it off, however.) Since you must use the remote control to turn off the projector and let it cool down period. Press Menu to open the Settings ... cool-down . Menu button ■ Control Panel Lock to disable all the buttons on the remote control. 2. Caution: If the Direct Power On setting is turned on (see page 47), using the ...main power switch can still use the remote control. Locking the Projector The projector includes two lock settings to prevent the image from being accidentally...
...seconds. (You can use the Ppower button to turn it off, however.) Since you must use the remote control to turn off the projector and let it cool down period. Press Menu to open the Settings ... cool-down . Menu button ■ Control Panel Lock to disable all the buttons on the remote control. 2. Caution: If the Direct Power On setting is turned on (see page 47), using the ...main power switch can still use the remote control. Locking the Projector The projector includes two lock settings to prevent the image from being accidentally...

User's Guide
Page 33
... can access the full menu or a line menu that lets you press Blank on the remote control while a menu is connected to it . 2. You can access the menu system either from the remote control or the buttons on the projector's control panel. This is useful for the highlighted menu...u or d button to highlight a setting, then press the Enter button. To display the full menu, press the Menu button on the projector or remote control. Making Detailed Adjustments 33 Press Blank again to make detailed adjustments to the image quality-such as the brightness, contrast, sharpness, and color. Making...
... can access the full menu or a line menu that lets you press Blank on the remote control while a menu is connected to it . 2. You can access the menu system either from the remote control or the buttons on the projector's control panel. This is useful for the highlighted menu...u or d button to highlight a setting, then press the Enter button. To display the full menu, press the Menu button on the projector or remote control. Making Detailed Adjustments 33 Press Blank again to make detailed adjustments to the image quality-such as the brightness, contrast, sharpness, and color. Making...

User's Guide
Page 34
When you can press Default on the remote control to reset the menu to its factory setting. 34 Making Detailed Adjustments You may have to press the Enter button to adjust the setting. 3. ...
When you can press Default on the remote control to reset the menu to its factory setting. 34 Making Detailed Adjustments You may have to press the Enter button to adjust the setting. 3. ...
User's Guide
Page 37
..., or if it contains noise or flickering, you 've connected it . ■ Sharpness Image > Sharpness Use this setting by pressing the Sharpness button on the remote control.
..., or if it contains noise or flickering, you 've connected it . ■ Sharpness Image > Sharpness Use this setting by pressing the Sharpness button on the remote control.

User's Guide
Page 41
You can also access this setting by pressing the Gamma button on the remote control. Higher values will increase the contrast of the six color components (red, green, blue, cyan, magenta, yellow). Making Detailed Adjustments 41 Use Offset to ... used when the Color Mode is set to x.v.Color (see page 28). You can also access this setting by pressing the RGBCMY button on the remote control. Lower values will darken the light areas. Use the RGBCMY settings to adjust the hue, saturation, and brightness of dark areas, but tend to...
You can also access this setting by pressing the Gamma button on the remote control. Higher values will increase the contrast of the six color components (red, green, blue, cyan, magenta, yellow). Making Detailed Adjustments 41 Use Offset to ... used when the Color Mode is set to x.v.Color (see page 28). You can also access this setting by pressing the RGBCMY button on the remote control. Lower values will darken the light areas. Use the RGBCMY settings to adjust the hue, saturation, and brightness of dark areas, but tend to...

User's Guide
Page 43
... each of fine detail (such as black text on a white background). ■ Sync. Certain settings may not be applied, depending on the remote control. 1. Press the Memory button on the screen using the memory button on the input signal. After a moment, the image appears on the... remote control. 2. Adjust the synchronization to select the desired setting, then press the Enter button. Select Load Memory. 3. Use the arrow buttons to eliminate ...
... each of fine detail (such as black text on a white background). ■ Sync. Certain settings may not be applied, depending on the remote control. 1. Press the Memory button on the screen using the memory button on the input signal. After a moment, the image appears on the... remote control. 2. Adjust the synchronization to select the desired setting, then press the Enter button. Select Load Memory. 3. Use the arrow buttons to eliminate ...

User's Guide
Page 44
Creating Memory Settings Memory settings can rename memory settings so that is displayed. 4. Renaming Memory Settings With the Home Cinema 8700 UB, you select a name that they are indicated by a green highlight next to save your own name, select Customized and use , then press... button. 44 Making Detailed Adjustments Select the memory name you to select a character, then press the Enter button. Press the Memory button on the remote control. 2. Note: Saved settings are easier for you want to use the keyboard screen to enter the name. When you want to the desired ...
Creating Memory Settings Memory settings can rename memory settings so that is displayed. 4. Renaming Memory Settings With the Home Cinema 8700 UB, you select a name that they are indicated by a green highlight next to save your own name, select Customized and use , then press... button. 44 Making Detailed Adjustments Select the memory name you to select a character, then press the Enter button. Press the Memory button on the remote control. 2. Note: Saved settings are easier for you want to use the keyboard screen to enter the name. When you want to the desired ...


