Technical Brief (Multimedia Projectors)
Page 1
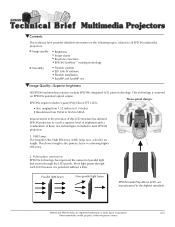
... these five technologies, included in achieving higher efficiency. 2. This shorter length is centered on the following topics, related to all EPSON multimedia projectors: Image quality M Brightness M Image clarity M Keystone correction M EPSON SizeWise™ resizing technology Versatility M Flexible controls M ELP Link IV software M Flexible installation M EasyMP and EasyMP.net Image Quality-Superior brightness All...
... these five technologies, included in achieving higher efficiency. 2. This shorter length is centered on the following topics, related to all EPSON multimedia projectors: Image quality M Brightness M Image clarity M Keystone correction M EPSON SizeWise™ resizing technology Versatility M Flexible controls M ELP Link IV software M Flexible installation M EasyMP and EasyMP.net Image Quality-Superior brightness All...

Technical Brief (Multimedia Projectors)
Page 5
...property of key strokes 2. Technical Brief-Multimedia projectors Page 5 L L LL L LL Versatility-ELP Link IV software EPSON's ELP Link IV software, which customizes projector controls, comes standard or optional with EPSON projectors and allows you to the remote control, and can also be controlled by a control system...: Change projector settings Change the test pattern Specify an image gamma Create a user logo Versatility-Flexible installation EPSON PowerLite projectors can be installed in a variety of ways: Front projection Rear projection Ceiling mount Ceiling mount LL L L LLL Many...
...property of key strokes 2. Technical Brief-Multimedia projectors Page 5 L L LL L LL Versatility-ELP Link IV software EPSON's ELP Link IV software, which customizes projector controls, comes standard or optional with EPSON projectors and allows you to the remote control, and can also be controlled by a control system...: Change projector settings Change the test pattern Specify an image gamma Create a user logo Versatility-Flexible installation EPSON PowerLite projectors can be installed in a variety of ways: Front projection Rear projection Ceiling mount Ceiling mount LL L L LLL Many...
Product Support Bulletin(s)
Page 1
....004 Authorization: Report #02-37 Total Pages: 1 ELP-3000 / 3300 / 3500, PowerLite 5000 / 5000XB / 7000 / 7000XB / 7300 Computer DVD video tearing on Epson Projectors This bulletin was not prevalent until the mass production of the mentioned projectors, Epson has no video tearing of DVD video tearing on Epson projectors manufactured prior to June 1998. The tearing...
....004 Authorization: Report #02-37 Total Pages: 1 ELP-3000 / 3300 / 3500, PowerLite 5000 / 5000XB / 7000 / 7000XB / 7300 Computer DVD video tearing on Epson Projectors This bulletin was not prevalent until the mass production of the mentioned projectors, Epson has no video tearing of DVD video tearing on Epson projectors manufactured prior to June 1998. The tearing...

User Manual
Page 7
... Lamp 81 . . . . . . 82 82 83 84 Video Menu (Image source = Video Audio Menu Option Menu Custom Menu 47 47 . . . . 50 . . . . 51 . . . . 52 . . . . 54 4 Using the ELP Link II Software Installing the Software Connecting Needed Cables Installing the Software from Windows 3.x Installing the Software from Windows 95 Installing the Software from Macintosh...
... Lamp 81 . . . . . . 82 82 83 84 Video Menu (Image source = Video Audio Menu Option Menu Custom Menu 47 47 . . . . 50 . . . . 51 . . . . 52 . . . . 54 4 Using the ELP Link II Software Installing the Software Connecting Needed Cables Installing the Software from Windows 3.x Installing the Software from Windows 95 Installing the Software from Macintosh...
User Manual
Page 10
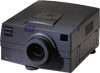
...To get the most out of your computer screen during presentations. The projector's ELP Link II software provides a number of add-on your projector, read this section for a quick summary of Your Projector The PowerLite 5000 projector comes with menus provided for the image display, video, and audio. ...Introduction Getting the Most Out of the important features. The PowerLite 5000 Projector supports IBM® compatible PCs and laptops, as well as a wireless mouse to control operations on features designed to ...
...To get the most out of your computer screen during presentations. The projector's ELP Link II software provides a number of add-on your projector, read this section for a quick summary of Your Projector The PowerLite 5000 projector comes with menus provided for the image display, video, and audio. ...Introduction Getting the Most Out of the important features. The PowerLite 5000 Projector supports IBM® compatible PCs and laptops, as well as a wireless mouse to control operations on features designed to ...

User Manual
Page 11
... the life of the lamp. Sleep Mode Sleep mode conserves electricity by automatically turning off , and provide direct access to access custom functions (with the ELP Link II software) and the projector's menu system. Use the remote control buttons to auto set up, blank, freeze, volume, mute, and image source switching...
... the life of the lamp. Sleep Mode Sleep mode conserves electricity by automatically turning off , and provide direct access to access custom functions (with the ELP Link II software) and the projector's menu system. Use the remote control buttons to auto set up, blank, freeze, volume, mute, and image source switching...

User Manual
Page 12
... accessories from your projector to a second Macintosh. Introduction Both a soft and hard case are available. ELP communication cable set ELPKC04 Computer cable ELPKC02 MAC adapter set ELPAP01 You can connect your PowerLite 5000 dealer or by calling EPSON Accessories at (800) 873-7766. Lamp with Filter ELPLP03 l Communication cable set to connect to a second...
... accessories from your projector to a second Macintosh. Introduction Both a soft and hard case are available. ELP communication cable set ELPKC04 Computer cable ELPKC02 MAC adapter set ELPAP01 You can connect your PowerLite 5000 dealer or by calling EPSON Accessories at (800) 873-7766. Lamp with Filter ELPLP03 l Communication cable set to connect to a second...
User Manual
Page 13
... installation procedures that apply to use the special presentation functions. Chapter 3, "Using the Projector Menus," describes how to your PowerLite 5000 projector. Chapter 4, "Using the ELP Link II Software," describes how to use the ELP Link II software to control the computer and use the menus to maintain the projector in good working order...
... installation procedures that apply to use the special presentation functions. Chapter 3, "Using the Projector Menus," describes how to your PowerLite 5000 projector. Chapter 4, "Using the ELP Link II Software," describes how to use the ELP Link II software to control the computer and use the menus to maintain the projector in good working order...

User Manual
Page 20
... need all these components: 0 Projector 0 Lens cover Remote control 2 AA batteries Power cord Video cable Audio cable Audio/visual (A/V) cable Macintosh adapter set Video adapter ELP Link II Communication Kit Main cable Mouse cable for PS/2 Mouse cable for Serial Mouse cable for Macintosh Monitor adapter Serial cable Macintosh serial cable...
... need all these components: 0 Projector 0 Lens cover Remote control 2 AA batteries Power cord Video cable Audio cable Audio/visual (A/V) cable Macintosh adapter set Video adapter ELP Link II Communication Kit Main cable Mouse cable for PS/2 Mouse cable for Serial Mouse cable for Macintosh Monitor adapter Serial cable Macintosh serial cable...

User Manual
Page 27
To also view the video on all connectors. 2. d. Tighten the screws on the computer monitor, connect the computer monitor's monitor cable to the projector. mouse cable Connecting to view the video output but the projection screen is behind you need to a Computer This is useful when you . c. The main cable connects the mouse cable (needed to use the remote control as a mouse) and serial cable (needed to use the ELP Link II software and the Effects buttons on the remote control) from your computer to the projector's Monitor port. Connect the main cable.
To also view the video on all connectors. 2. d. Tighten the screws on the computer monitor, connect the computer monitor's monitor cable to the projector. mouse cable Connecting to view the video output but the projection screen is behind you need to a Computer This is useful when you . c. The main cable connects the mouse cable (needed to use the remote control as a mouse) and serial cable (needed to use the ELP Link II software and the Effects buttons on the remote control) from your computer to the projector's Monitor port. Connect the main cable.

User Manual
Page 28
... the serial cable to make sure they are connecting a second computer.) b. If your system uses a serial mouse, perform steps b and c using the ELP Link II software or to use ELP Link II software if your computer. Connect one end of the main cable. Connect the other end of the mouse Ps/2 mouse...
... the serial cable to make sure they are connecting a second computer.) b. If your system uses a serial mouse, perform steps b and c using the ELP Link II software or to use ELP Link II software if your computer. Connect one end of the main cable. Connect the other end of the mouse Ps/2 mouse...

User Manual
Page 31
a. The main cable connects the mouse cable (needed to use the remote control as a mouse) and serial cable (needed to the projector. Connect the small end of the PS/2 mouse cable included with the projector to the mouse terminal on the remote control) to use the ELP Link II software and the Effects buttons on the square end of the main cable. Connect one end of the main cable to a Computer Connecting to the projector's Mouse/Corn 1 port. (Use the Mouse/Corn 2 port if you are connecting a second computer.) b. Connect the main cable.
a. The main cable connects the mouse cable (needed to use the remote control as a mouse) and serial cable (needed to the projector. Connect the small end of the PS/2 mouse cable included with the projector to the mouse terminal on the remote control) to use the ELP Link II software and the Effects buttons on the square end of the main cable. Connect one end of the main cable to a Computer Connecting to the projector's Mouse/Corn 1 port. (Use the Mouse/Corn 2 port if you are connecting a second computer.) b. Connect the main cable.

User Manual
Page 32
... PS/2 mouse cable to the mouse port on the square end of your laptop uses a serial mouse, perform steps b and c using the ELP Link II software or to use ELP Link II software if your laptop to the serial terminal on your laptop. h. d. c. If your computer. Tighten the screws on the back...
... PS/2 mouse cable to the mouse port on the square end of your laptop uses a serial mouse, perform steps b and c using the ELP Link II software or to use ELP Link II software if your laptop to the serial terminal on your laptop. h. d. c. If your computer. Tighten the screws on the back...

User Manual
Page 36
a. Connect the MAC mouse cable to the mouse terminal on the other end of the main cable to the projector's Mouse/Corn 1 port. (Use the Mouse/Corn 2 to the projector. Connect the main cable. The main cable connects the mouse cable (needed to use the remote control as a mouse) and serial cable (needed to use the ELP Link II software) from your Macintosh to connect a second computer.) b. 2. Connect the small end of the main cable. 1 l Installation
a. Connect the MAC mouse cable to the mouse terminal on the other end of the main cable to the projector's Mouse/Corn 1 port. (Use the Mouse/Corn 2 to the projector. Connect the main cable. The main cable connects the mouse cable (needed to use the remote control as a mouse) and serial cable (needed to use the ELP Link II software) from your Macintosh to connect a second computer.) b. 2. Connect the small end of the main cable. 1 l Installation

User Manual
Page 37
c. If you are planning to use the ELP Link II software, connect either end of the serial cable to the serial terminal on the large end of the audio cable to your Macintosh. e. ...
c. If you are planning to use the ELP Link II software, connect either end of the serial cable to the serial terminal on the large end of the audio cable to your Macintosh. e. ...

User Manual
Page 40
c. Connect the small end of the main cable to the mouse port on the other end of the MAC mouse cable to the projector's Mouse/Com 1 port. (Use the Mouse/Com 2 port if you are connecting a second computer.) b. Connect the mouse connector of the main cable. Connect the MAC mouse cable to the projector. a. The main cable connects the mouse cable (needed to use the remote control as a mouse) and serial cable (needed to use the ELP Link II software) to the mouse terminal on the back of the Power-Book. 1 l Installation Connect the main cable.
c. Connect the small end of the main cable to the mouse port on the other end of the MAC mouse cable to the projector's Mouse/Com 1 port. (Use the Mouse/Com 2 port if you are connecting a second computer.) b. Connect the mouse connector of the main cable. Connect the MAC mouse cable to the projector. a. The main cable connects the mouse cable (needed to use the remote control as a mouse) and serial cable (needed to use the ELP Link II software) to the mouse terminal on the back of the Power-Book. 1 l Installation Connect the main cable.

User Manual
Page 41
... a Computer d. Connect one end of the audio cable to the Audio In 1 jack on all connectors to make sure they are planning to use the ELP Link II software, connect either end of the serial cable to your Power-Book. a. Connect the other end of the audio cable to the serial...
... a Computer d. Connect one end of the audio cable to the Audio In 1 jack on all connectors to make sure they are planning to use the ELP Link II software, connect either end of the serial cable to your Power-Book. a. Connect the other end of the audio cable to the serial...

User Manual
Page 56
... (such as a mouse pointer when the projector is connected to the computer with all cables in the ELP Link II communications kit Effects buttons Use to display special effects in conjunction with the ELP Link II software. Blank Clears the screen of special effects and switches to optimize it for projection. Pointer...
... (such as a mouse pointer when the projector is connected to the computer with all cables in the ELP Link II communications kit Effects buttons Use to display special effects in conjunction with the ELP Link II software. Blank Clears the screen of special effects and switches to optimize it for projection. Pointer...

User Manual
Page 57
Use to assign functions to control the printer instead of the remote control. Keeps the current computer or video image on the screen. Cuts off audio. Using the Remote Control Button Resize Custom Freeze Mute -Volume + Power Function Switches the display dot mode and resize mode (for VGA and XGA input). Adjusts the volume Starts or stops the projector Control Panel Enter button You can program and access the custom features only when you are using the ELP Link II software. However, you can use the control panel to the Effects keys using the remote control.
Use to assign functions to control the printer instead of the remote control. Keeps the current computer or video image on the screen. Cuts off audio. Using the Remote Control Button Resize Custom Freeze Mute -Volume + Power Function Switches the display dot mode and resize mode (for VGA and XGA input). Adjusts the volume Starts or stops the projector Control Panel Enter button You can program and access the custom features only when you are using the ELP Link II software. However, you can use the control panel to the Effects keys using the remote control.

User Manual
Page 77
Using the ELP Link II Software T he ELP Link II software is a utility you can run from your desktop or laptop computer to control projector features and configure special effect buttons on the remote control.
Using the ELP Link II Software T he ELP Link II software is a utility you can run from your desktop or laptop computer to control projector features and configure special effect buttons on the remote control.

