
Operation Guide - EasyMP Monitor v4.40
Page 2
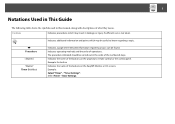
Example: Select "Timer" - Caution Indicates procedures which may result in this manual, along with descriptions of what they mean. Indicates the name of the numbered steps. "Timer Settings". Select Timer - 2 Notations Used in This Guide The ... shows the symbols used in damage or injury if sufficient care is not taken. Indicates operating methods and the order of the buttons on the projector's remote control or the control panel. q s Procedure [ (Name) ] "(Name)" Timer (Boldface) Indicates additional information and points which may be carried out in the order ...
Example: Select "Timer" - Caution Indicates procedures which may result in this manual, along with descriptions of what they mean. Indicates the name of the numbered steps. "Timer Settings". Select Timer - 2 Notations Used in This Guide The ... shows the symbols used in damage or injury if sufficient care is not taken. Indicates operating methods and the order of the buttons on the projector's remote control or the control panel. q s Procedure [ (Name) ] "(Name)" Timer (Boldface) Indicates additional information and points which may be carried out in the order ...
Operation Guide - EasyMP Monitor v4.40
Page 3
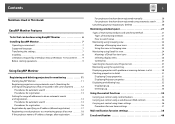
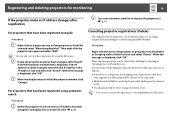
...by specifying an IP address (Manual registration 17 Registering several projectors to a monitoring group all at once 18 If the projector name or IP address changes after registration 20 For projectors that have been registered manually 20 For projectors that have been registered using automatic... search 20 Cancelling projector registrations (Delete 20 Monitoring window layout 21 ...
...by specifying an IP address (Manual registration 17 Registering several projectors to a monitoring group all at once 18 If the projector name or IP address changes after registration 20 For projectors that have been registered manually 20 For projectors that have been registered using automatic... search 20 Cancelling projector registrations (Delete 20 Monitoring window layout 21 ...

Operation Guide - EasyMP Monitor v4.40
Page 12
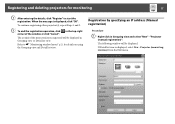
... registration) window will be detected. s p.17 q • You can also carry out this operation by specifying an IP address (Manual registration)". "Projector (automatic search)". Projector (automatic search) from the Edit menu. • Projectors that are located in the same segment) Procedures for automatic search Procedure A Right-click in the list, use "Registration by selecting...
... registration) window will be detected. s p.17 q • You can also carry out this operation by specifying an IP address (Manual registration)". "Projector (automatic search)". Projector (automatic search) from the Edit menu. • Projectors that are located in the same segment) Procedures for automatic search Procedure A Right-click in the list, use "Registration by selecting...
Operation Guide - EasyMP Monitor v4.40
Page 17
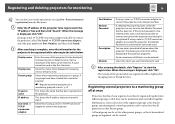
... the registration. If Detail list view is displayed, click "OK". C To end the registration operation, click corner of the projector(s) you registered will be displayed in Grouping view or Detail list view. "Projector (manual registration)". Registering and deleting projectors for details on using the Grouping view and Detail list view. To continue registering other...
... the registration. If Detail list view is displayed, click "OK". C To end the registration operation, click corner of the projector(s) you registered will be displayed in Grouping view or Detail list view. "Projector (manual registration)". Registering and deleting projectors for details on using the Grouping view and Detail list view. To continue registering other...
Operation Guide - EasyMP Monitor v4.40
Page 18
... the table below. Up to a maximum of the projector(s) you registered will not be monitored and controlled together. If using a serial W TCP/IP conversion adapter to connect the projector, enter the port number. Projector (manual registration) from the Edit menu. B Enter the IP... address of the registered groups as the first character. s "Registering several projectors to a monitoring group all at this time, it is...
... the table below. Up to a maximum of the projector(s) you registered will not be monitored and controlled together. If using a serial W TCP/IP conversion adapter to connect the projector, enter the port number. Projector (manual registration) from the Edit menu. B Enter the IP... address of the registered groups as the first character. s "Registering several projectors to a monitoring group all at this time, it is...
Operation Guide - EasyMP Monitor v4.40
Page 20
...the Edit menu. q You can be deleted if they are as follows. • If you select a Group icon in Grouping view, all projectors that have been registered manually Procedure A Right-click on the desired icons. • Use drag and drop to be deleted at the same time. • Hold down ...the Ctrl key on the keyboard while clicking on a projector icon in Grouping view or Detail list view. When the message is displayed, click "OK". For projectors ...
...the Edit menu. q You can be deleted if they are as follows. • If you select a Group icon in Grouping view, all projectors that have been registered manually Procedure A Right-click on the desired icons. • Use drag and drop to be deleted at the same time. • Hold down ...the Ctrl key on the keyboard while clicking on a projector icon in Grouping view or Detail list view. When the message is displayed, click "OK". For projectors ...
Quick Start
Page 4
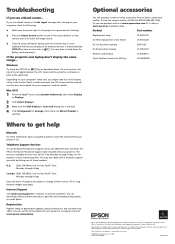
...-7661 and enter the PIN on both the LCD screen and the external monitor port are registered trademarks of Seiko Epson Corporation. PowerLite and PrivateLine are enabled. This information is selected. 4 Click Arrangement or Arrange, then make sure both at www...in those marks. This service is selected. It may be labelled CRT/LCD or have to get help Manuals For more information about using the projector, install the manuals from an Epson authorized reseller. Optional accessories You can purchase screens or other accessories from your computer, check the following: ...
...-7661 and enter the PIN on both the LCD screen and the external monitor port are registered trademarks of Seiko Epson Corporation. PowerLite and PrivateLine are enabled. This information is selected. 4 Click Arrangement or Arrange, then make sure both at www...in those marks. This service is selected. It may be labelled CRT/LCD or have to get help Manuals For more information about using the projector, install the manuals from an Epson authorized reseller. Optional accessories You can purchase screens or other accessories from your computer, check the following: ...
User's Guide
Page 10
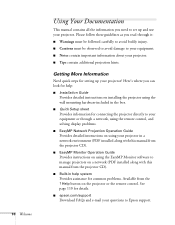
... common problems. Available from the projector CD). ■ Built-in a network environment (PDF installed along with this manual from the ? Here's where you can look for details. ■ epson.com/support Download FAQs and e-mail your projector. See page 110 for help system... Provides assistance for connecting the projector directly to your equipment or through it: ...
... common problems. Available from the projector CD). ■ Built-in a network environment (PDF installed along with this manual from the ? Here's where you can look for details. ■ epson.com/support Download FAQs and e-mail your projector. See page 110 for help system... Provides assistance for connecting the projector directly to your equipment or through it: ...

User's Guide
Page 12
... use the original packaging (or the equivalent) when you need to send the projector to ship the projector. See page 107 for instructions on mounting the projector on a wall. Save all these parts: 12 Welcome Projector PDF manuals and registration CD-ROM Projector software CD-ROM Power cord Remote control 2 AA batteries (for remote control) Security...
... use the original packaging (or the equivalent) when you need to send the projector to ship the projector. See page 107 for instructions on mounting the projector on a wall. Save all these parts: 12 Welcome Projector PDF manuals and registration CD-ROM Projector software CD-ROM Power cord Remote control 2 AA batteries (for remote control) Security...
User's Guide
Page 25
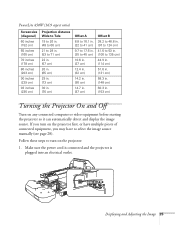
... multiple pieces of connected equipment, you may have to select the image source manually (see page 28). Displaying and Adjusting the Image 25 Make sure the power cord is connected and the projector is plugged into an electrical outlet. PowerLite 450W (16:9 aspect ratio) Screen size (diagonal) 60 inches (152 cm) 65 inches (165....6 to 53 in. (106 to 135 cm) 44.9 in. (114 cm) 51.6 in. (131 cm) 58.3 in. (148 cm) 60.3 in. (153 cm) Turning the Projector On and Off Turn on the projector: 1. If you turn on any connected computer or video equipment before starting the...
... multiple pieces of connected equipment, you may have to select the image source manually (see page 28). Displaying and Adjusting the Image 25 Make sure the power cord is connected and the projector is plugged into an electrical outlet. PowerLite 450W (16:9 aspect ratio) Screen size (diagonal) 60 inches (152 cm) 65 inches (165....6 to 53 in. (106 to 135 cm) 44.9 in. (114 cm) 51.6 in. (131 cm) 58.3 in. (148 cm) 60.3 in. (153 cm) Turning the Projector On and Off Turn on the projector: 1. If you turn on any connected computer or video equipment before starting the...

User's Guide
Page 45
...available USB port on your notebook or desktop computer. You can connect an optional audio cable if you see your computer screen as the projector is recognized and the software is installed, you want to install the software. 6. See page 113 for instructions. On Mac OS,...Messages appear on the remote control or the projector. 7. Connect the square end of the cable to install the Epson USB Display software. If you see a "Digital Signature Warning," select Continue or Continue Anyway. (You see page 53). You can install it manually. Connecting to Computers, USB Devices, and ...
...available USB port on your notebook or desktop computer. You can connect an optional audio cable if you see your computer screen as the projector is recognized and the software is installed, you want to install the software. 6. See page 113 for instructions. On Mac OS,...Messages appear on the remote control or the projector. 7. Connect the square end of the cable to install the Epson USB Display software. If you see a "Digital Signature Warning," select Continue or Continue Anyway. (You see page 53). You can install it manually. Connecting to Computers, USB Devices, and ...
User's Guide
Page 63
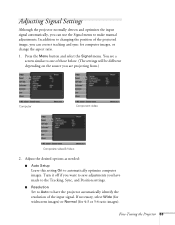
...to Auto to one of the projected image, you can use the Signal menu to automatically optimize computer images. Adjusting Signal Settings Although the projector normally detects and optimizes the input signal automatically, you can correct tracking and sync for 4:3 or 5:4 ratio images). Adjust the desired ...options as needed: ■ Auto Setup Leave this setting On to make manual adjustments. In addition to changing the position of those below. (The settings will be different depending on the source you are projecting from.) ...
...to Auto to one of the projected image, you can use the Signal menu to automatically optimize computer images. Adjusting Signal Settings Although the projector normally detects and optimizes the input signal automatically, you can correct tracking and sync for 4:3 or 5:4 ratio images). Adjust the desired ...options as needed: ■ Auto Setup Leave this setting On to make manual adjustments. In addition to changing the position of those below. (The settings will be different depending on the source you are projecting from.) ...

User's Guide
Page 80
2. As a security feature, you can configure your connection manually as described in the next section. If you have the optional USB key, you can fasten the module using the screw that came with it. Or, you can use Quick Wireless connection as described on page 81. 80 Using the Projector on a Network Insert screw here 4. Close the air filter cover. Insert the wireless LAN module as shown. 3.
2. As a security feature, you can configure your connection manually as described in the next section. If you have the optional USB key, you can fasten the module using the screw that came with it. Or, you can use Quick Wireless connection as described on page 81. 80 Using the Projector on a Network Insert screw here 4. Close the air filter cover. Insert the wireless LAN module as shown. 3.

User's Guide
Page 115
.... ■ Make sure the cables are connected correctly, as , or it . Check your computer's documentation or online help for details. See your notebook's manual or online help for details. Open System Preferences. 2. On most systems, the key lets you may have an icon such as described beginning on page... 44. ■ If you've connected a computer and one or more video sources, you toggle between the LCD screen and the projector, or display on , the function Fn key that both the LCD screen and external monitor port are already turned on both at the same time...
.... ■ Make sure the cables are connected correctly, as , or it . Check your computer's documentation or online help for details. See your notebook's manual or online help for details. Open System Preferences. 2. On most systems, the key lets you may have an icon such as described beginning on page... 44. ■ If you've connected a computer and one or more video sources, you toggle between the LCD screen and the projector, or display on , the function Fn key that both the LCD screen and external monitor port are already turned on both at the same time...

User's Guide
Page 118
...the different technologies used, your projected image may look heavy or blurred. The image is needed, you can fine-tune the Tracking and Sync settings manually using the Signal menu, as your notebook or computer monitor. See page 30 for the Auto button to appear as described on page 64. ... bands. 3. Adjust the Tracking to increase the image sharpness. Press the Auto button on the remote control or the Enter button on the projector to adjust the tracking and sync settings as described in the Image menu. You see vertical bands or the image still looks blurry after trying...
...the different technologies used, your projected image may look heavy or blurred. The image is needed, you can fine-tune the Tracking and Sync settings manually using the Signal menu, as your notebook or computer monitor. See page 30 for the Auto button to appear as described on page 64. ... bands. 3. Adjust the Tracking to increase the image sharpness. Press the Auto button on the remote control or the Enter button on the projector to adjust the tracking and sync settings as described in the Image menu. You see vertical bands or the image still looks blurry after trying...

User's Guide
Page 169
...source, 28 Light output specifications, 127 Lights, status, 111 to 112 Locking buttons, 73 to 74 projector, 74 Logo, saving on projector, 71 to 73 M Macintosh display problems, 115 selecting network settings, 86 Manuals, 10 Menus changing settings, 60 to 61 default settings, restoring, 61 Extended, 67 to 68 Image,... 65 to 66 Signal, 63 to 64 User's Logo, 72 Mic Input Level setting, 66 Microphone, connecting, 55 Monitor, connecting external, 48 Monitoring projector EasyMP Monitor, 75 e-mail notifications, 91 to 92 SNMP, 92 to 93 using browser, 94 Mouse connecting cable for remote, 47 to 48 using ...
...source, 28 Light output specifications, 127 Lights, status, 111 to 112 Locking buttons, 73 to 74 projector, 74 Logo, saving on projector, 71 to 73 M Macintosh display problems, 115 selecting network settings, 86 Manuals, 10 Menus changing settings, 60 to 61 default settings, restoring, 61 Extended, 67 to 68 Image,... 65 to 66 Signal, 63 to 64 User's Logo, 72 Mic Input Level setting, 66 Microphone, connecting, 55 Monitor, connecting external, 48 Monitoring projector EasyMP Monitor, 75 e-mail notifications, 91 to 92 SNMP, 92 to 93 using browser, 94 Mouse connecting cable for remote, 47 to 48 using ...


