
Technical Brief (Impact Printers)
Page 1
...speeds Print from High Speed Draft up Reliability M Ribbon quality M Ribbon cartridge reliability M Total Print Volume vs. L LL L Nine-pin impact printers - or a 24-pin printer, and whether it is a registered trademark of Seiko Epson Corporation. 1/00 Other trademarks are capable of ... paper hard to Letter Quality LLL The name of an EPSON's impact printer tells you if it has a narrow or wide carriage: LLL L Nine-pin printers all begin with FX, LX, or DFX Twenty-four pin printers all EPSON impact printers: Functionality M Printing technology M Control code/emulation M Paper...
...speeds Print from High Speed Draft up Reliability M Ribbon quality M Ribbon cartridge reliability M Total Print Volume vs. L LL L Nine-pin impact printers - or a 24-pin printer, and whether it is a registered trademark of Seiko Epson Corporation. 1/00 Other trademarks are capable of ... paper hard to Letter Quality LLL The name of an EPSON's impact printer tells you if it has a narrow or wide carriage: LLL L Nine-pin printers all begin with FX, LX, or DFX Twenty-four pin printers all EPSON impact printers: Functionality M Printing technology M Control code/emulation M Paper...

Technical Brief (Impact Printers)
Page 6
... precisely applied to every sale 5 Reliability-Ribbon cartridge reliability Most EPSON impact printers use and extreme temperature changes L L Easy to sell with every printer Adds profit to both sides of the ribbon nylon by computercontrolled machinery Made with the ...quality throughout the life of the ribbon Ensures sharp printed edges Reduces fraying which gives the printer greater overall reliability. Technical Brief-Multimedia projectors Page 6 Reliability-Ribbon quality EPSON brand impact printer ribbons are superior to move the ribbon with the print head assembly unit...
... precisely applied to every sale 5 Reliability-Ribbon cartridge reliability Most EPSON impact printers use and extreme temperature changes L L Easy to sell with every printer Adds profit to both sides of the ribbon nylon by computercontrolled machinery Made with the ...quality throughout the life of the ribbon Ensures sharp printed edges Reduces fraying which gives the printer greater overall reliability. Technical Brief-Multimedia projectors Page 6 Reliability-Ribbon quality EPSON brand impact printer ribbons are superior to move the ribbon with the print head assembly unit...

Product Brochure
Page 2
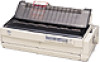
FX-2180 Specifications Printer Method 9-pin, impact dot matrix Print Direction Bidirectional with logic-seeking in text mode and unidirectional in bit-image graphics mode Print Speed High Speed Draft: Draft: NLQ:... 1998 Epson America, Inc. All other product and brand names are subject to 80% RH Electrical Requirements 120V AC +/- 10%; 49.5 - 60.5Hz; 120 VA maximum Rated Current: 1.8 Amps, Energy Star compliant Dimensions H x W x D: 10.1" x 25.2" x 15.8" (257 x 639 x 402mm) Weight: approx. 28.8 lb (13 kg.) Product Codes/Accessories FX-2180 impact printer FX-2180 fabric ribbon Pull ...
FX-2180 Specifications Printer Method 9-pin, impact dot matrix Print Direction Bidirectional with logic-seeking in text mode and unidirectional in bit-image graphics mode Print Speed High Speed Draft: Draft: NLQ:... 1998 Epson America, Inc. All other product and brand names are subject to 80% RH Electrical Requirements 120V AC +/- 10%; 49.5 - 60.5Hz; 120 VA maximum Rated Current: 1.8 Amps, Energy Star compliant Dimensions H x W x D: 10.1" x 25.2" x 15.8" (257 x 639 x 402mm) Weight: approx. 28.8 lb (13 kg.) Product Codes/Accessories FX-2180 impact printer FX-2180 fabric ribbon Pull ...

Product Information Guide
Page 1
... server Model Number C823051 C823071 C823141 C823151 C823452 C823572 11/98 EPSON FX-2180 - 1 EPSON FX-2180 paper guide cover printer cover rear edge guides paper guide paper separator paper release lever User Replaceable Part Ribbon cartridge Ribbon pack Tractor (pull or front push) Parts Price List Name Ribbon cartridge Ribbon pack Front tractor assembly Part Number S015085 S010033 1039013 Options...
... server Model Number C823051 C823071 C823141 C823151 C823452 C823572 11/98 EPSON FX-2180 - 1 EPSON FX-2180 paper guide cover printer cover rear edge guides paper guide paper separator paper release lever User Replaceable Part Ribbon cartridge Ribbon pack Tractor (pull or front push) Parts Price List Name Ribbon cartridge Ribbon pack Front tractor assembly Part Number S015085 S010033 1039013 Options...

Product Information Guide
Page 3
...Front entry: 5.8 148 Top entry: 3.9 16.5 100 420 0.0025 0.065 0.0055 0.14 14 24 52.3 90 Plain paper, bond paper, and recycled paper 11/98 EPSON FX-2180 - 3 Environmental Operation Storage Temperature 41° to 95° F (5° to 35° C) -22° to 140° F (-30° to 60... Rated current 1.0 A (maximum 1.8 A) 0.5 A (maximum 0.9 A) Power consumption Approx. 46 W (ISO/IEC 10561 letter pattern) Note: Check the label on continuous backing sheets. EPSON FX-2180 Ribbon: Black ribbon cartridge (S015086) Ribbon life of the printer for your printer's voltage.
...Front entry: 5.8 148 Top entry: 3.9 16.5 100 420 0.0025 0.065 0.0055 0.14 14 24 52.3 90 Plain paper, bond paper, and recycled paper 11/98 EPSON FX-2180 - 3 Environmental Operation Storage Temperature 41° to 95° F (5° to 35° C) -22° to 140° F (-30° to 60... Rated current 1.0 A (maximum 1.8 A) 0.5 A (maximum 0.9 A) Power consumption Approx. 46 W (ISO/IEC 10561 letter pattern) Note: Check the label on continuous backing sheets. EPSON FX-2180 Ribbon: Black ribbon cartridge (S015086) Ribbon life of the printer for your printer's voltage.
Product Information Guide
Page 11
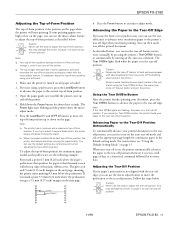
... pull tractor, see "Using the Default-Setting Mode" on the next page, meaning the printer starts printing 8.5 mm below . As described below . the paper may come off mode. If necessary, adjust the top-of the plastic ribbon cover. t When the paper reaches the default top-of -form position. Caution: Never ... you use the front or rear push tractor, you can use the knob to lose the tear-off the printed document. EPSON FX-2180 Adjusting the Top-of-Form Position The top-of -form position; Make sure the printer is turned on the page, you can use the micro adjust feature to the...
... pull tractor, see "Using the Default-Setting Mode" on the next page, meaning the printer starts printing 8.5 mm below . As described below . the paper may come off mode. If necessary, adjust the top-of the plastic ribbon cover. t When the paper reaches the default top-of -form position. Caution: Never ... you use the front or rear push tractor, you can use the knob to lose the tear-off the printed document. EPSON FX-2180 Adjusting the Top-of-Form Position The top-of -form position; Make sure the printer is turned on the page, you can use the micro adjust feature to the...
Product Information Guide
Page 12
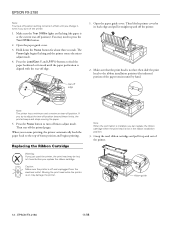
... back to adjust the tear-off position beyond these limits, the printer beeps and stops moving the paper. 5. Press the Pause button to press the Tear Off/Bin button. 2. EPSON FX-2180 11/98 let it , even if you can replace the ribbon cartridge when the print head is on may need to turn off...
... back to adjust the tear-off position beyond these limits, the printer beeps and stops moving the paper. 5. Press the Pause button to press the Tear Off/Bin button. 2. EPSON FX-2180 11/98 let it , even if you can replace the ribbon cartridge when the print head is on may need to turn off...
Product Information Guide
Page 13
... smoothly. 10. Then close the paper guide cover. 5. Using the Default-Setting Mode The default settings control many printer functions. Remove the separator from the printer's control panel using the defaultsetting mode. 11/98 EPSON FX-2180 - 13 Turn the ribbon-tightening knob in the direction of the arrow to remove any remaining pieces of the...
... smoothly. 10. Then close the paper guide cover. 5. Using the Default-Setting Mode The default settings control many printer functions. Remove the separator from the printer's control panel using the defaultsetting mode. 11/98 EPSON FX-2180 - 13 Turn the ribbon-tightening knob in the direction of the arrow to remove any remaining pieces of the...

Product Information Guide
Page 16
... options are installed, remove them and pack them in the printer's original box. Let it thoroughly several times a year. Remove the ribbon cartridge as the paper guide. EPSON FX-2180 Cleaning the Printer To keep your printer operating at its best, you should clean it cool before ...attempting to remove the ribbon cartridge. 4. Repack the printer, ribbon cartridge, paper guide, paper separator, and ...
... options are installed, remove them and pack them in the printer's original box. Let it thoroughly several times a year. Remove the ribbon cartridge as the paper guide. EPSON FX-2180 Cleaning the Printer To keep your printer operating at its best, you should clean it cool before ...attempting to remove the ribbon cartridge. 4. Repack the printer, ribbon cartridge, paper guide, paper separator, and ...

User Manual
Page 3
Printer Parts edge guides paper guide cover printer cover front paper guide (closed) control panel paper thickness lever shield plate paper guide paper separator paper release lever knob ribbon cartridge parallel interface tractor paper tension unit front paper guide (open) front edge guides
Printer Parts edge guides paper guide cover printer cover front paper guide (closed) control panel paper thickness lever shield plate paper guide paper separator paper release lever knob ribbon cartridge parallel interface tractor paper tension unit front paper guide (open) front edge guides

User Manual
Page 5
..., and Notes 0-15 Chapter 1 Setting Up the Printer Unpacking the Printer 1-2 Choosing a Place for the Printer 1-4 Positioning the continuous paper supply 1-5 Installing or Replacing the Ribbon Cartridge 1-6 Attaching the Paper Guide and Paper Separator 1-11 Plugging In the Printer 1-13 Connecting the Printer to Your Computer 1-14 Installing the Printer Driver on Your PC 1-15 For Windows...
..., and Notes 0-15 Chapter 1 Setting Up the Printer Unpacking the Printer 1-2 Choosing a Place for the Printer 1-4 Positioning the continuous paper supply 1-5 Installing or Replacing the Ribbon Cartridge 1-6 Attaching the Paper Guide and Paper Separator 1-11 Plugging In the Printer 1-13 Connecting the Printer to Your Computer 1-14 Installing the Printer Driver on Your PC 1-15 For Windows...

User Manual
Page 21
... roll paper holder, you need to supplement your printer, see Appendix A, "Enhancing Your Printer With Options." Ribbon Cartridges Your printer uses the following ribbon cartridge: EPSON black Ribbon cartridge S015086 When printing becomes faint, you can further expand your printer's versatility. Genuine EPSON ribbon cartridges are also available to replace the ribbon cartridge. They ensure proper operation and long life of...
... roll paper holder, you need to supplement your printer, see Appendix A, "Enhancing Your Printer With Options." Ribbon Cartridges Your printer uses the following ribbon cartridge: EPSON black Ribbon cartridge S015086 When printing becomes faint, you can further expand your printer's versatility. Genuine EPSON ribbon cartridges are also available to replace the ribbon cartridge. They ensure proper operation and long life of...

User Manual
Page 28
Chapter 1 Setting Up the Printer 1 Unpacking the Printer 1-2 Choosing a Place for the Printer 1-4 Positioning the continuous paper supply 1-5 Installing or Replacing the Ribbon Cartridge 1-6 Attaching the Paper Guide and Paper Separator 1-11 Plugging In the Printer 1-13 Connecting the Printer to Your Computer 1-14 Installing the Printer Driver on Your PC 1-15 For Windows 95 or NT 4.0 1-16 For Windows 3.1 or NT 3.5x 1-19 For DOS programs 1-20 Setting Up the Printer 1-1
Chapter 1 Setting Up the Printer 1 Unpacking the Printer 1-2 Choosing a Place for the Printer 1-4 Positioning the continuous paper supply 1-5 Installing or Replacing the Ribbon Cartridge 1-6 Attaching the Paper Guide and Paper Separator 1-11 Plugging In the Printer 1-13 Connecting the Printer to Your Computer 1-14 Installing the Printer Driver on Your PC 1-15 For Windows 95 or NT 4.0 1-16 For Windows 3.1 or NT 3.5x 1-19 For DOS programs 1-20 Setting Up the Printer 1-1

User Manual
Page 29
Unpacking the Printer Besides this guide, your printer box should include EPSON printer software disks, a Notice Sheet, and the following items: printer power cord paper guide paper separator screwdriver ribbon cartridge Note: Depending on the country in which you have is the right one for your location. 1-2 Setting Up the Printer be sure the plug you bought your printer model, the power cord may be permanently attached to the printer. Also, the shape of the power cord plug varies depending on your printer;
Unpacking the Printer Besides this guide, your printer box should include EPSON printer software disks, a Notice Sheet, and the following items: printer power cord paper guide paper separator screwdriver ribbon cartridge Note: Depending on the country in which you have is the right one for your location. 1-2 Setting Up the Printer be sure the plug you bought your printer model, the power cord may be permanently attached to the printer. Also, the shape of the power cord plug varies depending on your printer;

User Manual
Page 33
... protectors as shown. c Caution: Moving the print head while the printer is connected to your printer not covered by EPSON's warranties. w Warning: You will need to install or replace the ribbon cartridge. If the printer is on may be hot; Products not manufactured by hand to remove... the used the printer, the print head may damage the printer. 2. The printer is even with a new one. EPSON recommends the use of the Operate button ...
... protectors as shown. c Caution: Moving the print head while the printer is connected to your printer not covered by EPSON's warranties. w Warning: You will need to install or replace the ribbon cartridge. If the printer is on may be hot; Products not manufactured by hand to remove... the used the printer, the print head may damage the printer. 2. The printer is even with a new one. EPSON recommends the use of the Operate button ...

User Manual
Page 34
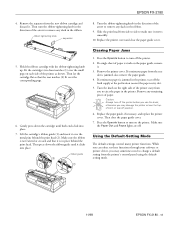
t 1 i 4. if it is not hot; 3. Make sure that the print head is , let it cool for a few minutes before touching it straight up and off. Note: When you use the pull tractor, you can replace the ribbon cartridge even though the print head is not positioned in the ribbon installation position. Then slide the print head to the ribbon installation position (the indented portion of the paper tension unit) by its back edge and then pull it . Setting Up the Printer 1-7 Lift the printer cover by hand.
t 1 i 4. if it is not hot; 3. Make sure that the print head is , let it cool for a few minutes before touching it straight up and off. Note: When you use the pull tractor, you can replace the ribbon cartridge even though the print head is not positioned in the ribbon installation position. Then slide the print head to the ribbon installation position (the indented portion of the paper tension unit) by its back edge and then pull it . Setting Up the Printer 1-7 Lift the printer cover by hand.

User Manual
Page 35
ribbon guide 6. Then turn the ribbon-tightening knob in the direction of the ribbon cartridge and discard the separator. If a used ribbon cartridge. Remove the new ribbon cartridge from the metal pins behind the print head. Properly dispose of the used cartridge is installed, grasp the cartridge and pull it slightly forward and up; the ribbon guide snaps away from the package. Remove the separator from the middle of the arrow to remove any slack in the ribbon. separator ribbon-tightening knob 1-8 Setting Up the Printer 5.
ribbon guide 6. Then turn the ribbon-tightening knob in the direction of the ribbon cartridge and discard the separator. If a used ribbon cartridge. Remove the new ribbon cartridge from the metal pins behind the print head. Properly dispose of the used cartridge is installed, grasp the cartridge and pull it slightly forward and up; the ribbon guide snaps away from the package. Remove the separator from the middle of the arrow to remove any slack in the ribbon. separator ribbon-tightening knob 1-8 Setting Up the Printer 5.

User Manual
Page 36
Hold the cartridge with the ribbon-tightening knob up. Fit the two front notches of the ribbon cartridge over the small pegs on each side of the printer as shown below. Then gently press down the cartridge until both ends click into place. Make sure that the two rear notches of the cartridge fit over the small pegs on each side of the printer. Then lay 1 the cartridge flat. 8. Setting Up the Printer 1-9 7.
Hold the cartridge with the ribbon-tightening knob up. Fit the two front notches of the ribbon cartridge over the small pegs on each side of the printer as shown below. Then gently press down the cartridge until both ends click into place. Make sure that the two rear notches of the cartridge fit over the small pegs on each side of the printer. Then lay 1 the cartridge flat. 8. Setting Up the Printer 1-9 7.

User Manual
Page 37
Lift the ribbon guide of the arrow to make sure it clicks into place. Press down the guide until it moves smoothly. 1-10 Setting Up the Printer Then slide the print head from side to side to remove any slack in place behind the print head (t ). 9. ribbon guide ribbon-tightening knob 10. Make sure the ribbon is not twisted or creased and that it firmly over the metal pins behind the print head. Turn the ribbon-tightening knob in the direction of the ribbon cartridge (i ) and insert it is in the ribbon as shown above.
Lift the ribbon guide of the arrow to make sure it clicks into place. Press down the guide until it moves smoothly. 1-10 Setting Up the Printer Then slide the print head from side to side to remove any slack in place behind the print head (t ). 9. ribbon guide ribbon-tightening knob 10. Make sure the ribbon is not twisted or creased and that it firmly over the metal pins behind the print head. Turn the ribbon-tightening knob in the direction of the ribbon cartridge (i ) and insert it is in the ribbon as shown above.

User Manual
Page 74
Then load paper printable side up (forward). Then load paper in the paper; Printing on both sprockets. Fit four holes of the printer's ribbon. 2 Before you load paper in place by pushing the sprocket lock down . 10. Slide the right sprocket to remove any slack in the rear slot ... printable side up . Insert the paper into the front, bottom, or rear paper slot as described below until the perforation between the platen and the ribbon guide.
Then load paper printable side up (forward). Then load paper in the paper; Printing on both sprockets. Fit four holes of the printer's ribbon. 2 Before you load paper in place by pushing the sprocket lock down . 10. Slide the right sprocket to remove any slack in the rear slot ... printable side up . Insert the paper into the front, bottom, or rear paper slot as described below until the perforation between the platen and the ribbon guide.


