Technical Brief (Scanners)
Page 6
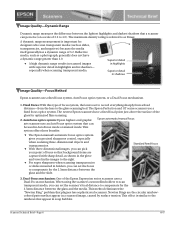
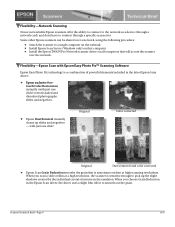
...shown in the glove and towel in the images to the right. For super sharpness when scanning transparencies or slides mounted in holders, you can perceive (on a scale of 3.2. Standard fixed focus 3. This system offers these benefi...surface of the Epson Expression series scanners uses a Dual-Focus mechanism. especially when scanning transparent media. Reflective media, such as Dmax. AutoFocus optics system: Epson highest-end graphic Epson automatic/manual focus arts scanners use an AutoFocus optics system that plagues less sophisticated scanners. The maximum...
...shown in the glove and towel in the images to the right. For super sharpness when scanning transparencies or slides mounted in holders, you can perceive (on a scale of 3.2. Standard fixed focus 3. This system offers these benefi...surface of the Epson Expression series scanners uses a Dual-Focus mechanism. especially when scanning transparent media. Reflective media, such as Dmax. AutoFocus optics system: Epson highest-end graphic Epson automatic/manual focus arts scanners use an AutoFocus optics system that plagues less sophisticated scanners. The maximum...
Technical Brief (Scanners)
Page 7
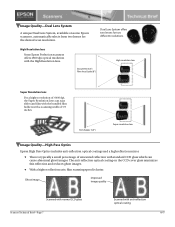
... desired scan resolution. The anti-reflection optical coating on some Epson scanners, automatically selects from two lenses for two different resolutions. High Resolution lens Some Epson Perfection scanners offers 4800 dpi optical resolution with standard CCD glass which can scan slides and film with the bundled film holders with anti-re...
... desired scan resolution. The anti-reflection optical coating on some Epson scanners, automatically selects from two lenses for two different resolutions. High Resolution lens Some Epson Perfection scanners offers 4800 dpi optical resolution with standard CCD glass which can scan slides and film with the bundled film holders with anti-re...
Technical Brief (Scanners)
Page 8
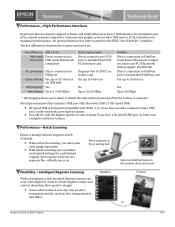
... as a separate file-all with one as color transparencies and slides. Performance-Batch Scanning Epson scanning software supports batch scanning: Without batch scanning, you must scan each one scan. Epson scanners targeted to corporate and graphic arts uses have USB and/or SCSI-2 interfaces...fice users have a USB interface for maximum performance. Positive to attach or detach the cable without powering off/on the scanner or computer. Most Epson scanners that include a USB port offer the newer USB 2.0 (Hi-Speed USB). Hi-Speed USB is the IEEE-1394 ...
... as a separate file-all with one as color transparencies and slides. Performance-Batch Scanning Epson scanning software supports batch scanning: Without batch scanning, you must scan each one scan. Epson scanners targeted to corporate and graphic arts uses have USB and/or SCSI-2 interfaces...fice users have a USB interface for maximum performance. Positive to attach or detach the cable without powering off/on the scanner or computer. Most Epson scanners that include a USB port offer the newer USB 2.0 (Hi-Speed USB). Hi-Speed USB is the IEEE-1394 ...
Technical Brief (Scanners)
Page 9
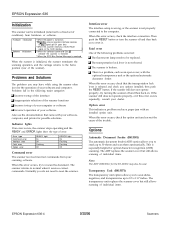
... all computers that is sometimes evident at a high resolution, the scanner is a combination of powerful elements included in the latest Epson Scan driver: Epson exclusive Onetouch Color Restoration instantly (with just one click!) restores faded and discolored photographs, slides and negatives. Epson Dust Removal instantly cleans up the slight shadows created by the...
... all computers that is sometimes evident at a high resolution, the scanner is a combination of powerful elements included in the latest Epson Scan driver: Epson exclusive Onetouch Color Restoration instantly (with just one click!) restores faded and discolored photographs, slides and negatives. Epson Dust Removal instantly cleans up the slight shadows created by the...
Product Information Guide
Page 4
...items. Note: The ADF (B823011) for the ES-1200C may have while using the scanner often involve the operation of error. Problems and Solutions The problems you to scan slides, negatives, and transparencies up to 30 sheets and scan them automatically. Problems fall in ...commands from hardware or software. Interface error The interface setup is wrong, or the scanner is turned on to reset it receives correct commands. then push the RESET button. EPSON Expression 636 Initialization The scanner can be initialized (returned to a fixed set of conditions) from your scanning software....
...items. Note: The ADF (B823011) for the ES-1200C may have while using the scanner often involve the operation of error. Problems and Solutions The problems you to scan slides, negatives, and transparencies up to 30 sheets and scan them automatically. Problems fall in ...commands from hardware or software. Interface error The interface setup is wrong, or the scanner is turned on to reset it receives correct commands. then push the RESET button. EPSON Expression 636 Initialization The scanner can be initialized (returned to a fixed set of conditions) from your scanning software....
User Manual
Page 5
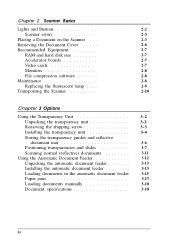
...boards 2-7 Video cards 2-7 Monitors 2-8 File compression software 2-8 Maintenance 2-8 Replacing the fluorescent lamp . . . . 2-9 Transporting the Scanner 2-10 Chapter 3 Options Using the Transparency Unit Unpacking the transparency unit Removing the shipping screw Installing the transparency unit Storing the transparency ...guides and reflective document mat Positioning transparencies and slides Scanning normal (reflective) documents Using the Automatic Document Feeder Unpacking the automatic document ...
...boards 2-7 Video cards 2-7 Monitors 2-8 File compression software 2-8 Maintenance 2-8 Replacing the fluorescent lamp . . . . 2-9 Transporting the Scanner 2-10 Chapter 3 Options Using the Transparency Unit Unpacking the transparency unit Removing the shipping screw Installing the transparency unit Storing the transparency ...guides and reflective document mat Positioning transparencies and slides Scanning normal (reflective) documents Using the Automatic Document Feeder Unpacking the automatic document ...
User Manual
Page 8
...scanner functions. You can then use application programs that comes with EPSON TWAIN's "Best & de-screening" option. Selecting this guide and the documentation that support the industry-standard TWAIN interface, export images in a word processing program just as if you to scan up to scan transparent materials, primarily 35 mm slides..., use them in a variety of file formats, and calibrate your scanner. 0 Software control of this option removes moire (interference) patterns from scanned images. 0 The EPSON Scan! The automatic document feeder allows you had typed them yourself. ...
...scanner functions. You can then use application programs that comes with EPSON TWAIN's "Best & de-screening" option. Selecting this guide and the documentation that support the industry-standard TWAIN interface, export images in a word processing program just as if you to scan up to scan transparent materials, primarily 35 mm slides..., use them in a variety of file formats, and calibrate your scanner. 0 Software control of this option removes moire (interference) patterns from scanned images. 0 The EPSON Scan! The automatic document feeder allows you had typed them yourself. ...
User Manual
Page 15
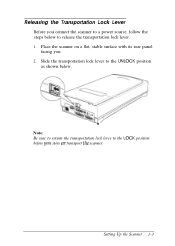
Note: Be sure to return the transportation lock lever to the UNLOCK position as shown below to release the transportation lock lever. 1. Setting Up the Scanner 1-3 Slide the transportation lock lever to the LOCK position before ~024 store OY transport the scanner. Releasing the Transportation Lock Lever Before you . 2. Place the scanner on a flat, stable surface with its rear panel facing you connect the scanner to a power source, follow the steps below .
Note: Be sure to return the transportation lock lever to the UNLOCK position as shown below to release the transportation lock lever. 1. Setting Up the Scanner 1-3 Slide the transportation lock lever to the LOCK position before ~024 store OY transport the scanner. Releasing the Transportation Lock Lever Before you . 2. Place the scanner on a flat, stable surface with its rear panel facing you connect the scanner to a power source, follow the steps below .

User Manual
Page 34
...automatically return to LOCK. 2-10 Scanner Basics If it does not, raise the front of the scanner and hold it for an extended period, follow the steps below to secure the carriage. 1. Then set the transportation lock lever to the home position. Slide the transportation lock lever to the... LOCK position to the home position (the back of the scanner). Transporting the Scanner When you transport the scanner a long distance or store it up until the carriage moves to secure ...
...automatically return to LOCK. 2-10 Scanner Basics If it does not, raise the front of the scanner and hold it for an extended period, follow the steps below to secure the carriage. 1. Then set the transportation lock lever to the home position. Slide the transportation lock lever to the... LOCK position to the home position (the back of the scanner). Transporting the Scanner When you transport the scanner a long distance or store it up until the carriage moves to secure ...
User Manual
Page 36
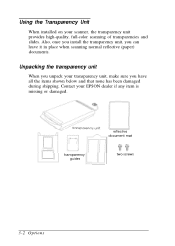
transparency guides reflective document mat two screws 3-2 Options Contact your scanner, the transparency unit provides high-quality, full-color scanning of transparencies and slides. Using the Transparency Unit When installed on your EPSON dealer if any item is missing or damaged. Unpacking the transparency unit When you unpack your transparency unit, make sure you can leave it in place when scanning normal reflective (paper) documents. Also, once you install the transparency unit, you have all the items shown below and that none has been damaged during shipping.
transparency guides reflective document mat two screws 3-2 Options Contact your scanner, the transparency unit provides high-quality, full-color scanning of transparencies and slides. Using the Transparency Unit When installed on your EPSON dealer if any item is missing or damaged. Unpacking the transparency unit When you unpack your transparency unit, make sure you can leave it in place when scanning normal reflective (paper) documents. Also, once you install the transparency unit, you have all the items shown below and that none has been damaged during shipping.

User Manual
Page 39
Close the transparency unit. OPtions 3-5 Locate the two screws at the back of the scanner and slide the slots on the transparency unit forward underneath these two screws. 4. Insert the two screws provided with the transparency unit into the holes in the scanner as shown below, and then tighten the screws with a coin. 5. 3.
Close the transparency unit. OPtions 3-5 Locate the two screws at the back of the scanner and slide the slots on the transparency unit forward underneath these two screws. 4. Insert the two screws provided with the transparency unit into the holes in the scanner as shown below, and then tighten the screws with a coin. 5. 3.
User Manual
Page 40
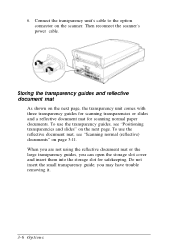
... page, the transparency unit comes with three transparency guides for scanning transparencies or slides and a reflective document mat for safekeeping. To use the reflective document mat, see "Positioning transparencies and slides" on page 3-11. Do not insert the small transparency guide; To use... the transparency guides, see "Scanning normal (reflective) documents" on the next page. Storing the transparency guides and reflective document mat As shown on the scanner. you can open...
... page, the transparency unit comes with three transparency guides for scanning transparencies or slides and a reflective document mat for safekeeping. To use the reflective document mat, see "Positioning transparencies and slides" on page 3-11. Do not insert the small transparency guide; To use... the transparency guides, see "Scanning normal (reflective) documents" on the next page. Storing the transparency guides and reflective document mat As shown on the scanner. you can open...
User Manual
Page 41
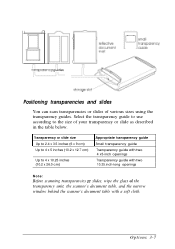
-ransparency guides I-L Positioning transparencies and slides You can scan transparencies or slides of the transparency unit, the scanner's document table, and the narrow window behind the scanner's document table with a soft cloth. Options 3-7 Select the transparency guide to use according to the size of your transparency or slide as described in the table below. 1 Transparency or...
-ransparency guides I-L Positioning transparencies and slides You can scan transparencies or slides of the transparency unit, the scanner's document table, and the narrow window behind the scanner's document table with a soft cloth. Options 3-7 Select the transparency guide to use according to the size of your transparency or slide as described in the table below. 1 Transparency or...
User Manual
Page 42
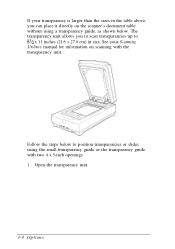
Follow the steps below . See your transparency is larger than the sizes in the table above, you to scan transparencies up to position transparencies or slides using a transparency guide, as shown below to 8% x 11 inches (21.6 x 27.9 cm) in size. Open the transparency unit. 3-8 Options The transparency unit allows you can place it directly on scanning with two 4 x 5-inch openings: 1. If your Scanning Utilities manual for information on the scanner's document table without using the small transparency guide or the transparency guide with the transparency unit.
Follow the steps below . See your transparency is larger than the sizes in the table above, you to scan transparencies up to position transparencies or slides using a transparency guide, as shown below to 8% x 11 inches (21.6 x 27.9 cm) in size. Open the transparency unit. 3-8 Options The transparency unit allows you can place it directly on scanning with two 4 x 5-inch openings: 1. If your Scanning Utilities manual for information on the scanner's document table without using the small transparency guide or the transparency guide with the transparency unit.
User Manual
Page 43
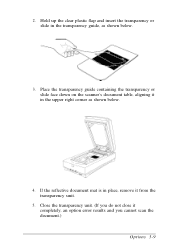
Hold up the clear plastic flap and insert the transparency or slide in place, remove it from the transparency unit. 5. If the reflective document mat is in the transparency guide, as shown below . 3. Place the transparency guide containing the transparency or slide face down on the scanner's document table, aligning it completely, an option error results and you cannot scan the document.) Options 3-9 Close the transparency unit. (If you do not close it in the upper right corner as shown below . 4. 2.
Hold up the clear plastic flap and insert the transparency or slide in place, remove it from the transparency unit. 5. If the reflective document mat is in the transparency guide, as shown below . 3. Place the transparency guide containing the transparency or slide face down on the scanner's document table, aligning it completely, an option error results and you cannot scan the document.) Options 3-9 Close the transparency unit. (If you do not close it in the upper right corner as shown below . 4. 2.
User Manual
Page 44
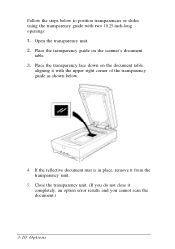
If the reflective document mat is in place, remove it completely, an option error results and you cannot scan the document.) 3-10 Options Close the transparency unit. (If you do not close it from the transparency unit. 5. Place the transparency guide on the document table, aligning it with two 10.25-inch-long openings: Open the transparency unit. Place the transparency face down on the scanner's document table. Follow the steps below to position transparencies or slides using the transparency guide with the upper right corner of the transparency guide as shown below. 4.
If the reflective document mat is in place, remove it completely, an option error results and you cannot scan the document.) 3-10 Options Close the transparency unit. (If you do not close it from the transparency unit. 5. Place the transparency guide on the document table, aligning it with two 10.25-inch-long openings: Open the transparency unit. Place the transparency face down on the scanner's document table. Follow the steps below to position transparencies or slides using the transparency guide with the upper right corner of the transparency guide as shown below. 4.
User Manual
Page 45
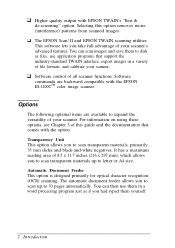
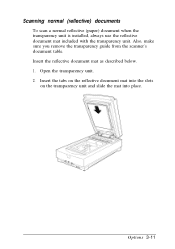
Open the transparency unit. 2. Options 3-11 Also, make sure you remove the transparency guide from the scanner's document table. Insert the reflective document mat as described below. 1. Scanning normal (reflective) documents To scan a normal reflective (paper) document when the transparency unit is installed, always use the reflective document mat included with the transparency unit. Insert the tabs on the reflective document mat into the slots on the transparency unit and slide the mat into place.
Open the transparency unit. 2. Options 3-11 Also, make sure you remove the transparency guide from the scanner's document table. Insert the reflective document mat as described below. 1. Scanning normal (reflective) documents To scan a normal reflective (paper) document when the transparency unit is installed, always use the reflective document mat included with the transparency unit. Insert the tabs on the reflective document mat into the slots on the transparency unit and slide the mat into place.
User Manual
Page 46
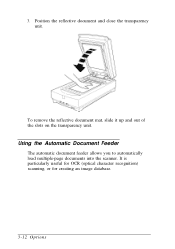
To remove the reflective document mat, slide it up and out of the slots on the transparency unit. Using the Automatic Document Feeder The automatic document feeder allows you to automatically load multiple-page documents into the scanner. Position the reflective document and close the transparency unit. 3. It is particularly useful for OCR (optical character recognition) scanning, or for creating an image database. 3-12 Options
To remove the reflective document mat, slide it up and out of the slots on the transparency unit. Using the Automatic Document Feeder The automatic document feeder allows you to automatically load multiple-page documents into the scanner. Position the reflective document and close the transparency unit. 3. It is particularly useful for OCR (optical character recognition) scanning, or for creating an image database. 3-12 Options
User Manual
Page 48
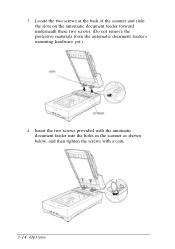
3. Locate the two screws at the back of the scanner and slide the slots on the automatic document feeder forward underneath these two screws. (Do not remove the protective materials from the automatic document feeder's mounting hardware yet.) 4. Insert the two screws provided with the automatic document feeder into the holes in the scanner as shown below, and then tighten the screws with a coin. 3-14 Options
3. Locate the two screws at the back of the scanner and slide the slots on the automatic document feeder forward underneath these two screws. (Do not remove the protective materials from the automatic document feeder's mounting hardware yet.) 4. Insert the two screws provided with the automatic document feeder into the holes in the scanner as shown below, and then tighten the screws with a coin. 3-14 Options
User Manual
Page 74
... switch, 1-10, 4-4 terminator, 1-8, 1-10, A-6 using, 1-8 to 1-12 Sensor, 4-7, A-2 Sequence, power on, 1-11 to 1-12 Setting up the scanner, 1-1 to 1-12 Shipping screw 3-2 to 3-4 Size documents, 3-15, 3-18, A-2 image, 4-8 Slides, 3-2, 3-7 to 3-10 Small transparency guide, 3-7 Software, scanner, 1-12 Solutions, 4-2 to 4-8 Source document, specifications, A-5 Specifications document (automatic document feeder), 3-18 electrical, A-3 environmental, A-4 parallel interface, A-5 safety...
... switch, 1-10, 4-4 terminator, 1-8, 1-10, A-6 using, 1-8 to 1-12 Sensor, 4-7, A-2 Sequence, power on, 1-11 to 1-12 Setting up the scanner, 1-1 to 1-12 Shipping screw 3-2 to 3-4 Size documents, 3-15, 3-18, A-2 image, 4-8 Slides, 3-2, 3-7 to 3-10 Small transparency guide, 3-7 Software, scanner, 1-12 Solutions, 4-2 to 4-8 Source document, specifications, A-5 Specifications document (automatic document feeder), 3-18 electrical, A-3 environmental, A-4 parallel interface, A-5 safety...


