
Users Guide
Page 3
Contents ES-200/ES-300W User's Guide ...7 Scanner Basics...8 Scanner Parts Locations ...8 Scanner Parts...8 Scanner Buttons and Lights...12 User Replaceable Epson Scanner Parts and Accessories 14 Changing the Power Save Settings...14 Charging the Battery (ES-300W)...15 Loading Originals...18 Loading Originals in the Input Tray...18 ...Setup ...44 Connecting to an Existing Wi-Fi Network 45 Manually Connecting to a Wi-Fi Router Using EpsonNet Config 46 Setting Up Network Scanning...49 Determining the Scanner's IP Address 50 Direct Wi-Fi Mode (AP Mode) Setup 51 Enabling a Direct Wi-Fi (AP Mode)...
Contents ES-200/ES-300W User's Guide ...7 Scanner Basics...8 Scanner Parts Locations ...8 Scanner Parts...8 Scanner Buttons and Lights...12 User Replaceable Epson Scanner Parts and Accessories 14 Changing the Power Save Settings...14 Charging the Battery (ES-300W)...15 Loading Originals...18 Loading Originals in the Input Tray...18 ...Setup ...44 Connecting to an Existing Wi-Fi Network 45 Manually Connecting to a Wi-Fi Router Using EpsonNet Config 46 Setting Up Network Scanning...49 Determining the Scanner's IP Address 50 Direct Wi-Fi Mode (AP Mode) Setup 51 Enabling a Direct Wi-Fi (AP Mode)...
Users Guide
Page 4
......63 Scanning ...65 Starting a Scan...65 Starting a Scan from a Scanner Button 65 Assigning Start Button Settings or Scan Jobs 66 Starting a Scan Using the Epson Scan 2 Icon 67 Starting a Scan from a Scanning Program 69 Scanning with Document Capture Pro and Document Capture 71 Scanning in Epson Scan 2 ...74 Additional Scanning Settings - Windows 94 Scanning to Editable Text (OCR 85 Scanning Using OCR - Mac ...88 Saving Scanned Documents...
......63 Scanning ...65 Starting a Scan...65 Starting a Scan from a Scanner Button 65 Assigning Start Button Settings or Scan Jobs 66 Starting a Scan Using the Epson Scan 2 Icon 67 Starting a Scan from a Scanning Program 69 Scanning with Document Capture Pro and Document Capture 71 Scanning in Epson Scan 2 ...74 Additional Scanning Settings - Windows 94 Scanning to Editable Text (OCR 85 Scanning Using OCR - Mac ...88 Saving Scanned Documents...
Users Guide
Page 5
... Environmental Specifications ...141 Network Interface Specifications (ES-300W 142 Safety and Approvals Specifications 142 Notices ...144 Important Safety Instructions...144 5 Scanner Does Not Turn On or Turns Off Unexpectedly 121 Scanner Button Does Not Work as Expected 122 Scanning Software Does Not Operate Correctly 123 Cannot Start Epson Scan 2 ...124 Original Feeds Incorrectly in...
... Environmental Specifications ...141 Network Interface Specifications (ES-300W 142 Safety and Approvals Specifications 142 Notices ...144 Important Safety Instructions...144 5 Scanner Does Not Turn On or Turns Off Unexpectedly 121 Scanner Button Does Not Work as Expected 122 Scanning Software Does Not Operate Correctly 123 Cannot Start Epson Scan 2 ...124 Original Feeds Incorrectly in...

Users Guide
Page 14
... reseller. You can use the Epson Scan 2 Utility to the Apps screen and select Epson Scan 2 Utility. • Windows (other versions): Click or Start, and select All Programs or Programs. Select EPSON > Epson Scan 2 > Epson Scan 2 Utility. • Mac: Open the Applications folder, open the Epson Software folder, and select Epson Scan 2 Utility. 14 User Replaceable Epson Scanner Parts and Accessories You can...
... reseller. You can use the Epson Scan 2 Utility to the Apps screen and select Epson Scan 2 Utility. • Windows (other versions): Click or Start, and select All Programs or Programs. Select EPSON > Epson Scan 2 > Epson Scan 2 Utility. • Mac: Open the Applications folder, open the Epson Software folder, and select Epson Scan 2 Utility. 14 User Replaceable Epson Scanner Parts and Accessories You can...

Users Guide
Page 15
Select a power off timer setting for the AC power or AC adapter and Battery or USB power settings. 5. 2. Close the Epson Scan 2 Utility. You can charge the battery from a computer with a USB cable or WiFi. Parent topic: Scanner Basics Charging the Battery (ES-300W) The scanner runs on battery power when it is connected to the computer with a USB connection or by connecting a power cord and AC adapter to sleep as the Sleep Timer setting. 4. Click the Power Save tab. 3. Select the length of time after which you want the scanner to go to the scanner. 15
Select a power off timer setting for the AC power or AC adapter and Battery or USB power settings. 5. 2. Close the Epson Scan 2 Utility. You can charge the battery from a computer with a USB cable or WiFi. Parent topic: Scanner Basics Charging the Battery (ES-300W) The scanner runs on battery power when it is connected to the computer with a USB connection or by connecting a power cord and AC adapter to sleep as the Sleep Timer setting. 4. Click the Power Save tab. 3. Select the length of time after which you want the scanner to go to the scanner. 15
Users Guide
Page 24
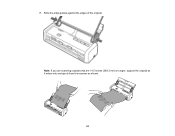
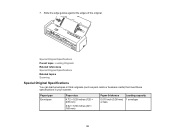
8. Note: If you are scanning originals that are 14.5 inches (368.3 mm) or longer, support the original as it enters into and ejects from the scanner as shown. 24 Slide the edge guides against the edges of the original.
8. Note: If you are scanning originals that are 14.5 inches (368.3 mm) or longer, support the original as it enters into and ejects from the scanner as shown. 24 Slide the edge guides against the edges of the original.
Users Guide
Page 25
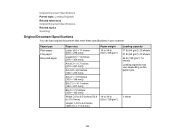
Original Document Specifications Parent topic: Loading Originals Related references Original Document Specifications Related topics Scanning Original Document Specifications You can load original documents that meet these specifications in your scanner. Paper type Plain paper Fine paper Recycled paper Paper size ...
Original Document Specifications Parent topic: Loading Originals Related references Original Document Specifications Related topics Scanning Original Document Specifications You can load original documents that meet these specifications in your scanner. Paper type Plain paper Fine paper Recycled paper Paper size ...
Users Guide
Page 28
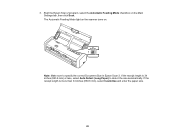
Start the Epson Scan 2 program, select the Automatic Feeding Mode checkbox on . If the receipt length is 34 inches (863.6 mm) or less, select Auto Detect (Long Paper) to specify the correct Document Size in Epson Scan 2. If the receipt length is more than 34 inches (863.6 mm), select Customize and enter the paper size. 28 3. The Automatic Feeding Mode light on the scanner turns on the Main Settings tab, then click Scan. Note: Make sure to detect the size automatically.
Start the Epson Scan 2 program, select the Automatic Feeding Mode checkbox on . If the receipt length is 34 inches (863.6 mm) or less, select Auto Detect (Long Paper) to specify the correct Document Size in Epson Scan 2. If the receipt length is more than 34 inches (863.6 mm), select Customize and enter the paper size. 28 3. The Automatic Feeding Mode light on the scanner turns on the Main Settings tab, then click Scan. Note: Make sure to detect the size automatically.
Users Guide
Page 31
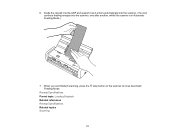
Receipt Specifications Parent topic: Loading Originals Related references Receipt Specifications Related topics Scanning stop button on the scanner to close Automatic 31 When you are finished scanning, press the Feeding Mode. 6. Guide the receipt into the ADF and support it as it enters automatically into the scanner. (You can continue feeding receipts into the scanner, one after another, while the scanner is in Automatic Feeding Mode.) 7.
Receipt Specifications Parent topic: Loading Originals Related references Receipt Specifications Related topics Scanning stop button on the scanner to close Automatic 31 When you are finished scanning, press the Feeding Mode. 6. Guide the receipt into the ADF and support it as it enters automatically into the scanner. (You can continue feeding receipts into the scanner, one after another, while the scanner is in Automatic Feeding Mode.) 7.
Users Guide
Page 32
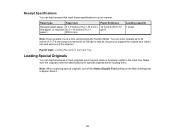
Make sure the originals meet these specifications in Epson Scan 2. 32 You can scan receipts up to 77 g/m²) Loading capacity 1 sheet Note: Scan receipts one at a resolution of the scanner. Receipt Specifications You can load envelopes or thick originals (such as it enters into and exits out of ...: Loading Receipts in the Input Tray Loading Special Originals You can load receipts that meet the specifications for special originals before loading them. Note: When scanning special originals, turn off the Detect Double Feed setting on the Main Settings tab in your scanner.
Make sure the originals meet these specifications in Epson Scan 2. 32 You can scan receipts up to 77 g/m²) Loading capacity 1 sheet Note: Scan receipts one at a resolution of the scanner. Receipt Specifications You can load envelopes or thick originals (such as it enters into and exits out of ...: Loading Receipts in the Input Tray Loading Special Originals You can load receipts that meet the specifications for special originals before loading them. Note: When scanning special originals, turn off the Detect Double Feed setting on the Main Settings tab in your scanner.
Users Guide
Page 38
Paper type Envelopes Paper size 4.72 × 9.25 inches (120 × 235 mm) 3.62 × 6.50 inches (92 × 165 mm) Paper thickness Loading capacity 0.015 inch (0.38 mm) 1 envelope or less 38 Special Original Specifications Parent topic: Loading Originals Related references Special Original Specifications Related topics Scanning Special Original Specifications You can load envelopes or thick originals (such as post cards or business cards) that meet these specifications in your scanner. 7. Slide the edge guides against the edges of the original.
Paper type Envelopes Paper size 4.72 × 9.25 inches (120 × 235 mm) 3.62 × 6.50 inches (92 × 165 mm) Paper thickness Loading capacity 0.015 inch (0.38 mm) 1 envelope or less 38 Special Original Specifications Parent topic: Loading Originals Related references Special Original Specifications Related topics Scanning Special Original Specifications You can load envelopes or thick originals (such as post cards or business cards) that meet these specifications in your scanner. 7. Slide the edge guides against the edges of the original.
Users Guide
Page 42
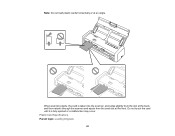
Do not touch the card until it is taken into the scanner, protrudes slightly from the slot at the back, and then returns through the scanner and ejects from the card slot at an angle. Plastic Card Specifications Parent topic: Loading Originals 42 Note: Do not load plastic cards horizontally or at the front. When scanning starts, the card is fully ejected or a malfunction may occur.
Do not touch the card until it is taken into the scanner, protrudes slightly from the slot at the back, and then returns through the scanner and ejects from the card slot at an angle. Plastic Card Specifications Parent topic: Loading Originals 42 Note: Do not load plastic cards horizontally or at the front. When scanning starts, the card is fully ejected or a malfunction may occur.
Users Guide
Page 43
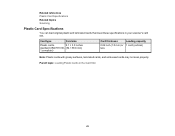
Parent topic: Loading Plastic Cards in your scanner's card slot. Related references Plastic Card Specifications Related topics Scanning Plastic Card Specifications You can load original plastic and laminated cards that meet these specifications in the Card Slot 43 Card type Card size Plastic cards, 2.1 × 3.3 inches standard (ISO7810 ID- (54 × 85.6 mm) 1 compliant) Card thickness Loading capacity 0.04 inch (1.0 mm) or 1 card (vertical) less Note: Plastic cards with glossy surfaces, laminated cards, and embossed cards may not scan properly.
Parent topic: Loading Plastic Cards in your scanner's card slot. Related references Plastic Card Specifications Related topics Scanning Plastic Card Specifications You can load original plastic and laminated cards that meet these specifications in the Card Slot 43 Card type Card size Plastic cards, 2.1 × 3.3 inches standard (ISO7810 ID- (54 × 85.6 mm) 1 compliant) Card thickness Loading capacity 0.04 inch (1.0 mm) or 1 card (vertical) less Note: Plastic cards with glossy surfaces, laminated cards, and embossed cards may not scan properly.
Users Guide
Page 44
...Fi Network Direct Wi-Fi Mode (AP Mode) Setup Wi-Fi Protected Setup (WPS) Epson DocumentScan App for iOS/Android Restoring Default Network Settings Manual Network Connection Setup If the ...or access point, do the following to manually connect to the networked scanner. Set up your computer to scan to a network: 1. Follow the links here for your router or access point using a direct Wi-Fi...-Fi Networking 44 Connect your scanner to use your scanner over a Wi-Fi network (ES-300W). Enter the network settings for instructions on each procedure. Wi-Fi Networking See these sections to your...
...Fi Network Direct Wi-Fi Mode (AP Mode) Setup Wi-Fi Protected Setup (WPS) Epson DocumentScan App for iOS/Android Restoring Default Network Settings Manual Network Connection Setup If the ...or access point, do the following to manually connect to the networked scanner. Set up your computer to scan to a network: 1. Follow the links here for your router or access point using a direct Wi-Fi...-Fi Networking 44 Connect your scanner to use your scanner over a Wi-Fi network (ES-300W). Enter the network settings for instructions on each procedure. Wi-Fi Networking See these sections to your...
Users Guide
Page 45
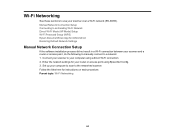
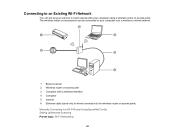
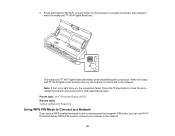
Connecting to a Wi-Fi Router Using EpsonNet Config Setting Up Network Scanning Parent topic: Wi-Fi Networking 45 The wireless router or access point can be connected to your computer over a wireless or wired network. 1 Epson scanner 2 Wireless router or access point 3 Computer with your scanner to communicate with a wireless interface 4 Computer 5 Internet 6 Ethernet cable (used only for wired connection to the wireless router or access point) Manually Connecting to an Existing Wi-Fi Network You can set up your computer using a wireless router or access point.
Connecting to a Wi-Fi Router Using EpsonNet Config Setting Up Network Scanning Parent topic: Wi-Fi Networking 45 The wireless router or access point can be connected to your computer over a wireless or wired network. 1 Epson scanner 2 Wireless router or access point 3 Computer with your scanner to communicate with a wireless interface 4 Computer 5 Internet 6 Ethernet cable (used only for wired connection to the wireless router or access point) Manually Connecting to an Existing Wi-Fi Network You can set up your computer using a wireless router or access point.
Users Guide
Page 48
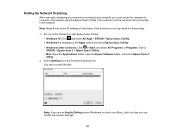
... connect the computer or device to an Existing Wi-Fi Network Related tasks Enabling a Direct Wi-Fi (AP Mode) Connection Setting Up Network Scanning 48 Set up network scanning on the scanner. Parent topic: Connecting to the router or access point. 13. Turn off the scanner. 12. Turn on your computer. When...
... connect the computer or device to an Existing Wi-Fi Network Related tasks Enabling a Direct Wi-Fi (AP Mode) Connection Setting Up Network Scanning 48 Set up network scanning on the scanner. Parent topic: Connecting to the router or access point. 13. Turn off the scanner. 12. Turn on your computer. When...
Users Guide
Page 49
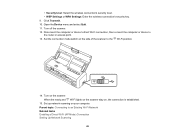
...Epson Scan 2 Utility: • Windows 10: Click and select All Apps > EPSON > Epson Scan 2 Utility. • Windows 8.x: Navigate to the Apps screen and select Epson Scan 2 Utility. • Windows (other versions): Click or Start, and select All Programs or Programs. Select EPSON > Epson Scan 2 > Epson Scan ...2 Utility. • Mac: Open the Applications folder, open the Epson Software folder, and select Epson Scan 2 Utility. 2. Setting Up Network Scanning After manually configuring your scanner to connect to ...
...Epson Scan 2 Utility: • Windows 10: Click and select All Apps > EPSON > Epson Scan 2 Utility. • Windows 8.x: Navigate to the Apps screen and select Epson Scan 2 Utility. • Windows (other versions): Click or Start, and select All Programs or Programs. Select EPSON > Epson Scan 2 > Epson Scan ...2 Utility. • Mac: Open the Applications folder, open the Epson Software folder, and select Epson Scan 2 Utility. 2. Setting Up Network Scanning After manually configuring your scanner to connect to ...
Users Guide
Page 50
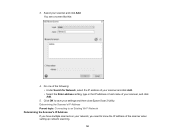
... Add. • Select the Enter address setting, type in the IP address or host name of the scanner when setting up network scanning. 50 Select your settings and then close Epson Scan 2 Utility. Click OK to know the IP address of your network, you have multiple scanners on your scanner, and click Add...
... Add. • Select the Enter address setting, type in the IP address or host name of the scanner when setting up network scanning. 50 Select your settings and then close Epson Scan 2 Utility. Click OK to know the IP address of your network, you have multiple scanners on your scanner, and click Add...
Users Guide
Page 51
1. Parent topic: Setting Up Network Scanning Direct Wi-Fi Mode (AP Mode) Setup You can set up to 4 devices. 51 Locate your computer or another device without requiring a wireless router or ... (other versions): Click or Start, and select All Programs or Programs. Select EpsonNet > EpsonNet Config > EpsonNet Config. • Mac: Open the Applications folder and select Epson Software > EpsonNet > EpsonNet Config > EpsonNet Config. 2. Do one of the following to start EpsonNet Config: • Windows 10: Click > All apps > EpsonNet > EpsonNet Config. •...
1. Parent topic: Setting Up Network Scanning Direct Wi-Fi Mode (AP Mode) Setup You can set up to 4 devices. 51 Locate your computer or another device without requiring a wireless router or ... (other versions): Click or Start, and select All Programs or Programs. Select EpsonNet > EpsonNet Config > EpsonNet Config. • Mac: Open the Applications folder and select Epson Software > EpsonNet > EpsonNet Config > EpsonNet Config. 2. Do one of the following to start EpsonNet Config: • Windows 10: Click > All apps > EpsonNet > EpsonNet Config. •...
Users Guide
Page 59
Parent topic: Wi-Fi Protected Setup (WPS) Related tasks Setting Up Network Scanning Using WPS PIN Mode to Connect to a Network If you have a WPS-enabled wireless router or access point that supports PIN mode, you can use ...
Parent topic: Wi-Fi Protected Setup (WPS) Related tasks Setting Up Network Scanning Using WPS PIN Mode to Connect to a Network If you have a WPS-enabled wireless router or access point that supports PIN mode, you can use ...


