
Reference Guide
Page 5
... and utility problems 109 Communication errors 110 Chapter 7 Cleaning and Transporting the Printer Cleaning the Printer 113 Cleaning the inside of the printer 113 Removing spilled toner 115 Cleaning the printer case 116 Transporting the Printer 117 Appendix A Technical Specifications Paper 119 Specifications 119 Printer 121 General 121 Environmental 122 Safety approvals 122 Mechanical 123 Electrical 123 Interface...
... and utility problems 109 Communication errors 110 Chapter 7 Cleaning and Transporting the Printer Cleaning the Printer 113 Cleaning the inside of the printer 113 Removing spilled toner 115 Cleaning the printer case 116 Transporting the Printer 117 Appendix A Technical Specifications Paper 119 Specifications 119 Printer 121 General 121 Environmental 122 Safety approvals 122 Mechanical 123 Electrical 123 Interface...
Reference Guide
Page 6
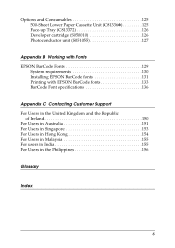
...-up Tray (C813372 126 Developer cartridge (S050010 126 Photoconductor unit (S051055 127 Appendix B Working with Fonts EPSON BarCode Fonts 129 System requirements 130 Installing EPSON BarCode fonts 131 Printing with EPSON BarCode fonts 133 BarCode Font specifications 136 Appendix C Contacting Customer Support For Users in the United Kingdom and the Republic of Ireland 150...
...-up Tray (C813372 126 Developer cartridge (S050010 126 Photoconductor unit (S051055 127 Appendix B Working with Fonts EPSON BarCode Fonts 129 System requirements 130 Installing EPSON BarCode fonts 131 Printing with EPSON BarCode fonts 133 BarCode Font specifications 136 Appendix C Contacting Customer Support For Users in the United Kingdom and the Republic of Ireland 150...
Reference Guide
Page 8
...what to do if you need to follow to clean and transport your printer. Appendix A, "Technical Specifications," contains the technical specifications for the printer. Notes contain important information and useful tips about the operation of the ...available fonts. Appendix B, "Working with Fonts," describes the steps you encounter problems. Chapter 7, "Cleaning and Transporting the Printer," provides instructions on how to add EPSON...
...what to do if you need to follow to clean and transport your printer. Appendix A, "Technical Specifications," contains the technical specifications for the printer. Notes contain important information and useful tips about the operation of the ...available fonts. Appendix B, "Working with Fonts," describes the steps you encounter problems. Chapter 7, "Cleaning and Transporting the Printer," provides instructions on how to add EPSON...

Reference Guide
Page 19
... not mentioned in a dry environment. Poor quality paper may reduce print quality, cause paper jams and other printers cannot be changed by the manufacturer at any time, EPSON cannot guarantee the quality of any particular brand or type of media may cause the labels to 43.4 lb...paper Colored paper Letterhead Description Recycled paper is extremely sensitive to 24 lb) No paste and no tape No plastic window (unless specifically designed for laser printers) The backing sheet should be covered completely, with no gaps between labels may be used. * Use recycled paper only under normal...
... not mentioned in a dry environment. Poor quality paper may reduce print quality, cause paper jams and other printers cannot be changed by the manufacturer at any time, EPSON cannot guarantee the quality of any particular brand or type of media may cause the labels to 43.4 lb...paper Colored paper Letterhead Description Recycled paper is extremely sensitive to 24 lb) No paste and no tape No plastic window (unless specifically designed for laser printers) The backing sheet should be covered completely, with no gaps between labels may be used. * Use recycled paper only under normal...

Reference Guide
Page 40
Chapter 3 Using the Printer Driver 40 Default button: Restores default settings. The following settings and buttons appear in the Utility tab of error that you wish to select the types of the printer driver's Properties dialog box. Setting Monitoring Preferences To make specific monitoring settings, click the Monitoring Preferences button in the dialog box: Select Notification: Use the check boxes to be notified about. The Monitoring Preferences dialog box appears.
Chapter 3 Using the Printer Driver 40 Default button: Restores default settings. The following settings and buttons appear in the Utility tab of error that you wish to select the types of the printer driver's Properties dialog box. Setting Monitoring Preferences To make specific monitoring settings, click the Monitoring Preferences button in the dialog box: Select Notification: Use the check boxes to be notified about. The Monitoring Preferences dialog box appears.

Reference Guide
Page 43
... through the CPU, which increases the effectiveness of parallel port with Direct Memory Access (DMA) is possible if your printer is "ECP" or "ENHANCED" through an Extended Capability Port (ECP), a type of data flow. Increasing the Printing Speed Faster printing with expanded specifications. However, before setting the BIOS, uninstall the EPL-5800L printer driver.
... through the CPU, which increases the effectiveness of parallel port with Direct Memory Access (DMA) is possible if your printer is "ECP" or "ENHANCED" through an Extended Capability Port (ECP), a type of data flow. Increasing the Printing Speed Faster printing with expanded specifications. However, before setting the BIOS, uninstall the EPL-5800L printer driver.

Reference Guide
Page 52
Note: Only Macintosh® and PC systems equipped with Microsoft Plug and Play (PnP) USB specifications. Click the Start button, point to Settings, and then click Printers. 2. USB connection The USB interface that appears. 3. Right-click the EPSON EPL-5800L Advanced icon, and click Properties in the menu that comes with your printer complies with a USB connector and running Mac® OS 8.1 (or later) or Windows Me/98/2000 respectively support the USB interface. Chapter 3 Using the Printer Driver 52 Select the Details tab. For Windows Me/98/2000 1.
Note: Only Macintosh® and PC systems equipped with Microsoft Plug and Play (PnP) USB specifications. Click the Start button, point to Settings, and then click Printers. 2. USB connection The USB interface that appears. 3. Right-click the EPSON EPL-5800L Advanced icon, and click Properties in the menu that comes with your printer complies with a USB connector and running Mac® OS 8.1 (or later) or Windows Me/98/2000 respectively support the USB interface. Chapter 3 Using the Printer Driver 52 Select the Details tab. For Windows Me/98/2000 1.

Reference Guide
Page 58
... is low (10 percent or less). Default button: Restores default settings. Monitor Setup To make specific monitoring settings, click the Monitor Setup button when you wish to select the types of remaining toner. Chapter 3 Using the Printer Driver 58 Photoconductor Unit Indicates the remaining functional life of Life: the photoconductor unit. Cancel...
... is low (10 percent or less). Default button: Restores default settings. Monitor Setup To make specific monitoring settings, click the Monitor Setup button when you wish to select the types of remaining toner. Chapter 3 Using the Printer Driver 58 Photoconductor Unit Indicates the remaining functional life of Life: the photoconductor unit. Cancel...

Reference Guide
Page 99
..., then set it locks into the paper-tray, making sure the paper is evenly aligned and that meets the specifications for this printer. 6. Make sure you purchased the option. Open and then close the printer cover. Set the paper-tray back into the 500-Sheet Lower Paper Cassette Unit. 7. The tray can accommodate...
..., then set it locks into the paper-tray, making sure the paper is evenly aligned and that meets the specifications for this printer. 6. Make sure you purchased the option. Open and then close the printer cover. Set the paper-tray back into the 500-Sheet Lower Paper Cassette Unit. 7. The tray can accommodate...
Reference Guide
Page 102
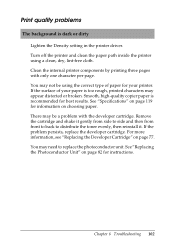
For more information, see "Replacing the Developer Cartridge" on choosing paper. See "Specifications" on page 119 for instructions. Remove the cartridge and shake it . If the problem persists, replace the developer cartridge. See "Replacing the Photoconductor Unit" on ... may appear distorted or broken. Smooth, high-quality copier paper is recommended for your paper is dark or dirty Lighten the Density setting in the printer driver. You may need to distribute the toner evenly, then reinstall it gently from side to side and then from front to back to replace...
For more information, see "Replacing the Developer Cartridge" on choosing paper. See "Specifications" on page 119 for instructions. Remove the cartridge and shake it . If the problem persists, replace the developer cartridge. See "Replacing the Photoconductor Unit" on ... may appear distorted or broken. Smooth, high-quality copier paper is recommended for your paper is dark or dirty Lighten the Density setting in the printer driver. You may need to distribute the toner evenly, then reinstall it gently from side to side and then from front to back to replace...

Reference Guide
Page 104
...Clean the paper path inside the printer using the correct type of the cartridge with only one character per page. The higher the moisture content of your paper is too rough, printed characters may appear distorted or broken. See "Specifications" on page 119 for information ... see "Replacing the Developer Cartridge" on printed images Your paper may be moist or damp. See "Specifications" on page 119 for information on choosing paper. Clean the internal printer components by the paper. If the problem remains, replace the developer cartridge. Printing is recommended for your...
...Clean the paper path inside the printer using the correct type of the cartridge with only one character per page. The higher the moisture content of your paper is too rough, printed characters may appear distorted or broken. See "Specifications" on page 119 for information ... see "Replacing the Developer Cartridge" on printed images Your paper may be moist or damp. See "Specifications" on page 119 for information on choosing paper. Clean the internal printer components by the paper. If the problem remains, replace the developer cartridge. Printing is recommended for your...

Reference Guide
Page 118
Appendix A Technical Specifications Paper 119 Specifications 119 Printer 121 General 121 Environmental 122 Safety approvals 122 Mechanical 123 Electrical 123 Interface 124 Parallel interface 124 USB interface 124 Options and Consumables 125 500-Sheet Lower Paper Cassette Unit (C81336 125 Face-up Tray (C813372 126 Developer cartridge (S050010 126 Photoconductor unit (S051055 127 Appendix A Technical Specifications 118
Appendix A Technical Specifications Paper 119 Specifications 119 Printer 121 General 121 Environmental 122 Safety approvals 122 Mechanical 123 Electrical 123 Interface 124 Parallel interface 124 USB interface 124 Options and Consumables 125 500-Sheet Lower Paper Cassette Unit (C81336 125 Face-up Tray (C813372 126 Developer cartridge (S050010 126 Photoconductor unit (S051055 127 Appendix A Technical Specifications 118

Reference Guide
Page 119
..., transparencies, colored paper, thick paper, card stock, letterhead Note: Use recycled paper under normal temperature and humidity conditions only. Paper Specifications Note: Since the quality of any particular brand or type of paper may reduce print quality, cause paper jams and other problems. ...* lb: Ream Weight (lb/500 sheets/17 in. × 22 in.) Appendix A Technical Specifications 119 Poor-quality paper may be changed by the manufacturer at any time, EPSON cannot guarantee the quality of paper stock before purchasing large quantities or printing large jobs. Always test samples...
..., transparencies, colored paper, thick paper, card stock, letterhead Note: Use recycled paper under normal temperature and humidity conditions only. Paper Specifications Note: Since the quality of any particular brand or type of paper may reduce print quality, cause paper jams and other problems. ...* lb: Ream Weight (lb/500 sheets/17 in. × 22 in.) Appendix A Technical Specifications 119 Poor-quality paper may be changed by the manufacturer at any time, EPSON cannot guarantee the quality of paper stock before purchasing large quantities or printing large jobs. Always test samples...

Reference Guide
Page 120
... .) c Caution: Only load paper sizes that are listed above. Printable area: The area on a page contained within a 4-mm minimum margin on all sides Appendix A Technical Specifications 120 Paper size: Paper Envelopes A4 (210 × 297 mm) A5 (148 × 210 mm) B5 (182 × 257 mm) Letter (216 × 279mm, 8.5 ×...
... .) c Caution: Only load paper sizes that are listed above. Printable area: The area on a page contained within a 4-mm minimum margin on all sides Appendix A Technical Specifications 120 Paper size: Paper Envelopes A4 (210 × 297 mm) A5 (148 × 210 mm) B5 (182 × 257 mm) Letter (216 × 279mm, 8.5 ×...

Reference Guide
Page 121
Printer General Printing method: Laser beam scanning and dry electrophotographic process Resolution: 600 × 600 dpi, 300 × 300 dpi Printing speed: Up to 10 pages per minute at 600/.../m² paper): Up to 20 sheets for face-up output with the optional Face-up Tray RAM: 2 MB, expandable up to 13 MB Appendix A Technical Specifications 121
Printer General Printing method: Laser beam scanning and dry electrophotographic process Resolution: 600 × 600 dpi, 300 × 300 dpi Printing speed: Up to 10 pages per minute at 600/.../m² paper): Up to 20 sheets for face-up output with the optional Face-up Tray RAM: 2 MB, expandable up to 13 MB Appendix A Technical Specifications 121

Reference Guide
Page 123
Appendix A Technical Specifications 123 Mechanical Dimensions and weight: Height: Width: Depth: Weight: 338 mm (13.3 in.) 387 mm (15.2 in.) 475 mm (18.7 in.) Approx. 7.0 kg (15.4 lb), ... V 50 Hz ± 3 Hz/ 60 Hz ± 3 Hz 3.2 A Less than 700 W Less than10 W * No options installed c Caution: Check the label on the back of the printer for its specified voltage.
Appendix A Technical Specifications 123 Mechanical Dimensions and weight: Height: Width: Depth: Weight: 338 mm (13.3 in.) 387 mm (15.2 in.) 475 mm (18.7 in.) Approx. 7.0 kg (15.4 lb), ... V 50 Hz ± 3 Hz/ 60 Hz ± 3 Hz 3.2 A Less than 700 W Less than10 W * No options installed c Caution: Check the label on the back of the printer for its specified voltage.

Reference Guide
Page 124
To use the ECP mode with a USB connector and running Mac OS 8.1 (or later) and Windows Me/98/2000 support the USB interface. Note: Windows Me/98/95/2000/NT 4.0 support the parallel interface. Appendix A Technical Specifications 124 USB interface Windows USB Plug and Play (PnP) compliant. Note: Only Macintosh and PC systems equipped with the parallel connector, see "Using the ECP mode" on page 51. Interface Parallel interface Use only an IEEE 1284-B compliant parallel connector.
To use the ECP mode with a USB connector and running Mac OS 8.1 (or later) and Windows Me/98/2000 support the USB interface. Note: Windows Me/98/95/2000/NT 4.0 support the parallel interface. Appendix A Technical Specifications 124 USB interface Windows USB Plug and Play (PnP) compliant. Note: Only Macintosh and PC systems equipped with the parallel connector, see "Using the ECP mode" on page 51. Interface Parallel interface Use only an IEEE 1284-B compliant parallel connector.

Reference Guide
Page 125
... (✽) in .) including the tray Weight 4.0 kg (8.8 lb) including the tray Appendix A Technical Specifications 125 subsequent sheets, 10 pages per minute Paper types: Plain paper, such as copier paper, and recycled paper Power supply: 5 V dc supplied by the printer Dimensions and weight: 4.0 kg (8.8 lb) including the tray Height 124.5 mm (4.9 in.) Width...
... (✽) in .) including the tray Weight 4.0 kg (8.8 lb) including the tray Appendix A Technical Specifications 125 subsequent sheets, 10 pages per minute Paper types: Plain paper, such as copier paper, and recycled paper Power supply: 5 V dc supplied by the printer Dimensions and weight: 4.0 kg (8.8 lb) including the tray Height 124.5 mm (4.9 in.) Width...

Reference Guide
Page 126
Face-up Tray (C813372) Dimensions and weight (including printer): Height 35 mm (16.5 in.) Width 239 mm (15.2 in.) Depth 243 mm (23.4 in.) Weight 0.2 kg (0.44 lb) Paper output capacity: 20 sheets (75 g/m² or 20 lb paper) Developer cartridge (S050010) Storage temperature: 0 to 35 °C (32 to 95 °F) Storage humidity: 30 to 85% RH Shelf life: 18 months after production Life: Up to 6,000 pages under the following conditions: Letter or A4 size paper, continuous printing, 5% print ratio Appendix A Technical Specifications 126
Face-up Tray (C813372) Dimensions and weight (including printer): Height 35 mm (16.5 in.) Width 239 mm (15.2 in.) Depth 243 mm (23.4 in.) Weight 0.2 kg (0.44 lb) Paper output capacity: 20 sheets (75 g/m² or 20 lb paper) Developer cartridge (S050010) Storage temperature: 0 to 35 °C (32 to 95 °F) Storage humidity: 30 to 85% RH Shelf life: 18 months after production Life: Up to 6,000 pages under the following conditions: Letter or A4 size paper, continuous printing, 5% print ratio Appendix A Technical Specifications 126

Reference Guide
Page 127
Appendix A Technical Specifications 127 Photoconductor unit (S051055) Storage temperature: 0 to 35 °C (32 to 95 °F) Storage humidity: 30 to 85% RH Shelf life: 18 months after production ...
Appendix A Technical Specifications 127 Photoconductor unit (S051055) Storage temperature: 0 to 35 °C (32 to 95 °F) Storage humidity: 30 to 85% RH Shelf life: 18 months after production ...