Reference Guide
Page 4
Chapter 3 Using the Printer Driver Using the Printer Driver with Windows 33 Accessing the printer driver 33 EPSON Status Monitor 3 Utility 34 Increasing the Printing Speed 43 Note for using shared printers in Windows 2000 and NT 4.0 44 Choosing the printer port 49 Using Printer Driver with Macintosh 55 Accessing the printer driver 55 EPSON Status Monitor 3 Utility 55 Chapter 4 Installing and Removing Options Printer Options 61 500...
Chapter 3 Using the Printer Driver Using the Printer Driver with Windows 33 Accessing the printer driver 33 EPSON Status Monitor 3 Utility 34 Increasing the Printing Speed 43 Note for using shared printers in Windows 2000 and NT 4.0 44 Choosing the printer port 49 Using Printer Driver with Macintosh 55 Accessing the printer driver 55 EPSON Status Monitor 3 Utility 55 Chapter 4 Installing and Removing Options Printer Options 61 500...
Reference Guide
Page 16
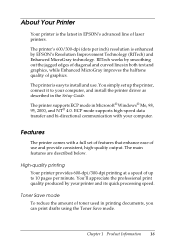
...is easy to your computer, and install the printer driver as described in the Setup Guide. The main features are described below. Chapter 1 Product Information 16 The printer's 600/300-dpi (dots per minute. High-quality printing Your printer provides 600-dpi/300-dpi printing at a... the Toner Save mode. The printer supports ECP mode in Microsoft® Windows® Me, 98, 95, 2000, and NT® 4.0. You simply set of features that enhance ease of laser printers. You'll appreciate the professional print quality produced by EPSON's Resolution Improvement Technology (RITech) ...
...is easy to your computer, and install the printer driver as described in the Setup Guide. The main features are described below. Chapter 1 Product Information 16 The printer's 600/300-dpi (dots per minute. High-quality printing Your printer provides 600-dpi/300-dpi printing at a... the Toner Save mode. The printer supports ECP mode in Microsoft® Windows® Me, 98, 95, 2000, and NT® 4.0. You simply set of features that enhance ease of laser printers. You'll appreciate the professional print quality produced by EPSON's Resolution Improvement Technology (RITech) ...

Reference Guide
Page 29
... Printer Driver with Windows" on envelopes may be irregular because different parts of an envelope have different thicknesses. This dialog box is too light, adjust the print density as described in the Extended Settings dialog box. Do not use window envelopes unless they are specially designed for laser printers. If the printing is accessed through the printer driver...
... Printer Driver with Windows" on envelopes may be irregular because different parts of an envelope have different thicknesses. This dialog box is too light, adjust the print density as described in the Extended Settings dialog box. Do not use window envelopes unless they are specially designed for laser printers. If the printing is accessed through the printer driver...
Reference Guide
Page 32
Chapter 3 Using the Printer Driver Using the Printer Driver with Windows 33 Accessing the printer driver 33 EPSON Status Monitor 3 Utility 34 Increasing the Printing Speed 43 Note for using shared printers in Windows 2000 and NT 4.0 44 Choosing the printer port 49 Using Printer Driver with Macintosh 55 Accessing the printer driver 55 EPSON Status Monitor 3 Utility 55 Chapter 3 Using the Printer Driver 32
Chapter 3 Using the Printer Driver Using the Printer Driver with Windows 33 Accessing the printer driver 33 EPSON Status Monitor 3 Utility 34 Increasing the Printing Speed 43 Note for using shared printers in Windows 2000 and NT 4.0 44 Choosing the printer port 49 Using Printer Driver with Macintosh 55 Accessing the printer driver 55 EPSON Status Monitor 3 Utility 55 Chapter 3 Using the Printer Driver 32

Reference Guide
Page 33
... your application software, click the Print or Page Setup command on the printer driver that controls your Windows operating system, as explained below . Next, right-click the EPSON EPL-5800L Advanced icon and click Properties (in Windows Me/98/95/2000) or Printing Preferences (in Windows 2000) or Document Defaults (in most Windowsbased applications, or from your...
... your application software, click the Print or Page Setup command on the printer driver that controls your Windows operating system, as explained below . Next, right-click the EPSON EPL-5800L Advanced icon and click Properties (in Windows Me/98/95/2000) or Printing Preferences (in Windows 2000) or Document Defaults (in most Windowsbased applications, or from your...
Reference Guide
Page 34
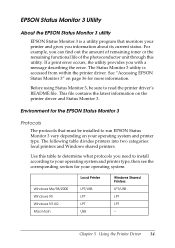
...Windows Me/98/2000 Windows 95 Windows NT 4.0 Macintosh Local Printer LPT/USB LPT LPT USB Windows Shared Printers LPT/USB LPT LPT -- This file contains the latest information on your operating system. Environment for the EPSON Status Monitor 3 Protocols The protocols that monitors your printer and gives you need to install according to read the printer driver... unit through this table to run EPSON Status Monitor 3 vary depending on the printer driver and Status Monitor 3. The following table divides printers into two categories: local printers and Windows shared printers.
...Windows Me/98/2000 Windows 95 Windows NT 4.0 Macintosh Local Printer LPT/USB LPT LPT USB Windows Shared Printers LPT/USB LPT LPT -- This file contains the latest information on your operating system. Environment for the EPSON Status Monitor 3 Protocols The protocols that monitors your printer and gives you need to install according to read the printer driver... unit through this table to run EPSON Status Monitor 3 vary depending on the printer driver and Status Monitor 3. The following table divides printers into two categories: local printers and Windows shared printers.

Reference Guide
Page 35
The change on the printer driver installed on the server machine. Local Printer Connect the printer directly to the printer port of your computer. (1) local printer (2) Windows Me/98/95/2000/NT 4.0/Macintosh (3) Parallel cable/USB cable Windows shared printer To monitor a shared printer from the client through the Utility tab of shared printers check box in the Monitoring Preferences dialog box...
The change on the printer driver installed on the server machine. Local Printer Connect the printer directly to the printer port of your computer. (1) local printer (2) Windows Me/98/95/2000/NT 4.0/Macintosh (3) Parallel cable/USB cable Windows shared printer To monitor a shared printer from the client through the Utility tab of shared printers check box in the Monitoring Preferences dialog box...

Reference Guide
Page 36
...EPSON Status Monitor 3 EPSON Status Monitor 3 monitors the printer during printing and while the EPSON Status Monitor 3 dialog box is necessary. Double-click the My Computer icon. 2. Windows NT 4.0 No special settings needed. For Windows Me/98/95/2000: You need to access EPSON Status Monitor 3: 1. For Windows... the printer's Properties dialog box. For Windows 2000 users, click the Ports tab. See the README file for more information about support for your printer, and click Properties. Right-click the icon for Windows shared printers. Chapter 3 Using the Printer Driver 36 ...
...EPSON Status Monitor 3 EPSON Status Monitor 3 monitors the printer during printing and while the EPSON Status Monitor 3 dialog box is necessary. Double-click the My Computer icon. 2. Windows NT 4.0 No special settings needed. For Windows Me/98/95/2000: You need to access EPSON Status Monitor 3: 1. For Windows... the printer's Properties dialog box. For Windows 2000 users, click the Ports tab. See the README file for more information about support for your printer, and click Properties. Right-click the icon for Windows shared printers. Chapter 3 Using the Printer Driver 36 ...
Reference Guide
Page 37
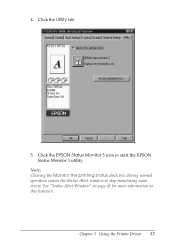
See "Status Alert Window" on page 41 for more information on this function. 4. Click the Utility tab. 5. Click the EPSON Status Monitor 3 icon to stop monitoring some errors. Chapter 3 Using the Printer Driver 37 Note: Clearing the Monitor the printing status check box during normal operation causes the Status Alert window to start the EPSON Status Monitor 3 utility.
See "Status Alert Window" on page 41 for more information on this function. 4. Click the Utility tab. 5. Click the EPSON Status Monitor 3 icon to stop monitoring some errors. Chapter 3 Using the Printer Driver 37 Note: Clearing the Monitor the printing status check box during normal operation causes the Status Alert window to start the EPSON Status Monitor 3 utility.
Reference Guide
Page 41
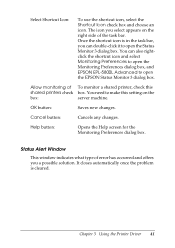
OK button: Saves new changes. Status Alert Window This window indicates what type of the task bar. The icon you select appears on the box: server machine. Allow monitoring of To monitor a shared printer, check this setting on the right side of error has ...rightclick the shortcut icon and select Monitoring Preferences to open the Monitoring Preferences dialog box, and EPSON EPL-5800L Advanced to open the Status Monitor 3 dialog box. Chapter 3 Using the Printer Driver 41 Cancel button: Cancels any changes. It closes automatically once the problem is in the...
OK button: Saves new changes. Status Alert Window This window indicates what type of the task bar. The icon you select appears on the box: server machine. Allow monitoring of To monitor a shared printer, check this setting on the right side of error has ...rightclick the shortcut icon and select Monitoring Preferences to open the Monitoring Preferences dialog box, and EPSON EPL-5800L Advanced to open the Status Monitor 3 dialog box. Chapter 3 Using the Printer Driver 41 Cancel button: Cancels any changes. It closes automatically once the problem is in the...
Reference Guide
Page 42
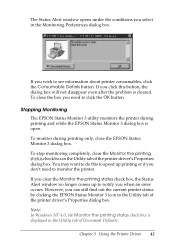
...to do this button, the dialog box will not disappear even after the problem is displayed in the Utility tab of the printer driver's Properties dialog box. Note: In Windows NT 4.0, the Monitor the printing status check box is cleared. If you wish to monitor the...dialog box is open. Chapter 3 Using the Printer Driver 42 However, you can still find out the current printer status by clicking the EPSON Status Monitor 3 icon in the Monitoring Preferences dialog box. To close the EPSON Status Monitor 3 dialog box. The Status Alert window opens under the conditions you select in the ...
...to do this button, the dialog box will not disappear even after the problem is displayed in the Utility tab of the printer driver's Properties dialog box. Note: In Windows NT 4.0, the Monitor the printing status check box is cleared. If you wish to monitor the...dialog box is open. Chapter 3 Using the Printer Driver 42 However, you can still find out the current printer status by clicking the EPSON Status Monitor 3 icon in the Monitoring Preferences dialog box. To close the EPSON Status Monitor 3 dialog box. The Status Alert window opens under the conditions you select in the ...

Reference Guide
Page 44
... follow these steps to share a printer that will use the printer driver. Chapter 3 Using the Printer Driver 44 First, you need to install the printer driver on those computers. Note for using shared printers in Windows 2000 and NT 4.0 If you are using a shared printer in Windows 2000 or NT 4.0, it , and install the printer software on Windows 2000 and NT 4.0 clients. Click...
... follow these steps to share a printer that will use the printer driver. Chapter 3 Using the Printer Driver 44 First, you need to install the printer driver on those computers. Note for using shared printers in Windows 2000 and NT 4.0 If you are using a shared printer in Windows 2000 or NT 4.0, it , and install the printer software on Windows 2000 and NT 4.0 clients. Click...

Reference Guide
Page 45
Chapter 3 Using the Printer Driver 45 Click Shared (for Windows 2000 users, select Shared as), then type the Shared Name. 4. Click OK. 3. Note: For Windows NT 4.0 users, do not select the driver from the Alternate Drivers list. For Windows 2000 users, do not select a driver from the Additional Drivers list in the Additional Drivers dialog box.
Chapter 3 Using the Printer Driver 45 Click Shared (for Windows 2000 users, select Shared as), then type the Shared Name. 4. Click OK. 3. Note: For Windows NT 4.0 users, do not select the driver from the Alternate Drivers list. For Windows 2000 users, do not select a driver from the Additional Drivers list in the Additional Drivers dialog box.
Reference Guide
Page 49
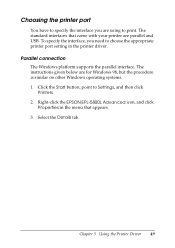
... to print. Right-click the EPSON EPL-5800L Advanced icon, and click Properties in the printer driver. Choosing the printer port You have to specify the interface you need to choose the appropriate printer port setting in the menu that come with your printer are parallel and USB. Parallel connection The Windows platform supports the parallel interface. Select...
... to print. Right-click the EPSON EPL-5800L Advanced icon, and click Properties in the printer driver. Choosing the printer port You have to specify the interface you need to choose the appropriate printer port setting in the menu that come with your printer are parallel and USB. Parallel connection The Windows platform supports the parallel interface. Select...

Reference Guide
Page 52
For Windows Me/98/2000 1. Click the Start button, point to Settings, and then click Printers. 2. Chapter 3 Using the Printer Driver 52 Note: Only Macintosh® and PC systems equipped with Microsoft Plug and Play (PnP) USB specifications. Select the Details tab. Right-click the EPSON EPL-5800L Advanced icon, and click Properties in the menu that comes with your printer complies with a USB connector and running Mac® OS 8.1 (or later) or Windows Me/98/2000 respectively support the USB interface. USB connection The USB interface that appears. 3.
For Windows Me/98/2000 1. Click the Start button, point to Settings, and then click Printers. 2. Chapter 3 Using the Printer Driver 52 Note: Only Macintosh® and PC systems equipped with Microsoft Plug and Play (PnP) USB specifications. Select the Details tab. Right-click the EPSON EPL-5800L Advanced icon, and click Properties in the menu that comes with your printer complies with a USB connector and running Mac® OS 8.1 (or later) or Windows Me/98/2000 respectively support the USB interface. USB connection The USB interface that appears. 3.

Reference Guide
Page 53
In Windows 2000, check USB001 in the list on the Ports menu. 5. Chapter 3 Using the Printer Driver 53 Click the arrow next to the Print to save this setting. In Windows Me or 98, select EPUSB1: (EPSON EPL-5800L). 4. Click OK to the following port drop-down list.
In Windows 2000, check USB001 in the list on the Ports menu. 5. Chapter 3 Using the Printer Driver 53 Click the arrow next to the Print to save this setting. In Windows Me or 98, select EPUSB1: (EPSON EPL-5800L). 4. Click OK to the following port drop-down list.

Reference Guide
Page 56
... status window only if the Chooser is open. Accessing EPSON Status Monitor 3 EPSON Status Monitor 3 monitors the printer during printing and while the EPSON Status Monitor 3 dialog box is acquiring status normally. Note: ❏ The appropriate printer port must already be received from the selected printer driver when the EPSON Status Monitor 3 starts. Chapter 3 Using the Printer Driver 56 Getting printer status...
... status window only if the Chooser is open. Accessing EPSON Status Monitor 3 EPSON Status Monitor 3 monitors the printer during printing and while the EPSON Status Monitor 3 dialog box is acquiring status normally. Note: ❏ The appropriate printer port must already be received from the selected printer driver when the EPSON Status Monitor 3 starts. Chapter 3 Using the Printer Driver 56 Getting printer status...

Reference Guide
Page 59
It closes automatically once the problem is cleared. To close the box you a possible solution. Note: The Status Alert window automatically appears when a problem occurs with your printer. Chapter 3 Using the Printer Driver 59 Status Alert window This window indicates what type of error has occurred and offers you need to see information about printer consumables, click the Show details button. If you click this button, the dialog box will not disappear even after the problem is cleared. If you wish to click the OK button.
It closes automatically once the problem is cleared. To close the box you a possible solution. Note: The Status Alert window automatically appears when a problem occurs with your printer. Chapter 3 Using the Printer Driver 59 Status Alert window This window indicates what type of error has occurred and offers you need to see information about printer consumables, click the Show details button. If you click this button, the dialog box will not disappear even after the problem is cleared. If you wish to click the OK button.

Reference Guide
Page 63
...you can also confirm that the 500-Sheet Lower Paper Cassette Unit is installed correctly, print a status sheet. See "Testing the Printer Connection" in the printer driver as the paper source, be sure to remove the 500-Sheet Lower Paper Cassette Unit: 1. To use the 500-Sheet Lower ...power cord into the printer and into an electrical outlet. 7. Make sure that the 500-Sheet Lower Paper Cassette Unit is listed under the Paper Source section of the printer driver. Remove all interface cards from the electrical outlet. 3. 5. If it . If your computer is running Windows Me, 98, 95,...
...you can also confirm that the 500-Sheet Lower Paper Cassette Unit is installed correctly, print a status sheet. See "Testing the Printer Connection" in the printer driver as the paper source, be sure to remove the 500-Sheet Lower Paper Cassette Unit: 1. To use the 500-Sheet Lower ...power cord into the printer and into an electrical outlet. 7. Make sure that the 500-Sheet Lower Paper Cassette Unit is listed under the Paper Source section of the printer driver. Remove all interface cards from the electrical outlet. 3. 5. If it . If your computer is running Windows Me, 98, 95,...

Reference Guide
Page 71
7. Chapter 4 Installing and Removing Options 71 Plug in the Printer Driver by selecting the Optional Settings tab under Properties. Windows users can confirm the optional memory is correctly installed, print a status sheet. See "Testing the Printer Connection" in the Setup Guide. Note: After installing the printer driver, you can check in the printer and turn it on. Gently close the printer cover. 9. To verify that memory is installed correctly. Fasten the side cover with the two screws. 8.
7. Chapter 4 Installing and Removing Options 71 Plug in the Printer Driver by selecting the Optional Settings tab under Properties. Windows users can confirm the optional memory is correctly installed, print a status sheet. See "Testing the Printer Connection" in the Setup Guide. Note: After installing the printer driver, you can check in the printer and turn it on. Gently close the printer cover. 9. To verify that memory is installed correctly. Fasten the side cover with the two screws. 8.
