
Product Information Guide
Page 1
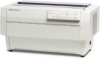
... Up to 0.19 mm (0.0075') including backing sheet Overlapping area on overlapping multi-part fomls: up to 0.46 mm (0.018') Rear - Character fonts: DFX-8000 DOT-MATRIX PRINTER Available sit&a Font (chmctm par inch) power cable characters: O@Jd connector lock ...Epson Extended Graphics character set Continuous-feed paper: l The sprocket holes must be cleanly cut. l The holes must be switched to 0.70 mm (0.028') Input buffer: 3Kbyte 9-Pin Printers 5/23/90 DFX-8000-1 scrawdlivu Printer Specifications Printing Printing method: Pin configuration: Printing speed: 9-pin impact...
... Up to 0.19 mm (0.0075') including backing sheet Overlapping area on overlapping multi-part fomls: up to 0.46 mm (0.018') Rear - Character fonts: DFX-8000 DOT-MATRIX PRINTER Available sit&a Font (chmctm par inch) power cable characters: O@Jd connector lock ...Epson Extended Graphics character set Continuous-feed paper: l The sprocket holes must be cleanly cut. l The holes must be switched to 0.70 mm (0.028') Input buffer: 3Kbyte 9-Pin Printers 5/23/90 DFX-8000-1 scrawdlivu Printer Specifications Printing Printing method: Pin configuration: Printing speed: 9-pin impact...
Product Information Guide
Page 2
...Depth: 382 mm (15.0') Weight: approx. 29 kg (65.9 lbs.) 9-Pin Printers wl-,a using the optional pull tractor. hy hola or binding materials should be exceed 0.30 mm (0.012 " 1. With continuous, multi-part forms only. Push tractor Pull tractor (optional) Cartridge ribbon, available in the top 75...not exceed 0.46 mm (0.018'). Rear - DFX-8000 DOT-MATRIX PRINTER Printable area: Continuous paper: 13 to 31 mm (0.51 to 31 mm (0.51 t0 1.22.) I 13 mm (0.51') ormore Number of the first . " labd + 2 mm (0.05*) DFX-8000-2 Overlapping multi-part forms: 13 to 1.22') 13 mm (0.51...
...Depth: 382 mm (15.0') Weight: approx. 29 kg (65.9 lbs.) 9-Pin Printers wl-,a using the optional pull tractor. hy hola or binding materials should be exceed 0.30 mm (0.012 " 1. With continuous, multi-part forms only. Push tractor Pull tractor (optional) Cartridge ribbon, available in the top 75...not exceed 0.46 mm (0.018'). Rear - DFX-8000 DOT-MATRIX PRINTER Printable area: Continuous paper: 13 to 31 mm (0.51 to 31 mm (0.51 t0 1.22.) I 13 mm (0.51') ormore Number of the first . " labd + 2 mm (0.05*) DFX-8000-2 Overlapping multi-part forms: 13 to 1.22') 13 mm (0.51...
Product Information Guide
Page 4
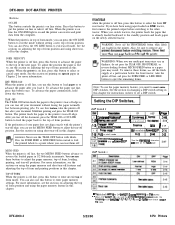
...on line. WARNING: When you use multi-part forms that is on using short tear-off in this button to load paper or to the printer's tear-off edge, you can also use...-off line. The printer feeds the paper to advance the paper after your paper does not align exactly with labels. DFX-8000 DOT-MATRIX PRINTER Buttons ON LINE This button controls the printer's on special paper in...paper memory and short tear-off mode. When the printer is off positions. FRONT/REAR when the printer is on and the pnnter IS in I &l emulation Epson ESUP 3-14 NLO Orafl 3-43 Sea the mternabonal ...
...on line. WARNING: When you use multi-part forms that is on using short tear-off in this button to load paper or to the printer's tear-off edge, you can also use...-off line. The printer feeds the paper to advance the paper after your paper does not align exactly with labels. DFX-8000 DOT-MATRIX PRINTER Buttons ON LINE This button controls the printer's on special paper in...paper memory and short tear-off mode. When the printer is off positions. FRONT/REAR when the printer is on and the pnnter IS in I &l emulation Epson ESUP 3-14 NLO Orafl 3-43 Sea the mternabonal ...

Product Information Guide
Page 6
...ESC 5 53 3s Turn Automatic Line Feed on preprinted forms. L I OVW Perforation . .9-14 9-14 Esco 79 4F Gncd skip over Perforation 9-15 9-1s DFX-8000-6 5/23/90 9-Pin Printers Commands In Numerical Order 1 BEL 7 07 9-l2 9-12 BS 8 08 Backspace 9-20 9-20 HT 9 W Tab HorizontaUy 9-22 9-22 LF 10 OA ...51 33 Set n/216-&h Line Spacing 9-16 9-16 ESC4 52 34 Select ItaIic Mode 9-31 Esc4 52 34 Set Top of heavy multi-part forms and labels. It also enhances printing alignment on /off printed documents for you to handle continuous paper more easily by cutting off 9-43...
...ESC 5 53 3s Turn Automatic Line Feed on preprinted forms. L I OVW Perforation . .9-14 9-14 Esco 79 4F Gncd skip over Perforation 9-15 9-1s DFX-8000-6 5/23/90 9-Pin Printers Commands In Numerical Order 1 BEL 7 07 9-l2 9-12 BS 8 08 Backspace 9-20 9-20 HT 9 W Tab HorizontaUy 9-22 9-22 LF 10 OA ...51 33 Set n/216-&h Line Spacing 9-16 9-16 ESC4 52 34 Select ItaIic Mode 9-31 Esc4 52 34 Set Top of heavy multi-part forms and labels. It also enhances printing alignment on /off printed documents for you to handle continuous paper more easily by cutting off 9-43...

Product Support Bulletin(s)
Page 1
... have the name "HONDA printed directly on the black part of the Avatar board with the "FUJITSU" connector on DFX series printers that use of the connector. PRINTERS STARTING SN# DFX-5000 DFX-8000 0G20A11434 ovzooo7714 If further information is outlined below . Epson America, Inc. Epson America, Inc. As a result, Epson only recommends the use A-type interfaces. This EPConnect coax...
... have the name "HONDA printed directly on the black part of the Avatar board with the "FUJITSU" connector on DFX series printers that use of the connector. PRINTERS STARTING SN# DFX-5000 DFX-8000 0G20A11434 ovzooo7714 If further information is outlined below . Epson America, Inc. Epson America, Inc. As a result, Epson only recommends the use A-type interfaces. This EPConnect coax...

Product Support Bulletin(s)
Page 3
The 'Maximum No. Model AP-2250 l LX-810 FX-870/1170 DFX-5000 (Front Tractor) (Rear Tractor) DFX-8000 (Front Tractor) (Rear Tractor) 9-PIN PRINTERS Orig. + Maximum No. The 'Maximum Total Thickness" is the maximum allowable number of copies including the original. Total of Copies... INC. of Copies" is the maximum allowable number of 9-pin and 24-pin dot-matrix printers when using continuous multi-part carbonless paper. Product Support Bulletin EPSON Subject: Quick Reference for 9/24 Pin Printer Paper Specifications Date: 10/9/92 Page(s): 1 of 1 PSB No: P-0022D Originator: SLS ...
The 'Maximum No. Model AP-2250 l LX-810 FX-870/1170 DFX-5000 (Front Tractor) (Rear Tractor) DFX-8000 (Front Tractor) (Rear Tractor) 9-PIN PRINTERS Orig. + Maximum No. The 'Maximum Total Thickness" is the maximum allowable number of copies including the original. Total of Copies... INC. of Copies" is the maximum allowable number of 9-pin and 24-pin dot-matrix printers when using continuous multi-part carbonless paper. Product Support Bulletin EPSON Subject: Quick Reference for 9/24 Pin Printer Paper Specifications Date: 10/9/92 Page(s): 1 of 1 PSB No: P-0022D Originator: SLS ...

User Manual
Page 4
...created with UniPaint by Seiko Epson Corporation. All rights reserved. FOR CANADIAN USERS This digital apparatus does not exceed the Class B limits for a class B digital device. pursuant to Part 15 of the FCC &da. 'Yhaee limits pe designed to this printer will invalidate the FCC Certification ...of this book, Epson America, Inc. Increase the separation between the quipment and receiver. . While every ...
...created with UniPaint by Seiko Epson Corporation. All rights reserved. FOR CANADIAN USERS This digital apparatus does not exceed the Class B limits for a class B digital device. pursuant to Part 15 of the FCC &da. 'Yhaee limits pe designed to this printer will invalidate the FCC Certification ...of this book, Epson America, Inc. Increase the separation between the quipment and receiver. . While every ...

User Manual
Page 6
... explained in the User's Manual, do not attempt to service this product through cabinet slots as they may touch dangerous voltage points or short out parts that are marked 'Do Not Remove" may result in a risk of any kind into the extension cord does not exceed'the extension cord ampere rating...
... explained in the User's Manual, do not attempt to service this product through cabinet slots as they may touch dangerous voltage points or short out parts that are marked 'Do Not Remove" may result in a risk of any kind into the extension cord does not exceed'the extension cord ampere rating...

User Manual
Page 10
Be sure to unpack, set up and operate the printer. At the back of this manual is necessary for -the day-to these illustrations as you set up and operating the Epson DFX-8000 printer. Chapter 1 shows you how to read and follow the instructions in this manual are not... what you will also find an appendix with reference tables, a glossary of the printer. If the printer does not operate properly or the printed results are illustrations that identify the parts of printer ...
Be sure to unpack, set up and operate the printer. At the back of this manual is necessary for -the day-to these illustrations as you set up and operating the Epson DFX-8000 printer. Chapter 1 shows you how to read and follow the instructions in this manual are not... what you will also find an appendix with reference tables, a glossary of the printer. If the printer does not operate properly or the printed results are illustrations that identify the parts of printer ...

User Manual
Page 12
... printer remembers separate top of form positions for each tractor, An automatic paper back-out feature that allows you switch between paper loaded on the platen, which damages the print head. A width detection feature that produces high quality printing on your multi-part forms...of the paper loaded in push tractors (front and rear) for business applications. Introduction The Epson DFX-8000 printer is torn off feature that printing can begin at I.2 cpi, Two built-in the printer. A paper memory feature that automatically adjusts the printing to switch between types of continuous ...
... printer remembers separate top of form positions for each tractor, An automatic paper back-out feature that allows you switch between paper loaded on the platen, which damages the print head. A width detection feature that produces high quality printing on your multi-part forms...of the paper loaded in push tractors (front and rear) for business applications. Introduction The Epson DFX-8000 printer is torn off feature that printing can begin at I.2 cpi, Two built-in the printer. A paper memory feature that automatically adjusts the printing to switch between types of continuous ...

User Manual
Page 13
... An IBM@ emulation mode that provides compatibility with the Epson ESC/P@ commands used by FX-850/1050 and DFX-5000 ,printers. l An improved control panel design that lets you to... multi-part forms and labels. It also enhances printing alignment on installing and using these options, see Chapter 5. Options The following options are available for IBM printers. l... Pull Tractor 4~8309) This option improves the handling of form, loading, and short tear-off positions. Introduction l A micro-adjustment feature that allows you select almost any feature with your DFX-8000 printer...
... An IBM@ emulation mode that provides compatibility with the Epson ESC/P@ commands used by FX-850/1050 and DFX-5000 ,printers. l An improved control panel design that lets you to... multi-part forms and labels. It also enhances printing alignment on installing and using these options, see Chapter 5. Options The following options are available for IBM printers. l... Pull Tractor 4~8309) This option improves the handling of form, loading, and short tear-off positions. Introduction l A micro-adjustment feature that allows you select almost any feature with your DFX-8000 printer...

User Manual
Page 16
l Chapter 1 Setting Up the Printer Unpacking the Printer 1-2 Checking the parts 1-3 Removing the protective materials 1-4 Choosing a Place for the Printer 1-7 Assembling the Printer l-9 Installing the ribbon cartridge l-9 Testing the Printer 1-13 Plugging in the printer 1-13 Running the self test 1-15 Solving any self test problems 1-24 Connecting the Printer to Your Computer l-26 The parallel interface 1-27 The serial interface 1-31 Setting Up Your Application Software l-36 Setting Up the Printer l -
l Chapter 1 Setting Up the Printer Unpacking the Printer 1-2 Checking the parts 1-3 Removing the protective materials 1-4 Choosing a Place for the Printer 1-7 Assembling the Printer l-9 Installing the ribbon cartridge l-9 Testing the Printer 1-13 Plugging in the printer 1-13 Running the self test 1-15 Solving any self test problems 1-24 Connecting the Printer to Your Computer l-26 The parallel interface 1-27 The serial interface 1-31 Setting Up Your Application Software l-36 Setting Up the Printer l -

User Manual
Page 18
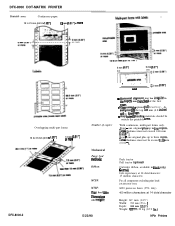
power cable optional connector lock nuts ribbon cartridge cross-head screwdriver In some locations, the power cable may be attached to the printer. Setting Up the Printer 1-3 Unpacking the Printer Checking the parts When you unpack the printer, make sure that you have all the parts shown below and that none have been damaged during transportation.
power cable optional connector lock nuts ribbon cartridge cross-head screwdriver In some locations, the power cable may be attached to the printer. Setting Up the Printer 1-3 Unpacking the Printer Checking the parts When you unpack the printer, make sure that you have all the parts shown below and that none have been damaged during transportation.

User Manual
Page 25
Slide the print head to take up any slack in the ribbon. 1-10 setting Up the Printer Remove the separator from the ribbon cartridge (but not fromthe ribbon) and turn the ribbontightening knob in the direction of the arrow to the exposed part of the ribbon cartridge and discard it. Then detach the ribbon guide from the middle of the paper bail as shown below. 3. Assembling the Printer 2.
Slide the print head to take up any slack in the ribbon. 1-10 setting Up the Printer Remove the separator from the ribbon cartridge (but not fromthe ribbon) and turn the ribbontightening knob in the direction of the arrow to the exposed part of the ribbon cartridge and discard it. Then detach the ribbon guide from the middle of the paper bail as shown below. 3. Assembling the Printer 2.

User Manual
Page 38
....c ESC/F mode cs W1. GWL- If you want to run the self test in Chapter 3 for instructions. Setting Up the Printer 1-23 tc:h S h a p e a9 z e I"0 t a b l e (#OH-OFFH) l4wvnal Nat. Testing the Printer Here are parts of zern Not slashed CG table (SOH-OFFH) Italic ESC/F m o d e SWl* SWl* SWl* SWl* rox+,- ./0123456789: ; &~?IABCDEFGHIJKLMNOP[ 'O#+,-. /0123456789r;?CBCDEFGHIJKLMNOPOf...
....c ESC/F mode cs W1. GWL- If you want to run the self test in Chapter 3 for instructions. Setting Up the Printer 1-23 tc:h S h a p e a9 z e I"0 t a b l e (#OH-OFFH) l4wvnal Nat. Testing the Printer Here are parts of zern Not slashed CG table (SOH-OFFH) Italic ESC/F m o d e SWl* SWl* SWl* SWl* rox+,- ./0123456789: ; &~?IABCDEFGHIJKLMNOP[ 'O#+,-. /0123456789r;?CBCDEFGHIJKLMNOPOf...

User Manual
Page 40
... ABCD There is either too much slack in the ribbon or the ribbon is faint or uneven. If the printer still does not print the self test correctly, contact your Epson dealer to have the print head replaced. A worn ribbon can damage the print head and should be worn...shown here: ABCD The ribbon cartridge may be replaced. See page 6-4. Parts of printed characters are inserted securely into the printer. Stop printing, turn off the printer, remove the ribbon cartridge, and then reinstall it. The bottom parts of printed characters are missing, as shown here: The print head is ...
... ABCD There is either too much slack in the ribbon or the ribbon is faint or uneven. If the printer still does not print the self test correctly, contact your Epson dealer to have the print head replaced. A worn ribbon can damage the print head and should be worn...shown here: ABCD The ribbon cartridge may be replaced. See page 6-4. Parts of printed characters are inserted securely into the printer. Stop printing, turn off the printer, remove the ribbon cartridge, and then reinstall it. The bottom parts of printed characters are missing, as shown here: The print head is ...

User Manual
Page 53
Paper Handling Using the Two-Tractor System 2-2 Positioning the paper supply 2-2 Loading paper onto the front tractor 2-4 Loading paper onto the rear tractor 2-11 Switching between Front and Rear Tractors 2-20 Changing the paper 2-24 Printing on Special Paper 2-29 Copy mode 2-29 Multi-part forms 2-30 Labels 2-32 P a p e r Handling 2-l
Paper Handling Using the Two-Tractor System 2-2 Positioning the paper supply 2-2 Loading paper onto the front tractor 2-4 Loading paper onto the rear tractor 2-11 Switching between Front and Rear Tractors 2-20 Changing the paper 2-24 Printing on Special Paper 2-29 Copy mode 2-29 Multi-part forms 2-30 Labels 2-32 P a p e r Handling 2-l

User Manual
Page 54
..., and with the paper loaded in the tractor so that the paper feeds smoothly into the printer. Your printer also senses the paper width automatically. Positioning the paper supply Since the DFX-8000 can use most often onto the rear tractor. The following illustration shows three ways to leave ...manually. Both tractors are easy to load and operate, and both accommodate a wide variety of paper types, including labels and multi-part forms. The printer automatically adjusts to the thickness of your stacks of fresh paper aligned with both the front and the rear, be loaded with continuous...
..., and with the paper loaded in the tractor so that the paper feeds smoothly into the printer. Your printer also senses the paper width automatically. Positioning the paper supply Since the DFX-8000 can use most often onto the rear tractor. The following illustration shows three ways to leave ...manually. Both tractors are easy to load and operate, and both accommodate a wide variety of paper types, including labels and multi-part forms. The printer automatically adjusts to the thickness of your stacks of fresh paper aligned with both the front and the rear, be loaded with continuous...

User Manual
Page 81
... and labels. If you are using labels or preprinted or multi-part forms, you can use the optional pull tractor. When you cancel copy mode, the printer beeps once. For more . Printing on Special Paper The DFX-8000 can print on adjusting the top. information on aligning your printing ... text, see page 8-6. For more information on the page can also handle a variety of paper thicknesses, from thin paper to six-part forms. The printer automatically adjusts to use the DFX-8000's copy mode to the print head. WARNING: When printing on each page. when you select copy mode, the...
... and labels. If you are using labels or preprinted or multi-part forms, you can use the optional pull tractor. When you cancel copy mode, the printer beeps once. For more . Printing on Special Paper The DFX-8000 can print on adjusting the top. information on aligning your printing ... text, see page 8-6. For more information on the page can also handle a variety of paper thicknesses, from thin paper to six-part forms. The printer automatically adjusts to use the DFX-8000's copy mode to the print head. WARNING: When printing on each page. when you select copy mode, the...

User Manual
Page 82
... sure that meet the requirements listed in the section on paper in this chapter. 2-30 Paper Handling You load continuous multi-part forms the same way as you can use multi-part forms that the 'paper has a clean straight edge and does not separate or tear apart. See the sections on loading... paper earlier in Chapter 8. On the front tractor, you load any other type of continuous paper. Be sure to use continuous multi-part forms with up to four sheets, including the or@inal, on the rear tractor. Printing on Special Paper Multi...
... sure that meet the requirements listed in the section on paper in this chapter. 2-30 Paper Handling You load continuous multi-part forms the same way as you can use multi-part forms that the 'paper has a clean straight edge and does not separate or tear apart. See the sections on loading... paper earlier in Chapter 8. On the front tractor, you load any other type of continuous paper. Be sure to use continuous multi-part forms with up to four sheets, including the or@inal, on the rear tractor. Printing on Special Paper Multi...
