

User Manual
Page 8
Chapter 4 Keyboard 1 4-1 Keyboard Layout 2 4-2 Getting Acquainted with Your Keyboard 3 Function Keys 3 Numeric Keypad 3 Mode lndicator Lights 5 Special Keys 6 QWERTY Keys 7 Cursor Keys 8 Key Combinations 8 4-3 Keyboard Tilt Adjustment 9 Chapter 5 Troubleshooting 1 5-1 Command Problems 2 5-2 System Error Messages 4 Examples of System Error Messages 5 5-3 System BIOS Error Messages 6 VII
Chapter 4 Keyboard 1 4-1 Keyboard Layout 2 4-2 Getting Acquainted with Your Keyboard 3 Function Keys 3 Numeric Keypad 3 Mode lndicator Lights 5 Special Keys 6 QWERTY Keys 7 Cursor Keys 8 Key Combinations 8 4-3 Keyboard Tilt Adjustment 9 Chapter 5 Troubleshooting 1 5-1 Command Problems 2 5-2 System Error Messages 4 Examples of System Error Messages 5 5-3 System BIOS Error Messages 6 VII

User Manual
Page 10
... Figures Chapter 1 System Overview 1 Figure 1-1 : Quick Start 3 Figure 1-2: System Configuration 6 Figure 1-3: System Unit Case 7 Figure 1-4: Front Panel 8 Figure 1-5: Keyboard lock and Two Security-Lock Keys 9 Figure 1-6: Power Switch 9 Figure 1-7: Rear Panel 10 Figure 1-8: Connecting the Keyboard Cable 11 Figure 1-9: System Power Cord 12 Figure 1-10: Two Kinds of Display Connectors... Peripherals 15 Figure 1-13: Floppy and Hard Disk Drive Bays 16 Figure 1-14: Copy Protection for 3.5" Floppy Disk 18 Figure 1-15: Copy Protection for 5.25" Floppy Disk 18 Figure 1-16: Keyboard 20 IX
... Figures Chapter 1 System Overview 1 Figure 1-1 : Quick Start 3 Figure 1-2: System Configuration 6 Figure 1-3: System Unit Case 7 Figure 1-4: Front Panel 8 Figure 1-5: Keyboard lock and Two Security-Lock Keys 9 Figure 1-6: Power Switch 9 Figure 1-7: Rear Panel 10 Figure 1-8: Connecting the Keyboard Cable 11 Figure 1-9: System Power Cord 12 Figure 1-10: Two Kinds of Display Connectors... Peripherals 15 Figure 1-13: Floppy and Hard Disk Drive Bays 16 Figure 1-14: Copy Protection for 3.5" Floppy Disk 18 Figure 1-15: Copy Protection for 5.25" Floppy Disk 18 Figure 1-16: Keyboard 20 IX

User Manual
Page 12
Chapter 4 Keyboard 1 Figure 4-1: Keyboard Layout 2 Figure 4-2: Function Keys 3 Figure 4-3: Numeric Keypad 3 Figure 4-4: Indicator Lights 5 Figure 4-5: Special Keys 6 Figure 4-6: QWERTY Keys 7 Figure 4-7: Cursor Keys 8 Figure 4-8: Adjustment of Keyboard Angles 9 Appendix 1 Figure 6-1: Fastening Metal Guides to a 5.25 Disk Drive 2 Figure 6-2: Installing 5.25 Disk Drives 3 Figure 6-3: Fastening the bracket to 3.5 Disk Drives 4 Figure 6-4: Installing 3.5 Disk Drives 4 Figure 6-5: Cables for Disk...
Chapter 4 Keyboard 1 Figure 4-1: Keyboard Layout 2 Figure 4-2: Function Keys 3 Figure 4-3: Numeric Keypad 3 Figure 4-4: Indicator Lights 5 Figure 4-5: Special Keys 6 Figure 4-6: QWERTY Keys 7 Figure 4-7: Cursor Keys 8 Figure 4-8: Adjustment of Keyboard Angles 9 Appendix 1 Figure 6-1: Fastening Metal Guides to a 5.25 Disk Drive 2 Figure 6-2: Installing 5.25 Disk Drives 3 Figure 6-3: Fastening the bracket to 3.5 Disk Drives 4 Figure 6-4: Installing 3.5 Disk Drives 4 Figure 6-5: Cables for Disk...

User Manual
Page 13
... of PEI-306 RAM Card 21 Table 2-12: Factory Default Settings 22 Table 2-13: Power Supply Pinouts 24 Chapter 4 Keyboard 1 Table 4-1 : Functions of Numeric Keypad Keys 4 Table 4-2: Functions of Special Keys 6 Table 4-3: Functions of Special QWERTY Keys 7 Table 4-4: Special Functions 8 XII
... of PEI-306 RAM Card 21 Table 2-12: Factory Default Settings 22 Table 2-13: Power Supply Pinouts 24 Chapter 4 Keyboard 1 Table 4-1 : Functions of Numeric Keypad Keys 4 Table 4-2: Functions of Special Keys 6 Table 4-3: Functions of Special QWERTY Keys 7 Table 4-4: Special Functions 8 XII

User Manual
Page 19
If you are the key design features of fuss. While maintaining complete compatibility with mainboards produced by -step instructions. Quality, flexibility, and functionality are a novice, you will be able to ..., your system. 2 Chapter 1: System Overview The PEI-306 RAM Card is specifically designed for some DTK 386 or higher level products for your choice of your needs. It is included with 80387-25 or Weitek WTL3167-25 coprocessors optional. If you will also gain valuable hands-on this system. You will appreciate the affordable...
If you are the key design features of fuss. While maintaining complete compatibility with mainboards produced by -step instructions. Quality, flexibility, and functionality are a novice, you will be able to ..., your system. 2 Chapter 1: System Overview The PEI-306 RAM Card is specifically designed for some DTK 386 or higher level products for your choice of your needs. It is included with 80387-25 or Weitek WTL3167-25 coprocessors optional. If you will also gain valuable hands-on this system. You will appreciate the affordable...

User Manual
Page 26
Keys for keylock Figure 1-5: 1Keyboard lock and Two Security-Lock Keys System Power Switch The system power switch is turned off before modifying the hardware configuration in any way. You should always be certain that the power is located on the right side of the case toward the rear. Figure 1-6: Power Switch Chapter 1: System Overview 9 Keyboard Lock The keyboard lock enables or disables the keyboard. In the unlock mode the keyboard is disabled to deny unauthorized user's access to the computer. In the lock mode, the keyboard is activated.
Keys for keylock Figure 1-5: 1Keyboard lock and Two Security-Lock Keys System Power Switch The system power switch is turned off before modifying the hardware configuration in any way. You should always be certain that the power is located on the right side of the case toward the rear. Figure 1-6: Power Switch Chapter 1: System Overview 9 Keyboard Lock The keyboard lock enables or disables the keyboard. In the unlock mode the keyboard is disabled to deny unauthorized user's access to the computer. In the lock mode, the keyboard is activated.

User Manual
Page 37
Figure 1- 16: Keyboard 20 Chapter 1: System Overview Refer to Chapter 4 for a more detailed description of function keys, cursor keys and a numeric keypad. 1-11 Keyboard Your keyboard has a set of the keyboard. The figure below shows a typical keyboard.
Figure 1- 16: Keyboard 20 Chapter 1: System Overview Refer to Chapter 4 for a more detailed description of function keys, cursor keys and a numeric keypad. 1-11 Keyboard Your keyboard has a set of the keyboard. The figure below shows a typical keyboard.

User Manual
Page 47
... enables the keyboard. Refer to enable the use the computer. The keyboard lock is on. If you can ensure that anyone who does not have a key will be lost.
... enables the keyboard. Refer to enable the use the computer. The keyboard lock is on. If you can ensure that anyone who does not have a key will be lost.

User Manual
Page 65
... on the keyboard while you have the same appearance. 26 Chapter 2: Setting Up your panel, if you press the minus key. To return to 12.5MHz mode, press the same keys you enter the 12.5MHz mode, the cursor will return to the dash (_) form and the Turbo LED will initiate 12... on the Turbo LED, refer to the Connectors section. When you used to 25MHz, do the following: press and hold down the control and alternate keys on the screen will turn off will turn into a box. The two switches are set up the board yourself. To switch the speed to enter...
... on the keyboard while you have the same appearance. 26 Chapter 2: Setting Up your panel, if you press the minus key. To return to 12.5MHz mode, press the same keys you enter the 12.5MHz mode, the cursor will return to the dash (_) form and the Turbo LED will initiate 12... on the Turbo LED, refer to the Connectors section. When you used to 25MHz, do the following: press and hold down the control and alternate keys on the screen will turn off will turn into a box. The two switches are set up the board yourself. To switch the speed to enter...

User Manual
Page 68
... your computer, you will see the following message on the screen following the RAM test: Non-system disk or disk error Replace and strike any key when ready Then, you use applications and create and manage files on your computer. DOS also lets you should follow the instructions below to the...
... your computer, you will see the following message on the screen following the RAM test: Non-system disk or disk error Replace and strike any key when ready Then, you use applications and create and manage files on your computer. DOS also lets you should follow the instructions below to the...

User Manual
Page 69
... is 0 : 02 : 15.00 Enter new time: 2:20 Your computer is Fri 01-01-1990 Enter new date (MM-DD-YY): For the new date, key in drive "A" and switch on your DOS user manual. You will "boot" or start itself. Starting MS-DOS If you are using a hard disk with...
... is 0 : 02 : 15.00 Enter new time: 2:20 Your computer is Fri 01-01-1990 Enter new date (MM-DD-YY): For the new date, key in drive "A" and switch on your DOS user manual. You will "boot" or start itself. Starting MS-DOS If you are using a hard disk with...

User Manual
Page 71
... your Diskettes and Files In order not to lose your files through disk damage or accidental deletion it is important to back up a single file, key in the backup command and directory as below: A>backup /A Chapter 3: Operating Your System 5 After your screen. Press if you will see the following : A> diskcopy a: b: Press...
... your Diskettes and Files In order not to lose your files through disk damage or accidental deletion it is important to back up a single file, key in the backup command and directory as below: A>backup /A Chapter 3: Operating Your System 5 After your screen. Press if you will see the following : A> diskcopy a: b: Press...

User Manual
Page 73
... using the command. If you want to find out what files are three ways to stop the screen from scrolling. • pressing the and the keys simultaneous • pressing • typing DIR/P to display the directory of the disk in drive A, you would use the following command: DIR A: After you use... the command without a drive letter, MS-DOS lists the directory of the disk which was most recently accessed. If you hit the enter key, all the file information will be displayed on the screen. Finding Out What is on Your Disk If you want to see one screen each...
... using the command. If you want to find out what files are three ways to stop the screen from scrolling. • pressing the and the keys simultaneous • pressing • typing DIR/P to display the directory of the disk in drive A, you would use the following command: DIR A: After you use... the command without a drive letter, MS-DOS lists the directory of the disk which was most recently accessed. If you hit the enter key, all the file information will be displayed on the screen. Finding Out What is on Your Disk If you want to see one screen each...

User Manual
Page 74
... hard disk. Insert your DOS diskette in MS-DOS User's Guide and Reference. 8 Chapter 3: Operating Your System You can be formatted before it can press key quickly just after the RAM test to 33MB in size. 33MB is supplied by DOS. Partition This process creates DOS partitioning on a system with multiple...
... hard disk. Insert your DOS diskette in MS-DOS User's Guide and Reference. 8 Chapter 3: Operating Your System You can be formatted before it can press key quickly just after the RAM test to 33MB in size. 33MB is supplied by DOS. Partition This process creates DOS partitioning on a system with multiple...

User Manual
Page 75
... DOS prompt. The command should be keyed in as: A> FORMAT D: If you want to boot your system later. You can use this procedure if you don't need to perform this system disk ...
... DOS prompt. The command should be keyed in as: A> FORMAT D: If you want to boot your system later. You can use this procedure if you don't need to perform this system disk ...
User Manual
Page 77
... simple to be used to your BIOS manual. It is extremely important that you respond correctly to the prompts about the setup program, refer to key in your BIOS on hard disk types. The following will guide you can set the date, time, base memory, expansion memory, number of floppy and...
... simple to be used to your BIOS manual. It is extremely important that you respond correctly to the prompts about the setup program, refer to key in your BIOS on hard disk types. The following will guide you can set the date, time, base memory, expansion memory, number of floppy and...

User Manual
Page 78
Pressing to Enter the Setup Program You will start the setup program. 12 Chapter 3: Operating Your System Entering the Setup Program There are two ways to press DEBUG -g=F000:FF60 This command will need to enter the setup program: by pressing or by pressing . 1.
Pressing to Enter the Setup Program You will start the setup program. 12 Chapter 3: Operating Your System Entering the Setup Program There are two ways to press DEBUG -g=F000:FF60 This command will need to enter the setup program: by pressing or by pressing . 1.

User Manual
Page 79
If you miss the chance to do so, reset your computer, press the key quickly before the RAM test finishes. SET UP BUILT-IN UTILITY. 4. SET UP USER-DEFINED HARD DISK TYPE. 6. Once you have entered the setup program, ...
If you miss the chance to do so, reset your computer, press the key quickly before the RAM test finishes. SET UP BUILT-IN UTILITY. 4. SET UP USER-DEFINED HARD DISK TYPE. 6. Once you have entered the setup program, ...

User Manual
Page 80
.... If you may either highlight selections and press < 8 > to enter the command or use the up < # > and down < $ > arrows to make modifications. Pressing the enter key < 8 > confirms your configuration, you will see in using the program. 14 Chapter 3: Operating Your System You can use the left ,< ' > and right < ' > arrows to exit...
.... If you may either highlight selections and press < 8 > to enter the command or use the up < # > and down < $ > arrows to make modifications. Pressing the enter key < 8 > confirms your configuration, you will see in using the program. 14 Chapter 3: Operating Your System You can use the left ,< ' > and right < ' > arrows to exit...

User Manual
Page 83
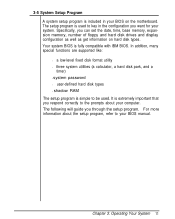
Note that these utilities. Pressing will exit these utilities can be used if you press , and (on the key pad). Figure 3-4: Calculator Chapter 3: Operating Your System 17 These utilities are in the 80-column text display mode only. he calculator and the hard disk park can be used in your system BIOS. 3. Setting Up Built-in Utilities three system utilities, a calculator, a hard disk park, and a timer, are enabled by the setup program. The following is the figure for the calculator.
Note that these utilities. Pressing will exit these utilities can be used if you press , and (on the key pad). Figure 3-4: Calculator Chapter 3: Operating Your System 17 These utilities are in the 80-column text display mode only. he calculator and the hard disk park can be used in your system BIOS. 3. Setting Up Built-in Utilities three system utilities, a calculator, a hard disk park, and a timer, are enabled by the setup program. The following is the figure for the calculator.