
Installation Guide - ELPMBUNI Universal Mount Assembly
Page 3
...commercially available). Contact Premier Mounts with any surface other source of the projector. At least two qualified people should perform the installation procedure. Page... A MAX WEIGHT OF 25 LBS., THE WEIGHT OF THE PROJECTOR. USE PROPER SAFETY GEAR AND TOOLS FOR THE INSTALLATION PROCEDURE ...ceiling that is to be disconnected from dropping or mishandling the projector. THE INSTALLATION INSTRUCTIONS MUST BE READ TO PREVENT PERSONAL INJURY AND... so may result in damage to the projector and/or damage to the projector and could increase the risk of impact....
...commercially available). Contact Premier Mounts with any surface other source of the projector. At least two qualified people should perform the installation procedure. Page... A MAX WEIGHT OF 25 LBS., THE WEIGHT OF THE PROJECTOR. USE PROPER SAFETY GEAR AND TOOLS FOR THE INSTALLATION PROCEDURE ...ceiling that is to be disconnected from dropping or mishandling the projector. THE INSTALLATION INSTRUCTIONS MUST BE READ TO PREVENT PERSONAL INJURY AND... so may result in damage to the projector and/or damage to the projector and could increase the risk of impact....

Installation Guide - ELPMBUNI Universal Mount Assembly
Page 4
... Tools Phillips Head Screw Driver Soft Material/ Blanket Allen Wrench (Supplied) Tape Measure Ladder NOTE: The following pages for the installation. Installation Manual Page - 5 - ELPMBUNI Parts List NOTE: This mount is not required for model specific hardware: Pages 10, 11, 12, and 13... (Qty 4) Portable Drill Pencil Level (Supplied) Stud Finder (Commercially Available) M5 Allen Wrench NOTE: Mounting screws will vary by projector. If there are missing and/or damaged before beginning installation. Please see the following hardware is included in the hardware pack but ...
... Tools Phillips Head Screw Driver Soft Material/ Blanket Allen Wrench (Supplied) Tape Measure Ladder NOTE: The following pages for the installation. Installation Manual Page - 5 - ELPMBUNI Parts List NOTE: This mount is not required for model specific hardware: Pages 10, 11, 12, and 13... (Qty 4) Portable Drill Pencil Level (Supplied) Stud Finder (Commercially Available) M5 Allen Wrench NOTE: Mounting screws will vary by projector. If there are missing and/or damaged before beginning installation. Please see the following hardware is included in the hardware pack but ...

Installation Guide - ELPMBUNI Universal Mount Assembly
Page 5
... Solid Structure Mounting Points C Ceiling Plate D Allen Wrench E Height Adjustment Screws F Tension Knobs G Safety Knob H Security Screws I Leveling Barrels J Universal Mounting Bracket K Leg Assembly L Projector (Not Supplied) M Tri-Lock Opening Option 1 H B D F Combination I Leg Single Leg D Option 2 M NOTE: See the best configuration for filter and lamp access. The ... of mounting points found on the bottom of single and dual legs together as single leg or any combination C of your projector for your G projector. Page - 6 - K M J L J L Installation Manual
... Solid Structure Mounting Points C Ceiling Plate D Allen Wrench E Height Adjustment Screws F Tension Knobs G Safety Knob H Security Screws I Leveling Barrels J Universal Mounting Bracket K Leg Assembly L Projector (Not Supplied) M Tri-Lock Opening Option 1 H B D F Combination I Leg Single Leg D Option 2 M NOTE: See the best configuration for filter and lamp access. The ... of mounting points found on the bottom of single and dual legs together as single leg or any combination C of your projector for your G projector. Page - 6 - K M J L J L Installation Manual

Installation Guide - ELPMBUNI Universal Mount Assembly
Page 6
... could result in thread size (Figure 1). NOTE: Review the projectors manufacture's operation manual and refer to the projector. CAUTION: THE PROJECTOR IS FRAGILE; Carefully invert the projector and place it on the screen. 1. Mounting Points Inverted Projector Blanket, soft cloth etc Figure 1 Flat surface Installation Manual Page - 7 - ELPMBUNI Projector Preparation WARNING: Proper installation procedure by qualified personnel as...
... could result in thread size (Figure 1). NOTE: Review the projectors manufacture's operation manual and refer to the projector. CAUTION: THE PROJECTOR IS FRAGILE; Carefully invert the projector and place it on the screen. 1. Mounting Points Inverted Projector Blanket, soft cloth etc Figure 1 Flat surface Installation Manual Page - 7 - ELPMBUNI Projector Preparation WARNING: Proper installation procedure by qualified personnel as...

Installation Guide - ELPMBUNI Universal Mount Assembly
Page 7
Installation Manual Figure 2 Tri-Lock Opening Rotate 180° To Unlock Tension Knobs Upper Assembly Safety Knob Figure 3 Figure 4 Page - 8 - Separate the upper assembly from the projector mounting bracket by slightly loosening the two tension knurl knobs to be rotated 180° apart and separate. Next loosen the safety screw knurl knob far enough to allow the two parts to create free play between the bracket tri-lock assembly and the upper section tri-lock assembly points. 5. ELPMBUNI 4.
Installation Manual Figure 2 Tri-Lock Opening Rotate 180° To Unlock Tension Knobs Upper Assembly Safety Knob Figure 3 Figure 4 Page - 8 - Separate the upper assembly from the projector mounting bracket by slightly loosening the two tension knurl knobs to be rotated 180° apart and separate. Next loosen the safety screw knurl knob far enough to allow the two parts to create free play between the bracket tri-lock assembly and the upper section tri-lock assembly points. 5. ELPMBUNI 4.

Installation Guide - ELPMBUNI Universal Mount Assembly
Page 8
... A). FIGURE 6 Two-Piece Leg FIGURE 7 One-Piece Leg Allen Wrench Mounting Hardware Inverted Projector Leveling Barrels FIGURE A Installation Manual Figure 5 Line up the leveling barrels to adjust the height of the mounting bracket. Use the M3 x 16 Phillips screws with the flat...as shown for a better overall fit to allow routing of the legs around critical ventilation screens on the bottom of the projector and use the appropriate number of the projector as shown. Insert the M3 x 16 Phillips screws with the M3 flat washers (supplied). ELPMBUNI Securing the Bracket to ...
... A). FIGURE 6 Two-Piece Leg FIGURE 7 One-Piece Leg Allen Wrench Mounting Hardware Inverted Projector Leveling Barrels FIGURE A Installation Manual Figure 5 Line up the leveling barrels to adjust the height of the mounting bracket. Use the M3 x 16 Phillips screws with the flat...as shown for a better overall fit to allow routing of the legs around critical ventilation screens on the bottom of the projector and use the appropriate number of the projector as shown. Insert the M3 x 16 Phillips screws with the M3 flat washers (supplied). ELPMBUNI Securing the Bracket to ...

Installation Guide - ELPMBUNI Universal Mount Assembly
Page 9
PowerLite S3, S4, 62C, 76C, 82C, Hardware: M4 x 12mm (Qty 3) Page - 10 - PowerLite 830p, 835p Hardware: M4 x 12mm (Qty 4) Installation Manual This mount works with all sub-25 pound projectors. ELPMBUNI NOTE: If your projector model is not shown, when arranging the leg combination, simply ensure access to filters and lamp housings when aligning brackets.
PowerLite S3, S4, 62C, 76C, 82C, Hardware: M4 x 12mm (Qty 3) Page - 10 - PowerLite 830p, 835p Hardware: M4 x 12mm (Qty 4) Installation Manual This mount works with all sub-25 pound projectors. ELPMBUNI NOTE: If your projector model is not shown, when arranging the leg combination, simply ensure access to filters and lamp housings when aligning brackets.

Installation Guide - ELPMBUNI Universal Mount Assembly
Page 13
Rotate the leveling barrels to the projector then tighten the hex head leg screws with the Allen wrench (supplied) (Figure 8 and Figure 9). When the position desired is achieved tighten the mounting hardware ..., if not all, ventilation points (including lamp & filter access doors). 2. Failure to do not over-tighten the mounting hardware. Installation Manual ELPMBUNI Leveling the Mounting bracket 1. Allen Wrench Level Inverted Projector DOWN UP Adjusting the Mount Figure 8 Leveling Barrels Page - 14 - CAUTION: Secure but do so will result in damaging the threads...
Rotate the leveling barrels to the projector then tighten the hex head leg screws with the Allen wrench (supplied) (Figure 8 and Figure 9). When the position desired is achieved tighten the mounting hardware ..., if not all, ventilation points (including lamp & filter access doors). 2. Failure to do not over-tighten the mounting hardware. Installation Manual ELPMBUNI Leveling the Mounting bracket 1. Allen Wrench Level Inverted Projector DOWN UP Adjusting the Mount Figure 8 Leveling Barrels Page - 14 - CAUTION: Secure but do so will result in damaging the threads...

Installation Guide - ELPMBUNI Universal Mount Assembly
Page 14
...a solid wood ceiling stud with the three (3) #14 x 2" wood screws (supplied) or with the top image edge of the projector. Ceiling Structure Ceiling Wood Stud Wood Screws Upper Assembly Installation Manual Knurl Knobs (3ea) Figure 9 Secure the ceiling mount to the ceiling or wall. 5. Locate the inverted... projectors top of the lens point to the edge of the wood stud. NOTE: If installing the security kit (...
...a solid wood ceiling stud with the three (3) #14 x 2" wood screws (supplied) or with the top image edge of the projector. Ceiling Structure Ceiling Wood Stud Wood Screws Upper Assembly Installation Manual Knurl Knobs (3ea) Figure 9 Secure the ceiling mount to the ceiling or wall. 5. Locate the inverted... projectors top of the lens point to the edge of the wood stud. NOTE: If installing the security kit (...

Installation Guide - ELPMBUNI Universal Mount Assembly
Page 17
Safety Knurl Knob Tension Knurl Knobs Figure 13 Tri-Lock Opening Alignment Slot Projector Mount Installation Manual Tighten the remaining two tension knurl knobs until the mount becomes rigid. 5. Make sure the three-knurl knobs are loosened to fully expose to the "...tri-lock" mounting plate in the upper assembly. 4. Once inserted rotate the projector and mounting bracket 180° and secure the rear safety knob first...
Safety Knurl Knob Tension Knurl Knobs Figure 13 Tri-Lock Opening Alignment Slot Projector Mount Installation Manual Tighten the remaining two tension knurl knobs until the mount becomes rigid. 5. Make sure the three-knurl knobs are loosened to fully expose to the "...tri-lock" mounting plate in the upper assembly. 4. Once inserted rotate the projector and mounting bracket 180° and secure the rear safety knob first...

Installation Guide - ELPMBUNI Universal Mount Assembly
Page 18
... the two M8 roll adjustment screws (Figure 16). Wood Stud Ceiling Allen Wrench Height Adjustable Screws (Roll) Adjusting Screws Allen Wrench Installation Manual Figure 14 Figure 15 Wood Stud Ceiling Tilt Adjusting Screws Allen Wrench Wood Stud Ceiling Figure 16 Page - 19 - If roll adjustment ...is achieved tighten the two screws. 4. With the projector secured in the mount and power on the screen, slightly loosen the front and rear M8 screws and adjust to optimize the projected image. ...
... the two M8 roll adjustment screws (Figure 16). Wood Stud Ceiling Allen Wrench Height Adjustable Screws (Roll) Adjusting Screws Allen Wrench Installation Manual Figure 14 Figure 15 Wood Stud Ceiling Tilt Adjusting Screws Allen Wrench Wood Stud Ceiling Figure 16 Page - 19 - If roll adjustment ...is achieved tighten the two screws. 4. With the projector secured in the mount and power on the screen, slightly loosen the front and rear M8 screws and adjust to optimize the projected image. ...

Product Brochure
Page 2
...Quick Setup Sheet, PrivateLine support card, password protection sticker Product/Accessory Part Numbers Epson PowerLite S4 projector Replacement lamp Air filter set (2 filters) Universal ceiling mount Suspension adapter False ...Epson PowerLite S4 Specifications Projection System Epson 3LCD technology Projection Method Front/rear/ceiling mount LCD Driving method Pixel number Native resolution Aspect ratio Pixel arrangement Epson Poly-silicon TFT Active Matrix 480,000 dots x 3 (800 x 600) LCDs SVGA 4:3 (supports 16:9) Stripe Projection Lens Type F-number Focal length Zoom ratio Manual...
...Quick Setup Sheet, PrivateLine support card, password protection sticker Product/Accessory Part Numbers Epson PowerLite S4 projector Replacement lamp Air filter set (2 filters) Universal ceiling mount Suspension adapter False ...Epson PowerLite S4 Specifications Projection System Epson 3LCD technology Projection Method Front/rear/ceiling mount LCD Driving method Pixel number Native resolution Aspect ratio Pixel arrangement Epson Poly-silicon TFT Active Matrix 480,000 dots x 3 (800 x 600) LCDs SVGA 4:3 (supports 16:9) Stripe Projection Lens Type F-number Focal length Zoom ratio Manual...

Product Information Guide
Page 8
... failure. 7. Touching the glass could result in the trash. 6. To find the nearest reseller, call 800-GO-EPSON (800-463-7766). Related Documentation CPD-21361 CPD-21358R1 CPD-21666 Epson Powerlite S4 Projector User's Guide (HTML manual on the projector or remote control. 2. Limited Warranty 8 - Warning: This product includes a lamp component that contains mercury (Hg). Replace the...
... failure. 7. Touching the glass could result in the trash. 6. To find the nearest reseller, call 800-GO-EPSON (800-463-7766). Related Documentation CPD-21361 CPD-21358R1 CPD-21666 Epson Powerlite S4 Projector User's Guide (HTML manual on the projector or remote control. 2. Limited Warranty 8 - Warning: This product includes a lamp component that contains mercury (Hg). Replace the...

Quick Start
Page 6
... also speak with a projector support specialist by dialing one computer and/or video source, you may be labeled CRT/LCD. General Notice: Other product names used herein are registered trademarks and Epson Store is a registered trademark of your notebook's manual or online help Internet ...If you see a blank screen If you can purchase screens, carrying cases, video cables, or other accessories from an Epson authorized reseller. PowerLite and PrivateLine are for identification purposes only and may need to uncheck the option to access tips, templates, and training ...
... also speak with a projector support specialist by dialing one computer and/or video source, you may be labeled CRT/LCD. General Notice: Other product names used herein are registered trademarks and Epson Store is a registered trademark of your notebook's manual or online help Internet ...If you see a blank screen If you can purchase screens, carrying cases, video cables, or other accessories from an Epson authorized reseller. PowerLite and PrivateLine are for identification purposes only and may need to uncheck the option to access tips, templates, and training ...
User Manual
Page 12
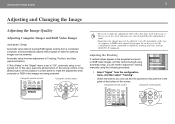
...RGB video signals being projected. Using the remote control Using the control panel p • If you will need to adjust the tracking and sync settings manually. Adjusting the Tracking If vertical stripes appear in the guide at the bottom of Tracking, Position, and Sync (synchronization). Adjusting the Image Quality 12 ... and then select "Tracking". Check the buttons you can use , these signals so that the optimum images can be adjusted correctly depending on the projector's control panel to "Off", automatic setup is made. • Sometimes the signals may not be obtained.
...RGB video signals being projected. Using the remote control Using the control panel p • If you will need to adjust the tracking and sync settings manually. Adjusting the Tracking If vertical stripes appear in the guide at the bottom of Tracking, Position, and Sync (synchronization). Adjusting the Image Quality 12 ... and then select "Tracking". Check the buttons you can use , these signals so that the optimum images can be adjusted correctly depending on the projector's control panel to "Off", automatic setup is made. • Sometimes the signals may not be obtained.

User Manual
Page 33
...their default values. Press the [Enter] button on the remote control or on or off the function for the connected equipment manually. (Adjustment is only possible when composite video/S-Video signals are recognized automatically. Adjusts computer images when vertical stripes appear in the...for automatically optimizing images when the input source is changed. Position Progressive Computer1 Input Video Signal Resize Reset Function Turns on the projector's control panel. On: Interlaced (i) signals are saved separately for projected images. Selects the input signal in accordance with the ...
...their default values. Press the [Enter] button on the remote control or on or off the function for the connected equipment manually. (Adjustment is only possible when composite video/S-Video signals are recognized automatically. Adjusts computer images when vertical stripes appear in the...for automatically optimizing images when the input source is changed. Position Progressive Computer1 Input Video Signal Resize Reset Function Turns on the projector's control panel. On: Interlaced (i) signals are saved separately for projected images. Selects the input signal in accordance with the ...

User Manual
Page 53
...the "Position" menu command. If signals other than analog RGB images from a computer or RGB video images are being input, adjust the setting manually using the "Position" menu command. See "List of Supported Monitor Displays" on the remote control to select the signal format. See page 20.... has been activated in images Check Remedy Are the image signal format settings correct? To display the whole of the image on the projector's control panel to carry out automatic adjustment. For computer images, has the correct resolution been Set the computer so that the signals ...
...the "Position" menu command. If signals other than analog RGB images from a computer or RGB video images are being input, adjust the setting manually using the "Position" menu command. See "List of Supported Monitor Displays" on the remote control to select the signal format. See page 20.... has been activated in images Check Remedy Are the image signal format settings correct? To display the whole of the image on the projector's control panel to carry out automatic adjustment. For computer images, has the correct resolution been Set the computer so that the signals ...

User Manual
Page 64
... matrix SVGA 480,000 pixels (800 (W) × 600 (H) dots) × 3 500:1 1800 ANSI lumens (high brightness) 1500 ANSI lumens (low brightness) Manual Electronic (approx. 1:1.35) UHE lamp, 170 W 2000 hours (high brightness) 3000 hours (low brightness) 1W monaural 100/240VAC 50/60Hz 2.2/1.0A Operating: 250W...* The USB interface complies with all USB-compatible devices. Turn off this Projector. 0°- 30° 0°- 30° If you use the projector when it could fall or be damaged. Angle of the projector. Lamp brightness decreases over time. The USB connector is tilted more than 30...
... matrix SVGA 480,000 pixels (800 (W) × 600 (H) dots) × 3 500:1 1800 ANSI lumens (high brightness) 1500 ANSI lumens (low brightness) Manual Electronic (approx. 1:1.35) UHE lamp, 170 W 2000 hours (high brightness) 3000 hours (low brightness) 1W monaural 100/240VAC 50/60Hz 2.2/1.0A Operating: 250W...* The USB interface complies with all USB-compatible devices. Turn off this Projector. 0°- 30° 0°- 30° If you use the projector when it could fall or be damaged. Angle of the projector. Lamp brightness decreases over time. The USB connector is tilted more than 30...


