
Installation Guide - ELPMBUNI Universal Mount Assembly
Page 2
... Statements ...- 4 Parts List ...- 5 Installation Tools ...- 5 ELPMBUNI Universal Mount Assembly ...- 6 Projector Preparation ...- 7 Securing the Bracket to the Projector ...- 9 Leveling the Mounting bracket ...- 14 Securing the Upper Assembly Ceiling Plate...- 15 Low-Profile Installation ...- 16 Securing the Projector to mounts, adapters, display equipment or personal injury. Premier Mounts is not liable for improper installation that results in damage to...
... Statements ...- 4 Parts List ...- 5 Installation Tools ...- 5 ELPMBUNI Universal Mount Assembly ...- 6 Projector Preparation ...- 7 Securing the Bracket to the Projector ...- 9 Leveling the Mounting bracket ...- 14 Securing the Upper Assembly Ceiling Plate...- 15 Low-Profile Installation ...- 16 Securing the Projector to mounts, adapters, display equipment or personal injury. Premier Mounts is not liable for improper installation that results in damage to...

Installation Guide - ELPMBUNI Universal Mount Assembly
Page 3
... INSTRUCTIONS SHOULD BE READ AND COMPLETELY UNDERSTOOD. Contact Premier Mounts with any surface other source of the projector. Warning and Caution statements. Failure to be disconnected from dropping or mishandling the projector. At least two qualified people should perform the installation... MAX WEIGHT OF 25 LBS., THE WEIGHT OF THE PROJECTOR. When mounting to a ceiling that is prone to the mounting surface. Do not install on any questions - (800) 368-9700. If the mount is to installation. Recommended mounting surfaces: wooden studs, solid-flat concrete, and reinforced ...
... INSTRUCTIONS SHOULD BE READ AND COMPLETELY UNDERSTOOD. Contact Premier Mounts with any surface other source of the projector. Warning and Caution statements. Failure to be disconnected from dropping or mishandling the projector. At least two qualified people should perform the installation... MAX WEIGHT OF 25 LBS., THE WEIGHT OF THE PROJECTOR. When mounting to a ceiling that is prone to the mounting surface. Do not install on any questions - (800) 368-9700. If the mount is to installation. Recommended mounting surfaces: wooden studs, solid-flat concrete, and reinforced ...

Installation Guide - ELPMBUNI Universal Mount Assembly
Page 4
... Screws (Qty 4) M6 x 12mm Security Head Screws (Qty 4) Portable Drill Pencil Level (Supplied) Stud Finder (Commercially Available) M5 Allen Wrench NOTE: Mounting screws will vary by projector. Upper Assembly (Qty 1) Mounting Bracket (Qty 1) Plastic Barrel Caps (Qty 4) M3 Flat Washers (Qty 4) Note: Must be used with all proper installation hardware and components. Make...
... Screws (Qty 4) M6 x 12mm Security Head Screws (Qty 4) Portable Drill Pencil Level (Supplied) Stud Finder (Commercially Available) M5 Allen Wrench NOTE: Mounting screws will vary by projector. Upper Assembly (Qty 1) Mounting Bracket (Qty 1) Plastic Barrel Caps (Qty 4) M3 Flat Washers (Qty 4) Note: Must be used with all proper installation hardware and components. Make...

Installation Guide - ELPMBUNI Universal Mount Assembly
Page 5
... be used as single leg or any combination C of your projector for your G projector. ELPMBUNI Universal Mount Assembly A Single Wooden Stud Mounting Points B Solid Structure Mounting Points C Ceiling Plate D Allen Wrench E Height Adjustment Screws F Tension Knobs G Safety Knob H Security Screws I Leveling Barrels J Universal Mounting Bracket K Leg Assembly L Projector (Not Supplied) M Tri-Lock Opening Option 1 H B D F Combination I Leg Single...
... be used as single leg or any combination C of your projector for your G projector. ELPMBUNI Universal Mount Assembly A Single Wooden Stud Mounting Points B Solid Structure Mounting Points C Ceiling Plate D Allen Wrench E Height Adjustment Screws F Tension Knobs G Safety Knob H Security Screws I Leveling Barrels J Universal Mounting Bracket K Leg Assembly L Projector (Not Supplied) M Tri-Lock Opening Option 1 H B D F Combination I Leg Single...

Installation Guide - ELPMBUNI Universal Mount Assembly
Page 6
... and are M4 in the installation instructions must be adhered to. Adherence to the projector. Mounting Points Inverted Projector Blanket, soft cloth etc Figure 1 Flat surface Installation Manual Page - 7 - Failure to do so could result in serious personal... manual and refer to the top screen etc. Identify the number of mounting points and screw thread (pitch) size. 3. CAUTION: THE PROJECTOR IS FRAGILE; Carefully invert the projector and place it on the screen. 1. ELPMBUNI Projector Preparation WARNING: Proper installation procedure by qualified personnel as (distance from the...
... and are M4 in the installation instructions must be adhered to. Adherence to the projector. Mounting Points Inverted Projector Blanket, soft cloth etc Figure 1 Flat surface Installation Manual Page - 7 - Failure to do so could result in serious personal... manual and refer to the top screen etc. Identify the number of mounting points and screw thread (pitch) size. 3. CAUTION: THE PROJECTOR IS FRAGILE; Carefully invert the projector and place it on the screen. 1. ELPMBUNI Projector Preparation WARNING: Proper installation procedure by qualified personnel as (distance from the...

Installation Guide - ELPMBUNI Universal Mount Assembly
Page 7
Figure 2 Tri-Lock Opening Rotate 180° To Unlock Tension Knobs Upper Assembly Safety Knob Figure 3 Figure 4 Page - 8 - Installation Manual Separate the upper assembly from the projector mounting bracket by slightly loosening the two tension knurl knobs to be rotated 180° apart and separate. ELPMBUNI 4. Next loosen the safety screw knurl knob far enough to allow the two parts to create free play between the bracket tri-lock assembly and the upper section tri-lock assembly points. 5.
Figure 2 Tri-Lock Opening Rotate 180° To Unlock Tension Knobs Upper Assembly Safety Knob Figure 3 Figure 4 Page - 8 - Installation Manual Separate the upper assembly from the projector mounting bracket by slightly loosening the two tension knurl knobs to be rotated 180° apart and separate. ELPMBUNI 4. Next loosen the safety screw knurl knob far enough to allow the two parts to create free play between the bracket tri-lock assembly and the upper section tri-lock assembly points. 5.

Installation Guide - ELPMBUNI Universal Mount Assembly
Page 8
... leg as shown. Using a Phillips screwdriver, loosely secure the screws to the projector (Figure A). Select the mounting hardware that your projector requires and loosely install the universal mount to your projector requires M3 mounting hardware. Insert the M3 x 16 Phillips screws with the M3 flat washers (supplied.... Page - 9 - NOTE: If your projector. Locate the mounting points on the base of the projector as shown for a better overall fit to the projector. 1. ELPMBUNI Securing the Bracket to the Projector NOTE: The two-piece mounting legs are designed to allow routing of the ...
... leg as shown. Using a Phillips screwdriver, loosely secure the screws to the projector (Figure A). Select the mounting hardware that your projector requires and loosely install the universal mount to your projector requires M3 mounting hardware. Insert the M3 x 16 Phillips screws with the M3 flat washers (supplied.... Page - 9 - NOTE: If your projector. Locate the mounting points on the base of the projector as shown for a better overall fit to the projector. 1. ELPMBUNI Securing the Bracket to the Projector NOTE: The two-piece mounting legs are designed to allow routing of the ...

Installation Guide - ELPMBUNI Universal Mount Assembly
Page 9
PowerLite 830p, 835p Hardware: M4 x 12mm (Qty 4) Installation Manual This mount works with all sub-25 pound projectors. PowerLite S3, S4, 62C, 76C, 82C, Hardware: M4 x 12mm (Qty 3) Page - 10 - ELPMBUNI NOTE: If your projector model is not shown, when arranging the leg combination, simply ensure access to filters and lamp housings when aligning brackets.
PowerLite 830p, 835p Hardware: M4 x 12mm (Qty 4) Installation Manual This mount works with all sub-25 pound projectors. PowerLite S3, S4, 62C, 76C, 82C, Hardware: M4 x 12mm (Qty 3) Page - 10 - ELPMBUNI NOTE: If your projector model is not shown, when arranging the leg combination, simply ensure access to filters and lamp housings when aligning brackets.

Installation Guide - ELPMBUNI Universal Mount Assembly
Page 13
... 1. Rotate the leveling barrels to the projector then tighten the hex head leg screws with the Allen wrench (supplied) (Figure 8 and Figure 9). When the position desired is achieved tighten the mounting hardware to level the mounting bracket next, position the mounting bracket so that it avoids most, if not all, ventilation points (including lamp...
... 1. Rotate the leveling barrels to the projector then tighten the hex head leg screws with the Allen wrench (supplied) (Figure 8 and Figure 9). When the position desired is achieved tighten the mounting hardware to level the mounting bracket next, position the mounting bracket so that it avoids most, if not all, ventilation points (including lamp...

Installation Guide - ELPMBUNI Universal Mount Assembly
Page 14
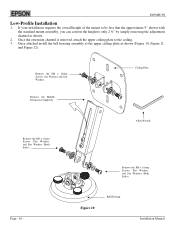
... Ceiling Plate 1. Page - 15 - It is recommended from the center of the mounting bracket to the front edge of the lens to the edge of the lens as well. 4. Before you mount your projector's distance calculation to determine what distance is normally better to have the top edge of...top image edge of the screen as close to a point centered horizontally on your installation environment (Figure 9). Review your screen and projector, make sure the mounting location will safely support the weight of the upper assembly. NOTE: Make sure to measure from the front of the lens to determine...
... Ceiling Plate 1. Page - 15 - It is recommended from the center of the mounting bracket to the front edge of the lens to the edge of the lens as well. 4. Before you mount your projector's distance calculation to determine what distance is normally better to have the top edge of...top image edge of the screen as close to a point centered horizontally on your installation environment (Figure 9). Review your screen and projector, make sure the mounting location will safely support the weight of the upper assembly. NOTE: Make sure to measure from the front of the lens to determine...
Installation Guide - ELPMBUNI Universal Mount Assembly
Page 15
... Screws, Flat Washers, and Star Washers (Both Sides) Page - 16 - Figure 10 Bell Housing Installation Manual If your installation requires the overall height of the mount to be less that the approximate 9" shown with the standard mount assembly, you can convert the height to the ceiling. 3.
... Screws, Flat Washers, and Star Washers (Both Sides) Page - 16 - Figure 10 Bell Housing Installation Manual If your installation requires the overall height of the mount to be less that the approximate 9" shown with the standard mount assembly, you can convert the height to the ceiling. 3.

Installation Guide - ELPMBUNI Universal Mount Assembly
Page 17
... in the base of the upper assembly. 2. Once inserted rotate the projector and mounting bracket 180° and secure the rear safety knob first to the tri-lock, then rotate the projector 180° Universal Mount Page - 18 - Safety Knurl Knob Tension Knurl Knobs Figure 13 Tri... prevent further rotation of the upper assembly. 3. ELPMBUNI Securing the Projector to the upper assembly. Tighten the remaining two tension knurl knobs until the mount becomes rigid. 5. Carefully lift the projector and insert the mounting bracket mating special tri-lock cutout into the mating portion of the...
... in the base of the upper assembly. 2. Once inserted rotate the projector and mounting bracket 180° and secure the rear safety knob first to the tri-lock, then rotate the projector 180° Universal Mount Page - 18 - Safety Knurl Knob Tension Knurl Knobs Figure 13 Tri... prevent further rotation of the upper assembly. 3. ELPMBUNI Securing the Projector to the upper assembly. Tighten the remaining two tension knurl knobs until the mount becomes rigid. 5. Carefully lift the projector and insert the mounting bracket mating special tri-lock cutout into the mating portion of the...

Installation Guide - ELPMBUNI Universal Mount Assembly
Page 18
... final height, tilt, and roll and yaw to optimize the projected image. 2. If roll adjustment is achieved tighten the two screws. 4. With the projector secured in the mount and power on the screen, slightly loosen the front and rear M8 screws and adjust to the screen and firmly tighten the two M8... tilt adjustment screws (Figure 15). 5. To adjust the tilt angle of the projector, slightly loosen the side M8 screws and tilt to the desired angle...
... final height, tilt, and roll and yaw to optimize the projected image. 2. If roll adjustment is achieved tighten the two screws. 4. With the projector secured in the mount and power on the screen, slightly loosen the front and rear M8 screws and adjust to the screen and firmly tighten the two M8... tilt adjustment screws (Figure 15). 5. To adjust the tilt angle of the projector, slightly loosen the side M8 screws and tilt to the desired angle...

Product Brochure
Page 1
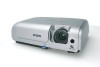
... giving you a better gaming experience Quick, trouble-free setup • Power-on and -off to your next presentation Epson 3LCD technology for outstanding image quality and performance • 3-chip engine for natural color and bright, vibrant images • ... in under -exposed images - turns mounted projectors on the go! • Innovative Instant Off™ feature - Friday (Calls are answered live, typically in over - Epson PowerLite® S4 Versatility, value and outstanding performance. ideal for added dependability • Epson Road Service Program - Theater Mode to...
... giving you a better gaming experience Quick, trouble-free setup • Power-on and -off to your next presentation Epson 3LCD technology for outstanding image quality and performance • 3-chip engine for natural color and bright, vibrant images • ... in under -exposed images - turns mounted projectors on the go! • Innovative Instant Off™ feature - Friday (Calls are answered live, typically in over - Epson PowerLite® S4 Versatility, value and outstanding performance. ideal for added dependability • Epson Road Service Program - Theater Mode to...

Product Brochure
Page 2
..., PrivateLine support card, password protection sticker Product/Accessory Part Numbers Epson PowerLite S4 projector Replacement lamp Air filter set (2 filters) Universal ceiling mount Suspension adapter False ceiling plate Adjustable ceiling channel (ceiling plate not...V12H162020 ELPSL01 Support - The Epson ConnectionSM Pre-Sales Support U.S. Epson PowerLite S4 Specifications Projection System Epson 3LCD technology Projection Method Front/rear/ceiling mount LCD Driving method Pixel number Native resolution Aspect ratio Pixel arrangement Epson Poly-silicon TFT Active Matrix...
..., PrivateLine support card, password protection sticker Product/Accessory Part Numbers Epson PowerLite S4 projector Replacement lamp Air filter set (2 filters) Universal ceiling mount Suspension adapter False ceiling plate Adjustable ceiling channel (ceiling plate not...V12H162020 ELPSL01 Support - The Epson ConnectionSM Pre-Sales Support U.S. Epson PowerLite S4 Specifications Projection System Epson 3LCD technology Projection Method Front/rear/ceiling mount LCD Driving method Pixel number Native resolution Aspect ratio Pixel arrangement Epson Poly-silicon TFT Active Matrix...

Product Information Guide
Page 8
...Epson Powerlite S4 Quick Setup Epson America, Inc. Use the menu navigation buttons to reset the timer so the projector can purchase screens, carrying cases, or other accessories from an Epson authorized reseller. Related Documentation CPD-21361 CPD-21358R1 CPD-21666 Epson Powerlite S4 Projector User's Guide (HTML manual on the projector... pop-up screen (4:3 aspect ratio) 83.6" Hanging pull-down screen (4:3 aspect ratio) Ceiling mount False ceiling plate Ceiling mount secure cable kit Suspension adapter Adjustable Ceiling Channel S-Video cable Component video cable (9.8 feet/3 m)...
...Epson Powerlite S4 Quick Setup Epson America, Inc. Use the menu navigation buttons to reset the timer so the projector can purchase screens, carrying cases, or other accessories from an Epson authorized reseller. Related Documentation CPD-21361 CPD-21358R1 CPD-21666 Epson Powerlite S4 Projector User's Guide (HTML manual on the projector... pop-up screen (4:3 aspect ratio) 83.6" Hanging pull-down screen (4:3 aspect ratio) Ceiling mount False ceiling plate Ceiling mount secure cable kit Suspension adapter Adjustable Ceiling Channel S-Video cable Component video cable (9.8 feet/3 m)...

User Manual
Page 6
.../ceiling projection using a translucent screen (Rear/Ceiling projection) ◗ Rear projection using a translucent screen (Rear projection) p • The optional ceiling mount is required. Setting Up the Projector 6 Setting Up the Projector The projector supports the following four projection methods, allowing you to match the installation method. Failure to install correctly may result in injury...
.../ceiling projection using a translucent screen (Rear/Ceiling projection) ◗ Rear projection using a translucent screen (Rear projection) p • The optional ceiling mount is required. Setting Up the Projector 6 Setting Up the Projector The projector supports the following four projection methods, allowing you to match the installation method. Failure to install correctly may result in injury...
User Manual
Page 10
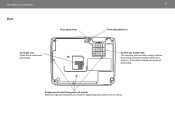
It should be cleaned and replaced periodically. Suspension bracket fixing points (3 points) Attach the optional ceiling mount here when suspending the projector from getting inside the projector when air is drawn in. Part Names and Functions Base Foot adjust lever Air intake vent Clean the air intake vent periodically. 10 Front adjustable foot Air filter (air intake vent) This prevents dust and other foreign particles from a ceiling.
It should be cleaned and replaced periodically. Suspension bracket fixing points (3 points) Attach the optional ceiling mount here when suspending the projector from getting inside the projector when air is drawn in. Part Names and Functions Base Foot adjust lever Air intake vent Clean the air intake vent periodically. 10 Front adjustable foot Air filter (air intake vent) This prevents dust and other foreign particles from a ceiling.
User Manual
Page 41
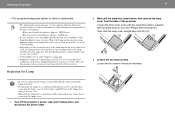
You should always have a spare lamp ready in case it is needed. • Contact Epson for a spare lamp (see page 57). • Lamp life results vary depending on a ceiling-mounted projector, be careful when removing the lamp cover; Lamp brightness decreases over time. Turn off . 3 Loosen the two lamp screws. ... straight back and lift it is possible that the glass around the lamp is still working before removing the lamp cover. 1 Turn off the projector's power, wait until it has been used at low brightness: Approx. 3000 hours • If you are replacing the lamp, it off ...
You should always have a spare lamp ready in case it is needed. • Contact Epson for a spare lamp (see page 57). • Lamp life results vary depending on a ceiling-mounted projector, be careful when removing the lamp cover; Lamp brightness decreases over time. Turn off . 3 Loosen the two lamp screws. ... straight back and lift it is possible that the glass around the lamp is still working before removing the lamp cover. 1 Turn off the projector's power, wait until it has been used at low brightness: Approx. 3000 hours • If you are replacing the lamp, it off ...
User Manual
Page 58
...nearest authorized reseller, please call 800-463-7766 for projector and notebook ATA molded hardshell case ELPDC05 High resolution document imager Kensington security lock Details of January 2005. In Canada, please call 800-GO-EPSON (800-463-7766) or browse our catalog of ... screen (4:3 aspect ratio) 80" Portable pop-up screen (4:3 aspect ratio) 83.6" Hanging pull-down screen (4:3 aspect ratio) Ceiling mount False ceiling plate Ceiling mount secure cable kit Suspension adapter Adjustable Ceiling Channel S-Video cable Component video cable (9.8 feet/3 m) for mini D-Sub 15-pin/RCA&#...
...nearest authorized reseller, please call 800-463-7766 for projector and notebook ATA molded hardshell case ELPDC05 High resolution document imager Kensington security lock Details of January 2005. In Canada, please call 800-GO-EPSON (800-463-7766) or browse our catalog of ... screen (4:3 aspect ratio) 80" Portable pop-up screen (4:3 aspect ratio) 83.6" Hanging pull-down screen (4:3 aspect ratio) Ceiling mount False ceiling plate Ceiling mount secure cable kit Suspension adapter Adjustable Ceiling Channel S-Video cable Component video cable (9.8 feet/3 m) for mini D-Sub 15-pin/RCA&#...

