
English Manual
Page 3
..., the walking belt may change speed, accelerate, or stop procedure before operating the treadmill. 1. No other appliance should not be on page 5 for both men and women. The pulse sensor is fully closed. 3 When folding or moving the treadmill, make sure that the storage latch is intended only as described in front. Do not put the treadmill in speed. 8. Wear appropriate exercise clothes when using the treadmill. 7. Never use...
..., the walking belt may change speed, accelerate, or stop procedure before operating the treadmill. 1. No other appliance should not be on page 5 for both men and women. The pulse sensor is fully closed. 3 When folding or moving the treadmill, make sure that the storage latch is intended only as described in front. Do not put the treadmill in speed. 8. Wear appropriate exercise clothes when using the treadmill. 7. Never use...
English Manual
Page 4
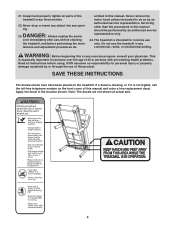
... object into any exercise program, consult your physician. tenance and adjustment procedures de- scribed in any commercial, rental, or institutional setting. Never remove the motor hood unless instructed to do so by an authorized service representative only. 24. Note: The decals are not shown at actual size. 4 WARNING: Before beginning this manual and order a free replacement decal. Inspect and properly tighten all instructions before performing...
... object into any exercise program, consult your physician. tenance and adjustment procedures de- scribed in any commercial, rental, or institutional setting. Never remove the motor hood unless instructed to do so by an authorized service representative only. 24. Note: The decals are not shown at actual size. 4 WARNING: Before beginning this manual and order a free replacement decal. Inspect and properly tighten all instructions before performing...
English Manual
Page 5
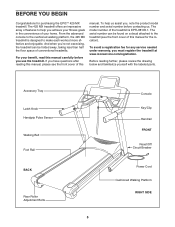
..., note the product model number and serial number before you achieve your fitness goals in the convenience of features to the treadmill (see the front cover of conventional treadmills. Accessory Tray Latch Knob Handgrip Pulse Sensor Walking Belt Foot Rail BACK Rear Roller Adjustment Bolts Console Key/Clip Handrail FRONT Reset/Off Circuit Breaker Power Cord Cushioned Walking Platform RIGHT SIDE 5 BEFORE YOU BEGIN Congratulations for purchasing the EPICTM 425 MX treadmill. The 425 MX treadmill offers an impressive array...
..., note the product model number and serial number before you achieve your fitness goals in the convenience of features to the treadmill (see the front cover of conventional treadmills. Accessory Tray Latch Knob Handgrip Pulse Sensor Walking Belt Foot Rail BACK Rear Roller Adjustment Bolts Console Key/Clip Handrail FRONT Reset/Off Circuit Breaker Power Cord Cushioned Walking Platform RIGHT SIDE 5 BEFORE YOU BEGIN Congratulations for purchasing the EPICTM 425 MX treadmill. The 425 MX treadmill offers an impressive array...

English Manual
Page 9
... WHEN THE POWER IS TURNED ON. Remove the elastic band holding the Upright Wire Harness (75). While pressing down on the pin. (Note: If there are replaceable. Remove the knob from the console assembly, simply press them back in the side of Bracket Console Wire 75 74 75 9. Insert the Upright Wire Harness (75) and the console wire into place. Connect the Upright Wire Harness to the Uprights (73, 74) with four Upright Bolts (72...
... WHEN THE POWER IS TURNED ON. Remove the elastic band holding the Upright Wire Harness (75). While pressing down on the pin. (Note: If there are replaceable. Remove the knob from the console assembly, simply press them back in the side of Bracket Console Wire 75 74 75 9. Insert the Upright Wire Harness (75) and the console wire into place. Connect the Upright Wire Harness to the Uprights (73, 74) with four Upright Bolts (72...

English Manual
Page 10
... Door (70) from the Console Back (69). Make sure that the power cord is unplugged. Place the treadmill in the storage position (see HOW TO FOLD THE TREADMILL FOR STORAGE on the receiver (A) to adjust the walking belt (see page 22), follow the steps below to the plastic posts on the Access Door (70) with the Screw (67). Tighten the Upright Bolts (72) in a secure place...
... Door (70) from the Console Back (69). Make sure that the power cord is unplugged. Place the treadmill in the storage position (see HOW TO FOLD THE TREADMILL FOR STORAGE on the receiver (A) to adjust the walking belt (see page 22), follow the steps below to the plastic posts on the Access Door (70) with the Screw (67). Tighten the Upright Bolts (72) in a secure place...
English Manual
Page 11
... your treadmill being turned on the front cover of this manual and order part number 146148, or see your treadmill (see your home's power. Lug Metal Screw The temporary adapter should be used to connect the surge suppressor to the control system of 450 joules. Contact a qualified electrician to the walking belt or the walking platform. To decrease the possibility of elec- Do not modify the plug provided...
... your treadmill being turned on the front cover of this manual and order part number 146148, or see your treadmill (see your home's power. Lug Metal Screw The temporary adapter should be used to connect the surge suppressor to the control system of 450 joules. Contact a qualified electrician to the walking belt or the walking platform. To decrease the possibility of elec- Do not modify the plug provided...
English Manual
Page 12
... the console, causing the walking belt to slow to a stop. Each program automatically adjusts the speed and incline of the treadmill to keep your workouts more effective. Note: The heart rate programs require the use a custom program, see page 16. To create and use of the optional chest pulse sensor. Plug in the reset position. Next, locate the reset/off circuit breaker on the console, remove the plastic. Two heart rate programs are also offered. Next, insert the key...
... the console, causing the walking belt to slow to a stop. Each program automatically adjusts the speed and incline of the treadmill to keep your workouts more effective. Note: The heart rate programs require the use a custom program, see page 16. To create and use of the optional chest pulse sensor. Plug in the reset position. Next, locate the reset/off circuit breaker on the console, remove the plastic. Two heart rate programs are also offered. Next, insert the key...
English Manual
Page 13
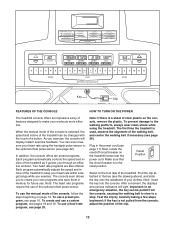
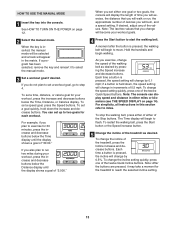
... SPEED DISPLAY on page 12. 2 Select the manual mode. See HOW TO TURN ON THE POWER on page 14). You can display speed and distance in increments of the twelve Quick Speed buttons. Note: The console can set either of the treadmill, press the Incline increase and decrease buttons. HOW TO USE THE MANUAL MODE 1 Insert the key into the console. if a button is pressed, the incline will exercise, the distance that you plan to miles. To stop the walking belt, press...
... SPEED DISPLAY on page 12. 2 Select the manual mode. See HOW TO TURN ON THE POWER on page 14). You can display speed and distance in increments of the twelve Quick Speed buttons. Note: The console can set either of the treadmill, press the Incline increase and decrease buttons. HOW TO USE THE MANUAL MODE 1 Insert the key into the console. if a button is pressed, the incline will exercise, the distance that you plan to miles. To stop the walking belt, press...
English Manual
Page 14
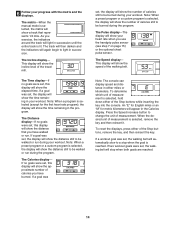
... speed of the Stop buttons, remove the key, and then reinsert the key. This display will again begin to be burned during the program. Note: When a program is selected, the display will show the time remaining in either of the walking belt. The Calories display- The Speed display- Note: The console can display speed and distance in your heart rate when you use the handgrip pulse sensor (see step 7 on page 15) or the optional chest pulse sensor...
... speed of the Stop buttons, remove the key, and then reinsert the key. This display will again begin to be burned during the program. Note: When a program is selected, the display will show the time remaining in either of the walking belt. The Calories display- The Speed display- Note: The console can display speed and distance in your heart rate when you use the handgrip pulse sensor (see step 7 on page 15) or the optional chest pulse sensor...
English Manual
Page 15
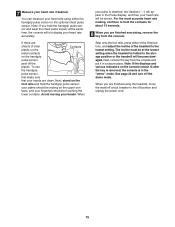
... are finished using either of the Stop buttons, and adjust the incline of clear Contacts plastic on the metal contacts on the handgrip pulse sensor, peel off the demo mode. When your pulse is detected, two dashes (- -) will appear in the Pulse display, and then your heart rate will not display your heart rate using the treadmill, move the reset/off circuit breaker to the lowest setting. You can measure your heart rate accurately...
... are finished using either of the Stop buttons, and adjust the incline of clear Contacts plastic on the metal contacts on the handgrip pulse sensor, peel off the demo mode. When your pulse is detected, two dashes (- -) will appear in the Pulse display, and then your heart rate will not display your heart rate using the treadmill, move the reset/off circuit breaker to the lowest setting. You can measure your heart rate accurately...
English Manual
Page 16
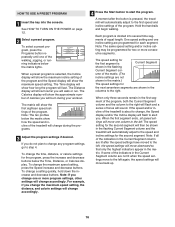
... speed setting, press the Speed increase and decrease buttons. Note: If you will show the approximate number of calories you do not plan to change during your workout. The speed setting for the second segment. If you will show the maximum speed setting. Hold the handrails and begin walking. The Calories display will burn during the programs. 3 Adjust the program settings if desired. HOW TO USE A PRESET PROGRAM 1 Insert the key...
... speed setting, press the Speed increase and decrease buttons. Note: If you will show the approximate number of calories you do not plan to change during your workout. The speed setting for the second segment. If you will show the maximum speed setting. Hold the handrails and begin walking. The Calories display will burn during the programs. 3 Adjust the program settings if desired. HOW TO USE A PRESET PROGRAM 1 Insert the key...
English Manual
Page 17
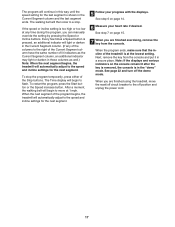
... begins, the treadmill will begin to move the reset/off circuit breaker to the speed and incline settings for the next segment. To stop . Next, remove the key from the console. See page 22 and turn off position and unplug the power cord. 17 The walking belt will automatically adjust to the off the demo mode. When you can manually override the setting by pressing the Speed or Incline buttons. When the program ends, make...
... begins, the treadmill will begin to move the reset/off circuit breaker to the speed and incline settings for the next segment. To stop . Next, remove the key from the console. See page 22 and turn off position and unplug the power cord. 17 The walking belt will automatically adjust to the off the demo mode. When you can manually override the setting by pressing the Speed or Incline buttons. When the program ends, make...
English Manual
Page 18
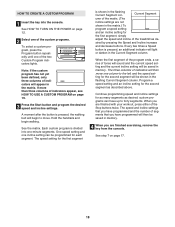
... not shown in memory. 4 When you have up to forty segments. The three columns of the treadmill as described above. If more than three columns of the Stop buttons twice. One speed setting and one column to move. Program a speed setting and an incline setting for the first segment, simply adjust the speed and incline of indicators will then move one incline setting can have programmed will begin walking.
... not shown in memory. 4 When you have up to forty segments. The three columns of the treadmill as described above. If more than three columns of the Stop buttons twice. One speed setting and one column to move. Program a speed setting and an incline setting for the first segment, simply adjust the speed and incline of indicators will then move one incline setting can have programmed will begin walking.
English Manual
Page 19
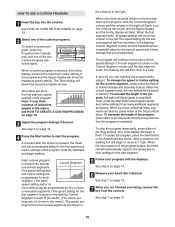
... exercising, remove the key from the console. The Time display will show the first eighteen speed settings of the program. tings are not shown in the Current Segment column and the last segment ends. To change the speed or incline setting for the second segment will then be shown in the flashing Current Segment column and the treadmill will automatically adjust to the second speed...
... exercising, remove the key from the console. The Time display will show the first eighteen speed settings of the program. tings are not shown in the Current Segment column and the last segment ends. To change the speed or incline setting for the second segment will then be shown in the flashing Current Segment column and the treadmill will automatically adjust to the second speed...
English Manual
Page 20
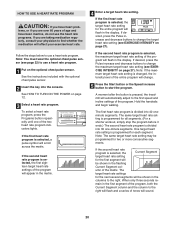
... buttons to change . 5 Press the Start button or the Speed increase button to start the program. The target heart rate settings for the first segment will flash in the display. HOW TO USE A HEART RATE PROGRAM CAUTION: If you are over 60 years of age and have been inactive, do not use a heart rate program. lems, or if you are taking medication regularly, consult your exercise heart rate. See the instructions included with the optional chest pulse sensor...
... buttons to change . 5 Press the Start button or the Speed increase button to start the program. The target heart rate settings for the first segment will flash in the display. HOW TO USE A HEART RATE PROGRAM CAUTION: If you are over 60 years of age and have been inactive, do not use a heart rate program. lems, or if you are taking medication regularly, consult your exercise heart rate. See the instructions included with the optional chest pulse sensor...
English Manual
Page 21
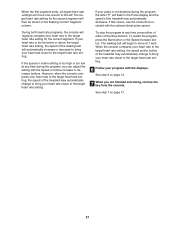
... finished exercising, remove the key from the console. The target heart rate setting for the current segment. To restart the program, press the Start button or the Speed increase button. See step 6 on page 17. 21 If your heart rate to the target heart rate setting. If this occurs, see the instructions included with the Speed or Incline increase or decrease buttons. See step 7 on page 14. 7 When you can adjust the setting with the optional chest pulse sensor...
... finished exercising, remove the key from the console. The target heart rate setting for the current segment. To restart the program, press the Start button or the Speed increase button. See step 6 on page 17. 21 If your heart rate to the target heart rate setting. If this occurs, see the instructions included with the Speed or Incline increase or decrease buttons. See step 7 on page 14. 7 When you can adjust the setting with the optional chest pulse sensor...

English Manual
Page 22
... in the "demo" mode. An "E" for English miles or an "M" for speed and distance. IMPORTANT: The Pulse display should be used . To purchase the optional chest pulse sensor, call the toll-free telephone number on and turn on the front cover of miles or kilometers that the walking belt has moved. Press the Speed increase button to select miles or kilometers as it continuously monitors your heart rate. In addition, the information mode allows you to change the unit...
... in the "demo" mode. An "E" for English miles or an "M" for speed and distance. IMPORTANT: The Pulse display should be used . To purchase the optional chest pulse sensor, call the toll-free telephone number on and turn on the front cover of miles or kilometers that the walking belt has moved. Press the Speed increase button to select miles or kilometers as it continuously monitors your heart rate. In addition, the information mode allows you to change the unit...

English Manual
Page 26
...), move the Reed Switch slightly, and then retighten the Screw. When the walking belt is centered. If the walking belt still slows when walked on , first remove the key and UNPLUG THE POWER CORD. Repeat until the walking belt is aligned with the Reed Switch. Then, plug in the power cord, insert the key, and run the treadmill for a few minutes. Using the included allen wrench, turn both rear roller bolts clockwise 1/4 of a turn ; Remove the key and UNPLUG THE POWER CORD. Use...
...), move the Reed Switch slightly, and then retighten the Screw. When the walking belt is centered. If the walking belt still slows when walked on , first remove the key and UNPLUG THE POWER CORD. Repeat until the walking belt is aligned with the Reed Switch. Then, plug in the power cord, insert the key, and run the treadmill for a few minutes. Using the included allen wrench, turn both rear roller bolts clockwise 1/4 of a turn ; Remove the key and UNPLUG THE POWER CORD. Use...
English Manual
Page 27
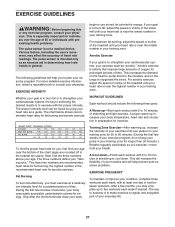
... your training zone. The pulse sensor is intended only as an exercise aid in determining heart rate trends in your training zone for energy. EXERCISE INTENSITY Whether your goal is not a medical device. WORKOUT GUIDELINES Each workout should include the following guidelines will help you to burn fat, adjust the speed or incline of the treadmill until your pulse is near the lowest number in your body uses...
... your training zone. The pulse sensor is intended only as an exercise aid in determining heart rate trends in your training zone for energy. EXERCISE INTENSITY Whether your goal is not a medical device. WORKOUT GUIDELINES Each workout should include the following guidelines will help you to burn fat, adjust the speed or incline of the treadmill until your pulse is near the lowest number in your body uses...
English Manual
Page 34
... products used for a lifetime. This warranty gives you . ICON HEALTH & FITNESS, INC., 1500 S. 1000 W., LOGAN, UT 84321-9813 Part No. 235249 R0706A Printed in connection with the use , costs of removal or installation or other warranty beyond that specifically set forth herein. products used as store display models. Accordingly, the above limitation may not apply to the original purchaser. HOW TO ORDER REPLACEMENT PARTS To order replacement parts, see the PART LIST on...
... products used for a lifetime. This warranty gives you . ICON HEALTH & FITNESS, INC., 1500 S. 1000 W., LOGAN, UT 84321-9813 Part No. 235249 R0706A Printed in connection with the use , costs of removal or installation or other warranty beyond that specifically set forth herein. products used as store display models. Accordingly, the above limitation may not apply to the original purchaser. HOW TO ORDER REPLACEMENT PARTS To order replacement parts, see the PART LIST on...


