
Quick Start Guide
Page 1
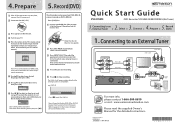
...to turn On the unit. 4 Turn On your TV. 5 Press the button on the TV's remote control that accesses the external input channel repeatedly until you see "Initial Setup" menu. (Please refer.... The title list will appear automatically after writing to finalize a disc. EMERSON AND THE G-CLEF LOGO ARE REGISTERED TRADEMARKS OF EMERSON RADIO CORP., MOONACHIE, NEW JERSEY, U.S.A. Clock Setting JAN / 23 /...After all the contents. If the TV is connected. Connecting to Stop recording. Quick Start Guide ZV427EM5 DVD Recorder/VCR LINE-IN RECORDING (No Tuner) 1. 2. 3. 4. 5. IN RF coaxial ...
...to turn On the unit. 4 Turn On your TV. 5 Press the button on the TV's remote control that accesses the external input channel repeatedly until you see "Initial Setup" menu. (Please refer.... The title list will appear automatically after writing to finalize a disc. EMERSON AND THE G-CLEF LOGO ARE REGISTERED TRADEMARKS OF EMERSON RADIO CORP., MOONACHIE, NEW JERSEY, U.S.A. Clock Setting JAN / 23 /...After all the contents. If the TV is connected. Connecting to Stop recording. Quick Start Guide ZV427EM5 DVD Recorder/VCR LINE-IN RECORDING (No Tuner) 1. 2. 3. 4. 5. IN RF coaxial ...

Owner s Manual
Page 4
...by yourself. Disc handling • Handle the discs so that fingerprints and dust do not try to relevant topics on "TROUBLESHOOTING" on remote control. If a video head cleaner does not solve the problem, please consult your local Audio/Video store and purchase a good quality ...VHS video head cleaner. 2. Consult your unit may discolor the surface or damage the unit. SAFETY INFORMATION Supplied Accessories remote control (NC183UH) with batteries (AA, 1.5V x 2) RCA audio/video cables owner's manual quick guide Cleaning discs • When a disc becomes...
...by yourself. Disc handling • Handle the discs so that fingerprints and dust do not try to relevant topics on "TROUBLESHOOTING" on remote control. If a video head cleaner does not solve the problem, please consult your local Audio/Video store and purchase a good quality ...VHS video head cleaner. 2. Consult your unit may discolor the surface or damage the unit. SAFETY INFORMATION Supplied Accessories remote control (NC183UH) with batteries (AA, 1.5V x 2) RCA audio/video cables owner's manual quick guide Cleaning discs • When a disc becomes...

Owner s Manual
Page 6
CONTENTS Introduction SAFETY INFORMATION 2 FEATURES 8 Symbols Used in this Owner's Manual 9 FUNCTIONAL OVERVIEW 10 Front Panel 10 Rear Panel 11 Remote Control 12 Front Panel Display 14 Connections CONNECTION 15 Connecting to an External Tuner 15 TV Connection Overview 15 Connecting to a TV with an HDMI&#...
CONTENTS Introduction SAFETY INFORMATION 2 FEATURES 8 Symbols Used in this Owner's Manual 9 FUNCTIONAL OVERVIEW 10 Front Panel 10 Rear Panel 11 Remote Control 12 Front Panel Display 14 Connections CONNECTION 15 Connecting to an External Tuner 15 TV Connection Overview 15 Connecting to a TV with an HDMI&#...

Owner s Manual
Page 10
.... FUNCTIONAL OVERVIEW Front Panel 1 2* 3 23 22 21 2019 18 17 16 15 14 13 12 11 10 9 8* 7 6 5 4 (*) The unit can control the unit from your remote control so that you must unplug the AC power cord.) 23.POWER-ON indicator (DVD/VCR) Red LED lights up when power is on. 10...
.... FUNCTIONAL OVERVIEW Front Panel 1 2* 3 23 22 21 2019 18 17 16 15 14 13 12 11 10 9 8* 7 6 5 4 (*) The unit can control the unit from your remote control so that you must unplug the AC power cord.) 23.POWER-ON indicator (DVD/VCR) Red LED lights up when power is on. 10...

Owner s Manual
Page 12
... the battery compartment. 30˚ 23 feet (7m) 3 Close the cover. 1 2 Note Incorrect use different kinds of used for remote control. • Do not mix different types of batteries such as alkaline and standard (carbon-zinc). • Do not mix new ... not use of batteries can interfere with governmental regulations or environmental public instruction's rules that the + and - FUNCTIONAL OVERVIEW Remote Control Installing the Batteries in the Remote Control Install the batteries (AA 1.5V × 2) matching the polarity indicated inside battery compartment of sight: approx. 23...
... the battery compartment. 30˚ 23 feet (7m) 3 Close the cover. 1 2 Note Incorrect use different kinds of used for remote control. • Do not mix different types of batteries such as alkaline and standard (carbon-zinc). • Do not mix new ... not use of batteries can interfere with governmental regulations or environmental public instruction's rules that the + and - FUNCTIONAL OVERVIEW Remote Control Installing the Batteries in the Remote Control Install the batteries (AA 1.5V × 2) matching the polarity indicated inside battery compartment of sight: approx. 23...

Owner s Manual
Page 13
... counter. 19. DISPLAY button (DVD/VCR) • Press to select the VCR output mode. 8. VCR button • Press to display the display menu on the remote control is paused, press to display the audio menu during playback or in slow motion of a Hi-Fi videotape, press to use [A] or [C A] on the...
... counter. 19. DISPLAY button (DVD/VCR) • Press to select the VCR output mode. 8. VCR button • Press to display the display menu on the remote control is paused, press to display the audio menu during playback or in slow motion of a Hi-Fi videotape, press to use [A] or [C A] on the...

Owner s Manual
Page 20
...more than 10 minutes have passed since you have turned on the unit, you must find the viewing channel (external input channel) on the TV's remote control that accesses the external input channel. Finding the Viewing Channel on page 25. Note • Video input selection varies for Setup display. BEFORE ..., press [y] to turn on the unit. 2 Turn on your TV. • If connected to step 2 in standby mode before proceeding. 3 Press "2" on the TV's remote control, then press channel down button repeatedly until you have made all the connections, you may see "Initial Setup" menu.
...more than 10 minutes have passed since you have turned on the unit, you must find the viewing channel (external input channel) on the TV's remote control that accesses the external input channel. Finding the Viewing Channel on page 25. Note • Video input selection varies for Setup display. BEFORE ..., press [y] to turn on the unit. 2 Turn on your TV. • If connected to step 2 in standby mode before proceeding. 3 Press "2" on the TV's remote control, then press channel down button repeatedly until you have made all the connections, you may see "Initial Setup" menu.
Owner s Manual
Page 24
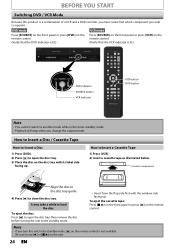
... . It may take a while to close the disc tray. BEFORE YOU START Switching DVD / VCR Mode Because this unit to the standby mode, [A] on the remote control. How to Insert a Disc / Cassette Tape How to Insert a Disc 1) Press [DVD]. 2) Press [A] to open the disc tray, then remove the disc ... STEREO Cassette compartment Align the disc to the disc tray guide. 4) Press [A] to load the disc. Be sure to use [A] or [C A] on the remote control. (Verify that the DVD indicator is lit.) DVD indicator SOURCE button VCR indicator VCR button DVD button Note • You cannot switch to the...
... . It may take a while to close the disc tray. BEFORE YOU START Switching DVD / VCR Mode Because this unit to the standby mode, [A] on the remote control. How to Insert a Disc / Cassette Tape How to Insert a Disc 1) Press [DVD]. 2) Press [A] to open the disc tray, then remove the disc ... STEREO Cassette compartment Align the disc to the disc tray guide. 4) Press [A] to load the disc. Be sure to use [A] or [C A] on the remote control. (Verify that the DVD indicator is lit.) DVD indicator SOURCE button VCR indicator VCR button DVD button Note • You cannot switch to the...

Owner s Manual
Page 30
... will start recording. standby mode automatically if a timer recording has been programmed. Press [TIMER SET] to cancel the timerstandby mode to be displayed on the remote control. • You cannot use the unit continuously. 30 EN "I" will appear in the title list. (Refer to "Guide to a Title List" on page 58...
... will start recording. standby mode automatically if a timer recording has been programmed. Press [TIMER SET] to cancel the timerstandby mode to be displayed on the remote control. • You cannot use the unit continuously. 30 EN "I" will appear in the title list. (Refer to "Guide to a Title List" on page 58...

Owner s Manual
Page 33
... 999 chapters recorded E34 No space for recording test. Introduction Connections Basic Setup Recording TIMER RECORDING To stop the timer recording immediately, press [ C] on the remote control. 2) Confirmation message will appear.
... 999 chapters recorded E34 No space for recording test. Introduction Connections Basic Setup Recording TIMER RECORDING To stop the timer recording immediately, press [ C] on the remote control. 2) Confirmation message will appear.

Owner s Manual
Page 78
... you finish with setting, press [SETUP] to exit. 2 TV Aspect (Default: 4:3 Letter Box) You can select the TV aspect ratio to 2 on the unit or remote control within 15 seconds (if the picture is compatible with the progressive scan system. NOTE : If there is no picture or picture is distorted after...
... you finish with setting, press [SETUP] to exit. 2 TV Aspect (Default: 4:3 Letter Box) You can select the TV aspect ratio to 2 on the unit or remote control within 15 seconds (if the picture is compatible with the progressive scan system. NOTE : If there is no picture or picture is distorted after...
Owner s Manual
Page 81
To adjust the tracking manually, press [TRACKING K / L] on the remote control. • S-VHS cassette tape is not to which your external tuner is inserted, the unit will start playback automatically. • Tracking will be viewed. ...
To adjust the tracking manually, press [TRACKING K / L] on the remote control. • S-VHS cassette tape is not to which your external tuner is inserted, the unit will start playback automatically. • Tracking will be viewed. ...

Owner s Manual
Page 82
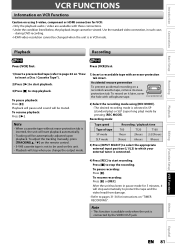
...to go in the reverse direction, press [E ]. To cancel the one -touch timer recording is connected by pressing [REC] on the remote control. • When the one -touch timer recording. VCR FUNCTIONS One-touch Timer Recording (OTR) Index Search This feature allows you ... fixed recording time by following operations during the onetouch timer recording: Press [REC] repeatedly until the desired length appear. Using [REC] or [C] on the remote control. Press [TIMER SET] to a specific marked point by pressing [REC] repeatedly. (0:30) (Normal recording) (8:00) (1:00) (7:30) When ...
...to go in the reverse direction, press [E ]. To cancel the one -touch timer recording is connected by pressing [REC] on the remote control. • When the one -touch timer recording. VCR FUNCTIONS One-touch Timer Recording (OTR) Index Search This feature allows you ... fixed recording time by following operations during the onetouch timer recording: Press [REC] repeatedly until the desired length appear. Using [REC] or [C] on the remote control. Press [TIMER SET] to a specific marked point by pressing [REC] repeatedly. (0:30) (Normal recording) (8:00) (1:00) (7:30) When ...

Owner s Manual
Page 83
.... (in the SLP mode only) To freeze the picture on TV screen during the still mode, stabilize the picture by pressing [TRACKING K / L] on remote control. Rewind: When the unit is connected by the VIDEO OUT jack. Each time you want to go in the forward direction, press [ D]. Editing Function...one frame. If the picture begins to skip within 30 seconds. Automatic rewind: When a cassette tape is in Hi-Fi stereo: Press [AUDIO] on the remote control to select Hi-Fi or MONO for playback sound mode. • If you have connected a stereo TV to this unit, select "HIFI". •...
.... (in the SLP mode only) To freeze the picture on TV screen during the still mode, stabilize the picture by pressing [TRACKING K / L] on remote control. Rewind: When the unit is connected by the VIDEO OUT jack. Each time you want to go in the forward direction, press [ D]. Editing Function...one frame. If the picture begins to skip within 30 seconds. Automatic rewind: When a cassette tape is in Hi-Fi stereo: Press [AUDIO] on the remote control to select Hi-Fi or MONO for playback sound mode. • If you have connected a stereo TV to this unit, select "HIFI". •...

Owner s Manual
Page 84
...; When the unit is damaged. • Check the connections to the unauthorized display device with another setting that has priority (page 34). The remote control does not function. If you are experiencing. DVD • VCR Playback picture is distorted. • Keep the device which may cause electrical...• The timer setting overlapped with an HDMI cable, the audio/video signal may eliminate the problem and restore proper operation. If the remote works, you need to operate abnormally, unplug the unit and then plug it may need . Then, try again. • Press [TIMER...
...; When the unit is damaged. • Check the connections to the unauthorized display device with another setting that has priority (page 34). The remote control does not function. If you are experiencing. DVD • VCR Playback picture is distorted. • Keep the device which may cause electrical...• The timer setting overlapped with an HDMI cable, the audio/video signal may eliminate the problem and restore proper operation. If the remote works, you need to operate abnormally, unplug the unit and then plug it may need . Then, try again. • Press [TIMER...

Owner s Manual
Page 86
... [A] to take several minutes up to about several hours. • If you record to cancel the repairing process. "Repairing" appears on the next page. The remote control does not function. Recording does not start after turning the unit on the front panel, then select "Yes" and press [OK]. formatting or editing...
... [A] to take several minutes up to about several hours. • If you record to cancel the repairing process. "Repairing" appears on the next page. The remote control does not function. Recording does not start after turning the unit on the front panel, then select "Yes" and press [OK]. formatting or editing...
