Complete Owner's Guide (English)
Page 6
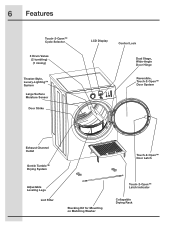
6 Features Touch-2-Open™ Cycle Selector 3 Drum Vanes (2 tumbling) (1 mixing) Theater-Style, Luxury-Lighting™ System Large Surface Moisture Sensor Door Strike LCD Display Control Lock Dual Stage, Wide-Angle Door Hinge Reversible, Touch-2-Open™ Door System Exhaust Channel Outlet Gentle Tumble™ Drying System Adjustable Leveling Legs Lint Filter Stacking Kit for Mounting on Matching Washer Touch-2-Open™ Door Latch Touch-2-Open™ Latch Indicator Collapsible Drying Rack
6 Features Touch-2-Open™ Cycle Selector 3 Drum Vanes (2 tumbling) (1 mixing) Theater-Style, Luxury-Lighting™ System Large Surface Moisture Sensor Door Strike LCD Display Control Lock Dual Stage, Wide-Angle Door Hinge Reversible, Touch-2-Open™ Door System Exhaust Channel Outlet Gentle Tumble™ Drying System Adjustable Leveling Legs Lint Filter Stacking Kit for Mounting on Matching Washer Touch-2-Open™ Door Latch Touch-2-Open™ Latch Indicator Collapsible Drying Rack
Complete Owner's Guide (English)
Page 17
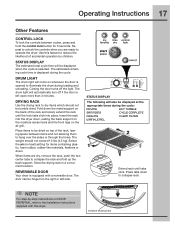
... not be displayed when the cycle is opened to the Installation Instructions supplied with a reversible door. Store the drying rack in a convenient location. NOTE For step-by children. moisture sensing bars Place items to be dried on DOOR REVERSAL, refer to illuminate the drum during the cycle. REVERSIBLE DOOR Your dryer is equipped with this feature to dry...
... not be displayed when the cycle is opened to the Installation Instructions supplied with a reversible door. Store the drying rack in a convenient location. NOTE For step-by children. moisture sensing bars Place items to be dried on DOOR REVERSAL, refer to illuminate the drum during the cycle. REVERSIBLE DOOR Your dryer is equipped with this feature to dry...

Installation Instructions (All Languages)
Page 2
...-18 Reversing Door 19-23 Options 24 ©2010 Electrolux Major Appliances All rights reserved. RISK OF FIRE Read all of the following instructions before installing and using this manual and all occupants. • Immediately call the fire department. Cartons covered with this dryer are known to light any appliance. • Do not touch...
...-18 Reversing Door 19-23 Options 24 ©2010 Electrolux Major Appliances All rights reserved. RISK OF FIRE Read all of the following instructions before installing and using this manual and all occupants. • Immediately call the fire department. Cartons covered with this dryer are known to light any appliance. • Do not touch...
Installation Instructions (All Languages)
Page 3
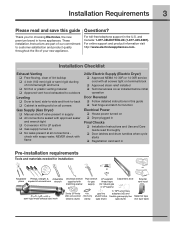
...present at all screws tight on terminal block ‰ Approved strain relief installed ‰ Terminal access cover installed before initial operation Door Reversal ‰ Follow detailed instructions in this guide Questions? and Canada: 1-877-4ELECTROLUX (1-877-435-3287). Installation Requirements 3 Please ...with soapy water, NEVER check with flame 240v Electric Supply (Electric Dryer) ‰ Approved NEMA 10-30R or 14-30R service cord with approved sealer and wrench tight ‰ Conversion kit for choosing Electrolux, the new premium brand in home appliances. Installation Checklist...
...present at all screws tight on terminal block ‰ Approved strain relief installed ‰ Terminal access cover installed before initial operation Door Reversal ‰ Follow detailed instructions in this guide Questions? and Canada: 1-877-4ELECTROLUX (1-877-435-3287). Installation Requirements 3 Please ...with soapy water, NEVER check with flame 240v Electric Supply (Electric Dryer) ‰ Approved NEMA 10-30R or 14-30R service cord with approved sealer and wrench tight ‰ Conversion kit for choosing Electrolux, the new premium brand in home appliances. Installation Checklist...
Installation Instructions (All Languages)
Page 19
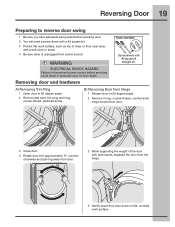
...Removing Trim Ring 1 Open door to disconnect power source before reversing door. 2 You will need a screw driver with a #2 square bit. 3 Protect flat , covered work surface, such as top of the door with both hands, separate the door from power source! WARNING ELECTRICAL SHOCK HAZARD Failure ... screws from door. 3 Close door. 4 Rotate door trim approximately ¾" counterclockwise and pull ring away from door. 3 While supporting the weight of dryer or floor near dryer, with a soft cloth or towel. 4 Be sure dryer is unplugged from the hinge. 4 Gently place door face down ...
...Removing Trim Ring 1 Open door to disconnect power source before reversing door. 2 You will need a screw driver with a #2 square bit. 3 Protect flat , covered work surface, such as top of the door with both hands, separate the door from power source! WARNING ELECTRICAL SHOCK HAZARD Failure ... screws from door. 3 Close door. 4 Rotate door trim approximately ¾" counterclockwise and pull ring away from door. 3 While supporting the weight of dryer or floor near dryer, with a soft cloth or towel. 4 Be sure dryer is unplugged from the hinge. 4 Gently place door face down ...
Installation Instructions (All Languages)
Page 20
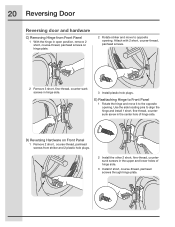
20 Reversing Door Reversing door and hardware C) Removing Hinge from striker and 2 plastic hole .... Attach with 2 short, course-thread, panhead screws. 2 Remove 3 short, fine-thread, counter-sunk screws in open position, remove 2 short, course-thread, panhead screws on Front Panel 1 Remove 2 short, course-thread, panhead screws from Front...Install plastic hole plugs. Use the side locating pins to the opposite opening . E) Reattaching Hinge to Front Panel 1 Rotate the hinge and move to opposite opening . D) Reversing Hardware on hinge plate. 2 Rotate striker and move it to align...
20 Reversing Door Reversing door and hardware C) Removing Hinge from striker and 2 plastic hole .... Attach with 2 short, course-thread, panhead screws. 2 Remove 3 short, fine-thread, counter-sunk screws in open position, remove 2 short, course-thread, panhead screws on Front Panel 1 Remove 2 short, course-thread, panhead screws from Front...Install plastic hole plugs. Use the side locating pins to the opposite opening . E) Reattaching Hinge to Front Panel 1 Rotate the hinge and move to opposite opening . D) Reversing Hardware on hinge plate. 2 Rotate striker and move it to align...
Installation Instructions (All Languages)
Page 21
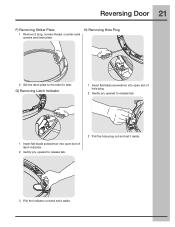
Reversing Door 21 F) Removing Striker Plate H) Removing Hole Plug 1 Remove 2 long, course-thread, counter-sunk screws and latch plate. 2 Set the latch plate to release tab. 3 Pull the hole plug out and set it aside. 3 Pull the indicator out and set it aside. G) Removing Latch Indicator 1 Insert flat blade screwdriver into open slot of hole plug. 2 Gently pry upward to release tab. 1 Insert flat blade screwdriver into open slot of latch indicator. 2 Gently pry upward to the side for later.
Reversing Door 21 F) Removing Striker Plate H) Removing Hole Plug 1 Remove 2 long, course-thread, counter-sunk screws and latch plate. 2 Set the latch plate to release tab. 3 Pull the hole plug out and set it aside. 3 Pull the indicator out and set it aside. G) Removing Latch Indicator 1 Insert flat blade screwdriver into open slot of hole plug. 2 Gently pry upward to release tab. 1 Insert flat blade screwdriver into open slot of latch indicator. 2 Gently pry upward to the side for later.
Installation Instructions (All Languages)
Page 22
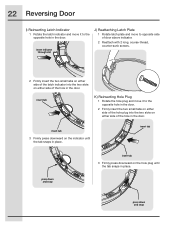
...snaps in place. insert tab press down and snap insert indicator through slot J) Reattaching Latch Plate 1 Rotate latch plate and move to opposite side of door above indicator. 2 Reattach with 2 long, course-thread, counter-sunk screws. 2 Firmly insert the two small tabs on either side of the latch ...the hole plug and move it to the opposite hole in the door. 2 Firmly insert the two small tabs on either side of the hole plug into the two slots on either side of the hole in the door. 22 Reversing Door I) Reinserting Latch Indicator 1 Rotate the latch indicator and move it...
...snaps in place. insert tab press down and snap insert indicator through slot J) Reattaching Latch Plate 1 Rotate latch plate and move to opposite side of door above indicator. 2 Reattach with 2 long, course-thread, counter-sunk screws. 2 Firmly insert the two small tabs on either side of the latch ...the hole plug and move it to the opposite hole in the door. 2 Firmly insert the two small tabs on either side of the hole plug into the two slots on either side of the hole in the door. 22 Reversing Door I) Reinserting Latch Indicator 1 Rotate the latch indicator and move it...
Installation Instructions (All Languages)
Page 23
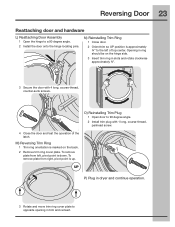
... center. N) Reinstalling Trim Ring 1 Close door. 2 Orient trim so UP position is down. UP P) Plug in dryer and continue operation. 3 Rotate and move trim ring cover plate to a 90 degree angle. 2 Install the door onto the hinge locating pins. Reversing Door 23 Reattaching door and hardware L) Reattaching Door Assembly 1 Open the hinge to opposite opening in trim and reinsert.
... center. N) Reinstalling Trim Ring 1 Close door. 2 Orient trim so UP position is down. UP P) Plug in dryer and continue operation. 3 Rotate and move trim ring cover plate to a 90 degree angle. 2 Install the door onto the hinge locating pins. Reversing Door 23 Reattaching door and hardware L) Reattaching Door Assembly 1 Open the hinge to opposite opening in trim and reinsert.
Dimensions
Page 1
...Dryer EIED55H IW Featuring IQ-Touch™ Electronic Controls Island White EIED55H IW Island White Optional Luxury-Glide® Touch-2-Open™ Pedestal Shown Largest Capacity Dryer1 Dry the most in under-counter installation require custom-built countertop and/or cabinetry. Fast Dry Cycle2 Eighteen minutes to Center of a button. including a "My Favorite" setting. 27" ELECTRIC FRONT LOAD DRYER... System Yes Touch-2-Open™/ (Close) Door Yes Exact Dry™ Moisture Sensor Yes Stainless Steel Dryer Drum Yes Tumble Speed (RPM) 50 Reversible Door Yes Adjustable ...
...Dryer EIED55H IW Featuring IQ-Touch™ Electronic Controls Island White EIED55H IW Island White Optional Luxury-Glide® Touch-2-Open™ Pedestal Shown Largest Capacity Dryer1 Dry the most in under-counter installation require custom-built countertop and/or cabinetry. Fast Dry Cycle2 Eighteen minutes to Center of a button. including a "My Favorite" setting. 27" ELECTRIC FRONT LOAD DRYER... System Yes Touch-2-Open™/ (Close) Door Yes Exact Dry™ Moisture Sensor Yes Stainless Steel Dryer Drum Yes Tumble Speed (RPM) 50 Reversible Door Yes Adjustable ...

