Complete Owner's Guide (English)
Page 6
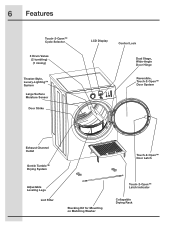
6 Features Touch-2-Open™ Cycle Selector 3 Drum Vanes (2 tumbling) (1 mixing) Theater-Style, Luxury-Lighting™ System Large Surface Moisture Sensor Door Strike LCD Display Control Lock Dual Stage, Wide-Angle Door Hinge Reversible, Touch-2-Open™ Door System Exhaust Channel Outlet Gentle Tumble™ Drying System Adjustable Leveling Legs Lint Filter Stacking Kit for Mounting on Matching Washer Touch-2-Open™ Door Latch Touch-2-Open™ Latch Indicator Collapsible Drying Rack
6 Features Touch-2-Open™ Cycle Selector 3 Drum Vanes (2 tumbling) (1 mixing) Theater-Style, Luxury-Lighting™ System Large Surface Moisture Sensor Door Strike LCD Display Control Lock Dual Stage, Wide-Angle Door Hinge Reversible, Touch-2-Open™ Door System Exhaust Channel Outlet Gentle Tumble™ Drying System Adjustable Leveling Legs Lint Filter Stacking Kit for Mounting on Matching Washer Touch-2-Open™ Door Latch Touch-2-Open™ Latch Indicator Collapsible Drying Rack
Installation Instructions (All Languages)
Page 3
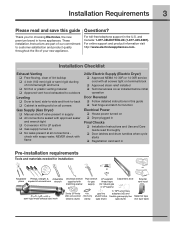
... read and save this guide ‰ Test hinge and latch for function Electrical Power ‰ House power turned on ‰ Dryer plugged in Final Checks ‰ Installation Instructions and Use and Care Guide read thoroughly ‰ Door latches and drum tumbles when cycle starts ‰ Registration card sent...com. check with soapy water, NEVER check with flame 240v Electric Supply (Electric Dryer) ‰ Approved NEMA 10-30R or 14-30R service cord with approved sealer and wrench tight ‰ Conversion kit for choosing Electrolux, the new premium brand in the U.S. and Canada: 1-877-...
... read and save this guide ‰ Test hinge and latch for function Electrical Power ‰ House power turned on ‰ Dryer plugged in Final Checks ‰ Installation Instructions and Use and Care Guide read thoroughly ‰ Door latches and drum tumbles when cycle starts ‰ Registration card sent...com. check with soapy water, NEVER check with flame 240v Electric Supply (Electric Dryer) ‰ Approved NEMA 10-30R or 14-30R service cord with approved sealer and wrench tight ‰ Conversion kit for choosing Electrolux, the new premium brand in the U.S. and Canada: 1-877-...
Installation Instructions (All Languages)
Page 21
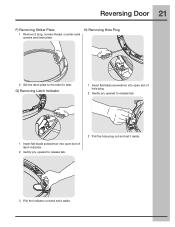
G) Removing Latch Indicator 1 Insert flat blade screwdriver into open slot of hole plug. 2 Gently pry upward to release tab. 1 Insert flat blade screwdriver into open slot of latch indicator. 2 Gently pry upward to the side for later. Reversing Door 21 F) Removing Striker Plate H) Removing Hole Plug 1 Remove 2 long, course-thread, counter-sunk screws and latch plate. 2 Set the latch plate to release tab. 3 Pull the hole plug out and set it aside. 3 Pull the indicator out and set it aside.
G) Removing Latch Indicator 1 Insert flat blade screwdriver into open slot of hole plug. 2 Gently pry upward to release tab. 1 Insert flat blade screwdriver into open slot of latch indicator. 2 Gently pry upward to the side for later. Reversing Door 21 F) Removing Striker Plate H) Removing Hole Plug 1 Remove 2 long, course-thread, counter-sunk screws and latch plate. 2 Set the latch plate to release tab. 3 Pull the hole plug out and set it aside. 3 Pull the indicator out and set it aside.
Installation Instructions (All Languages)
Page 22
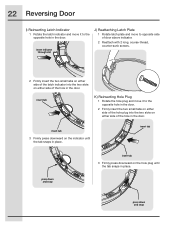
.... 2 Reattach with 2 long, course-thread, counter-sunk screws. 2 Firmly insert the two small tabs on either side of the latch indicator into the two slots on either side of the hole in the door. insert tab K) Reinserting Hole Plug 1 Rotate the hole plug and move to the opposite hole in the... on the hole plug until the tab snaps in place. insert tab press down and snap 22 Reversing Door I) Reinserting Latch Indicator 1 Rotate the latch indicator and move it to the opposite hole in the door. 2 Firmly insert the two small tabs on either side of the hole plug into the two slots ...
.... 2 Reattach with 2 long, course-thread, counter-sunk screws. 2 Firmly insert the two small tabs on either side of the latch indicator into the two slots on either side of the hole in the door. insert tab K) Reinserting Hole Plug 1 Rotate the hole plug and move to the opposite hole in the... on the hole plug until the tab snaps in place. insert tab press down and snap 22 Reversing Door I) Reinserting Latch Indicator 1 Rotate the latch indicator and move it to the opposite hole in the door. 2 Firmly insert the two small tabs on either side of the hole plug into the two slots ...
Installation Instructions (All Languages)
Page 23
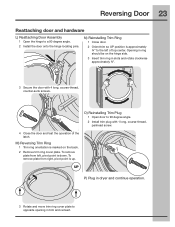
... latch. N) Reinstalling Trim Ring 1 Close door. 2 Orient trim so UP position is approximately ¾" to 90 degree angle. 2 Install trim plug with 4 long, course-thread, counter-sunk screws. Reversing Door 23 Reattaching door and hardware L) Reattaching Door Assembly 1 Open the hinge to opposite opening ...Insert trim ring in slots and rotate clockwise approximately ¾". 3 Secure the door with 1 long, course-thread, panhead screw. 4 Close the door and test the operation of top center. UP P) Plug in dryer and continue operation. 3 Rotate and move trim ring cover plate to a...
... latch. N) Reinstalling Trim Ring 1 Close door. 2 Orient trim so UP position is approximately ¾" to 90 degree angle. 2 Install trim plug with 4 long, course-thread, counter-sunk screws. Reversing Door 23 Reattaching door and hardware L) Reattaching Door Assembly 1 Open the hinge to opposite opening ...Insert trim ring in slots and rotate clockwise approximately ¾". 3 Secure the door with 1 long, course-thread, panhead screw. 4 Close the door and test the operation of top center. UP P) Plug in dryer and continue operation. 3 Rotate and move trim ring cover plate to a...

