Complete Owner's Guide (English)
Page 4
...carton, plastic bag and other packing materials after each load. 4 Safety WARNING To reduce the risk of fire, electrical shock, or injury to persons when using this dryer, comply with rugs, bedspreads or plastic sheets can become airtight chambers. • Keep laundry products out of children... warnings could result in your dryer. You can occur. Regularly inspect the outdoor exhaust opening and remove any time. • Do not use of all warnings on product labels. • Before the dryer is removed from service or discarded, remove the dryer door to prevent accidental entrapment. ...
...carton, plastic bag and other packing materials after each load. 4 Safety WARNING To reduce the risk of fire, electrical shock, or injury to persons when using this dryer, comply with rugs, bedspreads or plastic sheets can become airtight chambers. • Keep laundry products out of children... warnings could result in your dryer. You can occur. Regularly inspect the outdoor exhaust opening and remove any time. • Do not use of all warnings on product labels. • Before the dryer is removed from service or discarded, remove the dryer door to prevent accidental entrapment. ...
Complete Owner's Guide (English)
Page 6
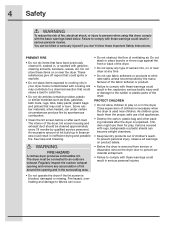
6 Features Touch-2-Open™ Cycle Selector 3 Drum Vanes (2 tumbling) (1 mixing) Theater-Style, Luxury-Lighting™ System Large Surface Moisture Sensor Door Strike LCD Display Control Lock Dual Stage, Wide-Angle Door Hinge Reversible, Touch-2-Open™ Door System Exhaust Channel Outlet Gentle Tumble™ Drying System Adjustable Leveling Legs Lint Filter Stacking Kit for Mounting on Matching Washer Touch-2-Open™ Door Latch Touch-2-Open™ Latch Indicator Collapsible Drying Rack
6 Features Touch-2-Open™ Cycle Selector 3 Drum Vanes (2 tumbling) (1 mixing) Theater-Style, Luxury-Lighting™ System Large Surface Moisture Sensor Door Strike LCD Display Control Lock Dual Stage, Wide-Angle Door Hinge Reversible, Touch-2-Open™ Door System Exhaust Channel Outlet Gentle Tumble™ Drying System Adjustable Leveling Legs Lint Filter Stacking Kit for Mounting on Matching Washer Touch-2-Open™ Door Latch Touch-2-Open™ Latch Indicator Collapsible Drying Rack
Complete Owner's Guide (English)
Page 8
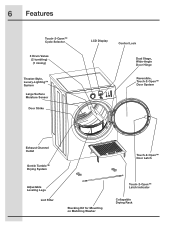
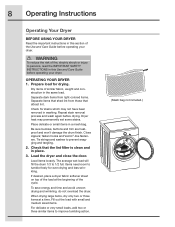
...sure buckles, buttons and trim are heatproof and won't damage the drum finish. Check for drying. Load the dryer and close the door. WARNING To reduce the risk of fire, electric shock or injury to persons, read the IMPORTANT SAFETY INSTRUCTIONS in this section of the cycle. If desired,... place a dryer fabric softener sheet on top of similar fabric, weight and construction in the same load. Place delicate ...
...sure buckles, buttons and trim are heatproof and won't damage the drum finish. Check for drying. Load the dryer and close the door. WARNING To reduce the risk of fire, electric shock or injury to persons, read the IMPORTANT SAFETY INSTRUCTIONS in this section of the cycle. If desired,... place a dryer fabric softener sheet on top of similar fabric, weight and construction in the same load. Place delicate ...
Complete Owner's Guide (English)
Page 9
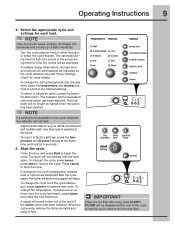
.... Start the cycle. IMPORTANT Clean the lint filter after the cycle starts, the lights will blink and a signal will not operate with the door open. NOTE Over-drying can cause wrinkles, shrinkage, lint, harshness and a build up of the cycle if the chime option has been selected.... A suitable drying temperature, dryness level and options will be displayed at the end of static electricity. See the "Dryer Settings Chart" for 5 seconds. 5. The indicator will not light. NOTE If a setting is not available for the cycle selected, the...
.... Start the cycle. IMPORTANT Clean the lint filter after the cycle starts, the lights will blink and a signal will not operate with the door open. NOTE Over-drying can cause wrinkles, shrinkage, lint, harshness and a build up of the cycle if the chime option has been selected.... A suitable drying temperature, dryness level and options will be displayed at the end of static electricity. See the "Dryer Settings Chart" for 5 seconds. 5. The indicator will not light. NOTE If a setting is not available for the cycle selected, the...
Complete Owner's Guide (English)
Page 15
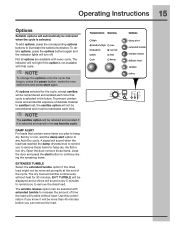
...must be removed promptly at the end of the cycle. DAMP ALERT For loads that contain some items you to remove those items, close the door and press the start again. The wrinkle release option can remove the load. Not all options are available with extended tumble to increase the ...amount of delicate material to any Auto Dry cycle. Open the door, remove those items to hang dry, dry flat or iron dry. The dry load will automatically be remembered and recalled each time. NOTE To...
...must be removed promptly at the end of the cycle. DAMP ALERT For loads that contain some items you to remove those items, close the door and press the start again. The wrinkle release option can remove the load. Not all options are available with extended tumble to increase the ...amount of delicate material to any Auto Dry cycle. Open the door, remove those items to hang dry, dry flat or iron dry. The dry load will automatically be remembered and recalled each time. NOTE To...
Complete Owner's Guide (English)
Page 17
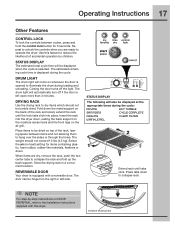
...place. When items are ready to the Installation Instructions supplied with a reversible door. Place items to be dried on DOOR REVERSAL, refer to operate the dryer. Press tabs down the metal support on the right or left open more than 3 minutes. STATUS DISPLAY The estimated total cycle time will ...come on the air grill. Use this dryer. REVERSIBLE DOOR Your dryer is displayed during the cycle: DRYING EXT. DRUM LIGHT The drum light will be ...
...place. When items are ready to the Installation Instructions supplied with a reversible door. Place items to be dried on DOOR REVERSAL, refer to operate the dryer. Press tabs down the metal support on the right or left open more than 3 minutes. STATUS DISPLAY The estimated total cycle time will ...come on the air grill. Use this dryer. REVERSIBLE DOOR Your dryer is displayed during the cycle: DRYING EXT. DRUM LIGHT The drum light will be ...
Complete Owner's Guide (English)
Page 19
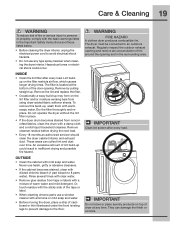
...• Before cleaning the dryer interior, unplug the electrical power cord to avoid electrical shock hazards. • Do not use any type spray cleanser when cleaning the dryer interior. Remove by pulling ... Rinse several times with clear water. • Remove glue residue from using dryer-added fabric softener sheets. Or, touch residue with the sticky side of the tape or label. • When... Do not store or place laundry products on top of dryer at the bottom of the door opening and in place. • If the dryer drum becomes stained from noncolorfast fabrics, clean the drum with...
...• Before cleaning the dryer interior, unplug the electrical power cord to avoid electrical shock hazards. • Do not use any type spray cleanser when cleaning the dryer interior. Remove by pulling ... Rinse several times with clear water. • Remove glue residue from using dryer-added fabric softener sheets. Or, touch residue with the sticky side of the tape or label. • When... Do not store or place laundry products on top of dryer at the bottom of the door opening and in place. • If the dryer drum becomes stained from noncolorfast fabrics, clean the drum with...
Wiring Diagram (All Languages)
Page 1
Wake the dryer up to 30 minutes to reset). Error Code Fault E31 Contact Sensor frequency too high E32 Contact Sensor frequency too low E42 Door Sensing failure Possible Fault Conditions Electronic Control Board defective or foreign object interfering with contact sensor ... Board defective Heater relay stuck open or closed Control Board Defective, or wiring positions. Replace heater and/or Heating element or wiring defective wiring and retest. Dryer Tech Data Sheet This information is intended for continuity. CAUTION: DISCONNECT ELECTRICAL CURRENT BEFORE SERVICING Please Return...
Wake the dryer up to 30 minutes to reset). Error Code Fault E31 Contact Sensor frequency too high E32 Contact Sensor frequency too low E42 Door Sensing failure Possible Fault Conditions Electronic Control Board defective or foreign object interfering with contact sensor ... Board defective Heater relay stuck open or closed Control Board Defective, or wiring positions. Replace heater and/or Heating element or wiring defective wiring and retest. Dryer Tech Data Sheet This information is intended for continuity. CAUTION: DISCONNECT ELECTRICAL CURRENT BEFORE SERVICING Please Return...

Installation Instructions (All Languages)
Page 2
... 2 Installation Requirements 3-9 Installed Dimensions 9 Installation Instructions 10-18 Reversing Door 19-23 Options 24 ©2010 Electrolux Major Appliances All rights reserved. Follow the gas supplier's instructions. ...gas supplier. • Install the clothes dryer according to the manufacturer's instructions and local codes. • The electrical service to the dryer must conform with local codes and ordinances...GAS: • Do not try to light any appliance. • Do not touch any appliance. 2 Important Safety Instructions WARNING For your safety the information in this ...
... 2 Installation Requirements 3-9 Installed Dimensions 9 Installation Instructions 10-18 Reversing Door 19-23 Options 24 ©2010 Electrolux Major Appliances All rights reserved. Follow the gas supplier's instructions. ...gas supplier. • Install the clothes dryer according to the manufacturer's instructions and local codes. • The electrical service to the dryer must conform with local codes and ordinances...GAS: • Do not try to light any appliance. • Do not touch any appliance. 2 Important Safety Instructions WARNING For your safety the information in this ...
Installation Instructions (All Languages)
Page 3
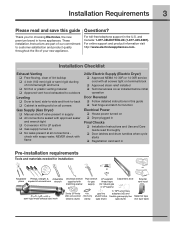
... (Electric Dryer) ‰ Approved NEMA 10-30R or 14-30R service cord with all screws tight on terminal block ‰ Approved strain relief installed ‰ Terminal access cover installed before initial operation Door Reversal ‰ Follow detailed instructions in this guide Questions? Installation ...wire or 4-wire 4 in supply ‰ All connections sealed with approved sealer and wrench tight ‰ Conversion kit for choosing Electrolux, the new premium brand in the U.S. These Installation Instructions are part of your new appliance. Installation Checklist Exhaust Venting ‰...
... (Electric Dryer) ‰ Approved NEMA 10-30R or 14-30R service cord with all screws tight on terminal block ‰ Approved strain relief installed ‰ Terminal access cover installed before initial operation Door Reversal ‰ Follow detailed instructions in this guide Questions? Installation ...wire or 4-wire 4 in supply ‰ All connections sealed with approved sealer and wrench tight ‰ Conversion kit for choosing Electrolux, the new premium brand in the U.S. These Installation Instructions are part of your new appliance. Installation Checklist Exhaust Venting ‰...
Installation Instructions (All Languages)
Page 8
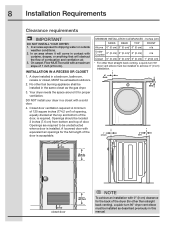
... installed. In an area where it for the full length of 1 inch (2.54 cm). Openings should be unobstructed when a door is required. A louvered door with a solid door. 4. 8 Installation Requirements Clearance requirements IMPORTANT DO NOT INSTALL YOUR DRYER: 1. INSTALLATION IN A RECESS OR CLOSET 1. MINIMUM INSTALLATION CLEARANCES - in. (387.1cm²) NOTE To achieve an installation with...
... installed. In an area where it for the full length of 1 inch (2.54 cm). Openings should be unobstructed when a door is required. A louvered door with a solid door. 4. 8 Installation Requirements Clearance requirements IMPORTANT DO NOT INSTALL YOUR DRYER: 1. INSTALLATION IN A RECESS OR CLOSET 1. MINIMUM INSTALLATION CLEARANCES - in. (387.1cm²) NOTE To achieve an installation with...
Installation Instructions (All Languages)
Page 9
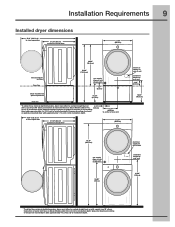
Downward venting of exhaust on pedestal-mounted dryer adds approximately 1.7 in. (4.3 cm) to installation depth. 13.50" (34.5cm) to center of rear vent 50.6" (128.5cm)* to clear open door 31.50" (80cm)* to front of closed door 27.00" (68.5cm) electrical supply on rear of unit centerline height .... (10.2 cm) to installation depth. Installation Requirements 9 Installed dryer dimensions 50.6" (128.5cm)* to clear open door 31.50" (80cm)* to front of closed door 27.00" (68.5cm) 38.00" (96.5cm) 53.00" (134.5cm) freestand dryer on floor floor line gas supply pipe on rear of gas unit ...
Downward venting of exhaust on pedestal-mounted dryer adds approximately 1.7 in. (4.3 cm) to installation depth. 13.50" (34.5cm) to center of rear vent 50.6" (128.5cm)* to clear open door 31.50" (80cm)* to front of closed door 27.00" (68.5cm) electrical supply on rear of unit centerline height .... (10.2 cm) to installation depth. Installation Requirements 9 Installed dryer dimensions 50.6" (128.5cm)* to clear open door 31.50" (80cm)* to front of closed door 27.00" (68.5cm) 38.00" (96.5cm) 53.00" (134.5cm) freestand dryer on floor floor line gas supply pipe on rear of gas unit ...

Installation Instructions (All Languages)
Page 17
...solidly on the power at a circuit breaker/fuse box before calling for stability. IMPORTANT Be sure the power is recommended to connect the dryer to seal all other joints. 2. Turn on all four legs. It contains valuable and helpful information that will save you have any ... the outside exhaust system (see pages 5 through 7). Rock alternating corners to check for service. 8. Remove and discard door tape. If you time and money. 6. The dryer MUST be level and A resting solidly on top of a 4" (102 mm) clamp (item A) is off at the circuit breaker/fuse box. 5....
...solidly on the power at a circuit breaker/fuse box before calling for stability. IMPORTANT Be sure the power is recommended to connect the dryer to seal all other joints. 2. Turn on all four legs. It contains valuable and helpful information that will save you have any ... the outside exhaust system (see pages 5 through 7). Rock alternating corners to check for service. 8. Remove and discard door tape. If you time and money. 6. The dryer MUST be level and A resting solidly on top of a 4" (102 mm) clamp (item A) is off at the circuit breaker/fuse box. 5....
Installation Instructions (All Languages)
Page 18
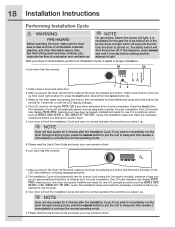
... the LCD window may display INSTAL PASS!, meaning your new dryer is properly installed and ready for use . Please read the Use & Care Guide and enjoy your new dryer is necessary for use . Empty dryer's drum and close door. 13 4 2. The Installation Cycle will display INSTAL CYCLE and... 877 435 3287, review the installation steps and make sure the dryer area is turned on the LCD User Interface, including language selection. 2. The Installation Cycle will stay awake for correct cord connection (on electric models), presence of gas supply (on gas models) and free ...
... the LCD window may display INSTAL PASS!, meaning your new dryer is properly installed and ready for use . Please read the Use & Care Guide and enjoy your new dryer is necessary for use . Empty dryer's drum and close door. 13 4 2. The Installation Cycle will display INSTAL CYCLE and... 877 435 3287, review the installation steps and make sure the dryer area is turned on the LCD User Interface, including language selection. 2. The Installation Cycle will stay awake for correct cord connection (on electric models), presence of gas supply (on gas models) and free ...
Installation Instructions (All Languages)
Page 19
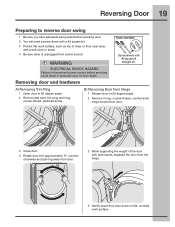
...hinge screws from door. 3 Close door. 4 Rotate door trim approximately ¾" counterclockwise and pull ring away from door. 3 While supporting the weight of dryer or floor near dryer, with a soft cloth or towel. 4 Be sure dryer is unplugged from the hinge. 4 Gently place door face down on... door from power source! WARNING ELECTRICAL SHOCK HAZARD Failure to disconnect power source before reversing door. 2 You will need a screw driver with a #2 square bit. 3 Protect flat work surface, such as top of the door with #2 square & straight bit A) Removing Trim Ring 1 Open door to...
...hinge screws from door. 3 Close door. 4 Rotate door trim approximately ¾" counterclockwise and pull ring away from door. 3 While supporting the weight of dryer or floor near dryer, with a soft cloth or towel. 4 Be sure dryer is unplugged from the hinge. 4 Gently place door face down on... door from power source! WARNING ELECTRICAL SHOCK HAZARD Failure to disconnect power source before reversing door. 2 You will need a screw driver with a #2 square bit. 3 Protect flat work surface, such as top of the door with #2 square & straight bit A) Removing Trim Ring 1 Open door to...
Installation Instructions (All Languages)
Page 20
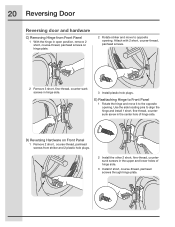
...1 Remove 2 short, course-thread, panhead screws from Front Panel 1 With the hinge in open position, remove 2 short, course-thread, panhead screws on hinge plate. 2 Rotate striker and move it to the opposite opening . Attach with 2 short, course-thread, panhead screws. 2 Remove 3 short, fine...to align the hinge and install 1 short, fine-thread, countersunk screw in hinge side. 3 Install plastic hole plugs. 20 Reversing Door Reversing door and hardware C) Removing Hinge from striker and 2 plastic hole plugs. 2 Install the other 2 short, fine-thread, countersunk screws ...
...1 Remove 2 short, course-thread, panhead screws from Front Panel 1 With the hinge in open position, remove 2 short, course-thread, panhead screws on hinge plate. 2 Rotate striker and move it to the opposite opening . Attach with 2 short, course-thread, panhead screws. 2 Remove 3 short, fine...to align the hinge and install 1 short, fine-thread, countersunk screw in hinge side. 3 Install plastic hole plugs. 20 Reversing Door Reversing door and hardware C) Removing Hinge from striker and 2 plastic hole plugs. 2 Install the other 2 short, fine-thread, countersunk screws ...
Installation Instructions (All Languages)
Page 21
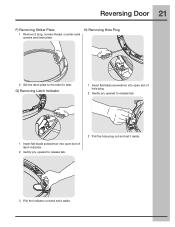
Reversing Door 21 F) Removing Striker Plate H) Removing Hole Plug 1 Remove 2 long, course-thread, counter-sunk screws and latch plate. 2 Set the latch plate to release tab. 3 Pull the hole plug out and set it aside. 3 Pull the indicator out and set it aside. G) Removing Latch Indicator 1 Insert flat blade screwdriver into open slot of hole plug. 2 Gently pry upward to release tab. 1 Insert flat blade screwdriver into open slot of latch indicator. 2 Gently pry upward to the side for later.
Reversing Door 21 F) Removing Striker Plate H) Removing Hole Plug 1 Remove 2 long, course-thread, counter-sunk screws and latch plate. 2 Set the latch plate to release tab. 3 Pull the hole plug out and set it aside. 3 Pull the indicator out and set it aside. G) Removing Latch Indicator 1 Insert flat blade screwdriver into open slot of hole plug. 2 Gently pry upward to release tab. 1 Insert flat blade screwdriver into open slot of latch indicator. 2 Gently pry upward to the side for later.
Installation Instructions (All Languages)
Page 22
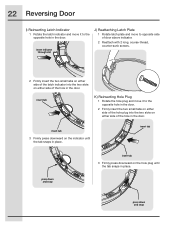
insert tab press down and snap insert tab K) Reinserting Hole Plug 1 Rotate the hole plug and move it to the opposite hole in the door. 2 Firmly insert the two small tabs on either side of the hole plug into the two slots on the indicator until the tab snaps...down and snap insert tab 3 Firmly press downward on either side of the hole in the door. 22 Reversing Door I) Reinserting Latch Indicator 1 Rotate the latch indicator and move it to the opposite hole in the door. insert indicator through slot J) Reattaching Latch Plate 1 Rotate latch plate and move to opposite ...
insert tab press down and snap insert tab K) Reinserting Hole Plug 1 Rotate the hole plug and move it to the opposite hole in the door. 2 Firmly insert the two small tabs on either side of the hole plug into the two slots on the indicator until the tab snaps...down and snap insert tab 3 Firmly press downward on either side of the hole in the door. 22 Reversing Door I) Reinserting Latch Indicator 1 Rotate the latch indicator and move it to the opposite hole in the door. insert indicator through slot J) Reattaching Latch Plate 1 Rotate latch plate and move to opposite ...
Installation Instructions (All Languages)
Page 23
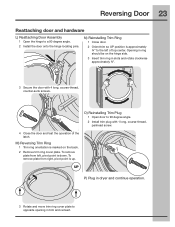
...should be on the back. 2 Remove trim ring cover plate. To remove plate from left of the latch. O) Reinstalling Trim Plug 1 Open door to the left , pivot point is approximately ¾" to 90 degree angle. 2 Install trim plug with 4 long, course-thread, ...Trim ring orientation is up. UP P) Plug in dryer and continue operation. 3 Rotate and move trim ring cover plate to a 90 degree angle. 2 Install the door onto the hinge locating pins. Reversing Door 23 Reattaching door and hardware L) Reattaching Door Assembly 1 Open the hinge to opposite opening in trim and reinsert.
...should be on the back. 2 Remove trim ring cover plate. To remove plate from left of the latch. O) Reinstalling Trim Plug 1 Open door to the left , pivot point is approximately ¾" to 90 degree angle. 2 Install trim plug with 4 long, course-thread, ...Trim ring orientation is up. UP P) Plug in dryer and continue operation. 3 Rotate and move trim ring cover plate to a 90 degree angle. 2 Install the door onto the hinge locating pins. Reversing Door 23 Reattaching door and hardware L) Reattaching Door Assembly 1 Open the hinge to opposite opening in trim and reinsert.
Dimensions
Page 1
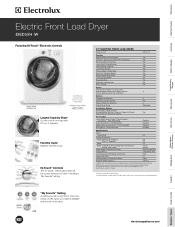
... Warmer Drawers Cooktops Built-In Ranges Freestanding Ranges Microwaves Electric Front Load Dryer EIED55H IW Featuring IQ-Touch™ Electronic Controls Island White EIED55H IW Island White Optional Luxury-Glide® Touch-2-Open™ Pedestal Shown Largest Capacity Dryer1 Dry the most in one load with 90° Door Open) 31-1/2" 50-5/8" Power Supply Connection Location Bottom Right Rear...
... Warmer Drawers Cooktops Built-In Ranges Freestanding Ranges Microwaves Electric Front Load Dryer EIED55H IW Featuring IQ-Touch™ Electronic Controls Island White EIED55H IW Island White Optional Luxury-Glide® Touch-2-Open™ Pedestal Shown Largest Capacity Dryer1 Dry the most in one load with 90° Door Open) 31-1/2" 50-5/8" Power Supply Connection Location Bottom Right Rear...

