

Installation Instructions (All Languages)
Page 2
... must conform with local codes and ordinances and the latest edition of contents Important Safety Instructions 2 Installation Requirements 3-9 Installed Dimensions 9 Installation Instructions 10-18 Reversing Door 19-23 Options 24 ©2010 Electrolux Major Appliances All rights reserved. Do not stack washer on pedestal. do not use gasoline or other literature included...
... must conform with local codes and ordinances and the latest edition of contents Important Safety Instructions 2 Installation Requirements 3-9 Installed Dimensions 9 Installation Instructions 10-18 Reversing Door 19-23 Options 24 ©2010 Electrolux Major Appliances All rights reserved. Do not stack washer on pedestal. do not use gasoline or other literature included...
Installation Instructions (All Languages)
Page 9
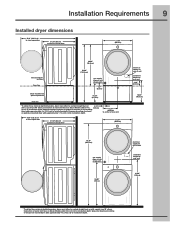
Installation Requirements 9 Installed dryer dimensions 50.6" (128.5cm)* to clear open door 31.50" (80cm)* to front of closed door 27.00...5cm) electrical supply on rear of unit centerline height for rear vent 41.00" (104cm) * To obtain these minimal depth dimensions, dryer must either be vented straight back or with a quick-turn 90° elbow. Downward venting of exhaust on pedestal-... on optional pedestal 16.25" (41.5cm) floor line * To obtain these minimal depth dimensions, dryer must either be vented straight back or 3.75" with a quick-turn 90° elbow.
Installation Requirements 9 Installed dryer dimensions 50.6" (128.5cm)* to clear open door 31.50" (80cm)* to front of closed door 27.00...5cm) electrical supply on rear of unit centerline height for rear vent 41.00" (104cm) * To obtain these minimal depth dimensions, dryer must either be vented straight back or with a quick-turn 90° elbow. Downward venting of exhaust on pedestal-... on optional pedestal 16.25" (41.5cm) floor line * To obtain these minimal depth dimensions, dryer must either be vented straight back or 3.75" with a quick-turn 90° elbow.