

Complete Owner's Guide (English)
Page 3
... harm, death or property damage. Safety 3 Important Safety Instructions Recognize safety symbols, words and labels Your safety and the safety of this manual are not meant to follow this manual must be installed on electric dryers (not provided with unit except those manufactured for future reference. 240 v Electric Dryer 120 v Gas Dryer...
... harm, death or property damage. Safety 3 Important Safety Instructions Recognize safety symbols, words and labels Your safety and the safety of this manual are not meant to follow this manual must be installed on electric dryers (not provided with unit except those manufactured for future reference. 240 v Electric Dryer 120 v Gas Dryer...
Complete Owner's Guide (English)
Page 13
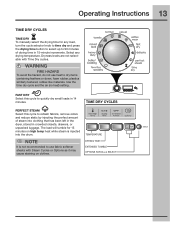
... closets, drawers, or unpacked luggage. Use the time dry cycle and the air (no heat) setting. Operating Instructions 13 TIME DRY CYCLES TIME DRY To manually select the drying time for 15 minutes on clothes.
... closets, drawers, or unpacked luggage. Use the time dry cycle and the air (no heat) setting. Operating Instructions 13 TIME DRY CYCLES TIME DRY To manually select the drying time for 15 minutes on clothes.

Installation Instructions (All Languages)
Page 2
..., death or property damage. WARNING - Do not stack washer on top of another washer. • The instructions in this manual and all materials in a garbage container or make materials inaccessible to children. • Clothes dryer installation and service must be ...contents Important Safety Instructions 2 Installation Requirements 3-9 Installed Dimensions 9 Installation Instructions 10-18 Reversing Door 19-23 Options 24 ©2010 Electrolux Major Appliances All rights reserved. This symbol alerts you to situations that may cause bodily injury or property damage. Follow the gas...
..., death or property damage. WARNING - Do not stack washer on top of another washer. • The instructions in this manual and all materials in a garbage container or make materials inaccessible to children. • Clothes dryer installation and service must be ...contents Important Safety Instructions 2 Installation Requirements 3-9 Installed Dimensions 9 Installation Instructions 10-18 Reversing Door 19-23 Options 24 ©2010 Electrolux Major Appliances All rights reserved. This symbol alerts you to situations that may cause bodily injury or property damage. Follow the gas...

Installation Instructions (All Languages)
Page 3
..., side-to-side and front-to-back ‰ Cabinet is setting solid on ‰ No leaks present at all corners Gas Supply (Gas Dryer) ‰ Manual shutoff valve present in supply ‰ All connections sealed with matching washer Pipe wrench for gas supply LP-resistant thread tape (for LP system ‰... (gas dryer) ½" NPT union flare adapters (x2) and flexible gas supply line (gas dryer) Metal foil tape (not duct tape) Thank you for choosing Electrolux, the new premium brand in the U.S. and Canada: 1-877-4ELECTROLUX (1-877-435-3287).
..., side-to-side and front-to-back ‰ Cabinet is setting solid on ‰ No leaks present at all corners Gas Supply (Gas Dryer) ‰ Manual shutoff valve present in supply ‰ All connections sealed with matching washer Pipe wrench for gas supply LP-resistant thread tape (for LP system ‰... (gas dryer) ½" NPT union flare adapters (x2) and flexible gas supply line (gas dryer) Metal foil tape (not duct tape) Thank you for choosing Electrolux, the new premium brand in the U.S. and Canada: 1-877-4ELECTROLUX (1-877-435-3287).
Installation Instructions (All Languages)
Page 8
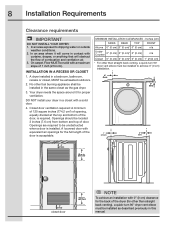
... be located 3 inches (7.6 cm) from bottom and top of the door, is installed. Openings are required to dripping water or outside weather conditions. 2. in this manual. On carpet. Your dryer needs the space around it will come in . (387.1cm²) NOTE To achieve an installation with equivalent air openings for...
... be located 3 inches (7.6 cm) from bottom and top of the door, is installed. Openings are required to dripping water or outside weather conditions. 2. in this manual. On carpet. Your dryer needs the space around it will come in . (387.1cm²) NOTE To achieve an installation with equivalent air openings for...
Installation Instructions (All Languages)
Page 10
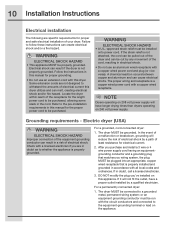
... matches you wiring system, the plug MUST be plugged into an appropriate, copper wired receptacle that is properly installed and grounded in this manual for proper grounding. • Do not use an aluminum wired receptacle with a copper wired receptacle. If in this dryer. DO NOT...is a copper wired power cord with a copper wired power cord and plug (or vice versa). Follow the instructions in accordance with this manual for the length power cord to be run with a licensed electrician if you 've installed on the appliance. or an equipment grounding conductor...
... matches you wiring system, the plug MUST be plugged into an appropriate, copper wired receptacle that is properly installed and grounded in this manual for proper grounding. • Do not use an aluminum wired receptacle with a copper wired receptacle. If in this dryer. DO NOT...is a copper wired power cord with a copper wired power cord and plug (or vice versa). Follow the instructions in accordance with this manual for the length power cord to be run with a licensed electrician if you 've installed on the appliance. or an equipment grounding conductor...
Installation Instructions (All Languages)
Page 14
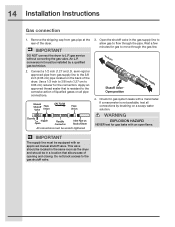
14 Installation Instructions Gas connection 1. semi-rigid or approved pipe from gas supply line to L.P. Manual Shutoff Flare Valve Union GAS FLOW Flare Union Closed Nipple Open Flexible Connector Inlet Pipe on a soapy water solution. Check for gas leaks with a manometer.... gas pipe at the rear of opening and closing. Wait a few minutes for the connection. IMPORTANT The supply line must be equipped with an approved manual shutoff valve. Open the shutoff valve in a location that is not available, test all pipe connections. Use a 1/2 inch to 3/8 inch (1.27 cm to fl...
14 Installation Instructions Gas connection 1. semi-rigid or approved pipe from gas supply line to L.P. Manual Shutoff Flare Valve Union GAS FLOW Flare Union Closed Nipple Open Flexible Connector Inlet Pipe on a soapy water solution. Check for gas leaks with a manometer.... gas pipe at the rear of opening and closing. Wait a few minutes for the connection. IMPORTANT The supply line must be equipped with an approved manual shutoff valve. Open the shutoff valve in a location that is not available, test all pipe connections. Use a 1/2 inch to 3/8 inch (1.27 cm to fl...


