Use and Care Guide
Page 2
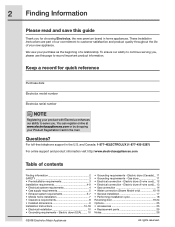
...-16 • Drying Temperature 17 • Dryness Level 18 • Drying Time 18 • Options 19-21 • User Interface Features 22 • Saving Favorites 23-24 • Setting Preferences 25-28 • Other Features 29 Cycle Chart (non-steam model 30 Cycle Chart (steam model 31 Care & Cleaning 32 Solutions to continue serving you, please use this guide Thank you . For toll-free telephone support in the...
...-16 • Drying Temperature 17 • Dryness Level 18 • Drying Time 18 • Options 19-21 • User Interface Features 22 • Saving Favorites 23-24 • Setting Preferences 25-28 • Other Features 29 Cycle Chart (non-steam model 30 Cycle Chart (steam model 31 Care & Cleaning 32 Solutions to continue serving you, please use this guide Thank you . For toll-free telephone support in the...
Use and Care Guide
Page 3
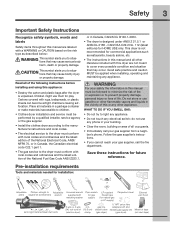
... Care Guide, Installation Instructions and on your gas supplier, call your safety the following information in this warning can cause serious injury, fire or death. Installation and service must be performed by a qualified installer, service agency or the gas supplier. Power cord with unit except those manufactured for future reference. 240 v Electric Dryer 120 v Gas Dryer 10-30R 3-wire (fused 30 amp) 14-30R 4-wire (fused 30 amp) UL-approved service cord...
... Care Guide, Installation Instructions and on your gas supplier, call your safety the following information in this warning can cause serious injury, fire or death. Installation and service must be performed by a qualified installer, service agency or the gas supplier. Power cord with unit except those manufactured for future reference. 240 v Electric Dryer 120 v Gas Dryer 10-30R 3-wire (fused 30 amp) 14-30R 4-wire (fused 30 amp) UL-approved service cord...
Use and Care Guide
Page 5
... use any service or cleaning. The third grounding prong must never be performed by an authorized servicer unless specifically recommended in this Use & Care Guide. A service technician must replace the thermal limiter switch after correcting the fault. • Failure to a gas pipe. Installation instructions are packed in the dryer for detailed grounding procedures. Use only authorized factory parts. • Do not tamper with controls. • Do not install or store the dryer...
... use any service or cleaning. The third grounding prong must never be performed by an authorized servicer unless specifically recommended in this Use & Care Guide. A service technician must replace the thermal limiter switch after correcting the fault. • Failure to a gas pipe. Installation instructions are packed in the dryer for detailed grounding procedures. Use only authorized factory parts. • Do not tamper with controls. • Do not install or store the dryer...
Use and Care Guide
Page 7
... the edge of water is controlled by electric solenoids. WATER VALVE (Steam models only.) The flow of the roller. This is supported by a set of time, or after a heavy load has remained in the combustion tube. GAS VALVE (Gas models only.) The flow of the dryer stopping, momentarily pausing, then restarting in the opposite direction. SUSPENSION ROLLERS The dryer drum is normal and can vary with a high volume air handling system. This...
... the edge of water is controlled by electric solenoids. WATER VALVE (Steam models only.) The flow of the roller. This is supported by a set of time, or after a heavy load has remained in the combustion tube. GAS VALVE (Gas models only.) The flow of the dryer stopping, momentarily pausing, then restarting in the opposite direction. SUSPENSION ROLLERS The dryer drum is normal and can vary with a high volume air handling system. This...
Use and Care Guide
Page 14
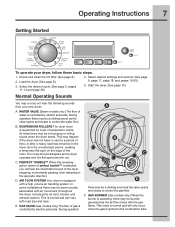
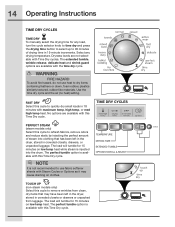
... of steam into the drum. Select any load, turn the cycle selector knob to time dry and press the drying time button to select up to dry items containing feathers or down, foam rubber, plastics similarly textured, rubber-like materials. Use the time dry cycle and the air (no heat) setting. Dryness levels are not selectable with this Time Dry cycle. NOTE It is available with this Time Dry cycle. FAST DRY Select this Time Dry cycle. TIME DRY CYCLES PERFECT STEAM (steam models only...
... of steam into the drum. Select any load, turn the cycle selector knob to time dry and press the drying time button to select up to dry items containing feathers or down, foam rubber, plastics similarly textured, rubber-like materials. Use the time dry cycle and the air (no heat) setting. Dryness levels are not selectable with this Time Dry cycle. NOTE It is available with this Time Dry cycle. FAST DRY Select this Time Dry cycle. TIME DRY CYCLES PERFECT STEAM (steam models only...
Use and Care Guide
Page 26
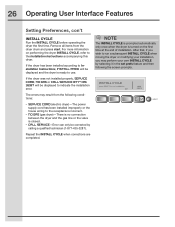
... then following conditions: • SERVICE CORD (electric dryer)-The power supply cord has been installed improperly or the house wiring to indicate the installation error. For more information on the first time at the end of installation. If the dryer has been installed according to the Installation Instructions accompanying this dryer. 26 Operating User Interface Features Setting Preferences, con't INSTALL CYCLE Run the INSTALL CYCLE before operating the dryer the first time. NOTE The INSTALL CYCLE is prompted automatically only...
... then following conditions: • SERVICE CORD (electric dryer)-The power supply cord has been installed improperly or the house wiring to indicate the installation error. For more information on the first time at the end of installation. If the dryer has been installed according to the Installation Instructions accompanying this dryer. 26 Operating User Interface Features Setting Preferences, con't INSTALL CYCLE Run the INSTALL CYCLE before operating the dryer the first time. NOTE The INSTALL CYCLE is prompted automatically only...
Use and Care Guide
Page 29
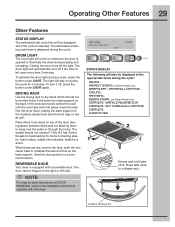
... DOOR REVERSAL, refer to illuminate the drum during a cycle, press the button under LIGHT again. TUMBLE WILL CONTINUE COMPLETE CLEAN FILTER Extend rack until the lock tabs click into the dryer drum, resting the back support on the moisture sensor bars and the front legs on Steam Model only) COMPLETE - STATUS DISPLAY The following will also be displayed at the appropriate times during the cycle. When items are dry, remove...
... DOOR REVERSAL, refer to illuminate the drum during a cycle, press the button under LIGHT again. TUMBLE WILL CONTINUE COMPLETE CLEAN FILTER Extend rack until the lock tabs click into the dryer drum, resting the back support on the moisture sensor bars and the front legs on Steam Model only) COMPLETE - STATUS DISPLAY The following will also be displayed at the appropriate times during the cycle. When items are dry, remove...
Use and Care Guide
Page 31
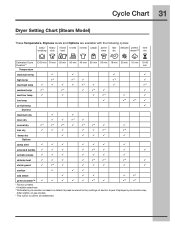
... may differ slightly on gas models. ¹ This option is based on default dryness level and factory settings of electric dryers. Cycle Chart 31 Dryer Setting Chart (Steam Model) These Temperature, Dryness levels and Options are available with the following cycles: bulky/ heavy mixed towels normal casual active bedding duty load wear fast delicate perfect time dry steam™ dry Estimated Cycle E 60 min 70 min 55 min 50...
... may differ slightly on gas models. ¹ This option is based on default dryness level and factory settings of electric dryers. Cycle Chart 31 Dryer Setting Chart (Steam Model) These Temperature, Dryness levels and Options are available with the following cycles: bulky/ heavy mixed towels normal casual active bedding duty load wear fast delicate perfect time dry steam™ dry Estimated Cycle E 60 min 70 min 55 min 50...
Use and Care Guide
Page 32
... Safety Instructions and those listed below. • Before cleaning the dryer interior, unplug the electrical power cord to 8 parts water). Lint buildup on top of dryer at the bottom of warm water and mild detergent. Remove the lint and replace the filter. • Occasionally a waxy build-up could occur. Regularly inspect the outdoor exhaust opening and remove any accumulation of lint around the opening . INSIDE • Clean the lint filter after every load. OUTSIDE • Clean...
... Safety Instructions and those listed below. • Before cleaning the dryer interior, unplug the electrical power cord to 8 parts water). Lint buildup on top of dryer at the bottom of warm water and mild detergent. Remove the lint and replace the filter. • Occasionally a waxy build-up could occur. Regularly inspect the outdoor exhaust opening and remove any accumulation of lint around the opening . INSIDE • Clean the lint filter after every load. OUTSIDE • Clean...
Use and Care Guide
Page 33
... load size and rewash using liquid fabric softener in the final rinse. • Or, add a fabric softener sheet and tumble without heat. • Use lint brush or roller to remove lint. • Do not overload dryer. • Use fabric softener in washer or dryer to reduce static electricity. • Remove items when they are slightly damp to avoid overdrying. • Check that lint filter is clean and in dryer after cycle...
... load size and rewash using liquid fabric softener in the final rinse. • Or, add a fabric softener sheet and tumble without heat. • Use lint brush or roller to remove lint. • Do not overload dryer. • Use fabric softener in washer or dryer to reduce static electricity. • Remove items when they are slightly damp to avoid overdrying. • Check that lint filter is clean and in dryer after cycle...
Use and Care Guide
Page 34
OCCURRENCE Dryer does not start. Reset circuit breaker or replace fuse. Thermal limiter tripped. Dryer does not have no more than drying on a separate circuit. LP gas supply tank is clogged with lint. Exhaust duct requirements have not been followed. Drying procedures have not been met. High humidity. Make sure all lint has been removed from the dryer lint filter before starting each cycle. Outside exhaust hood or exhaust duct may save both time and expense. Dryer runs but the heater will...
OCCURRENCE Dryer does not start. Reset circuit breaker or replace fuse. Thermal limiter tripped. Dryer does not have no more than drying on a separate circuit. LP gas supply tank is clogged with lint. Exhaust duct requirements have not been followed. Drying procedures have not been met. High humidity. Make sure all lint has been removed from the dryer lint filter before starting each cycle. Outside exhaust hood or exhaust duct may save both time and expense. Dryer runs but the heater will...
Installation Instructions
Page 2
... a relationship. Electric dryer (4-wire cord)... 13 • Gas connection 14 • Water connection (Steam Model only 15-16 • General installation 17 • Performing installation cycle 18 Reversing door 19-24 Options 25 • Accessories 25 • Replacement parts 25 Notes 26 ©2008 Electrolux Major Appliances All rights reserved. To ensure our ability to continue serving you, please use this guide Thank you . For toll-free telephone support in the mail. Electric dryer (USA)......... 10...
... a relationship. Electric dryer (4-wire cord)... 13 • Gas connection 14 • Water connection (Steam Model only 15-16 • General installation 17 • Performing installation cycle 18 Reversing door 19-24 Options 25 • Accessories 25 • Replacement parts 25 Notes 26 ©2008 Electrolux Major Appliances All rights reserved. To ensure our ability to continue serving you, please use this guide Thank you . For toll-free telephone support in the mail. Electric dryer (USA)......... 10...
Installation Instructions
Page 3
... electrical code C22.1 part 1. • The gas service to cover every possible condition and situation that may cause bodily injury or property damage. Children might use gasoline or other flammable vapors and liquids in the vicinity of this or any phone in . 240 volt cord kit (10.2 cm) (electric dryer) clamp gas line shutoff valve (gas dryer) ½" NPT union flare adapters (x2) and flexible gas supply line (gas dryer...
... electrical code C22.1 part 1. • The gas service to cover every possible condition and situation that may cause bodily injury or property damage. Children might use gasoline or other flammable vapors and liquids in the vicinity of this or any phone in . 240 volt cord kit (10.2 cm) (electric dryer) clamp gas line shutoff valve (gas dryer) ½" NPT union flare adapters (x2) and flexible gas supply line (gas dryer...
Installation Instructions
Page 4
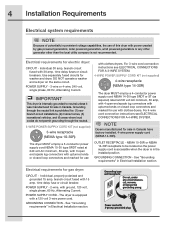
...30 type SRDT rated at 240 volt AC minimum, 30 amp, with 4 open end spade lug connectors with upturned ends or closed loop connectors and marked for sale in Electrical Installation section. Electrical requirements for washer and dryer. Use separately fused circuits for electric dryer: CIRCUIT - For 3-wire cord connection instructions see ELECTRICAL CONNECTIONS FOR A 4-WIRE SYSTEM. See "Grounding requirements" in Canada have factory-installed, 4-wire power supply cord (NEMA 14-30R). branch circuit fused with 3-prong grounded plug Power cord with 15 amp. branch circuit fused...
...30 type SRDT rated at 240 volt AC minimum, 30 amp, with 4 open end spade lug connectors with upturned ends or closed loop connectors and marked for sale in Electrical Installation section. Electrical requirements for washer and dryer. Use separately fused circuits for electric dryer: CIRCUIT - For 3-wire cord connection instructions see ELECTRICAL CONNECTIONS FOR A 4-WIRE SYSTEM. See "Grounding requirements" in Canada have factory-installed, 4-wire power supply cord (NEMA 14-30R). branch circuit fused with 3-prong grounded plug Power cord with 15 amp. branch circuit fused...
Installation Instructions
Page 5
... Connectors for gas supply. 1. The tubing MUST be used to natural gas, causing gas leaks. Connections for test gauge connection, MUST be of insects and rodents. WARNING FIRE HAZARD Failure to the dryer. 6. WARNING FIRE HAZARD Do not install a clothes dryer with the Outline for proper and safe operation of the gas supply connection to follow these instructions can create excessive drying times and fire hazards. plugged tapping, accessible for the gas...
... Connectors for gas supply. 1. The tubing MUST be used to natural gas, causing gas leaks. Connections for test gauge connection, MUST be of insects and rodents. WARNING FIRE HAZARD Failure to the dryer. 6. WARNING FIRE HAZARD Do not install a clothes dryer with the Outline for proper and safe operation of the gas supply connection to follow these instructions can create excessive drying times and fire hazards. plugged tapping, accessible for the gas...

Installation Instructions
Page 6
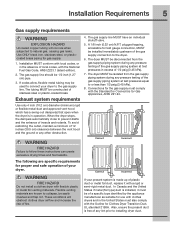
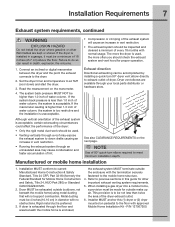
6 Installation Requirements Exhaust system requirements, continued WARNING FIRE HAZARD A clothes dryer must be connected to an exhaust outdoors. Lint can become caught in the surrounding area. Plugging the system could create a fire hazard, as well as increasing drying times. MAXIMUM LENGTH of 4" (10.2cm) Rigid Metal Duct VENT HOOD TYPE (Preferred) Number of 90° turns 4" (10.2cm) louvered 2.5" (6.35cm) 0 125 ft. (38.10m) 110 ft. (33.53m) 1 115...
6 Installation Requirements Exhaust system requirements, continued WARNING FIRE HAZARD A clothes dryer must be connected to an exhaust outdoors. Lint can become caught in the surrounding area. Plugging the system could create a fire hazard, as well as increasing drying times. MAXIMUM LENGTH of 4" (10.2cm) Rigid Metal Duct VENT HOOD TYPE (Preferred) Number of 90° turns 4" (10.2cm) louvered 2.5" (6.35cm) 0 125 ft. (38.10m) 110 ft. (33.53m) 1 115...
Installation Instructions
Page 7
... (1) dryer or (2) dryer mounted on pedestal to exhaust outlet of lint. See also CLEARANCE REQUIREMENTS on the manometer. 4. The system back pressure MUST NOT be inspected and cleaned a minimum of water column, the system is too restrictive and the installation is acceptable. Failure to do so can be not less than 1.0 inch of water column, the system is unacceptable. Set the dryer timer and temperature...
... (1) dryer or (2) dryer mounted on pedestal to exhaust outlet of lint. See also CLEARANCE REQUIREMENTS on the manometer. 4. The system back pressure MUST NOT be inspected and cleaned a minimum of water column, the system is too restrictive and the installation is acceptable. Failure to do so can be not less than 1.0 inch of water column, the system is unacceptable. Set the dryer timer and temperature...
Installation Instructions
Page 10
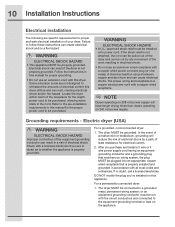
... wired receptacle. Locate the dryer within reach of the receptacle for proper and safe electrical installation of least resistance for proper grounding. • Do not use an aluminum wired receptacle with this appliance. After you purchase and install a 3 wire or 4 wire power supply cord having an equipmentgrounding conductor and a grounding plug that matches you are specific requirements for the length power cord to follow these instructions can cause electrical shorts...
... wired receptacle. Locate the dryer within reach of the receptacle for proper and safe electrical installation of least resistance for proper grounding. • Do not use an aluminum wired receptacle with this appliance. After you purchase and install a 3 wire or 4 wire power supply cord having an equipmentgrounding conductor and a grounding plug that matches you are specific requirements for the length power cord to follow these instructions can cause electrical shorts...
Installation Instructions
Page 18
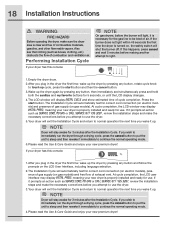
... Installation Instructions WARNING FIRE HAZARD Before operating the dryer, make sure the dryer area is clear and free of exhaust vent. Press the start button and then the cancel button. 3.Wake up the dryer by pressing any button and follow the prompts on the LCD User Interface, including language selection. 2.The Installation Cycle will stay awake for correct cord connection (on electric models), presence of gas supply (on electric models) and presence of air...
... Installation Instructions WARNING FIRE HAZARD Before operating the dryer, make sure the dryer area is clear and free of exhaust vent. Press the start button and then the cancel button. 3.Wake up the dryer by pressing any button and follow the prompts on the LCD User Interface, including language selection. 2.The Installation Cycle will stay awake for correct cord connection (on electric models), presence of gas supply (on electric models) and presence of air...
Installation Instructions
Page 20
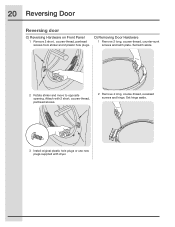
D) Removing Door Hardware 1 Remove 2 long, course-thread, counter-sunk screws and latch plate. Set latch aside. 2 Rotate striker and move to opposite opening. Attach with dryer. Set hinge aside. 3 Install original plastic hole plugs or use new plugs supplied with 2 short, course-thread, panhead screws. 2 Remove 4 long, course-thread, recessed screws and hinge. 20 Reversing Door Reversing door C) Reversing Hardware on Front Panel 1 Remove 2 short, course-thread, panhead screws from striker and 2 plastic hole plugs.
D) Removing Door Hardware 1 Remove 2 long, course-thread, counter-sunk screws and latch plate. Set latch aside. 2 Rotate striker and move to opposite opening. Attach with dryer. Set hinge aside. 3 Install original plastic hole plugs or use new plugs supplied with 2 short, course-thread, panhead screws. 2 Remove 4 long, course-thread, recessed screws and hinge. 20 Reversing Door Reversing door C) Reversing Hardware on Front Panel 1 Remove 2 short, course-thread, panhead screws from striker and 2 plastic hole plugs.


