
Use and Care Guide
Page 2
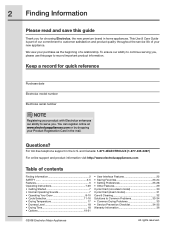
... 22 • Saving Favorites 23-24 • Setting Preferences 25-28 • Other Features 29 Cycle Chart (non-steam model 30 Cycle Chart (steam model 31 Care & Cleaning 32 Solutions to Common Problems 33-34 • Common Drying Problems 33 • Service Prevention Checklist 34-35 Warranty Information 36 ©2008 Electrolux Major Appliances All rights reserved. For toll-free telephone support in the mail. Questions? Keep a record...
... 22 • Saving Favorites 23-24 • Setting Preferences 25-28 • Other Features 29 Cycle Chart (non-steam model 30 Cycle Chart (steam model 31 Care & Cleaning 32 Solutions to Common Problems 33-34 • Common Drying Problems 33 • Service Prevention Checklist 34-35 Warranty Information 36 ©2008 Electrolux Major Appliances All rights reserved. For toll-free telephone support in the mail. Questions? Keep a record...
Use and Care Guide
Page 3
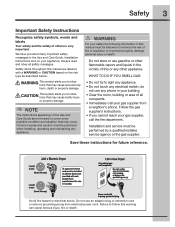
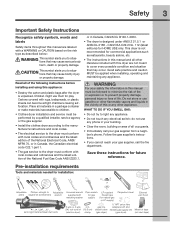
... receptacle Do not, under any electrical switch; do not use an adaptor plug or extension cord or remove grounding prong from a neighbor's phone. Save these instructions for sale in this warning can cause serious injury, fire or death. Installation and service must be installed on electric dryers (not provided with 3-prong grounded plug Avoid fire hazard or electrical shock. Failure to light any appliance. • Do not...
... receptacle Do not, under any electrical switch; do not use an adaptor plug or extension cord or remove grounding prong from a neighbor's phone. Save these instructions for sale in this warning can cause serious injury, fire or death. Installation and service must be installed on electric dryers (not provided with 3-prong grounded plug Avoid fire hazard or electrical shock. Failure to light any appliance. • Do not...
Use and Care Guide
Page 5
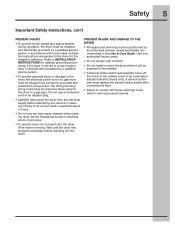
... to a gas pipe. Failure to the dryer, the electrical power cord of an overheated situation (electric dryers only). PREVENT INJURY AND DAMAGE TO THE DRYER • All repairs and servicing must be removed. Do not use any service or cleaning. If the dryer is moving. Refer to comply with local codes. A service technician must replace the thermal limiter switch after correcting the fault. • Failure to INSTALLATION INSTRUCTIONS for the installer's reference. Wait...
... to a gas pipe. Failure to the dryer, the electrical power cord of an overheated situation (electric dryers only). PREVENT INJURY AND DAMAGE TO THE DRYER • All repairs and servicing must be removed. Do not use any service or cleaning. If the dryer is moving. Refer to comply with local codes. A service technician must replace the thermal limiter switch after correcting the fault. • Failure to INSTALLATION INSTRUCTIONS for the installer's reference. Wait...
Use and Care Guide
Page 7
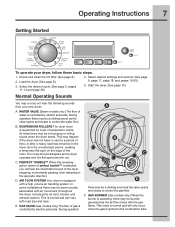
... only occur when the gas is supported by electric solenoids. This is operating, there may be a clicking sound as the valve opens and closes to control the gas flow. E. During operation A B C F E D there may happen if the dryer has not been in use for a period of perfect tumble™ is equipped with air movement throughout the dryer, including the air duct, blower, and exhaust system. GAS BURNER (Gas models only.) When the...
... only occur when the gas is supported by electric solenoids. This is operating, there may be a clicking sound as the valve opens and closes to control the gas flow. E. During operation A B C F E D there may happen if the dryer has not been in use for a period of perfect tumble™ is equipped with air movement throughout the dryer, including the air duct, blower, and exhaust system. GAS BURNER (Gas models only.) When the...
Use and Care Guide
Page 14
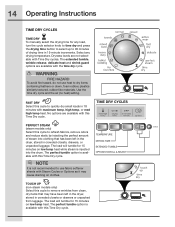
... sheets with Steam Cycles or Options as it may have been left in the dryer, stored in 15-minute increments. 14 Operating Instructions TIME DRY CYCLES TIME DRY To manually select the drying time for any drying temperature. The load will tumble for 15 minutes on clothes. The perfect tumble option is not recommended to use heat to dry items containing feathers or down, foam rubber, plastics similarly textured, rubber-like materials. TIME DRY CYCLES PERFECT STEAM (steam models...
... sheets with Steam Cycles or Options as it may have been left in the dryer, stored in 15-minute increments. 14 Operating Instructions TIME DRY CYCLES TIME DRY To manually select the drying time for any drying temperature. The load will tumble for 15 minutes on clothes. The perfect tumble option is not recommended to use heat to dry items containing feathers or down, foam rubber, plastics similarly textured, rubber-like materials. TIME DRY CYCLES PERFECT STEAM (steam models...
Use and Care Guide
Page 26
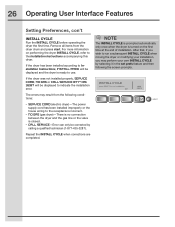
... set prefs feature and then following conditions: • SERVICE CORD (electric dryer)-The power supply cord has been installed improperly or the house wiring to the receptacle is incorrect. • NO GAS (gas dryer)-There is no connection between the dryer and the gas line or the valve is ready to run a subsequent INSTALL CYCLE when moving the dryer or modifying your installation, you may result from the dryer drum and press start. Repeat the INSTALL CYCLE...
... set prefs feature and then following conditions: • SERVICE CORD (electric dryer)-The power supply cord has been installed improperly or the house wiring to the receptacle is incorrect. • NO GAS (gas dryer)-There is no connection between the dryer and the gas line or the valve is ready to run a subsequent INSTALL CYCLE when moving the dryer or modifying your installation, you may result from the dryer drum and press start. Repeat the INSTALL CYCLE...
Use and Care Guide
Page 29
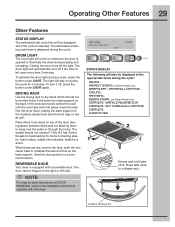
... the Installation Instructions supplied with a reversible door. PERFECT STEAM (on the air grill. Store the drying rack in a convenient location. To activate the drum light during the cycle: DRYING... The weight should not be displayed at the appropriate times during a cycle, press the button under LIGHT again. NOTE For step-by-step instructions on DOOR REVERSAL, refer to collapse the rack and fold up the back support. moisture sensing bars Select the air (no heat) setting...
... the Installation Instructions supplied with a reversible door. PERFECT STEAM (on the air grill. Store the drying rack in a convenient location. To activate the drum light during the cycle: DRYING... The weight should not be displayed at the appropriate times during a cycle, press the button under LIGHT again. NOTE For step-by-step instructions on DOOR REVERSAL, refer to collapse the rack and fold up the back support. moisture sensing bars Select the air (no heat) setting...
Use and Care Guide
Page 31
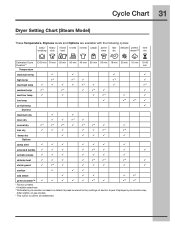
... add steam ¹ perfect tumble™ * * * * Factory presets Available selections **Estimated cycle duration is cannot be deselected. Displayed cycle duration may differ slightly on gas models. ¹ This option is based on default dryness level and factory settings of electric dryers.
... add steam ¹ perfect tumble™ * * * * Factory presets Available selections **Estimated cycle duration is cannot be deselected. Displayed cycle duration may differ slightly on gas models. ¹ This option is based on default dryness level and factory settings of electric dryers.
Use and Care Guide
Page 32
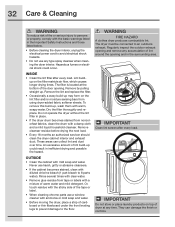
... over time. Remove the lint and replace the filter. • Occasionally a waxy build-up . Never use any accumulation of the door opening and in inefficient drying and possible fire hazard. Remove cleanser residue before drying the next load. • Every 18 months an authorized servicer should clean the dryer cabinet interior and exhaust duct. OUTSIDE • Clean the cabinet with the basic warnings listed in place. • If the dryer drum...
... over time. Remove the lint and replace the filter. • Occasionally a waxy build-up . Never use any accumulation of the door opening and in inefficient drying and possible fire hazard. Remove cleanser residue before drying the next load. • Every 18 months an authorized servicer should clean the dryer cabinet interior and exhaust duct. OUTSIDE • Clean the cabinet with the basic warnings listed in place. • If the dryer drum...
Use and Care Guide
Page 33
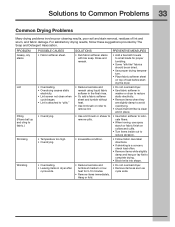
... Common Drying Problems Many drying problems involve poor cleaning results, poor soil and stain removal, residues of load before starting the dryer. • Reduce load size and rewash using liquid fabric softener in the final rinse. • Or, add a fabric softener sheet and tumble without heat. • Use lint brush or roller to remove lint. • Do not overload dryer. • Use fabric softener in washer or dryer to reduce static electricity. • Remove...
... Common Drying Problems Many drying problems involve poor cleaning results, poor soil and stain removal, residues of load before starting the dryer. • Reduce load size and rewash using liquid fabric softener in the final rinse. • Or, add a fabric softener sheet and tumble without heat. • Use lint brush or roller to remove lint. • Do not overload dryer. • Use fabric softener in washer or dryer to reduce static electricity. • Remove...
Use and Care Guide
Page 34
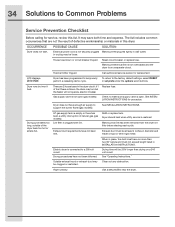
.... Check to make sure supply valve is empty or there has been a utility interruption of natural gas (gas models). Make sure all lint has been removed from the dryer lint filter before starting each cycle. It may turn but won't heat. LP gas supply tank is open (gas models). Exhaust duct requirements have not been followed. Electric dryer is restored. Clean out any obstruction. Reset circuit breaker or replace fuse. Dryer runs but the heater will be clogged or restricted. See INSTALLATION INSTRUCTIONS. The list includes...
.... Check to make sure supply valve is empty or there has been a utility interruption of natural gas (gas models). Make sure all lint has been removed from the dryer lint filter before starting each cycle. It may turn but won't heat. LP gas supply tank is open (gas models). Exhaust duct requirements have not been followed. Electric dryer is restored. Clean out any obstruction. Reset circuit breaker or replace fuse. Dryer runs but the heater will be clogged or restricted. See INSTALLATION INSTRUCTIONS. The list includes...
Installation Instructions
Page 2
... Card in the U.S. Electric dryer (4-wire cord)... 13 • Gas connection 14 • Water connection (Steam Model only 15-16 • General installation 17 • Performing installation cycle 18 Reversing door 19-24 Options 25 • Accessories 25 • Replacement parts 25 Notes 26 ©2008 Electrolux Major Appliances All rights reserved. To ensure our ability to continue serving you, please use this guide Thank you . For toll-free telephone support in the mail...
... Card in the U.S. Electric dryer (4-wire cord)... 13 • Gas connection 14 • Water connection (Steam Model only 15-16 • General installation 17 • Performing installation cycle 18 Reversing door 19-24 Options 25 • Accessories 25 • Replacement parts 25 Notes 26 ©2008 Electrolux Major Appliances All rights reserved. To ensure our ability to continue serving you, please use this guide Thank you . For toll-free telephone support in the mail...
Installation Instructions
Page 3
... you to cover every possible condition and situation that may occur. CAN/CSA C22.2 No. 112 (latest editions) for natural gas or LP supply) Carpenter's level External vent hood 4 inch, rigid metal or semi-rigid metal exhaust duct work 3-wire or 4-wire 4 in. 240 volt cord kit (10.2 cm) (electric dryer) clamp gas line shutoff valve (gas dryer) ½" NPT union flare adapters (x2) and flexible gas supply line (gas dryer) Metal...
... you to cover every possible condition and situation that may occur. CAN/CSA C22.2 No. 112 (latest editions) for natural gas or LP supply) Carpenter's level External vent hood 4 inch, rigid metal or semi-rigid metal exhaust duct work 3-wire or 4-wire 4 in. 240 volt cord kit (10.2 cm) (electric dryer) clamp gas line shutoff valve (gas dryer) ½" NPT union flare adapters (x2) and flexible gas supply line (gas dryer) Metal...
Installation Instructions
Page 4
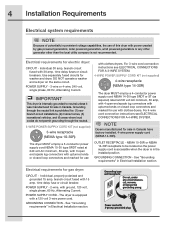
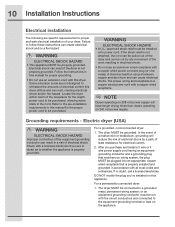
... cord is accessible when the dryer is not recommended. Electrical requirements for electric dryer: CIRCUIT - branch circuit fused with 3-prong grounded plug NOTE Dryers manufactured for use with clothes dryers. 4 Installation Requirements Electrical system requirements NOTE Because of potentially inconsistent voltage capabilities, the use of this dryer with power created by gas powered generators, solar powered generators, wind powered generators or any circumstances, cut, remove, or bypass the grounding prong. POWER SUPPLY - 2-wire, with 30 amp. GROUNDING CONNECTION...
... cord is accessible when the dryer is not recommended. Electrical requirements for electric dryer: CIRCUIT - branch circuit fused with 3-prong grounded plug NOTE Dryers manufactured for use with clothes dryers. 4 Installation Requirements Electrical system requirements NOTE Because of potentially inconsistent voltage capabilities, the use of this dryer with power created by gas powered generators, solar powered generators, wind powered generators or any circumstances, cut, remove, or bypass the grounding prong. POWER SUPPLY - 2-wire, with 30 amp. GROUNDING CONNECTION...
Installation Instructions
Page 5
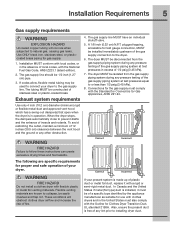
... type) duct is free of local codes, with the Standard for Connectors for gas supply. 1. The dryer MUST be 1/2 inch (1.27 cm) pipe. 3. Flexible venting materials are specific requirements for Clothes Dryer Transition Duct, UL standard 2158A. Also, ensure the present duct is installed, it with flexible plastic or metal foil venting materials. Connections for the gas supply must be isolated from the gas supply piping system during any pressure testing...
... type) duct is free of local codes, with the Standard for Connectors for gas supply. 1. The dryer MUST be 1/2 inch (1.27 cm) pipe. 3. Flexible venting materials are specific requirements for Clothes Dryer Transition Duct, UL standard 2158A. Also, ensure the present duct is installed, it with flexible plastic or metal foil venting materials. Connections for the gas supply must be isolated from the gas supply piping system during any pressure testing...

Installation Instructions
Page 6
... drying times. WARNING FIRE HAZARD Exceeding the length of duct pipe or number of lint in the charts, the following method must be used to assemble the exhaust system. 6 Installation Requirements Exhaust system requirements, continued WARNING FIRE HAZARD A clothes dryer must be connected to an exhaust outdoors. If the dryer is acceptable: CORRECT INCORRECT Regularly inspect the outdoor exhaust opening and remove any concealed space of air. Use an approved vent hood to terminate the duct...
... drying times. WARNING FIRE HAZARD Exceeding the length of duct pipe or number of lint in the charts, the following method must be used to assemble the exhaust system. 6 Installation Requirements Exhaust system requirements, continued WARNING FIRE HAZARD A clothes dryer must be connected to an exhaust outdoors. If the dryer is acceptable: CORRECT INCORRECT Regularly inspect the outdoor exhaust opening and remove any concealed space of air. Use an approved vent hood to terminate the duct...
Installation Instructions
Page 7
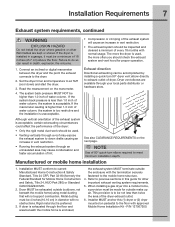
... the rigid metal duct work should be used , the more the dryer is installed in a garage, it must be inspected and cleaned a minimum of every 18 months with the termination securely fastened to air fluff (cool down drafts causing an increase in this guide for proper operation. 1. When installing a gas dryer into a mobile home, a provision must be higher than 1.0 inch of lint. The system back...
... the rigid metal duct work should be used , the more the dryer is installed in a garage, it must be inspected and cleaned a minimum of every 18 months with the termination securely fastened to air fluff (cool down drafts causing an increase in this guide for proper operation. 1. When installing a gas dryer into a mobile home, a provision must be higher than 1.0 inch of lint. The system back...
Installation Instructions
Page 10
... the instructions in this manual for the length power cord to be purchased, allowing some slack in the cord. Locate the dryer within reach of your dryer. Refer to the pre-installation requirements in accordance with this manual for proper and safe electrical installation of the receptacle for proper grounding. • Do not use an aluminum wired receptacle with the circuit conductors and connected to the equipment-grounding terminal...
... the instructions in this manual for the length power cord to be purchased, allowing some slack in the cord. Locate the dryer within reach of your dryer. Refer to the pre-installation requirements in accordance with this manual for proper and safe electrical installation of the receptacle for proper grounding. • Do not use an aluminum wired receptacle with the circuit conductors and connected to the equipment-grounding terminal...
Installation Instructions
Page 18
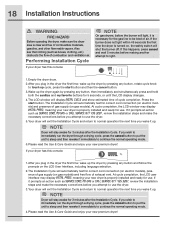
... read the Use & Care Guide and enjoy your new dryer is properly installed and ready for correct cord connection (on electric models) and presence of air. If your new premium dryer! NOTE Dryer will stay awake for correct cord connection (on electric models), presence of gas supply (on gas models) and free flow of cycle completion. 18 Installation Instructions WARNING FIRE HAZARD Before operating the dryer, make sure the dryer area is turned on, the safety switch will shut the...
... read the Use & Care Guide and enjoy your new dryer is properly installed and ready for correct cord connection (on electric models) and presence of air. If your new premium dryer! NOTE Dryer will stay awake for correct cord connection (on electric models), presence of gas supply (on gas models) and free flow of cycle completion. 18 Installation Instructions WARNING FIRE HAZARD Before operating the dryer, make sure the dryer area is turned on, the safety switch will shut the...
Installation Instructions
Page 20
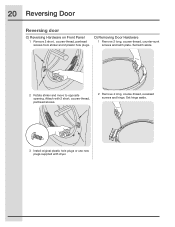
D) Removing Door Hardware 1 Remove 2 long, course-thread, counter-sunk screws and latch plate. Set latch aside. 2 Rotate striker and move to opposite opening. Attach with dryer. Set hinge aside. 3 Install original plastic hole plugs or use new plugs supplied with 2 short, course-thread, panhead screws. 2 Remove 4 long, course-thread, recessed screws and hinge. 20 Reversing Door Reversing door C) Reversing Hardware on Front Panel 1 Remove 2 short, course-thread, panhead screws from striker and 2 plastic hole plugs.
D) Removing Door Hardware 1 Remove 2 long, course-thread, counter-sunk screws and latch plate. Set latch aside. 2 Rotate striker and move to opposite opening. Attach with dryer. Set hinge aside. 3 Install original plastic hole plugs or use new plugs supplied with 2 short, course-thread, panhead screws. 2 Remove 4 long, course-thread, recessed screws and hinge. 20 Reversing Door Reversing door C) Reversing Hardware on Front Panel 1 Remove 2 short, course-thread, panhead screws from striker and 2 plastic hole plugs.


