

Use and Care Guide
Page 1
Use _ Care Guide Radiant/Induction Electric Cooktop
Use _ Care Guide Radiant/Induction Electric Cooktop

Use and Care Guide
Page 3
... Features 8..-9 Before Using the Cooktop 1. 0-17 Aboutthe CeramicGlassCooktop 10 Locationsof the SurfaceElements 10 LED Messagesor Light Indicators ... 8 CookingZoneDoes Not Heat Food (InductionElements 2..9. Aboutthe RadiantSurface Elements 12 LED MessagesDisplayedby RadiantElement Controls 1..2. The RecommendedRadiantElementSettings..... 13 LED MessagesDisplayedby Induction CookingZonecontrols 1..3 Use the CorrectCookwareTypeon the InductionCookingZones 1. 4 MinimumPan Size Requirementsfor the Two InductionCookingZones 14 CookwareRecommendations 1. 5 Use QualityCookwarein Good ...
... Features 8..-9 Before Using the Cooktop 1. 0-17 Aboutthe CeramicGlassCooktop 10 Locationsof the SurfaceElements 10 LED Messagesor Light Indicators ... 8 CookingZoneDoes Not Heat Food (InductionElements 2..9. Aboutthe RadiantSurface Elements 12 LED MessagesDisplayedby RadiantElement Controls 1..2. The RecommendedRadiantElementSettings..... 13 LED MessagesDisplayedby Induction CookingZonecontrols 1..3 Use the CorrectCookwareTypeon the InductionCookingZones 1. 4 MinimumPan Size Requirementsfor the Two InductionCookingZones 14 CookwareRecommendations 1. 5 Use QualityCookwarein Good ...
Use and Care Guide
Page 5
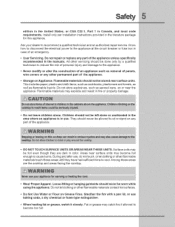
... technician to reduce the risk of an emergency. , User Servicing. They should be allowed to cool. Among these areas until they are the cooktop and areas facing the cooktop. • Wear Proper Apparel. Fat or grease may become too hot. Know how to disconnect the electrical power to recommend a qualifed technician and...
... technician to reduce the risk of an emergency. , User Servicing. They should be allowed to cool. Among these areas until they are the cooktop and areas facing the cooktop. • Wear Proper Apparel. Fat or grease may become too hot. Know how to disconnect the electrical power to recommend a qualifed technician and...

Use and Care Guide
Page 6
... due to unintentional contact with one or more surface units of clothing. Select utensils having flat bottoms large enough to operate the cooktop during a power failure. Only certain types of electric shock or fire or short circuit. Buildup of flammable materials, and spillage ...of burns, ignition of pressure may result in ignition of different sizes. Check the manufacturer's recommendations for baking if used as recommended for cooktop use. • Ventilating hood. If the power fails, always turn fan on. Exhaust fan ventilation hoods and grease filters should be...
... due to unintentional contact with one or more surface units of clothing. Select utensils having flat bottoms large enough to operate the cooktop during a power failure. Only certain types of electric shock or fire or short circuit. Buildup of flammable materials, and spillage ...of burns, ignition of pressure may result in ignition of different sizes. Check the manufacturer's recommendations for baking if used as recommended for cooktop use. • Ventilating hood. If the power fails, always turn fan on. Exhaust fan ventilation hoods and grease filters should be...

Use and Care Guide
Page 7
... produce harmful fumes if applied to break. • Do not slide pan across the cooktop surface. Safety FOR CERAMIC-GLASS COOKTOP ONLY . Contact a qualified technician immediately. • Clean Cooktop with Caution. Do Not Let Pans Boil Dry. Some cleaners can affect the ceramic-glass... cooking area, be careful to wipe spills on Cold Cooktop Glass. They may penetrate the broken cooktop and create a risk of damage is used to avoid a steam burn. If cooktop should break, cleaning solutions and spillovers may scratch the cooktop surface. . This could cause glass to a hot...
... produce harmful fumes if applied to break. • Do not slide pan across the cooktop surface. Safety FOR CERAMIC-GLASS COOKTOP ONLY . Contact a qualified technician immediately. • Clean Cooktop with Caution. Do Not Let Pans Boil Dry. Some cleaners can affect the ceramic-glass... cooking area, be careful to wipe spills on Cold Cooktop Glass. They may penetrate the broken cooktop and create a risk of damage is used to avoid a steam burn. If cooktop should break, cleaning solutions and spillovers may scratch the cooktop surface. . This could cause glass to a hot...

Use and Care Guide
Page 8
...36" Model Left Rear Single Radiant Element (Fig. 1) Left Rear Double Radiant Element (Fig. 2) 2. Left Front Element Control Pads 7. Right Front Element Control Pads 9. Center Rear Element Control Pads (Fig. 2 only) 12. Left Front Double Radiant Element 3. Induction cooking heats faster while using less energy. Main Cooktop...to boil and when simmering, 1. Right Front Double Induction Element 5. Right Rear Single Induction Element 4. A unique feature of the Induction Cooktop is whether turned ON or OFFt,hecooktospurfaceremaincsooletrhanstandarcderamicooktops. Center ...
...36" Model Left Rear Single Radiant Element (Fig. 1) Left Rear Double Radiant Element (Fig. 2) 2. Left Front Element Control Pads 7. Right Front Element Control Pads 9. Center Rear Element Control Pads (Fig. 2 only) 12. Left Front Double Radiant Element 3. Induction cooking heats faster while using less energy. Main Cooktop...to boil and when simmering, 1. Right Front Double Induction Element 5. Right Rear Single Induction Element 4. A unique feature of the Induction Cooktop is whether turned ON or OFFt,hecooktospurfaceremaincsooletrhanstandarcderamicooktops. Center ...

Use and Care Guide
Page 9
.... Element Size Indicator Lights m| i ;i 6 7 8 9 11 Element Controls (at 4 or 5 locations) Fig. 3 13. Cooktop Features coo., ?oo:'o2,,,,,,,,, lllllmlil// I! 10 Main Cooktop Controls 12 Minute Timer Key Pads . Element Power Key Pad (for each element) 21. Cooktop ON/OFF Indicator Light 15. Cooktop ON/OFF Key Pad 14. Element + hi Key Pad (for each element...
.... Element Size Indicator Lights m| i ;i 6 7 8 9 11 Element Controls (at 4 or 5 locations) Fig. 3 13. Cooktop Features coo., ?oo:'o2,,,,,,,,, lllllmlil// I! 10 Main Cooktop Controls 12 Minute Timer Key Pads . Element Power Key Pad (for each element) 21. Cooktop ON/OFF Indicator Light 15. Cooktop ON/OFF Key Pad 14. Element + hi Key Pad (for each element...

Use and Care Guide
Page 10
... elements located at the center rear position; - 2 dual radiant elements located at the left front position; - 1 small induction element located at the right rear position; - 1 dual induction element located at the right front position, Fig. 4 - 36" cooktop The surface elements are all factors that will affect the amount of surface elements in larger volumes...
... elements located at the center rear position; - 2 dual radiant elements located at the left front position; - 1 small induction element located at the right rear position; - 1 dual induction element located at the right front position, Fig. 4 - 36" cooktop The surface elements are all factors that will affect the amount of surface elements in larger volumes...

Use and Care Guide
Page 11
... switched to OFE Touch and hold the POWER key pad for 1 second. If no other key pads are touched the Cooktop Main POWER will activate. The control displays E(radiant/Induction zone controls)in Cooking Zones LEDs (Fig. 5) and digits in the LED display. Fig. 5 L(GHT(ND)CATORDS(...SP YED BYCOOK)NGELEMENT Fig. 6 COOKING ZONE ON/OFF PAD - To turn OFF automatically. This feature allows the cooktop to be displayed (Fig. 1 and ...
... switched to OFE Touch and hold the POWER key pad for 1 second. If no other key pads are touched the Cooktop Main POWER will activate. The control displays E(radiant/Induction zone controls)in Cooking Zones LEDs (Fig. 5) and digits in the LED display. Fig. 5 L(GHT(ND)CATORDS(...SP YED BYCOOK)NGELEMENT Fig. 6 COOKING ZONE ON/OFF PAD - To turn OFF automatically. This feature allows the cooktop to be displayed (Fig. 1 and ...

Use and Care Guide
Page 12
... glow red. The ON/OFF key pad for more precise settings at lower heat levels. See Fig. 8) warning when the cooktop is complete. The settings between 3.0 (Figures 3 & 4) and 1.2 (Figure 5) are preparing. As the temperature rises, the element will become very hot.... the keep warm key pad to set the Keep Warm function. The settings between 9.5 (Figure 2) and 3.0 (Figure 3) decrease or increase in increment of the cooktop and displays the message "HE" (hot element; Fig. 8 KEEP WARM (LH) - LH (Low Heat) should appear in the corresponding cooking zone display window ...
... glow red. The ON/OFF key pad for more precise settings at lower heat levels. See Fig. 8) warning when the cooktop is complete. The settings between 3.0 (Figures 3 & 4) and 1.2 (Figure 5) are preparing. As the temperature rises, the element will become very hot.... the keep warm key pad to set the Keep Warm function. The settings between 9.5 (Figure 2) and 3.0 (Figure 3) decrease or increase in increment of the cooktop and displays the message "HE" (hot element; Fig. 8 KEEP WARM (LH) - LH (Low Heat) should appear in the corresponding cooking zone display window ...

Use and Care Guide
Page 13
... if the pan is not made of the Cooking Zones is still too HOT,/-/ (See Fig. 4) will appear in each induction element display windows (See Fig. 7). LOCKOUT FEATURE (-) - Before Usi the Cooktop THERECOMMENDEDDIANT ELEMENTSE INGS Use the chart to determine the correct setting for 10 minutes (See Fig. 2). LEDMESSAGESDISP YED £Y INDUCTIONCOOKING...
... if the pan is not made of the Cooking Zones is still too HOT,/-/ (See Fig. 4) will appear in each induction element display windows (See Fig. 7). LOCKOUT FEATURE (-) - Before Usi the Cooktop THERECOMMENDEDDIANT ELEMENTSE INGS Use the chart to determine the correct setting for 10 minutes (See Fig. 2). LEDMESSAGESDISP YED £Y INDUCTIONCOOKING...

Use and Care Guide
Page 14
... cookware does not extend more than ½" beyond the thicker line on any of the pan touching the metal cooktop trims (Shown in Fig. 2). This will work. The 2 Induction Cooking Zones available on the glass surface without being lifted up. After centering the cookware of the... cooktop, make cleaning the surface difficult and degrade the overall appearance of developing scratches on your Induction Cooktop surface. The pan must FULLY cover the inner ring for proper cooking to test ...
... cookware does not extend more than ½" beyond the thicker line on any of the pan touching the metal cooktop trims (Shown in Fig. 2). This will work. The 2 Induction Cooking Zones available on the glass surface without being lifted up. After centering the cookware of the... cooktop, make cleaning the surface difficult and degrade the overall appearance of developing scratches on your Induction Cooktop surface. The pan must FULLY cover the inner ring for proper cooking to test ...

Use and Care Guide
Page 15
Before Usi the Cooktop COOKWARERECOMMENDATIONS INCORRECT CORRECT Cookware not centered on Cooking Zone surface. Cookware centered correctly on Cooking Zone surface.
Before Usi the Cooktop COOKWARERECOMMENDATIONS INCORRECT CORRECT Cookware not centered on Cooking Zone surface. Cookware centered correctly on Cooking Zone surface.

Use and Care Guide
Page 16
... glass to follow all the recommendations for the first time, apply the recommended cooktop cleaning creme to the ceramic surface. Before Usi the Cooktop USEQUAL( COOKWARE(NGOODCONDF)ON The cookware used with the Induction Cooktop should match the amount of food being prepared. • Do not let ...pans boil dry. Check for flatness by your cooktop for using your warranty). • Do ...
... glass to follow all the recommendations for the first time, apply the recommended cooktop cleaning creme to the ceramic surface. Before Usi the Cooktop USEQUAL( COOKWARE(NGOODCONDF)ON The cookware used with the Induction Cooktop should match the amount of food being prepared. • Do not let ...pans boil dry. Check for flatness by your cooktop for using your warranty). • Do ...
Use and Care Guide
Page 18
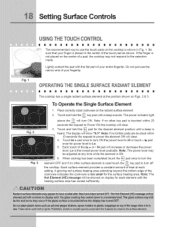
...HI or touch = Io pad once for each setting. Touch hi + pad once to turn ON the power level to turn off POWER the cooktop. A glowing red surface heating area extending beyond the bottom edge of the touch pad as shown, If the finger is shown in the center of... power the element ON will clear, 3. When cooking has been completed touch the [] pad once to turn ON. i OPERATINGTHE SINGLE SURFACE RADIANT ELEMENT The cooktop has a single radiant surface element at each element until a beep sounds, The power indicator light POWER above the C) will be adjusted at any time while...
...HI or touch = Io pad once for each setting. Touch hi + pad once to turn ON the power level to turn off POWER the cooktop. A glowing red surface heating area extending beyond the bottom edge of the touch pad as shown, If the finger is shown in the center of... power the element ON will clear, 3. When cooking has been completed touch the [] pad once to turn ON. i OPERATINGTHE SINGLE SURFACE RADIANT ELEMENT The cooktop has a single radiant surface element at each element until a beep sounds, The power indicator light POWER above the C) will be adjusted at any time while...

Use and Care Guide
Page 19
...Element: 1. Each touch of the dual radiant element will heat. When cooking has been completed touch the [] pad once to turn off the POWER cooktop.Note: The Hot Element (HE) message will be adjusted at each element until a beep oN _ is heard, Note: If no other key ... o Fig. 1 touching the (_ key pad. Touch hi + pad once to turn ON. Surface Controls OPERATINGTHE DUAL SURFACERADIANT ELEMENT Both the 30" and 36" cooktops are touched within 20 seconds the request to power the element ON will clear, 4. Symbols and indicator lights on the radiant surface element, 2. The •...
...Element: 1. Each touch of the dual radiant element will heat. When cooking has been completed touch the [] pad once to turn off the POWER cooktop.Note: The Hot Element (HE) message will be adjusted at each element until a beep oN _ is heard, Note: If no other key ... o Fig. 1 touching the (_ key pad. Touch hi + pad once to turn ON. Surface Controls OPERATINGTHE DUAL SURFACERADIANT ELEMENT Both the 30" and 36" cooktops are touched within 20 seconds the request to power the element ON will clear, 4. Symbols and indicator lights on the radiant surface element, 2. The •...
Use and Care Guide
Page 20
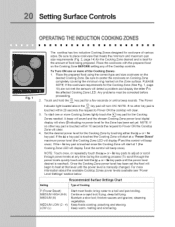
...level for cookware of various sizes. Setting Recommended Surface Settings Chart Type of the Cooktop controls. Continue a rapid boil; steaming vegetables. Setting Surface Controls OPE T(NG THE(NDUCT)ONCOOK)NGZONES The cooktop has two induction Cooking Zones designed for the Cooking Zone by touching either the hi + or ...the letter Fin the affected Cooking Zone LED. NOTE: Touch once, or repeatedly touch the hi + or = |o key pads to Power ON the cooktop will start at any of Cooking P (Power Boost) MEDIUM HIGH (8-9) MEDIUM (6) MEDIUM LOW (2 - 4) LOW (L) Start most foods; bring ...
...level for cookware of various sizes. Setting Recommended Surface Settings Chart Type of the Cooktop controls. Continue a rapid boil; steaming vegetables. Setting Surface Controls OPE T(NG THE(NDUCT)ONCOOK)NGZONES The cooktop has two induction Cooking Zones designed for the Cooking Zone by touching either the hi + or ...the letter Fin the affected Cooking Zone LED. NOTE: Touch once, or repeatedly touch the hi + or = |o key pads to Power ON the cooktop will start at any of Cooking P (Power Boost) MEDIUM HIGH (8-9) MEDIUM (6) MEDIUM LOW (2 - 4) LOW (L) Start most foods; bring ...

Use and Care Guide
Page 21
... thcoeockotoopk.top vent holes are touched the Cooking Zone will shut OFF automatically in mind that induction may display H if the Cooking Zone temperature is complete. The Cooking Zone will automatically shut OFF. Whenever using the cooktop the user should always pay attention to display error code and turn OFF while cooking...
... thcoeockotoopk.top vent holes are touched the Cooking Zone will shut OFF automatically in mind that induction may display H if the Cooking Zone temperature is complete. The Cooking Zone will automatically shut OFF. Whenever using the cooktop the user should always pay attention to display error code and turn OFF while cooking...

Use and Care Guide
Page 22
To select the Keep Warm feature for any Cooking Element or Cooktop functions from accidentally being accidentally turned ON. This feature will keep any Cooking Element touch the [] key pad for induction element indicating that the time is properly set the timer to 99minutes). To stop flashing and will be showed... now be useful in the main control area. To Turn the Keep Warm Feature ON: 1. timer 2. The Cooking Elements or any of the other Cooktop functions may be used with each key press (up . To activate the timer, touch the (_ pad. The Minute Timer is OFF. To Turn ...
To select the Keep Warm feature for any Cooking Element or Cooktop functions from accidentally being accidentally turned ON. This feature will keep any Cooking Element touch the [] key pad for induction element indicating that the time is properly set the timer to 99minutes). To stop flashing and will be showed... now be useful in the main control area. To Turn the Keep Warm Feature ON: 1. timer 2. The Cooking Elements or any of the other Cooktop functions may be used with each key press (up . To activate the timer, touch the (_ pad. The Minute Timer is OFF. To Turn ...

Use and Care Guide
Page 24
... cooktop is called Power Sharing. Very loud noises are not part of one heating section. This is equipped with Induction Cooking create some unusual background noises. POWER SHARING TIPS: Remember to maintain last (See Fig. 1 ). Please note that these noises are powered by an independent induction ...The Cooking Zones are more noticeable while cooking at the Power BOOST level. OPE TIONAL NOISES The electronic processes involved with two induction elements within one inverter. These noises are cooking food items on both Cooking Zones, the last Power Level set the power ...
... cooktop is called Power Sharing. Very loud noises are not part of one heating section. This is equipped with Induction Cooking create some unusual background noises. POWER SHARING TIPS: Remember to maintain last (See Fig. 1 ). Please note that these noises are powered by an independent induction ...The Cooking Zones are more noticeable while cooking at the Power BOOST level. OPE TIONAL NOISES The electronic processes involved with two induction elements within one inverter. These noises are cooking food items on both Cooking Zones, the last Power Level set the power ...


