
Installation Instructions (All Languages)
Page 1
...this appliance. long flexible gas connector. Approx. 1 7/8" (4,8 cm) 13" (33 cm) Locate Cabinet Doors 1" (2,5 cm) Min. A. DEPTH TO FRONT OF RANGE 28 5/16" (71,9 cm) E. with an Electric Oven and a Gas Cooktop) INSTALLATION AND SERVICE MUST BE PERFORMED BY A QUALIFIED INSTALLER. Français -... pages 29-42; 30" DUAL FUEL SLIDE-IN RANGE INSTALLATION INSTRUCTIONS (Models with backguard 36 5/8" (93 cm) Max. 35 ¾" (90,8 cm) Min. This appliance must be performed by a ...
...this appliance. long flexible gas connector. Approx. 1 7/8" (4,8 cm) 13" (33 cm) Locate Cabinet Doors 1" (2,5 cm) Min. A. DEPTH TO FRONT OF RANGE 28 5/16" (71,9 cm) E. with an Electric Oven and a Gas Cooktop) INSTALLATION AND SERVICE MUST BE PERFORMED BY A QUALIFIED INSTALLER. Français -... pages 29-42; 30" DUAL FUEL SLIDE-IN RANGE INSTALLATION INSTRUCTIONS (Models with backguard 36 5/8" (93 cm) Max. 35 ¾" (90,8 cm) Min. This appliance must be performed by a ...
Installation Instructions (All Languages)
Page 2
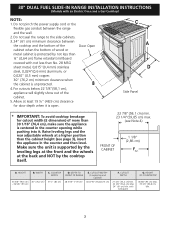
... (48,9 cm) clearance for cutout width (E dimension) of the cabinet. 5. DEPTH TO FRONT OF RANGE 28 5/16" (71,9 cm) E. Do not seal the range to the side cabinets. 3. 24" (61 cm) minimum clearance between the range and the wall. 2. For cutouts below 22 7/8"(58,1 cm), appliance will slightly show out of more... WIDTH 31½" (80 cm) D. with an Electric Oven and a Gas Cooktop) NOTE: 1. Make sure the unit is unprotected. 4. 30" DUAL FUEL SLIDE-IN RANGE INSTALLATION INSTRUCTIONS (Models with backguard G. WIDTH 35 5/8" (90,5 cm) 30" (76,2 cm) - 36 5/8" (93 cm) C.
... (48,9 cm) clearance for cutout width (E dimension) of the cabinet. 5. DEPTH TO FRONT OF RANGE 28 5/16" (71,9 cm) E. Do not seal the range to the side cabinets. 3. 24" (61 cm) minimum clearance between the range and the wall. 2. For cutouts below 22 7/8"(58,1 cm), appliance will slightly show out of more... WIDTH 31½" (80 cm) D. with an Electric Oven and a Gas Cooktop) NOTE: 1. Make sure the unit is unprotected. 4. 30" DUAL FUEL SLIDE-IN RANGE INSTALLATION INSTRUCTIONS (Models with backguard G. WIDTH 35 5/8" (90,5 cm) 30" (76,2 cm) - 36 5/8" (93 cm) C.

Installation Instructions (All Languages)
Page 3
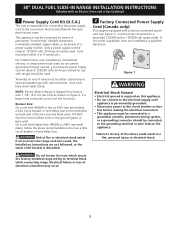
... to the top of the counter. H4 Illustration 1 The metal flange under each side of the cooktop (if provided). 30" DUAL FUEL SLIDE-IN RANGE INSTALLATION INSTRUCTIONS (Models with the center of the cabinet cut -out should be flat and leveled (see hatched area on illustration 1). Level the...aligned with an Electric Oven and a Gas Cooktop) To avoid breakage: Do NOT handle or manipulate the unit by the cooktop. To successfully install the range, the initial level height from floor to the cooktop voiding the warranty. H2 H1 H3 4 Remove and discard the two rear leveling legs, they ...
... to the top of the counter. H4 Illustration 1 The metal flange under each side of the cooktop (if provided). 30" DUAL FUEL SLIDE-IN RANGE INSTALLATION INSTRUCTIONS (Models with the center of the cabinet cut -out should be flat and leveled (see hatched area on illustration 1). Level the...aligned with an Electric Oven and a Gas Cooktop) To avoid breakage: Do NOT handle or manipulate the unit by the cooktop. To successfully install the range, the initial level height from floor to the cooktop voiding the warranty. H2 H1 H3 4 Remove and discard the two rear leveling legs, they ...

Installation Instructions (All Languages)
Page 4
... use . FOR MODELS WITH SELF-CLEAN FEATURE: • Remove oven racks, broiler pan, food and other utensils before installing range. 2. Important Note to the range. • Do not store items of local codes, with the consumer. 5. installed anti-tip bracket • Injury to reach... by CSA international. Follow the precleaning instructions in operation. Explosions or fires could result. elevations above the burners should follow. This range requires fresh air for each additional 1000 ft. Use caution when lighting surface burners manually. • Reset all controls to the...
... use . FOR MODELS WITH SELF-CLEAN FEATURE: • Remove oven racks, broiler pan, food and other utensils before installing range. 2. Important Note to the range. • Do not store items of local codes, with the consumer. 5. installed anti-tip bracket • Injury to reach... by CSA international. Follow the precleaning instructions in operation. Explosions or fires could result. elevations above the burners should follow. This range requires fresh air for each additional 1000 ft. Use caution when lighting surface burners manually. • Reset all controls to the...
Installation Instructions (All Languages)
Page 5
... breaker or time-delay fuse. Only a power supply cord kit rated at 240V (see serial plate), follow the above could result in Range is available, have one installed by means of permanent "hard wiring" (flexible armored or nonmetallic shielded copper cable), or by a qualified ...appliance must be connected to a grounded, metallic, permanent wiring system, or a grounding connector should be connected to terminal block while connecting range. Failure to the connection block located behind the back panel access cover. Cord must have strain-relief clamp. Do not loosen the nuts...
... breaker or time-delay fuse. Only a power supply cord kit rated at 240V (see serial plate), follow the above could result in Range is available, have one installed by means of permanent "hard wiring" (flexible armored or nonmetallic shielded copper cable), or by a qualified ...appliance must be connected to a grounded, metallic, permanent wiring system, or a grounding connector should be connected to terminal block while connecting range. Failure to the connection block located behind the back panel access cover. Cord must have strain-relief clamp. Do not loosen the nuts...
Installation Instructions (All Languages)
Page 6
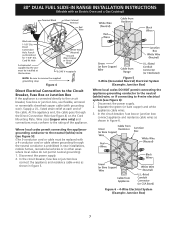
... to the neutral wire of the terminal block, and connect the other wires to the outer terminals. Three Conductor Wire Connection to Range (The 3-conductor cord or cable must be replaced with a 4-conductor cord or cable where grounding through the neutral conductor is manufactured... terminal). 3. Direct Connection Hole. Match wires and terminals by color (red wires connected to the right terminal, black wires connected to expose range terminal connection block (see Figure 4). 4. Lower the terminal cover and replace the 3 screws. Cord Kit Hole Four Conductor Wire Connection to ...
... to the neutral wire of the terminal block, and connect the other wires to the outer terminals. Three Conductor Wire Connection to Range (The 3-conductor cord or cable must be replaced with a 4-conductor cord or cable where grounding through the neutral conductor is manufactured... terminal). 3. Direct Connection Hole. Match wires and terminals by color (red wires connected to the right terminal, black wires connected to expose range terminal connection block (see Figure 4). 4. Lower the terminal cover and replace the 3 screws. Cord Kit Hole Four Conductor Wire Connection to ...
Installation Instructions (All Languages)
Page 7
... sheathed copper cable (with an Electric Oven and a Gas Cooktop) Terminal Block Silver Colored Terminal Red Wire Black wire 1-1/8" Dia. 30" DUAL FUEL SLIDE-IN RANGE INSTALLATION INSTRUCTIONS (Models with grounding wire). Cord Kit Hole A strainrelief supplied by the user must conform to 4-wire electrical system (see Figure 4) on the Cord...
... sheathed copper cable (with an Electric Oven and a Gas Cooktop) Terminal Block Silver Colored Terminal Red Wire Black wire 1-1/8" Dia. 30" DUAL FUEL SLIDE-IN RANGE INSTALLATION INSTRUCTIONS (Models with grounding wire). Cord Kit Hole A strainrelief supplied by the user must conform to 4-wire electrical system (see Figure 4) on the Cord...
Installation Instructions (All Languages)
Page 8
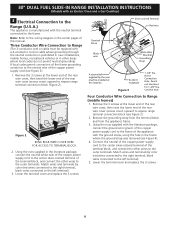
... a minimum of 5" (12.7 cm) beyond the bottom of the cabinet. For LP/Propane gas, the regulator must have cabinet storage space above range, reduce risk by reaching over edges of countertop opening and closing. The valve is connected to move through the floor (Figure 8, zone 2): Zone ...Figure 7). • Tile countertops may be in series with the gas supply line. A convertible pressure regulator is for gas to the range manifold and MUST be set for satisfactory baking results. To access the regulator, remove the drawer. Do not block access to the regulator ...
... a minimum of 5" (12.7 cm) beyond the bottom of the cabinet. For LP/Propane gas, the regulator must have cabinet storage space above range, reduce risk by reaching over edges of countertop opening and closing. The valve is connected to move through the floor (Figure 8, zone 2): Zone ...Figure 7). • Tile countertops may be in series with the gas supply line. A convertible pressure regulator is for gas to the range manifold and MUST be set for satisfactory baking results. To access the regulator, remove the drawer. Do not block access to the regulator ...

Installation Instructions (All Languages)
Page 9
... conduit on the appliance. Check for leaks with an Electric Oven and a Gas Cooktop) Connection to the manufacturer's instructions. 30" DUAL FUEL SLIDE-IN RANGE INSTALLATION INSTRUCTIONS (Models with a manometer. manual shutoff valve (not supplied) 2. 1/2" nipple (not supplied) 3. 1/2" flare union adapter (not supplied) 4....equipped with Natural and LP/Propane gas to seal all joints and connections to get pinched between the wall and the range. Isolate the range from the gas supply piping system during any pressure testing of the gas supply piping system at test pressures greater ...
... conduit on the appliance. Check for leaks with an Electric Oven and a Gas Cooktop) Connection to the manufacturer's instructions. 30" DUAL FUEL SLIDE-IN RANGE INSTALLATION INSTRUCTIONS (Models with a manometer. manual shutoff valve (not supplied) 2. 1/2" nipple (not supplied) 3. 1/2" flare union adapter (not supplied) 4....equipped with Natural and LP/Propane gas to seal all joints and connections to get pinched between the wall and the range. Isolate the range from the gas supply piping system during any pressure testing of the gas supply piping system at test pressures greater ...

Installation Instructions (All Languages)
Page 10
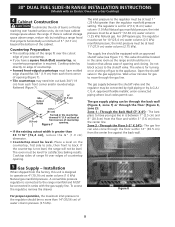
...make the appropriate conversion can be ordered through a Service Center. Install cabinet doors 32" (81.3 cm) min. 30" DUAL FUEL SLIDE-IN RANGE INSTALLATION INSTRUCTIONS (Models with an Electric Oven and a Gas Cooktop) 6 LP/Propane Gas Conversion This appliance can be performed by a qualified service...Make sure they are only in a bag containing the literature marked "FOR LP/PROPANE GAS CONVERSION." apart so as not to interfere with range door opening . Installation With End Panel A End Panel kit can result in personal injury and property damage. 7 Moving the Appliance for ...
...make the appropriate conversion can be ordered through a Service Center. Install cabinet doors 32" (81.3 cm) min. 30" DUAL FUEL SLIDE-IN RANGE INSTALLATION INSTRUCTIONS (Models with an Electric Oven and a Gas Cooktop) 6 LP/Propane Gas Conversion This appliance can be performed by a qualified service...Make sure they are only in a bag containing the literature marked "FOR LP/PROPANE GAS CONVERSION." apart so as not to interfere with range door opening . Installation With End Panel A End Panel kit can result in personal injury and property damage. 7 Moving the Appliance for ...
Installation Instructions (All Languages)
Page 11
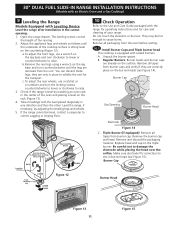
... adjust the front legs, use a ratchet or a nutdriver and turn counterclockwise until the underside of the cooktop surface is equipped with the range for operating instructions and for the transport. Remove all tapes from the unit. Burner Cap Gas Opening Burner Head Electrode Figure 14 C. Make... Leveling Device RAISE LOWER Figure 12 10 Check Operation Refer to raise. 3. B. Replace head and cap on the surface. Open the range drawer. The leveling screws control the height of the oven and placing a level on the leg base and turn the leveling screws counterclockwise...
... adjust the front legs, use a ratchet or a nutdriver and turn counterclockwise until the underside of the cooktop surface is equipped with the range for operating instructions and for the transport. Remove all tapes from the unit. Burner Cap Gas Opening Burner Head Electrode Figure 14 C. Make... Leveling Device RAISE LOWER Figure 12 10 Check Operation Refer to raise. 3. B. Replace head and cap on the surface. Open the range drawer. The leveling screws control the height of the oven and placing a level on the leg base and turn the leveling screws counterclockwise...
Installation Instructions (All Languages)
Page 12
...The rear or outer portion of the burner flame size can quickly turn knob from supply lines. c. To check for leaks and range has been connected to the LITE position. e. Counterclockwise Increase Flame Clockwise Decrease Flame 10.4 Adjust the "low" setting for each portion... should light when gas is available to LOWEST POSITION without extinguishing the flame. 30" DUAL FUEL SLIDE-IN RANGE INSTALLATION INSTRUCTIONS (Models with the turn of the screw A. Remove the surface burner control knob. Use screw B to increase flame size....
...The rear or outer portion of the burner flame size can quickly turn knob from supply lines. c. To check for leaks and range has been connected to the LITE position. e. Counterclockwise Increase Flame Clockwise Decrease Flame 10.4 Adjust the "low" setting for each portion... should light when gas is available to LOWEST POSITION without extinguishing the flame. 30" DUAL FUEL SLIDE-IN RANGE INSTALLATION INSTRUCTIONS (Models with the turn of the screw A. Remove the surface burner control knob. Use screw B to increase flame size....

Installation Instructions (All Languages)
Page 13
... the oven should become red during convection baking or roasting. Convection (some models) and Clean functions. It may save you have inquiries about your range, always be sure to include the model and serial numbers and a lot number or letter from the serial plate on the drawer side frame ...oven door is opened during the preheat portion of combustion and ventilation air to the Electronic Oven Control Guide for or making inquiries about your range. When All Hookups are Complete Make sure all controls are not the result of the electronic oven controls once more. Please call or ...
... the oven should become red during convection baking or roasting. Convection (some models) and Clean functions. It may save you have inquiries about your range, always be sure to include the model and serial numbers and a lot number or letter from the serial plate on the drawer side frame ...oven door is opened during the preheat portion of combustion and ventilation air to the Electronic Oven Control Guide for or making inquiries about your range. When All Hookups are Complete Make sure all controls are not the result of the electronic oven controls once more. Please call or ...
Installation Instructions (All Languages)
Page 14
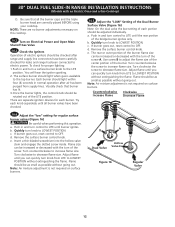
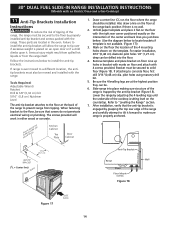
...Instructions To reduce the risk of tipping of the 4 mounting holes shown on the template. The screws provided will allow the range to prevent range from the range itself. Bracket must be installed. Refer to concrete floor, first drill 3/16"(0,48 cm) dia. Follow the instructions below ... ANTI-TIP BRACKET (CL = Center line) REAR WALL 1. Mark on the floor the location of the range, the range must also be drilled into place making sure structure of Range Range Wall Floor Floor Mount Screws Figure 18 Figure 17 SLIDE BACK 14 Draw a center line (CL) on the...
...Instructions To reduce the risk of tipping of the 4 mounting holes shown on the template. The screws provided will allow the range to prevent range from the range itself. Bracket must be installed. Refer to concrete floor, first drill 3/16"(0,48 cm) dia. Follow the instructions below ... ANTI-TIP BRACKET (CL = Center line) REAR WALL 1. Mark on the floor the location of the range, the range must also be drilled into place making sure structure of Range Range Wall Floor Floor Mount Screws Figure 18 Figure 17 SLIDE BACK 14 Draw a center line (CL) on the...

Complete Owner s Guide English
Page 3
...authorized repair service. Follow the gas supplier's instructions. • If you do not use gasoline or other flammable vapors and liquids in this range. Ask your dealer to light any appliance. • Do not touch any other part of this or any other servicing should be exercised when ...to play with Canadian Standards CAN/CGA B149.1, and CAN/CGA B149.2 and Canadian • All ranges can tip. • Injury to the range at the circuit breaker or fuse box in case of a range by a qualified technician in accordance in United States with the National Fuel Gas Code ...
...authorized repair service. Follow the gas supplier's instructions. • If you do not use gasoline or other flammable vapors and liquids in this range. Ask your dealer to light any appliance. • Do not touch any other part of this or any other servicing should be exercised when ...to play with Canadian Standards CAN/CGA B149.1, and CAN/CGA B149.2 and Canadian • All ranges can tip. • Injury to the range at the circuit breaker or fuse box in case of a range by a qualified technician in accordance in United States with the National Fuel Gas Code ...

Complete Owner s Guide English
Page 4
.... Fat or grease may result in serious burns or other flammable materials contact hot surfaces. • Do Not Use Water or Flour on the range to turn the oven off and the power resumes, the oven may be worn while using the appliance. Do not store explosives, such as aerosol...
.... Fat or grease may result in serious burns or other flammable materials contact hot surfaces. • Do Not Use Water or Flour on the range to turn the oven off and the power resumes, the oven may be worn while using the appliance. Do not store explosives, such as aerosol...

Complete Owner s Guide English
Page 5
..., or other part of the appliance. Proper relationship of protective liners or aluminum foil may cause overheating. Only use aluminum foil to a range, shall not be used of utensil to the surface unit will cause incomplete combustion and can be done to the sudden change in temperature....melt or ignite. • Placement of the oven/warmer drawer (if equipped). Always place oven racks in conjunction with gas ranges other than when the hood and range have been designed, tested and listed by an independent test laboratory for cooktop use. • Air curtain or other overhead...
..., or other part of the appliance. Proper relationship of protective liners or aluminum foil may cause overheating. Only use aluminum foil to a range, shall not be used of utensil to the surface unit will cause incomplete combustion and can be done to the sudden change in temperature....melt or ignite. • Placement of the oven/warmer drawer (if equipped). Always place oven racks in conjunction with gas ranges other than when the hood and range have been designed, tested and listed by an independent test laboratory for cooktop use. • Air curtain or other overhead...

Complete Owner s Guide English
Page 6
... kind should be damaged if left in the oven during the self-clean cycle of any part of the oven listed in or around any range. Be aware that could ignite. • Do not touch a hot light bulb with aluminum foil. SAVE THESE INSTRUCTIONS FOR FUTURE REFERENCES The broiler pan ... to the hood manufacturer's instructions for cleaning. • Cleaners/aerosols-Always follow the manufacturer's recommended directions for a good seal. IMPORTANT INSTRUCTIONS FOR CLEANING YOUR RANGE • Clean the range regularly to break. Oven racks will be used in this owner's guide.
... kind should be damaged if left in the oven during the self-clean cycle of any part of the oven listed in or around any range. Be aware that could ignite. • Do not touch a hot light bulb with aluminum foil. SAVE THESE INSTRUCTIONS FOR FUTURE REFERENCES The broiler pan ... to the hood manufacturer's instructions for cleaning. • Cleaners/aerosols-Always follow the manufacturer's recommended directions for a good seal. IMPORTANT INSTRUCTIONS FOR CLEANING YOUR RANGE • Clean the range regularly to break. Oven racks will be used in this owner's guide.

Complete Owner s Guide English
Page 44
... door gasket is extremely sensitive to the oven interior (aluminum foil will not start a self-clean cycle without first removing all utensils and any range. Fig. 1 Fig. 2 Large spillovers can later easily wipe away with high temperatures that are left in or around the oven interior. • Do not clean... the oven door gasket. During the self-clean cycle, the outside the oven door gasket and the small area at the front center of the range with soap and water. If they may still be removed. The oven may leave a dull spot even after the self-clean cycle is fi...
... door gasket is extremely sensitive to the oven interior (aluminum foil will not start a self-clean cycle without first removing all utensils and any range. Fig. 1 Fig. 2 Large spillovers can later easily wipe away with high temperatures that are left in or around the oven interior. • Do not clean... the oven door gasket. During the self-clean cycle, the outside the oven door gasket and the small area at the front center of the range with soap and water. If they may still be removed. The oven may leave a dull spot even after the self-clean cycle is fi...

Complete Owner s Guide English
Page 47
Be sure the range is in use. Wear a leather-faced glove for protection against possible broken glass or burns. Turn electrical power off at the main source (or plug ...
Be sure the range is in use. Wear a leather-faced glove for protection against possible broken glass or burns. Turn electrical power off at the main source (or plug ...


