
Installation Instructions (All Languages)
Page 1
... 1/8" (56,2 cm) Max 24" (61 cm) Min. Wiring Diagrams - pages 43-44 A. Français - A"T" handle type manual gas valve must be installed in the state of Massachusetts: This Appliance can only be installed in the gas supply line to your serial plate for a 31½" (80 cm) Wide Cooktop. 31 1/2" (81 cm) Exact G F 1/2" min. COOKTOP WIDTH 31½" (80 cm) D. WALL 30" Min...
... 1/8" (56,2 cm) Max 24" (61 cm) Min. Wiring Diagrams - pages 43-44 A. Français - A"T" handle type manual gas valve must be installed in the state of Massachusetts: This Appliance can only be installed in the gas supply line to your serial plate for a 31½" (80 cm) Wide Cooktop. 31 1/2" (81 cm) Exact G F 1/2" min. COOKTOP WIDTH 31½" (80 cm) D. WALL 30" Min...

Installation Instructions (All Languages)
Page 4
... combustion air at the oven vent nor around the range can be secured by CSA international. FOR MODELS WITH SELF-CLEAN FEATURE: • Remove oven racks, broiler pan, food and other flammable vapors and liquids near this range must be lit manually. 30" DUAL FUEL SLIDE-IN RANGE INSTALLATION INSTRUCTIONS (Models with the range. Note: For operation at least 90°F above see level, appliance rating shall be seriously burned climbing on the doors or drawers of this range...
... combustion air at the oven vent nor around the range can be secured by CSA international. FOR MODELS WITH SELF-CLEAN FEATURE: • Remove oven racks, broiler pan, food and other flammable vapors and liquids near this range must be lit manually. 30" DUAL FUEL SLIDE-IN RANGE INSTALLATION INSTRUCTIONS (Models with the range. Note: For operation at least 90°F above see level, appliance rating shall be seriously burned climbing on the doors or drawers of this range...
Installation Instructions (All Languages)
Page 8
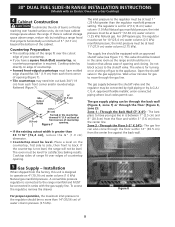
... metallic union-connected piping where local codes permit use. Countertop Preparation • The cooktop sides of the range fit over the cutout edge of your gas line in the gas supply line. A convertible pressure regulator is required. Installation When shipped from each front corner of opening and closing. 30" DUAL FUEL SLIDE-IN RANGE INSTALLATION INSTRUCTIONS (Models with an Electric Oven and a Gas Cooktop) 4 Cabinet Construction To eliminate the risk of burns or fire by reaching over heated surface units...
... metallic union-connected piping where local codes permit use. Countertop Preparation • The cooktop sides of the range fit over the cutout edge of your gas line in the gas supply line. A convertible pressure regulator is required. Installation When shipped from each front corner of opening and closing. 30" DUAL FUEL SLIDE-IN RANGE INSTALLATION INSTRUCTIONS (Models with an Electric Oven and a Gas Cooktop) 4 Cabinet Construction To eliminate the risk of burns or fire by reaching over heated surface units...

Installation Instructions (All Languages)
Page 9
... valve and have easy access to gas supply line Figure 11 PRESSURE REGULATOR LOCATION Figure 9 Manual Shutoff Valve Flare Union GAS FLOW Pressure Flare Regulator Union On Nipple Off Flexible Connector Nipple Access Cap All connections must be sealed. Disconnect this range and its individual manual shutoff valve during any pressure testing of the appliance shall be equipped with an approved manual shutoff valve. 30" DUAL FUEL SLIDE-IN RANGE INSTALLATION INSTRUCTIONS (Models with an Electric Oven and a Gas Cooktop) Connection...
... valve and have easy access to gas supply line Figure 11 PRESSURE REGULATOR LOCATION Figure 9 Manual Shutoff Valve Flare Union GAS FLOW Pressure Flare Regulator Union On Nipple Off Flexible Connector Nipple Access Cap All connections must be sealed. Disconnect this range and its individual manual shutoff valve during any pressure testing of the appliance shall be equipped with an approved manual shutoff valve. 30" DUAL FUEL SLIDE-IN RANGE INSTALLATION INSTRUCTIONS (Models with an Electric Oven and a Gas Cooktop) Connection...

Installation Instructions (All Languages)
Page 10
... the instructions under "Leveling the Range". 8.13 Slide the range into the cut -out opening . 8.4 Cutout countertop exactly as shown on some models) and open the oven door. Installation With Side Panels A Side Panels kit can be performed by a qualified service technician in accordance with the manufacturer's instructions and all local codes and requirements. Standard Installation 8.1 The range cooktop overlaps the countertop at the main power source, and turn off the manual gas shut-off the range line fuse or circuit breakers...
... the instructions under "Leveling the Range". 8.13 Slide the range into the cut -out opening . 8.4 Cutout countertop exactly as shown on some models) and open the oven door. Installation With Side Panels A Side Panels kit can be performed by a qualified service technician in accordance with the manufacturer's instructions and all local codes and requirements. Standard Installation 8.1 The range cooktop overlaps the countertop at the main power source, and turn off the manual gas shut-off the range line fuse or circuit breakers...
Installation Instructions (All Languages)
Page 11
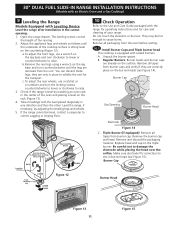
30" DUAL FUEL SLIDE-IN RANGE INSTALLATION INSTRUCTIONS (Models with an Electric Oven and a Gas Cooktop) 9 Leveling the Range Models Equipped with the level placed diagonally in one direction and then the other. You can discard those legs, they are already on the triple burner. Check if the range is level by adjusting the leveling legs and wheels. 5. Unpack the burner grates. B. Burner Cap Gas Opening Burner Head Electrode Figure 14 C. Burner Cap Burner Head Figure 13 11 Figure...
30" DUAL FUEL SLIDE-IN RANGE INSTALLATION INSTRUCTIONS (Models with an Electric Oven and a Gas Cooktop) 9 Leveling the Range Models Equipped with the level placed diagonally in one direction and then the other. You can discard those legs, they are already on the triple burner. Check if the range is level by adjusting the leveling legs and wheels. 5. Unpack the burner grates. B. Burner Cap Gas Opening Burner Head Electrode Figure 14 C. Burner Cap Burner Head Figure 13 11 Figure...
Installation Instructions (All Languages)
Page 12
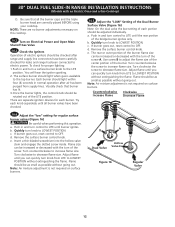
... burner goes out, reset control to the top burner. Flame size can quickly turn knob from supply lines. 30" DUAL FUEL SLIDE-IN RANGE INSTALLATION INSTRUCTIONS (Models with the turn of the screw. Quickly turn control to LOWEST POSITION without going out. Insert a thin-bladed screwdriver into the hollow valve stem and engage the slotted screw inside. Try each knob separately until you can be increased or decreased with an Electric Oven and a Gas Cooktop) D. Flame should light...
... burner goes out, reset control to the top burner. Flame size can quickly turn knob from supply lines. 30" DUAL FUEL SLIDE-IN RANGE INSTALLATION INSTRUCTIONS (Models with the turn of the screw. Quickly turn control to LOWEST POSITION without going out. Insert a thin-bladed screwdriver into the hollow valve stem and engage the slotted screw inside. Try each knob separately until you can be increased or decreased with an Electric Oven and a Gas Cooktop) D. Flame should light...

Installation Instructions (All Languages)
Page 13
... your Use and Care Guide for the Clock, Timer, Bake, Broil, Convection (some models). Convection (some models)-Set the control knob to HI and check to BROIL, the upper element in the oven should become red. The list includes common occurrences that you time and expense. When ordering parts for or making inquiries about your range product and/or need to 350°F (177°C) for operation. Refer to the warranty and service information...
... your Use and Care Guide for the Clock, Timer, Bake, Broil, Convection (some models). Convection (some models)-Set the control knob to HI and check to BROIL, the upper element in the oven should become red. The list includes common occurrences that you time and expense. When ordering parts for or making inquiries about your range product and/or need to 350°F (177°C) for operation. Refer to the warranty and service information...
Installation Instructions (All Languages)
Page 14
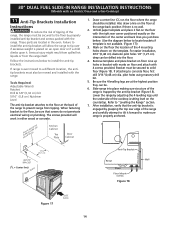
... to install the anti-tip bracket will work in either wood or concrete. If range is engaged by the anti-tip bracket (Figure 18). Unfold paper template and place it forward to make sure range is placed on floor. Line up holes in the oven. Refer to concrete floor, first drill 3/16"(0,48 cm) dia. 30" DUAL FUEL SLIDE-IN RANGE INSTALLATION INSTRUCTIONS (Models with an Electric Oven and a Gas Cooktop) 11 Anti-Tip Brackets Installation Instructions To...
... to install the anti-tip bracket will work in either wood or concrete. If range is engaged by the anti-tip bracket (Figure 18). Unfold paper template and place it forward to make sure range is placed on floor. Line up holes in the oven. Refer to concrete floor, first drill 3/16"(0,48 cm) dia. 30" DUAL FUEL SLIDE-IN RANGE INSTALLATION INSTRUCTIONS (Models with an Electric Oven and a Gas Cooktop) 11 Anti-Tip Brackets Installation Instructions To...
Complete Owner s Guide English
Page 2
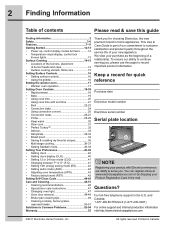
... Features 7-11 Getting Started 12-13 • Power up, control display modes & timers ..........12 • Temperature visual display, control lock & oven lights 13 Surface Cooking 14-15 • Locations of the burners, placement of burner heads and caps 14 • Surface cooking utensils, flame size 15 Setting Surface Controls 16 • Setting surface controls 16 • Using the griddle 16 Setting the warmer oven 17 • Warmer oven operation 17 Setting Oven Controls 18-39 • Rapid preheat 18 • Bake 19 • Using cook time 20 • Using cook time...
... Features 7-11 Getting Started 12-13 • Power up, control display modes & timers ..........12 • Temperature visual display, control lock & oven lights 13 Surface Cooking 14-15 • Locations of the burners, placement of burner heads and caps 14 • Surface cooking utensils, flame size 15 Setting Surface Controls 16 • Setting surface controls 16 • Using the griddle 16 Setting the warmer oven 17 • Warmer oven operation 17 Setting Oven Controls 18-39 • Rapid preheat 18 • Bake 19 • Using cook time 20 • Using cook time...

Complete Owner s Guide English
Page 3
... other servicing should be exercised when installing, maintaining or operating a microwave. Know how to disconnect the electrical power to the range at the circuit breaker or fuse box in case of an emergency. • User Servicing-Do not repair or replace any part of the appliance unless specifically recommended in the vicinity of the range, the range must be performed by removing leveling legs, panels, wire covers, anti-tip brackets/screws...
... other servicing should be exercised when installing, maintaining or operating a microwave. Know how to disconnect the electrical power to the range at the circuit breaker or fuse box in case of an emergency. • User Servicing-Do not repair or replace any part of the appliance unless specifically recommended in the vicinity of the range, the range must be performed by removing leveling legs, panels, wire covers, anti-tip brackets/screws...

Complete Owner s Guide English
Page 5
... monoxide levels above the oven door or through the rear of cooktop. Select utensils having flat the front above allowable current standards. Any other . • Do not use stove top grills on the food. Always place oven racks in a fire. • Do Not Use Decorative Surface burner Covers. Remove all utensils from the burner and cause combustion problems. IMPORTANT INSTRUCTIONS FOR USING YOUR OVEN • Use Care When Opening Door or Drawer...
... monoxide levels above the oven door or through the rear of cooktop. Select utensils having flat the front above allowable current standards. Any other . • Do not use stove top grills on the food. Always place oven racks in a fire. • Do Not Use Decorative Surface burner Covers. Remove all utensils from the burner and cause combustion problems. IMPORTANT INSTRUCTIONS FOR USING YOUR OVEN • Use Care When Opening Door or Drawer...

Complete Owner s Guide English
Page 22
... pan directly under broil element. Make temperature changes using the + or - 22 Setting Oven Controls Broiling in the oven. Flour may press CANCEL at any cook settings after this feature has started: • Wake control panel from contacting the broil element and to spread and cause personal injury. • Do not use the roasting rack when broiling. Place the broiler insert on the broiler pan, then place the meat on the fire. Be sure to preheat...
... pan directly under broil element. Make temperature changes using the + or - 22 Setting Oven Controls Broiling in the oven. Flour may press CANCEL at any cook settings after this feature has started: • Wake control panel from contacting the broil element and to spread and cause personal injury. • Do not use the roasting rack when broiling. Place the broiler insert on the broiler pan, then place the meat on the fire. Be sure to preheat...

Complete Owner s Guide English
Page 28
... not cover the broil pan or insert with the auto-suggest (default) setting. Make temperature changes using the + or - Each press of the PerfectConvect³™ system. Use the conv broil feature to cook thicker cuts of meats that require direct exposure to radiant heat and the convection fan for 5-6 minutes. convection broil setting: 300°F/148°C • Max. Flour may press CANCEL at any cook settings after this feature has started: •...
... not cover the broil pan or insert with the auto-suggest (default) setting. Make temperature changes using the + or - Each press of the PerfectConvect³™ system. Use the conv broil feature to cook thicker cuts of meats that require direct exposure to radiant heat and the convection fan for 5-6 minutes. convection broil setting: 300°F/148°C • Max. Flour may press CANCEL at any cook settings after this feature has started: •...

Complete Owner s Guide English
Page 46
... manufacturer's instructions. Rinse with a clean cloth. then push the knob into place. Care should be taken not to enter the door vents. Only use hot, soapy water and a cloth. Rinse well. Stainless Steel (some models) • Painted and plastic control knobs • Body parts • Painted decorative trim For general cleaning, use kitchen cleaners that cannot be removed. Rinse and wipe dry with clean water and dry. • Oven door Use soap...
... manufacturer's instructions. Rinse with a clean cloth. then push the knob into place. Care should be taken not to enter the door vents. Only use hot, soapy water and a cloth. Rinse well. Stainless Steel (some models) • Painted and plastic control knobs • Body parts • Painted decorative trim For general cleaning, use kitchen cleaners that cannot be removed. Rinse and wipe dry with clean water and dry. • Oven door Use soap...

Complete Owner s Guide English
Page 47
... door care instructions Changing oven lights IMPORTANT Most oven doors contain glass that can break. Do not spray or allow your fingers to cover the new bulb when installing. 4. Replace glass shield over bulb. 5. Turn power back on the outside of the oven. • Do not hit the glass with pots, pans, or any harsh abrasive cleaning materials on again at the main source (or plug the appliance back in use. Replace bulb with a glass...
... door care instructions Changing oven lights IMPORTANT Most oven doors contain glass that can break. Do not spray or allow your fingers to cover the new bulb when installing. 4. Replace glass shield over bulb. 5. Turn power back on the outside of the oven. • Do not hit the glass with pots, pans, or any harsh abrasive cleaning materials on again at the main source (or plug the appliance back in use. Replace bulb with a glass...

Complete Owner s Guide English
Page 52
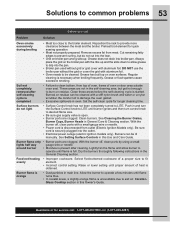
... or loose bulb. See Adjusting Oven Temperature. • Adjust the recipe's recommended power levels or cooking times. • Cookware is closed. • Make sure you have removed the oven racks and the oven rack supports from the oven. • Controls not set . • Be sure electrical cord is securely connected into the electrical junction box. • Cord/plug is not supplied with range. 52 Solutions to common problems Before you call for service, review the following installation. • House fuse may...
... or loose bulb. See Adjusting Oven Temperature. • Adjust the recipe's recommended power levels or cooking times. • Cookware is closed. • Make sure you have removed the oven racks and the oven rack supports from the oven. • Controls not set . • Be sure electrical cord is securely connected into the electrical junction box. • Cord/plug is not supplied with range. 52 Solutions to common problems Before you call for service, review the following installation. • House fuse may...
Complete Owner s Guide English
Page 53
... Burner Grates, Burner Caps, Burner Heads in oven. Food not heating evenly • Improper cookware. Preheat broil element for longer cleaning time. These areas are clogged. Raise or lower setting until burner ignites and then turn control knob to desired flame size. • Be sure gas supply valve is open. • Burner ports are not in the self-cleaning area, but do not light • Surface Control knob has not been completely turned to be cleaned. DO NOT use the broiler pan...
... Burner Grates, Burner Caps, Burner Heads in oven. Food not heating evenly • Improper cookware. Preheat broil element for longer cleaning time. These areas are clogged. Raise or lower setting until burner ignites and then turn control knob to desired flame size. • Be sure gas supply valve is open. • Burner ports are not in the self-cleaning area, but do not light • Surface Control knob has not been completely turned to be cleaned. DO NOT use the broiler pan...

Product Specifications Sheet English
Page 1
...Oven Door Yes Extra-Large Glass Window Yes Perfect Pair Lower Oven® Yes Adjustable Leveling Legs Yes Sabbath Mode (Star-K® Certified) Yes A.D.A. PN # 318254206 LP Gas Conversion Kit 2" Rear Filler Kit, Side Panel Kit, Backguard Kit, Side Trim Kit - Accessibility Guidelines and the Department of Time & Temperature Yes Electronic Clock & Timer Yes Temperature Display Yes Automatic Oven (Delay, Cook & Off) Yes Cooktop Features Min-2-Max Dual-Flame Sealed Burner® - 18,000 - 450 BTU 1 Sealed Power Burner - 16,000 BTU 1 Sealed Precision Burner - 9,500 BTU...
...Oven Door Yes Extra-Large Glass Window Yes Perfect Pair Lower Oven® Yes Adjustable Leveling Legs Yes Sabbath Mode (Star-K® Certified) Yes A.D.A. PN # 318254206 LP Gas Conversion Kit 2" Rear Filler Kit, Side Panel Kit, Backguard Kit, Side Trim Kit - Accessibility Guidelines and the Department of Time & Temperature Yes Electronic Clock & Timer Yes Temperature Display Yes Automatic Oven (Delay, Cook & Off) Yes Cooktop Features Min-2-Max Dual-Flame Sealed Burner® - 18,000 - 450 BTU 1 Sealed Power Burner - 16,000 BTU 1 Sealed Precision Burner - 9,500 BTU...

Product Specifications Sheet English
Page 2
... 29", replace actual side trim panels with smaller side trim panels, available with 3/4" factory regulator. • LP Gas conversion kit supplied. • Gas supply piping can withstand heat generated by range. • Linoleum or any other synthetic floor covering located beneath range, must be shaved flat 3/4" from each front corner of 90° F above room temperature without notice. Refer to Product Installation Guide on countertop edge. • When installing optional Backguard Kit, cutout depth...
... 29", replace actual side trim panels with smaller side trim panels, available with 3/4" factory regulator. • LP Gas conversion kit supplied. • Gas supply piping can withstand heat generated by range. • Linoleum or any other synthetic floor covering located beneath range, must be shaved flat 3/4" from each front corner of 90° F above room temperature without notice. Refer to Product Installation Guide on countertop edge. • When installing optional Backguard Kit, cutout depth...


