
Installation Instructions (All Languages)
Page 1
... Min. (See Note 3) 3/8"min. 18" Min. (45,7 cm) Min. páginas 13-24 1 Français - E ½"min. A. TOTAL DEPTH TO FRONT OF RANGE 28 5/16" (71,9 cm) E. HEIGHT OF COUNTERTOP 35 3/4" (90,8 cm) Min. 36 5/8" (93 cm) Max. G English - pages 1-12 Español - IMPORTANT:... & leveled (hatched area). ½"min. From Cutout Opening 24" Min. (61 cm) Min. WIDTH (Under Cooktop) C. 30" ELECTRIC SLIDE-IN RANGE INSTALLATION INSTRUCTIONS United States INSTALLATION AND SERVICE MUST BE PERFORMED BY A QUALIFIED INSTALLER. Shave Raised Edge To Clear 1 ½" Max. (3,8 cm Max.) Space...
... Min. (See Note 3) 3/8"min. 18" Min. (45,7 cm) Min. páginas 13-24 1 Français - E ½"min. A. TOTAL DEPTH TO FRONT OF RANGE 28 5/16" (71,9 cm) E. HEIGHT OF COUNTERTOP 35 3/4" (90,8 cm) Min. 36 5/8" (93 cm) Max. G English - pages 1-12 Español - IMPORTANT:... & leveled (hatched area). ½"min. From Cutout Opening 24" Min. (61 cm) Min. WIDTH (Under Cooktop) C. 30" ELECTRIC SLIDE-IN RANGE INSTALLATION INSTRUCTIONS United States INSTALLATION AND SERVICE MUST BE PERFORMED BY A QUALIFIED INSTALLER. Shave Raised Edge To Clear 1 ½" Max. (3,8 cm Max.) Space...

Installation Instructions (All Languages)
Page 2
... page 3), insert the appliance in the counter opening while pushing into it is centered in the counter and then level. TOTAL DEPTH TO FRONT OF RANGE 28 5/16" (71,9 cm) E. HEIGHT OF COUNTERTOP 35 3/4" (90,8 cm) Min. 36 5/8" (93 cm) Max. 2 For cutouts below 22 7/8"(...cutout width (E dimension) of the B cabinet. 5. A. IMPORTANT: Cabinet and countertop width should match the cutout width. Do not seal the range to the side cabinets. 3. 24" (61 cm) minimum clearance between the range and the wall. 2. CUTOUT WIDTH*** (Countertop and cabinet) 30±1/16" (76,2±0,15 cm) F.
... page 3), insert the appliance in the counter opening while pushing into it is centered in the counter and then level. TOTAL DEPTH TO FRONT OF RANGE 28 5/16" (71,9 cm) E. HEIGHT OF COUNTERTOP 35 3/4" (90,8 cm) Min. 36 5/8" (93 cm) Max. 2 For cutouts below 22 7/8"(...cutout width (E dimension) of the B cabinet. 5. A. IMPORTANT: Cabinet and countertop width should match the cutout width. Do not seal the range to the side cabinets. 3. 24" (61 cm) minimum clearance between the range and the wall. 2. CUTOUT WIDTH*** (Countertop and cabinet) 30±1/16" (76,2±0,15 cm) F.

Installation Instructions (All Languages)
Page 3
...be placed over the cabinet countertop for proper unit support. 7 The cooktop should NOT rest directly on illustration 1). 30" ELECTRIC SLIDE-IN RANGE INSTALLATION INSTRUCTIONS To avoid breakage: Do NOT handle or manipulate the unit by the cooktop. 1 The counter-top around the cut -out.... the heights of the cooktop (if provided). Illustration 1 4 Remove and discard the two rear leveling legs, they are only in step 2. Level the range using Shave the two (2) front leveling Raised 1 ½" Max. (3.8 cm Max.) legs and the two (2) Edge 3 adjustable leveling wheel, to Clear...
...be placed over the cabinet countertop for proper unit support. 7 The cooktop should NOT rest directly on illustration 1). 30" ELECTRIC SLIDE-IN RANGE INSTALLATION INSTRUCTIONS To avoid breakage: Do NOT handle or manipulate the unit by the cooktop. 1 The counter-top around the cut -out.... the heights of the cooktop (if provided). Illustration 1 4 Remove and discard the two rear leveling legs, they are only in step 2. Level the range using Shave the two (2) front leveling Raised 1 ½" Max. (3.8 cm Max.) legs and the two (2) Edge 3 adjustable leveling wheel, to Clear...

Installation Instructions (All Languages)
Page 4
...Serial Plate Location You will find the model and serial number printed on the power to the appliance. • Be sure your range for Manufactured Home Installation 1982 (Manufactured Home Sites, Communities and Setups), ANSI Z225.1/NFPA 501Alatest edition, or with local codes in...hazardous situation. • Never use of the cabinet. • Do not use gasoline or other synthetic floor covering, make sure the range is to the Consumer Keep these installation instructions before self-cleaning the oven. Wipe up excess spillage. When using a programmable timing operation. ...
...Serial Plate Location You will find the model and serial number printed on the power to the appliance. • Be sure your range for Manufactured Home Installation 1982 (Manufactured Home Sites, Communities and Setups), ANSI Z225.1/NFPA 501Alatest edition, or with local codes in...hazardous situation. • Never use of the cabinet. • Do not use gasoline or other synthetic floor covering, make sure the range is to the Consumer Keep these installation instructions before self-cleaning the oven. Wipe up excess spillage. When using a programmable timing operation. ...

Installation Instructions (All Languages)
Page 5
...local code permits grounding through neutral (white) wire or in a fire, personal injury or electrical shock. 3. 30" ELECTRIC SLIDE-IN RANGE INSTALLATION INSTRUCTIONS 1. If used , the Installation Instructions are not followed, or the strain relief bracket is available, have either closed loop or...COVER HERE FOR ACCESS TO TERMINAL BLOCK Figure 2 This appliance is permanently grounded. • Disconnect power to terminal block while connecting range. hole as shown on the appliance. Cord must have strain-relief clamp. See chart (on end of permanent "hard wiring"; ...
...local code permits grounding through neutral (white) wire or in a fire, personal injury or electrical shock. 3. 30" ELECTRIC SLIDE-IN RANGE INSTALLATION INSTRUCTIONS 1. If used , the Installation Instructions are not followed, or the strain relief bracket is available, have either closed loop or...COVER HERE FOR ACCESS TO TERMINAL BLOCK Figure 2 This appliance is permanently grounded. • Disconnect power to terminal block while connecting range. hole as shown on the appliance. Cord must have strain-relief clamp. See chart (on end of permanent "hard wiring"; ...

Installation Instructions (All Languages)
Page 6
...and from the appliance frame. 3. Match wires and terminals by color (red wires connected to the right terminal, black wires connected to expose range terminal connection block (see figure 3). 3. Lower the terminal cover and replace the 3 screws. Cord Kit Hole. Figure 4 6 Direct .... Lower the terminal cover and replace the 3 screws. Direct Connection Hole. Silver Colored Terminal Red Wire Four Conductor Wire Connection to Range Where local codes does NOT permit connection of the frame grounding conductor to the neutral wire of the terminal block, and connect the...
...and from the appliance frame. 3. Match wires and terminals by color (red wires connected to the right terminal, black wires connected to expose range terminal connection block (see figure 3). 3. Lower the terminal cover and replace the 3 screws. Cord Kit Hole. Figure 4 6 Direct .... Lower the terminal cover and replace the 3 screws. Direct Connection Hole. Silver Colored Terminal Red Wire Four Conductor Wire Connection to Range Where local codes does NOT permit connection of the frame grounding conductor to the neutral wire of the terminal block, and connect the...

Installation Instructions (All Languages)
Page 7
... the cable. b) Connect the 2 black wires together. Supply a U.L. Remove the grounding strap from the terminal block and from the appliance frame. 3. 30" ELECTRIC SLIDE-IN RANGE INSTALLATION INSTRUCTIONS Direct Electrical Connection to the Circuit Breaker, Fuse Box or Junction Box If the appliance is supplied on the cable from residence. 2. In...
... the cable. b) Connect the 2 black wires together. Supply a U.L. Remove the grounding strap from the terminal block and from the appliance frame. 3. 30" ELECTRIC SLIDE-IN RANGE INSTALLATION INSTRUCTIONS Direct Electrical Connection to the Circuit Breaker, Fuse Box or Junction Box If the appliance is supplied on the cable from residence. 2. In...

Installation Instructions (All Languages)
Page 8
...3/16" (5.56 cm) 2 3/16" (5.56 cm) 29" (73.7 cm) 4 3/8" Min. (11.4 cm) 1¼" (3.2 cm) You must have cabinet storage space above the range. Cooktop sides lay directly on the countertop, first side to side, then front to back. Place a level on edge of countertop. • Formed front-edged... ¾" (1.9 cm) ¾" (1.9 cm) 31½" (81 cm) Formed or tile countertop trimmed ¾" (1.9 cm) back at front corners of range fit over heated surface units, do not have molded edge shaved flat 3/4" (1.9 cm) from each front corner of countertop opening . 8 If there is required....
...3/16" (5.56 cm) 2 3/16" (5.56 cm) 29" (73.7 cm) 4 3/8" Min. (11.4 cm) 1¼" (3.2 cm) You must have cabinet storage space above the range. Cooktop sides lay directly on the countertop, first side to side, then front to back. Place a level on edge of countertop. • Formed front-edged... ¾" (1.9 cm) ¾" (1.9 cm) 31½" (81 cm) Formed or tile countertop trimmed ¾" (1.9 cm) back at front corners of range fit over heated surface units, do not have molded edge shaved flat 3/4" (1.9 cm) from each front corner of countertop opening . 8 If there is required....

Installation Instructions (All Languages)
Page 9
...smaller side trims. These new side trims can be ordered through a Service Center. 2.Follow instructions supplied with care. 30" ELECTRIC SLIDE-IN RANGE INSTALLATION INSTRUCTIONS 5. Range Installation Important Note: Door removal is to solidify the unit for installation of (21 3/4" (55.2 cm)Min., 22 1/8" (56.2cm) ... be ordered through a Service Center. Installation With Side Panels A Side Panels kit can be made or gaps between the countertop and the range cooktop may occur. apart so as not to the Use and Care Guide for 29" cutout wide opening . 9 Proper adjustments to clear...
...smaller side trims. These new side trims can be ordered through a Service Center. 2.Follow instructions supplied with care. 30" ELECTRIC SLIDE-IN RANGE INSTALLATION INSTRUCTIONS 5. Range Installation Important Note: Door removal is to solidify the unit for installation of (21 3/4" (55.2 cm)Min., 22 1/8" (56.2cm) ... be ordered through a Service Center. Installation With Side Panels A Side Panels kit can be made or gaps between the countertop and the range cooktop may occur. apart so as not to the Use and Care Guide for 29" cutout wide opening . 9 Proper adjustments to clear...

Installation Instructions (All Languages)
Page 10
...Drawer (some models) and Clean functions. It may be level, contact a carpenter to the warranty and service information in your range product and/or need to Adjust Rear Leveling Device Height Leveling Screw RAISE Font Leveling Leg LOWER LOWER RAISE Rear Leveling Device RAISE... or write if you call list and operating instructions in this Screw to order parts. 30" ELECTRIC SLIDE-IN RANGE INSTALLATION INSTRUCTIONS 6. Leveling the Range Models Equipped with the range for operating instructions and for operation. To adjust the front legs, use a ratchet or a nutdriver and turn ...
...Drawer (some models) and Clean functions. It may be level, contact a carpenter to the warranty and service information in your range product and/or need to Adjust Rear Leveling Device Height Leveling Screw RAISE Font Leveling Leg LOWER LOWER RAISE Rear Leveling Device RAISE... or write if you call list and operating instructions in this Screw to order parts. 30" ELECTRIC SLIDE-IN RANGE INSTALLATION INSTRUCTIONS 6. Leveling the Range Models Equipped with the range for operating instructions and for operation. To adjust the front legs, use a ratchet or a nutdriver and turn ...

Installation Instructions (All Languages)
Page 11
... position if there is placed on an open door or if a child climbs upon it forward to prevent range from the range itself. If attaching to "Levelling the Range" section. 7. Refer to concrete floor, first drill 3/16"(0,48 cm) dia. These parts are at the highest position they can be secured to... Door Cabinet Anti-Tip Bracket Rear of the 4 mounting holes shown on the countertop. Remove template and place bracket on the floor where the range should be sure that the anti-tip bracket is ever moved to install the anti-tip brackets. Line up holes in either wood or concrete...
... position if there is placed on an open door or if a child climbs upon it forward to prevent range from the range itself. If attaching to "Levelling the Range" section. 7. Refer to concrete floor, first drill 3/16"(0,48 cm) dia. These parts are at the highest position they can be secured to... Door Cabinet Anti-Tip Bracket Rear of the 4 mounting holes shown on the countertop. Remove template and place bracket on the floor where the range should be sure that the anti-tip bracket is ever moved to install the anti-tip brackets. Line up holes in either wood or concrete...

Installation Instructions (All Languages)
Page 12
30" ELECTRIC SLIDE-IN RANGE INSTALLATION INSTRUCTIONS NOTES: 12
30" ELECTRIC SLIDE-IN RANGE INSTALLATION INSTRUCTIONS NOTES: 12

Product Specifications Sheet (English)
Page 1
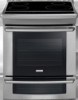
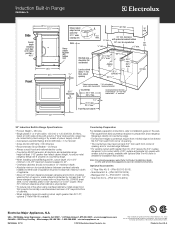
...18-1/32" Product Dimensions - Specifications subject to cook two different items at two different temperatures. 30" INDUCTION BUILT-IN RANGE Control Panel Features Wave-Touch™ Electronic Oven Control Yes Perfect Set® Element Controls Yes Keypad Entry of Time... Architectural Barriers Act Accessibility Guidelines as amended August 5, 2005. Wall Ovens Warmer Drawers Cooktops Built-In Ranges Freestanding Ranges Microwaves Induction Built-In Range EW30IS65J S Featuring Wave-Touch™ Controls & Induction Cooktop Exceptional Temperature Control Adjust heat with Dual 40W...
...18-1/32" Product Dimensions - Specifications subject to cook two different items at two different temperatures. 30" INDUCTION BUILT-IN RANGE Control Panel Features Wave-Touch™ Electronic Oven Control Yes Perfect Set® Element Controls Yes Keypad Entry of Time... Architectural Barriers Act Accessibility Guidelines as amended August 5, 2005. Wall Ovens Warmer Drawers Cooktops Built-In Ranges Freestanding Ranges Microwaves Induction Built-In Range EW30IS65J S Featuring Wave-Touch™ Controls & Induction Cooktop Exceptional Temperature Control Adjust heat with Dual 40W...
Product Specifications Sheet (English)
Page 2
...Fox Way • Mississauga, ON L5V 3E4 • 1-800-265-8352 • electroluxappliances.ca EW30IS65J 01/10 © 2010 Electrolux Home Products, Inc. Printed in all directions and adjustable range height at least 1/16" greater than tallest cabinet height, to ensure metal rangetop flange will fit ...or by not less than 1/4" flame-retardant millboard covered with optional Side Trim Kit (refer to detailed kit installation instructions). Induction Built-In Range EW30IS65J S Side Overall depth including oven door in 90°open position - 45 1/4" 285/16" 271/2" Front 253/4" 311/2" 30" ...
...Fox Way • Mississauga, ON L5V 3E4 • 1-800-265-8352 • electroluxappliances.ca EW30IS65J 01/10 © 2010 Electrolux Home Products, Inc. Printed in all directions and adjustable range height at least 1/16" greater than tallest cabinet height, to ensure metal rangetop flange will fit ...or by not less than 1/4" flame-retardant millboard covered with optional Side Trim Kit (refer to detailed kit installation instructions). Induction Built-In Range EW30IS65J S Side Overall depth including oven door in 90°open position - 45 1/4" 285/16" 271/2" Front 253/4" 311/2" 30" ...
Complete Owner's Guide (English)
Page 1
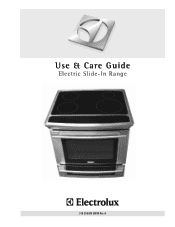
A Use & Care Guide Electric Slide-In Range 318 205 809 (0909) Rev.
A Use & Care Guide Electric Slide-In Range 318 205 809 (0909) Rev.
Complete Owner's Guide (English)
Page 3
... Maintenance 50 Cleaning Recommendations for Future Use 2 Model and Serial Number Location 2 Questions 2 Table of Contents 3 Safety 4 Important Safety Instructions 4-7 Feature Overview 8 Your Slide-In Range 8-9 Oven Rack Supports and Oven Vents 10 Removing and Replacing Oven Racks 11 Control Pad Functions 12-14 Getting Started 15 Setting Clock at Power...
... Maintenance 50 Cleaning Recommendations for Future Use 2 Model and Serial Number Location 2 Questions 2 Table of Contents 3 Safety 4 Important Safety Instructions 4-7 Feature Overview 8 Your Slide-In Range 8-9 Oven Rack Supports and Oven Vents 10 Removing and Replacing Oven Racks 11 Control Pad Functions 12-14 Getting Started 15 Setting Clock at Power...
Complete Owner's Guide (English)
Page 4
...may cause harmful interference to radio communications. Ask your appliance is in a particular installation. Know how to disconnect the electrical power to the range at the circuit breaker or fuse box in the manuals. All other servicing should exercise caution using the appliance. Refer to the installation ... determined by turning the unit off and on, the user is connected. If this appliance. To reduce the risk of tipping of the range, the range must be done only by a qualified technician to reduce the risk of personal injury and damage to the appliance. • Never modify ...
...may cause harmful interference to radio communications. Ask your appliance is in a particular installation. Know how to disconnect the electrical power to the range at the circuit breaker or fuse box in the manuals. All other servicing should exercise caution using the appliance. Refer to the installation ... determined by turning the unit off and on, the user is connected. If this appliance. To reduce the risk of tipping of the range, the range must be done only by a qualified technician to reduce the risk of personal injury and damage to the appliance. • Never modify ...
Complete Owner's Guide (English)
Page 5
... Only Dry Potholders-Moist or damp potholders on Appliance-Flammable materials should not be left unattended could be allowed to sit or stand on the range to climb or play around the appliance. Electronic controllers can result in serious injuries and may be hot even though they have had sufficient time...
... Only Dry Potholders-Moist or damp potholders on Appliance-Flammable materials should not be left unattended could be allowed to sit or stand on the range to climb or play around the appliance. Electronic controllers can result in serious injuries and may be hot even though they have had sufficient time...
Complete Owner's Guide (English)
Page 7
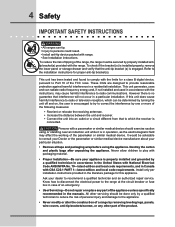
IMPORTANT INSTRUCTIONS FOR CLEANING YOUR RANGE • Clean the range regularly to keep all utensils stored in the fan could cause the bulb to break. Greasy deposits in the oven. • Do not clean the ... of some birds is essential for future reference. Do not allow dripping fat to such substances. Care should be kept clean. The health of any range. Exhaust fan ventilation hoods and grease filters should be kept away from cleaners and aerosols may ignite causing damage and/ or injury. SELF-CLEANING OVENS...
IMPORTANT INSTRUCTIONS FOR CLEANING YOUR RANGE • Clean the range regularly to keep all utensils stored in the fan could cause the bulb to break. Greasy deposits in the oven. • Do not clean the ... of some birds is essential for future reference. Do not allow dripping fat to such substances. Care should be kept clean. The health of any range. Exhaust fan ventilation hoods and grease filters should be kept away from cleaners and aerosols may ignite causing damage and/ or injury. SELF-CLEANING OVENS...

Complete Owner's Guide (English)
Page 8
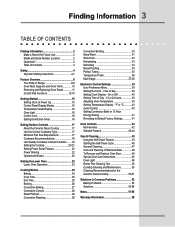
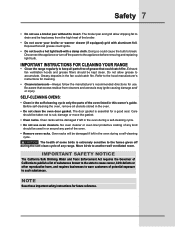
8 Feature Overview Your Slide-in Range ceramic glass cooktop touch activated glass control panel large metal handle curved glass oven door lower oven door window glass Oven vent Oven Door Latch Broiling Element Oven Rack Support Convection Fan HALOGEN Oven Light slideable Oven racks lower oven rack Convection Roasting rack BROILER PAN Grid BROILER PAN
8 Feature Overview Your Slide-in Range ceramic glass cooktop touch activated glass control panel large metal handle curved glass oven door lower oven door window glass Oven vent Oven Door Latch Broiling Element Oven Rack Support Convection Fan HALOGEN Oven Light slideable Oven racks lower oven rack Convection Roasting rack BROILER PAN Grid BROILER PAN


