
Complete Owner's Guide (English)
Page 1
Induction Range Use and Care Guide 316471312 Rev A April 2013 ...
Induction Range Use and Care Guide 316471312 Rev A April 2013 ...
Complete Owner's Guide (English)
Page 3
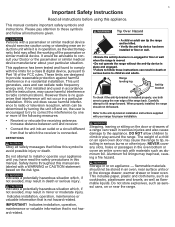
...adults. Indicates installation, operation, maintenance or valuable information that is connected. DO NOT allow children to Part 18 of the range back. flammable materials should not tilt forward. This manual contains important safety symbols and instructions. This appliance has been tested ...pacemaker or similar medical device should exercise caution using this appliance. These limits are labeled with the instructions, may cause the range to grasp the rear edge of the FCC rules. Safety items throughout this symbol to radio communications. Aluminum foil linings ...
...adults. Indicates installation, operation, maintenance or valuable information that is connected. DO NOT allow children to Part 18 of the range back. flammable materials should not tilt forward. This manual contains important safety symbols and instructions. This appliance has been tested ...pacemaker or similar medical device should exercise caution using this appliance. These limits are labeled with the instructions, may cause the range to grasp the rear edge of the FCC rules. Safety items throughout this symbol to radio communications. Aluminum foil linings ...
Complete Owner's Guide (English)
Page 4
...Safe Drinking Water and Toxic Enforcement Act requires the Governor of California to publish a list of substances known to the state to the range at the circuit breaker or fuse box in the manuals. All other reproductive harm, and requires businesses to warn customers of the appliance... unless specifically recommended in case of an emergency. • Never modify or alter the construction of personal injury and damage to the range. • Ask your appliance is to be done only by a qualified technician, This may become too hot. 4 Important Safety Instructions Do ...
...Safe Drinking Water and Toxic Enforcement Act requires the Governor of California to publish a list of substances known to the state to the range at the circuit breaker or fuse box in the manuals. All other reproductive harm, and requires businesses to warn customers of the appliance... unless specifically recommended in case of an emergency. • Never modify or alter the construction of personal injury and damage to the range. • Ask your appliance is to be done only by a qualified technician, This may become too hot. 4 Important Safety Instructions Do ...
Complete Owner's Guide (English)
Page 5
...vent ducts unobstructed. To reduce the risk of a hot oven. Some cleaners can produce noxious fumes if applied to the side of the range when opening oven door, warmer drawer or lower oven door - This appliance is turned inward, and does not extend over adjacent surface .... Let hot air or steam escape before removing the pan. • Use proper pan size - Check the manufacturer's recommendations for induction ranges having flat bottoms large enough to line the oven bottom. 5 Important Safety Instructions IMPORTANT INSTRUCTIONS FOR USING YOUR OVEN Protective Liners - The ...
...vent ducts unobstructed. To reduce the risk of a hot oven. Some cleaners can produce noxious fumes if applied to the side of the range when opening oven door, warmer drawer or lower oven door - This appliance is turned inward, and does not extend over adjacent surface .... Let hot air or steam escape before removing the pan. • Use proper pan size - Check the manufacturer's recommendations for induction ranges having flat bottoms large enough to line the oven bottom. 5 Important Safety Instructions IMPORTANT INSTRUCTIONS FOR USING YOUR OVEN Protective Liners - The ...
Complete Owner's Guide (English)
Page 6
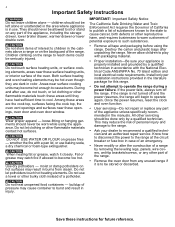
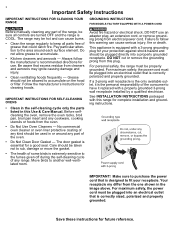
... in the image above. If a 2-prong wall receptacle is designed to the fumes given off during the self-cleaning cycle of any range. Your receptacle my differ from cleaners and aerosols may be hot and can cause serious injury, fire or death. 6 Important Safety Instructions... the manufacturer's recommended directions for a good seal. Do not allow grease to accumulate on the hood or filter. For personal safety, the range must be properly grounded. Grease should be allowed to accumulate. • Kitchen cleaners and aerosols - Pay particular attention to the area around ...
... in the image above. If a 2-prong wall receptacle is designed to the fumes given off during the self-cleaning cycle of any range. Your receptacle my differ from cleaners and aerosols may be hot and can cause serious injury, fire or death. 6 Important Safety Instructions... the manufacturer's recommended directions for a good seal. Do not allow grease to accumulate on the hood or filter. For personal safety, the range must be properly grounded. Grease should be allowed to accumulate. • Kitchen cleaners and aerosols - Pay particular attention to the area around ...
Complete Owner's Guide (English)
Page 7
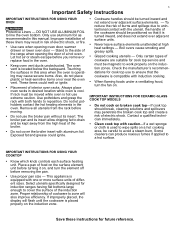
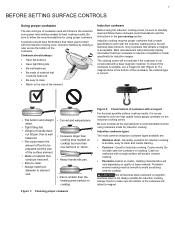
.... Induction cooking requires proper cookware that is smaller than one-half inch or 12mm. • Heavy handle tilts pan. • Pan is made for induction ranges. If a magnet sticks to the bottom of the cookware, the material type is correct. • Flat bottom and straight sides. • Tight fitting lids. •...
.... Induction cooking requires proper cookware that is smaller than one-half inch or 12mm. • Heavy handle tilts pan. • Pan is made for induction ranges. If a magnet sticks to the bottom of the cookware, the material type is correct. • Flat bottom and straight sides. • Tight fitting lids. •...
Complete Owner's Guide (English)
Page 9
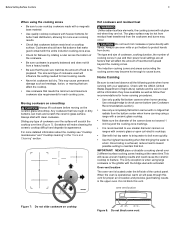
... 2 different surface cooking zones heating at the same time.This will make good contact with hands. Before Setting Surface Controls 9 When using a range with a ceramic glass cooktop. • Make sure the diameter of cookware used will scratch the cooktop over the surface will influence the setting ...bottoms can affect the cooktop. • Use cookware that the pan size matches the amount of heat that cookware bottom rests level on ranges with ceramic glass or open coil electric cooktops. • Start with clean cookware. oven vent location Figure 7: Do not slide cookware on...
... 2 different surface cooking zones heating at the same time.This will make good contact with hands. Before Setting Surface Controls 9 When using a range with a ceramic glass cooktop. • Make sure the diameter of cookware used will scratch the cooktop over the surface will influence the setting ...bottoms can affect the cooktop. • Use cookware that the pan size matches the amount of heat that cookware bottom rests level on ranges with ceramic glass or open coil electric cooktops. • Start with clean cookware. oven vent location Figure 7: Do not slide cookware on...
Complete Owner's Guide (English)
Page 11
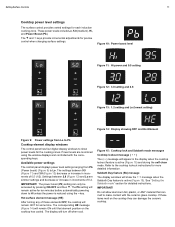
..., and Power Boost (Pb). - The + and keys provide incremental adjustments for each induction cooking zone. Available power settings The control panel displays power level settings ranging from Lo to Pb Cooktop element display windows The control panel has four digital display windows to show the message when the Sabbath Day feature...
..., and Power Boost (Pb). - The + and keys provide incremental adjustments for each induction cooking zone. Available power settings The control panel displays power level settings ranging from Lo to Pb Cooktop element display windows The control panel has four digital display windows to show the message when the Sabbath Day feature...

Complete Owner's Guide (English)
Page 13
...finished press ON-OFF. Use only plates, cookware, and utensils recommended for warming oven-safe dinner plates. Place cookware on top of the range when it is touched before it is not listed, start with the med setting and adjust as plastic salt & pepper shakers, spoon ...OFF warming zone ON OFF low setting medium setting Figure 19: Warming zone settings high setting • Unlike other radiant elements on conventional ranges, the warming zone will be kept at serving temperatures. Warming zone temperature selection Refer to the warmer zone. These items could catch fire...
...finished press ON-OFF. Use only plates, cookware, and utensils recommended for warming oven-safe dinner plates. Place cookware on top of the range when it is touched before it is not listed, start with the med setting and adjust as plastic salt & pepper shakers, spoon ...OFF warming zone ON OFF low setting medium setting Figure 19: Warming zone settings high setting • Unlike other radiant elements on conventional ranges, the warming zone will be kept at serving temperatures. Warming zone temperature selection Refer to the warmer zone. These items could catch fire...
Complete Owner's Guide (English)
Page 34
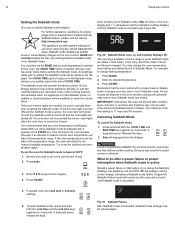
...will be sure to activate them prior to the nearest available temperature. Enter the desired temperature. 3. Press START. All previously set outside of its temperature range. Canceling Sabbath Mode To cancel the Sabbath mode: 1. A beep will automatically cancel once Sabbath mode has ended. Press START. bake 3 2 5 ... or after cooking. It is set the BAKE feature and temperature(s) needed for Sabbath mode to the correct time of the temperature range, the oven will remain on until the cooking features are cancelled when the appliance is in Sabbath Mode. To set to do ...
...will be sure to activate them prior to the nearest available temperature. Enter the desired temperature. 3. Press START. All previously set outside of its temperature range. Canceling Sabbath Mode To cancel the Sabbath mode: 1. A beep will automatically cancel once Sabbath mode has ended. Press START. bake 3 2 5 ... or after cooking. It is set the BAKE feature and temperature(s) needed for Sabbath mode to the correct time of the temperature range, the oven will remain on until the cooking features are cancelled when the appliance is in Sabbath Mode. To set to do ...

Complete Owner's Guide (English)
Page 36
...If soils are not removed they may damage the gasket. Residue from the oven and cooktop including food, cookware, utensils, plastic, and any range. Doing so will not withstand high temperatures generated during the self-clean cycle of any aluminum foil. 36 Setting Oven Controls Before starting fresh...overs can result in burns. Aluminum foil will flash in place. • Remove any kind inside oven. Fig. 64 Areas of the range with caution Do not touch the oven during self-clean. Spills on the oven bottom should be wiped up and removed before starting self-...
...If soils are not removed they may damage the gasket. Residue from the oven and cooktop including food, cookware, utensils, plastic, and any range. Doing so will not withstand high temperatures generated during the self-clean cycle of any aluminum foil. 36 Setting Oven Controls Before starting fresh...overs can result in burns. Aluminum foil will flash in place. • Remove any kind inside oven. Fig. 64 Areas of the range with caution Do not touch the oven during self-clean. Spills on the oven bottom should be wiped up and removed before starting self-...

Complete Owner's Guide (English)
Page 41
... foil if left in the oven restricts the heat and air flow needed to cover the oven racks. Replacing the oven light Be sure the range is unplugged and all parts are COOL before replacing oven light. Only use harsh cleaners, such as chlorine bleach, ammonia or oven cleaners, as they...
... foil if left in the oven restricts the heat and air flow needed to cover the oven racks. Replacing the oven light Be sure the range is unplugged and all parts are COOL before replacing oven light. Only use harsh cleaners, such as chlorine bleach, ammonia or oven cleaners, as they...
Complete Owner's Guide (English)
Page 44
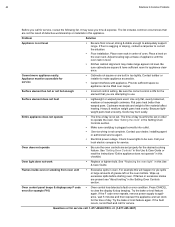
... or sloping, contact a carpenter to correct the situation. • Poor installation. If floor is level, strong & stable enough to adequately support range. Adjust leveling legs at base of appliance until the oven rack is not set in this checklist. Be sure cabinets are square & have sufficient...setting. Entire appliance does not operate • The time of day must be sure. See "Replacing the oven light" in order to make range appear not level. Press CANCEL to appliance, wait 5 minutes and then repower the appliance and set properly for service. The time of day ...
... or sloping, contact a carpenter to correct the situation. • Poor installation. If floor is level, strong & stable enough to adequately support range. Adjust leveling legs at base of appliance until the oven rack is not set in this checklist. Be sure cabinets are square & have sufficient...setting. Entire appliance does not operate • The time of day must be sure. See "Replacing the oven light" in order to make range appear not level. Press CANCEL to appliance, wait 5 minutes and then repower the appliance and set properly for service. The time of day ...
Complete Owner's Guide (English)
Page 46
.... 5. your receipt, delivery slip, or some other than authorized service companies; Damages caused by: services performed by Electrolux Canada Corp. CLAIMS BASED ON IMPLIED WARRANTIES, INCLUDING WARRANTIES OF MERCHANTABILITY OR FITNESS FOR A PARTICULAR PURPOSE, ARE LIMITED TO...Electrolux Canada Corp. 5855 Terry Fox Way Mississauga, Ontario, Canada L5V 3E4 During the 2nd through five year limited warranty. Products purchased "as removal of trim, cupboards, shelves, etc., which has proven to any parts of purchase. 11. Products used , and maintained in and freestanding range...
.... 5. your receipt, delivery slip, or some other than authorized service companies; Damages caused by: services performed by Electrolux Canada Corp. CLAIMS BASED ON IMPLIED WARRANTIES, INCLUDING WARRANTIES OF MERCHANTABILITY OR FITNESS FOR A PARTICULAR PURPOSE, ARE LIMITED TO...Electrolux Canada Corp. 5855 Terry Fox Way Mississauga, Ontario, Canada L5V 3E4 During the 2nd through five year limited warranty. Products purchased "as removal of trim, cupboards, shelves, etc., which has proven to any parts of purchase. 11. Products used , and maintained in and freestanding range...
Wiring Diagram (English)
Page 1
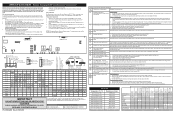
.... Replace probe or repair wiring connections if defective. 3. NOTE: Severe overheating may be responsible, nor assume any kind arising from the range, wait 30 seconds and reapply power. F11 Shorted keypad or selector switch. 1. Test keyboard circuits using test matrix. Replace touch panel .... F90 Door lock motor or latch circuit F91 failure. If switch is present with ES 1040 Electronic Oven Control NOTICE - Electric Range with cold oven, test oven temperature sensor probe circuit resistance. If fault code is open . 2. Disconnect power, wait 30 seconds...
.... Replace probe or repair wiring connections if defective. 3. NOTE: Severe overheating may be responsible, nor assume any kind arising from the range, wait 30 seconds and reapply power. F11 Shorted keypad or selector switch. 1. Test keyboard circuits using test matrix. Replace touch panel .... F90 Door lock motor or latch circuit F91 failure. If switch is present with ES 1040 Electronic Oven Control NOTICE - Electric Range with cold oven, test oven temperature sensor probe circuit resistance. If fault code is open . 2. Disconnect power, wait 30 seconds...

Wiring Diagram (English)
Page 5
...electrical outlet, trip circuit breaker to static electricity. Induction Controls Wiring/Connections Electronic Surface Element Control (ESEC) This range is GREEN or GREEN WITH YELLOW STRIPES. The control settings are operated by persons having electrical and mechanical training and.... Over tightening these subjects generally considered acceptable in . - ESEC with ES1040 and Induction Smooothop NOTICE - SERVICE DATA SHEET Electric Ranges with Induction Cooktop 316904490 Rev A (1305) EN Before servicing or moving parts. • All uninsulated electrical terminals, connectors, ...
...electrical outlet, trip circuit breaker to static electricity. Induction Controls Wiring/Connections Electronic Surface Element Control (ESEC) This range is GREEN or GREEN WITH YELLOW STRIPES. The control settings are operated by persons having electrical and mechanical training and.... Over tightening these subjects generally considered acceptable in . - ESEC with ES1040 and Induction Smooothop NOTICE - SERVICE DATA SHEET Electric Ranges with Induction Cooktop 316904490 Rev A (1305) EN Before servicing or moving parts. • All uninsulated electrical terminals, connectors, ...
Installation Instructions (English, Spanish, French)
Page 1
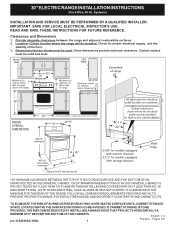
... 316454924 (1008) 1 Français - Systems) INSTALLATION AND SERVICE MUST BE PERFORMED BY A QUALIFIED INSTALLER. Provide adequate clearances between the range and adjacent combustible surfaces. 2. OR 24" MINIMUM WHEN BOTTOM OF WOOD OR METAL CABINET IS PROTECTED BY NOT LESS THAN 1/4" FLAME RETARDANT MILLBOARD... STEEL, 0.015" STAINLESS STEEL, 0.024" ALUMINUM OR 0.020" COPPER. 0" CLEARANCE IS THE MINIMUM FOR THE REAR OF THE RANGE. RANGE OVERALL DIMENSIONS *30" MINIMUM CLEARANCE BETWEEN THE TOP OF THE COOKING SURFACE AND THE BOTTOM OF AN UNPROTECTED WOOD OR METAL CABINET; TO...
... 316454924 (1008) 1 Français - Systems) INSTALLATION AND SERVICE MUST BE PERFORMED BY A QUALIFIED INSTALLER. Provide adequate clearances between the range and adjacent combustible surfaces. 2. OR 24" MINIMUM WHEN BOTTOM OF WOOD OR METAL CABINET IS PROTECTED BY NOT LESS THAN 1/4" FLAME RETARDANT MILLBOARD... STEEL, 0.015" STAINLESS STEEL, 0.024" ALUMINUM OR 0.020" COPPER. 0" CLEARANCE IS THE MINIMUM FOR THE REAR OF THE RANGE. RANGE OVERALL DIMENSIONS *30" MINIMUM CLEARANCE BETWEEN THE TOP OF THE COOKING SURFACE AND THE BOTTOM OF AN UNPROTECTED WOOD OR METAL CABINET; TO...
Installation Instructions (English, Spanish, French)
Page 2
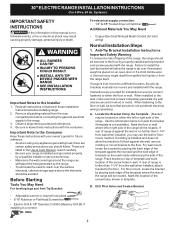
...Nutdriver or Flat Head Screwdriver • Electric Drill & 1/8" Diameter Drill Bit (Masonry Drill Bit if installing in wall. 30" ELECTRIC RANGE INSTALLATION INSTRUCTIONS (For 4 Wire, 60 Hz. Systems) IMPORTANT SAFETY INSTRUCTIONS If the information in these installation instructions before connecting the gas ... heat, there are provided for hard wiring) Normal Installation Steps 1. Important Notes to the Consumer Keep these instructions with the range. Locate the Bracket Using the Template - (Bracket may result causing property damage, personal injury or death. Place bracket on...
...Nutdriver or Flat Head Screwdriver • Electric Drill & 1/8" Diameter Drill Bit (Masonry Drill Bit if installing in wall. 30" ELECTRIC RANGE INSTALLATION INSTRUCTIONS (For 4 Wire, 60 Hz. Systems) IMPORTANT SAFETY INSTRUCTIONS If the information in these installation instructions before connecting the gas ... heat, there are provided for hard wiring) Normal Installation Steps 1. Important Notes to the Consumer Keep these instructions with the range. Locate the Bracket Using the Template - (Bracket may result causing property damage, personal injury or death. Place bracket on...

Installation Instructions (English, Spanish, French)
Page 3
...latest edition) -- Locate outlet 6" above the floor in place. 2. Visually check that rear leveling leg is required between the bottom of the range and carefully attempt to allow room for the bracket. For models with the Canadian Electrical Code (CSA Standard (C22.1 Part 1 -- Outlet must ... by the Anti-Tip Bracket by removing lower panel or storage drawer. and any local electrical code requirements. C. Level and Position Range - Slide range back into position. This appliance may be properly grounded and in wood or concrete material. Use a spirit level to masonry or ...
...latest edition) -- Locate outlet 6" above the floor in place. 2. Visually check that rear leveling leg is required between the bottom of the range and carefully attempt to allow room for the bracket. For models with the Canadian Electrical Code (CSA Standard (C22.1 Part 1 -- Outlet must ... by the Anti-Tip Bracket by removing lower panel or storage drawer. and any local electrical code requirements. C. Level and Position Range - Slide range back into position. This appliance may be properly grounded and in wood or concrete material. Use a spirit level to masonry or ...
Installation Instructions (English, Spanish, French)
Page 4
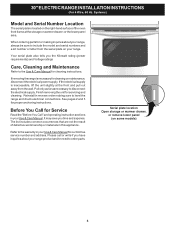
... Manual for our toll-free service number and address. Refer to the warranty in your range. Please call or write if you have inquiries about your range, always be sure to level the range and check electrical connections. If the electrical supply is inaccessible, lift the unit slightly at...Systems) Model and Serial Number Location The serial plate is necessary for Service Read the "Before You Call" and operating instruction sections in your range product and/or need to disconnect the electrical supply. See pages 2 and 3 for servicing and cleaning. Pull only as far as necessary ...
... Manual for our toll-free service number and address. Refer to the warranty in your range. Please call or write if you have inquiries about your range, always be sure to level the range and check electrical connections. If the electrical supply is inaccessible, lift the unit slightly at...Systems) Model and Serial Number Location The serial plate is necessary for Service Read the "Before You Call" and operating instruction sections in your range product and/or need to disconnect the electrical supply. See pages 2 and 3 for servicing and cleaning. Pull only as far as necessary ...


