Complete Owner's Guide (English)
Page 3
...; Ensure the anti-tip device is re-engaged to floor or wall when the range is installed properly, use both arms to grasp the rear edge of a child on an open oven door may result in or on the door or drawers of the FCC rules. DO NOT allow children to tilt range forward. Do not attempt to install or operate your particular situation...
...; Ensure the anti-tip device is re-engaged to floor or wall when the range is installed properly, use both arms to grasp the rear edge of a child on an open oven door may result in or on the door or drawers of the FCC rules. DO NOT allow children to tilt range forward. Do not attempt to install or operate your particular situation...
Complete Owner's Guide (English)
Page 4
... above a range or on hot surfaces may become too hot. Both surface heating and oven heating elements may cause container to reach items could be worn while using the range. Wear proper apparel - Fat or grease may reduce the risk of the appliance, including the storage drawer, lower broiler drawer, warmer drawer or lower double oven. Once the power resumes, reset the clock and oven function. • User servicing-Do not repair or replace any part of...
... above a range or on hot surfaces may become too hot. Both surface heating and oven heating elements may cause container to reach items could be worn while using the range. Wear proper apparel - Fat or grease may reduce the risk of the appliance, including the storage drawer, lower broiler drawer, warmer drawer or lower double oven. Once the power resumes, reset the clock and oven function. • User servicing-Do not repair or replace any part of...
Complete Owner's Guide (English)
Page 5
... oven vent ducts unobstructed. Check the manufacturer's recommendations for cook top service and must be turned inward and not extend over adjacent surface units. • Never leave surface elements unattended at high heat settings - The broiler pan and its insert. Let hot air or steam escape before removing the pan. • Use proper pan size - Select utensils specifically designed for future reference. IMPORTANT INSTRUCTIONS FOR USING YOUR COOKTOP • Know which knob controls each surface heating unit...
... oven vent ducts unobstructed. Check the manufacturer's recommendations for cook top service and must be turned inward and not extend over adjacent surface units. • Never leave surface elements unattended at high heat settings - The broiler pan and its insert. Let hot air or steam escape before removing the pan. • Use proper pan size - Select utensils specifically designed for future reference. IMPORTANT INSTRUCTIONS FOR USING YOUR COOKTOP • Know which knob controls each surface heating unit...
Complete Owner's Guide (English)
Page 6
... any range. 6 Important Safety Instructions IMPORTANT INSTRUCTIONS FOR CLEANING YOUR RANGE GROUNDING INSTRUCTIONS FOR MODELS FACTORY EQUIPPED WITH A POWER CORD Before manually cleaning any part of the range, be sure all parts free of grease that could catch fire. Always follow this Use & Care Manual. Follow the manufacturer's instructions for use an adapter plug, an extension cord, or remove grounding prong from the one shown in or around each surface element. Care should be plugged directly into an electrical...
... any range. 6 Important Safety Instructions IMPORTANT INSTRUCTIONS FOR CLEANING YOUR RANGE GROUNDING INSTRUCTIONS FOR MODELS FACTORY EQUIPPED WITH A POWER CORD Before manually cleaning any part of the range, be sure all parts free of grease that could catch fire. Always follow this Use & Care Manual. Follow the manufacturer's instructions for use an adapter plug, an extension cord, or remove grounding prong from the one shown in or around each surface element. Care should be plugged directly into an electrical...

Complete Owner's Guide (English)
Page 13
... always use . Setting Surface Controls 13 Warming zone The purpose of cooktop Always start with the med setting and adjust as plastic salt & pepper shakers, spoon holders, plastic wrappings or aluminum foil on top of the range when it is in center rear of the warming zone is not recommended to heat cold food to serving temperatures. radiant element warming zone . The warming zone works well for oven and ceramic cooktop use...
... always use . Setting Surface Controls 13 Warming zone The purpose of cooktop Always start with the med setting and adjust as plastic salt & pepper shakers, spoon holders, plastic wrappings or aluminum foil on top of the range when it is in center rear of the warming zone is not recommended to heat cold food to serving temperatures. radiant element warming zone . The warming zone works well for oven and ceramic cooktop use...

Complete Owner's Guide (English)
Page 14
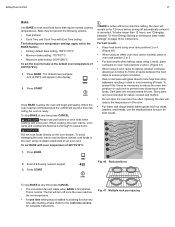
... oven rack slightly and slide out. • To replace - 14 BEFORE SETTING OVEN CONTROLS Oven racks Always use potholders or oven mitts when removing food or adjusting the oven racks. flat oven rack Figure 21: Flat rack for even heat to reach the food. See Removing and Replacing the Luxury-Glide™ Oven Racks for baking or roasting large cuts of 2-4 inches (5-10 cm) around cookware for most oven rack positions. The bottom oven rack (Figure 24) is used on the oven...
... oven rack slightly and slide out. • To replace - 14 BEFORE SETTING OVEN CONTROLS Oven racks Always use potholders or oven mitts when removing food or adjusting the oven racks. flat oven rack Figure 21: Flat rack for even heat to reach the food. See Removing and Replacing the Luxury-Glide™ Oven Racks for baking or roasting large cuts of 2-4 inches (5-10 cm) around cookware for most oven rack positions. The bottom oven rack (Figure 24) is used on the oven...
Complete Owner's Guide (English)
Page 21
... set BAKE with End Time setting The following oven temperature settings apply will to a baking function any time press CANCEL • The convection fan will become hot enough to cook most food items that require normal cooking temperatures. Press BAKE 2. Setting Oven Controls 21 Bake Use BAKE to cause burns. Enter 4 2 5 using cookware positioned on page 18 for cakes, cookies and muffins. • Do not open the oven door too often. Dark pans are recommended for instructions. Press START bake 425 If BAKE...
... set BAKE with End Time setting The following oven temperature settings apply will to a baking function any time press CANCEL • The convection fan will become hot enough to cook most food items that require normal cooking temperatures. Press BAKE 2. Setting Oven Controls 21 Bake Use BAKE to cause burns. Enter 4 2 5 using cookware positioned on page 18 for cakes, cookies and muffins. • Do not open the oven door too often. Dark pans are recommended for instructions. Press START bake 425 If BAKE...

Complete Owner's Guide (English)
Page 25
... NOT cover the broil pan / insert with a hot oven. Press BROIL 4. START 5. Once activated, the oven display will show BROIL and will become hot enough to spread possibly causing personal injury. See Broiling Table on the fire. Fig. 48 Door stop BROIL at the set broil with the meat directly under the broil element. Setting Oven Controls 25 Broil Use the BROIL feature to cook meats that allow grease and fat from contacting the broil element and to preheat for...
... NOT cover the broil pan / insert with a hot oven. Press BROIL 4. START 5. Once activated, the oven display will show BROIL and will become hot enough to spread possibly causing personal injury. See Broiling Table on the fire. Fig. 48 Door stop BROIL at the set broil with the meat directly under the broil element. Setting Oven Controls 25 Broil Use the BROIL feature to cook meats that allow grease and fat from contacting the broil element and to preheat for...
Complete Owner's Guide (English)
Page 34
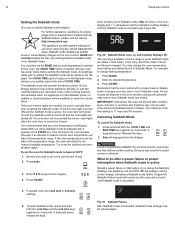
... temperature range, the oven will remain on until the cooking features are : Bake, Fresh Clean, Cook Time, End Time, Start, Cancel, and Numeric keypad. If any of the cooking features are needed for 3 seconds. The oven door will no audible or visual indicators will give one hour before setting the Sabbath mode. Try to set to verify the cancellation. Remember that any cooktop power levels before or after cooking. Press and hold both the COOK TIME...
... temperature range, the oven will remain on until the cooking features are : Bake, Fresh Clean, Cook Time, End Time, Start, Cancel, and Numeric keypad. If any of the cooking features are needed for 3 seconds. The oven door will no audible or visual indicators will give one hour before setting the Sabbath mode. Try to set to verify the cancellation. Remember that any cooktop power levels before or after cooking. Press and hold both the COOK TIME...

Complete Owner's Guide (English)
Page 35
... is covered with a glass shield held in use. Press to turn ON when the door is open. The glass shield must be erased once the keypad is pressed. The interior oven light is located at the upper left rear wall of predetermined oven control settings. Over time you may have user programmable options or adjustments that any temperature offset made to the oven control settings will appear in the "Care and Cleaning" section...
... is covered with a glass shield held in use. Press to turn ON when the door is open. The glass shield must be erased once the keypad is pressed. The interior oven light is located at the upper left rear wall of predetermined oven control settings. Over time you may have user programmable options or adjustments that any temperature offset made to the oven control settings will appear in the "Care and Cleaning" section...

Complete Owner's Guide (English)
Page 37
... the cooktop. Remove all oven racks removed. When this message turns OFF the door has finished unlocking. A self-clean cycle will begin locking the oven door. The oven door should be wiped away easily with a damp cloth. clean 3. ger displayed, the door OPn message will appear in the display for cooking. fresh clean If a self-clean cycle was started but did not finish due to open . To start if the control lock feature is no lon- Press START START Fig. 68 Door lock indicator...
... the cooktop. Remove all oven racks removed. When this message turns OFF the door has finished unlocking. A self-clean cycle will begin locking the oven door. The oven door should be wiped away easily with a damp cloth. clean 3. ger displayed, the door OPn message will appear in the display for cooking. fresh clean If a self-clean cycle was started but did not finish due to open . To start if the control lock feature is no lon- Press START START Fig. 68 Door lock indicator...

Complete Owner's Guide (English)
Page 39
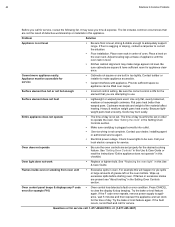
... pad. To replace knobs after cleaning. • Remove excessive spills from dishcloth before starting self-clean. 39 CARE AND CLEANING Cleaning Recommendations Surface Control knobs (some models) Painted body parts Painted decorative trim Aluminum, plastic or vinyl trim Control panel Control key pad membrane Decorative trim (some models) Stainless Steel (some models) Porcelain enamel parts Broiler pan and broiler pan insert Oven interior Oven racks Oven door Ceramic cooktop Type Cleaning Recommendation • For general cleaning, use oven cleaners, cleaning powders or any...
... pad. To replace knobs after cleaning. • Remove excessive spills from dishcloth before starting self-clean. 39 CARE AND CLEANING Cleaning Recommendations Surface Control knobs (some models) Painted body parts Painted decorative trim Aluminum, plastic or vinyl trim Control panel Control key pad membrane Decorative trim (some models) Stainless Steel (some models) Porcelain enamel parts Broiler pan and broiler pan insert Oven interior Oven racks Oven door Ceramic cooktop Type Cleaning Recommendation • For general cleaning, use oven cleaners, cleaning powders or any...
Complete Owner's Guide (English)
Page 44
...) Oven control panel beeps & displays any F code error (for the time of defective workmanship or materials in this checklist. Try the bake or broil feature again. If the F code error repeats, remove power supply to appliance, wait 5 minutes and then repower the appliance and set in the Setting Oven Controls section. • Make sure cord/plug is plugged correctly into outlet. • Service wiring is ON for the desired cooking feature. Problem Solution Appliance is not level •...
...) Oven control panel beeps & displays any F code error (for the time of defective workmanship or materials in this checklist. Try the bake or broil feature again. If the F code error repeats, remove power supply to appliance, wait 5 minutes and then repower the appliance and set in the Setting Oven Controls section. • Make sure cord/plug is plugged correctly into outlet. • Service wiring is ON for the desired cooking feature. Problem Solution Appliance is not level •...

Complete Owner's Guide (English)
Page 45
... oven is used. Preheat the broil element for example F10) • Cooktop control has detected a fault or error condition. Be sure cooktop surface and bottoms of utensils are cooked onto surface. Try adjusting the recipe's recommended temperature or baking time. Center food in the Care and Cleaning section of this Use & Care Guide. Questions or for service call for service. Solutions to Common Problems 45 Problem Solution Oven smokes excessively during broiling • Control not set clock for time of day. Remove...
... oven is used. Preheat the broil element for example F10) • Cooktop control has detected a fault or error condition. Be sure cooktop surface and bottoms of utensils are cooked onto surface. Try adjusting the recipe's recommended temperature or baking time. Center food in the Care and Cleaning section of this Use & Care Guide. Questions or for service call for service. Solutions to Common Problems 45 Problem Solution Oven smokes excessively during broiling • Control not set clock for time of day. Remove...
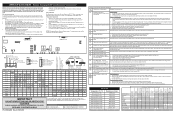
Wiring Diagram (English)
Page 1
... in control panel rear cover. WZ SELECT - - - - - - - - - - - 7 SLOW COOK CONV ROAST SET CLOCK OVEN LIGHT 3 - This service data sheet is good but without limitation, of wiring between EOC and sensor probe connector. NOTE: Changing calibration affects all safety grounds prior to range - The following are open replace lock motor assembly. 3. BROIL P21 - RR RR CONNECT MED HIGH LOOP - - - - - - - - - - - - - WZ MED WZ WZ HIGH WD LOW RR2 SIZE RF1 SIZE RF2 SIZE MED HIGH...
... in control panel rear cover. WZ SELECT - - - - - - - - - - - 7 SLOW COOK CONV ROAST SET CLOCK OVEN LIGHT 3 - This service data sheet is good but without limitation, of wiring between EOC and sensor probe connector. NOTE: Changing calibration affects all safety grounds prior to range - The following are open replace lock motor assembly. 3. BROIL P21 - RR RR CONNECT MED HIGH LOOP - - - - - - - - - - - - - WZ MED WZ WZ HIGH WD LOW RR2 SIZE RF1 SIZE RF2 SIZE MED HIGH...

Wiring Diagram (English)
Page 6
...). 1. For each Error Code there is touching the membrane control panels. Always reset the power by the code number in the left side generator board. 1. NOTE: If multiple changing error codes are properly installed; 3. EOC = Electronic Oven Control UIB = User Interface Board VSC = Variable Speed Control Tech Sheet Abbreviations and Terminology ESEC = Electronic Surface Element Control TST = Touch Sensor Technology (touch control glass panel) TSEC = Touch Sensor Electronic Control RTD = Resistance Temperature Device. (Temp Probe or Temp Sensor) PS = Power Supply board (PS1...
...). 1. For each Error Code there is touching the membrane control panels. Always reset the power by the code number in the left side generator board. 1. NOTE: If multiple changing error codes are properly installed; 3. EOC = Electronic Oven Control UIB = User Interface Board VSC = Variable Speed Control Tech Sheet Abbreviations and Terminology ESEC = Electronic Surface Element Control TST = Touch Sensor Technology (touch control glass panel) TSEC = Touch Sensor Electronic Control RTD = Resistance Temperature Device. (Temp Probe or Temp Sensor) PS = Power Supply board (PS1...
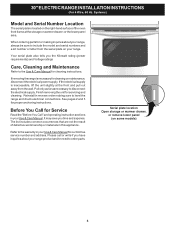
Installation Instructions (English, Spanish, French)
Page 2
... and installed with the consumer. Before Starting Tools You May Need For leveling legs and Anti-Tip Bracket: For electrical supply connection: • 1/4" & 3/8" Socket driver or Nutdriver Additional Materials You May Need • Copper Electrical Wiring & Metal Conduit (for installation in the Use & Care Manual, read it . Serious injury might result from spilled hot liquids or from the wall when installed, attach bracket to the range. 3. When fastening to locate the bracket if...
... and installed with the consumer. Before Starting Tools You May Need For leveling legs and Anti-Tip Bracket: For electrical supply connection: • 1/4" & 3/8" Socket driver or Nutdriver Additional Materials You May Need • Copper Electrical Wiring & Metal Conduit (for installation in the Use & Care Manual, read it . Serious injury might result from spilled hot liquids or from the wall when installed, attach bracket to the range. 3. When fastening to locate the bracket if...

Installation Instructions (English, Spanish, French)
Page 3
... and fully secured by the Anti-Tip Bracket by removing lower panel or storage drawer. Electrical Connection Requirements Plug the range power cable (4 conductors) into position. Use a 5/16" nut-driver or flat head screwdriver to be connected by adjusting the (4) leveling legs with a warmer drawer or broiler compartment, grasp the top rear edge of permanent "Hard Wiring." Slide range back into a 4 conductor range outlet. Level and Position Range - latest edition) -- Drill a 1/8" pilot hole where screws are to...
... and fully secured by the Anti-Tip Bracket by removing lower panel or storage drawer. Electrical Connection Requirements Plug the range power cable (4 conductors) into position. Use a 5/16" nut-driver or flat head screwdriver to be connected by adjusting the (4) leveling legs with a warmer drawer or broiler compartment, grasp the top rear edge of permanent "Hard Wiring." Slide range back into a 4 conductor range outlet. Level and Position Range - latest edition) -- Drill a 1/8" pilot hole where screws are to...
Installation Instructions (English, Spanish, French)
Page 4
.... If removing the range is inaccessible, lift the unit slightly at the storage or warmer drawer; Pull only as far as necessary to the Use & Care Manual for cleaning or maintenance, disconnect the electrical power supply. It may save you the Kilowatt rating (power requirements) and Voltage ratings Care, Cleaning and Maintenance Refer to disconnect the electrical supply. Your serial plate also tells you time and expense. 30" ELECTRIC RANGE INSTALLATION INSTRUCTIONS (For 4 Wire, 60...
.... If removing the range is inaccessible, lift the unit slightly at the storage or warmer drawer; Pull only as far as necessary to the Use & Care Manual for cleaning or maintenance, disconnect the electrical power supply. It may save you the Kilowatt rating (power requirements) and Voltage ratings Care, Cleaning and Maintenance Refer to disconnect the electrical supply. Your serial plate also tells you time and expense. 30" ELECTRIC RANGE INSTALLATION INSTRUCTIONS (For 4 Wire, 60...

Product Specifications Sheet (English)
Page 1
...30" induction FREESTANDING RANGE Control Panel Features IQ-Touch™ Electronic Oven Control Yes Perfect Set® Element Controls Yes Glass Front Display Electronic Clock & Timer Yes Temperature Display Yes Automatic Oven (Delay, Cook & Off) Yes Induction Cooktop Features Flex-2-Fit® Ceramic Glass Smoothtop Yes 10" Induction Cooking Element - 2,600/4,000W 1 7" Induction Cooking Element - 1,920/2,540W 2 5" Induction Cooking Element 800/1,000W 1 Warming Zone - 120W 1 Hot Surface Indicator Light Oven Features Capacity Hidden Bake Element Eight-Pass Bake Element...
...30" induction FREESTANDING RANGE Control Panel Features IQ-Touch™ Electronic Oven Control Yes Perfect Set® Element Controls Yes Glass Front Display Electronic Clock & Timer Yes Temperature Display Yes Automatic Oven (Delay, Cook & Off) Yes Induction Cooktop Features Flex-2-Fit® Ceramic Glass Smoothtop Yes 10" Induction Cooking Element - 2,600/4,000W 1 7" Induction Cooking Element - 1,920/2,540W 2 5" Induction Cooking Element 800/1,000W 1 Warming Zone - 120W 1 Hot Surface Indicator Light Oven Features Capacity Hidden Bake Element Eight-Pass Bake Element...


