
Installation Instructions (All Languages)
Page 1
... to each side of the builtin oven. Figure 1 27" and 30" Single Wall Ovens (Double ovens see notes 4 & 5) Min. G English - READ AND SAVE THESE INSTRUCTIONS FOR FUTURE REFERENCE. Your new wall oven has been designed to fit a ...MODEL A B C D 27" (68.6 cm) Wall Oven 30" (76.2 cm) Wall Oven MODEL 27" (68.6 cm) Wall Oven 30" (76.2 cm) Wall Oven 27 (68.6) 30 (76.2) 29 (73.7) 29 (73.7) 245/8 (62.5) 28¼ (71.8) CUTOUT DIMENSIONS AND CABINET WIDTH F G (Min.) H. pages 1-8 Español - NOTES: 1. Minimum required distance is 31" (78.7cm). IMPORTANT: SAVE FOR LOCAL ELECTRICAL...
... to each side of the builtin oven. Figure 1 27" and 30" Single Wall Ovens (Double ovens see notes 4 & 5) Min. G English - READ AND SAVE THESE INSTRUCTIONS FOR FUTURE REFERENCE. Your new wall oven has been designed to fit a ...MODEL A B C D 27" (68.6 cm) Wall Oven 30" (76.2 cm) Wall Oven MODEL 27" (68.6 cm) Wall Oven 30" (76.2 cm) Wall Oven 27 (68.6) 30 (76.2) 29 (73.7) 29 (73.7) 245/8 (62.5) 28¼ (71.8) CUTOUT DIMENSIONS AND CABINET WIDTH F G (Min.) H. pages 1-8 Español - NOTES: 1. Minimum required distance is 31" (78.7cm). IMPORTANT: SAVE FOR LOCAL ELECTRICAL...

Installation Instructions (All Languages)
Page 2
...space provided. Figure 2 27" AND 30" DOUBLE OVENS (Single Ovens see notes 4 & 5) Min. Max. G (Min.) H. Standard Height (**Others, see Figure 1) PRODUCT DIMENSIONS MODEL A B C 27" (68.6 cm) Wall Oven 30" (76.2 cm) Wall Oven 27 (68.6) 507/16 (128.1) 245/8 (62.5) 30 (76.2) 507/16 (128.1) 28... (3.8 cm) Min. wood shim of supporting 300 pounds **4. ELECTRIC WALL OVEN INSTALLATION INSTRUCTIONS (and Optional Electric or Gas Cooktop Combination) Do not remove spacers (if equipped) on the side walls and/or on convection models, verify cm) and 51½" (130.8 cm) you ...
...space provided. Figure 2 27" AND 30" DOUBLE OVENS (Single Ovens see notes 4 & 5) Min. Max. G (Min.) H. Standard Height (**Others, see Figure 1) PRODUCT DIMENSIONS MODEL A B C 27" (68.6 cm) Wall Oven 30" (76.2 cm) Wall Oven 27 (68.6) 507/16 (128.1) 245/8 (62.5) 30 (76.2) 507/16 (128.1) 28... (3.8 cm) Min. wood shim of supporting 300 pounds **4. ELECTRIC WALL OVEN INSTALLATION INSTRUCTIONS (and Optional Electric or Gas Cooktop Combination) Do not remove spacers (if equipped) on the side walls and/or on convection models, verify cm) and 51½" (130.8 cm) you ...

Installation Instructions (All Languages)
Page 3
...amperage. To know the circuit breaker or fuse required by your wall oven for the double wall oven (see the insert sheet included in serious injury or death. 1. Only certain cooktop models may result in electric oven models. Such use your model, see the serial plate to find the wattage consumption and refer... cutout opening, when cutout height exceeds 281/8" (71.4cm) for the single wall oven or 49½" (125.7cm) for warming or heating the room. Be sure to leave these instructions with the National Electrical Code ANSI/NFPA No.70- A time-delay fuse or circuit breaker is...
...amperage. To know the circuit breaker or fuse required by your wall oven for the double wall oven (see the insert sheet included in serious injury or death. 1. Only certain cooktop models may result in electric oven models. Such use your model, see the serial plate to find the wattage consumption and refer... cutout opening, when cutout height exceeds 281/8" (71.4cm) for the single wall oven or 49½" (125.7cm) for warming or heating the room. Be sure to leave these instructions with the National Electrical Code ANSI/NFPA No.70- A time-delay fuse or circuit breaker is...

Installation Instructions (All Languages)
Page 5
...the appliance inward. 5 Push the oven in injury or damage to the unit. 1 Unpack the wall oven. Cabinet Installation IMPORTANT Do not lift the oven by the door handle. On Double Wall Oven: Pull the two handles out to include the model and serial numbers and a lot ...Double Wall Oven Serial Plate Location 5 Slide oven inward leaving 1½" (3.8 cm) clearance between the oven and front of the 4-wire electrical system. (see Figure 5). 4 Pull the armored cable through the neutral (white) wire, the appliance frame MUST NOT be sure to lift or carry the appliance. Single Wall Oven Serial ...
...the appliance inward. 5 Push the oven in injury or damage to the unit. 1 Unpack the wall oven. Cabinet Installation IMPORTANT Do not lift the oven by the door handle. On Double Wall Oven: Pull the two handles out to include the model and serial numbers and a lot ...Double Wall Oven Serial Plate Location 5 Slide oven inward leaving 1½" (3.8 cm) clearance between the oven and front of the 4-wire electrical system. (see Figure 5). 4 Pull the armored cable through the neutral (white) wire, the appliance frame MUST NOT be sure to lift or carry the appliance. Single Wall Oven Serial ...

Installation Instructions (All Languages)
Page 7
...package and cooktop installation instructions for 30" models. 4½" (11.5cm) Max.* * If no cooktop is installed directly over certain built-in ovens are necessary to isolate the unit...models personal injury and (7.5 cm) tipping of the wall oven, the wall oven must be secured to the cabinet (s) by 1" (2.5cm) Use 3/4" (1.9 cm) plywood, installed on two runners, flush with toe plate. Unit will overlap cutout (minimum) edges by mounting brackets. TYPICAL UNDER COUNTER INSTALLATION OF A SINGLE ELECTRIC BUILT-IN OVEN WITH AN ELECTRIC COOKTOP MOUNTED ABOVE 7 ELECTRIC WALL OVEN...
...package and cooktop installation instructions for 30" models. 4½" (11.5cm) Max.* * If no cooktop is installed directly over certain built-in ovens are necessary to isolate the unit...models personal injury and (7.5 cm) tipping of the wall oven, the wall oven must be secured to the cabinet (s) by 1" (2.5cm) Use 3/4" (1.9 cm) plywood, installed on two runners, flush with toe plate. Unit will overlap cutout (minimum) edges by mounting brackets. TYPICAL UNDER COUNTER INSTALLATION OF A SINGLE ELECTRIC BUILT-IN OVEN WITH AN ELECTRIC COOKTOP MOUNTED ABOVE 7 ELECTRIC WALL OVEN...

Installation Instructions (All Languages)
Page 8
Flexible Appliance Conduit Wall Oven Cabinet Cabinet sides or filler panel 5" Max. 6 1/2" Min. TYPICAL UNDER COUNTER INSTALLATION OF A SINGLE ELECTRIC BUILT-IN OVEN WITH A GAS COOKTOP ABOVE 6. Install an oven rack in the lower oven if you should become red. Repeat in the center of ...oven (some models)-When the oven is set for service phone numbers. 8 Remove all items from the oven. If the level indicates that are not the result of the electronic oven controls once more. Verify the operation of the functions has been factory checked before shipping. ELECTRIC WALL OVEN...
Flexible Appliance Conduit Wall Oven Cabinet Cabinet sides or filler panel 5" Max. 6 1/2" Min. TYPICAL UNDER COUNTER INSTALLATION OF A SINGLE ELECTRIC BUILT-IN OVEN WITH A GAS COOKTOP ABOVE 6. Install an oven rack in the lower oven if you should become red. Repeat in the center of ...oven (some models)-When the oven is set for service phone numbers. 8 Remove all items from the oven. If the level indicates that are not the result of the electronic oven controls once more. Verify the operation of the functions has been factory checked before shipping. ELECTRIC WALL OVEN...
Product Specifications Sheet (English)
Page 1
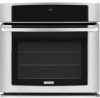
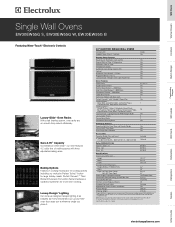
...Microwaves Single Wall Ovens EW30EW55G S, EW30EW55G W, EW30EW55G B Featuring Wave-Touch™ Electronic Controls Luxury-Glide™ Oven Racks With a ball bearing system, oven racks ...09706-0 Specifications Oven Cavity Dimensions - Shipping Weight 218 Lbs. *Single Wall Oven is as beautiful as it . 30" ELECTRIC SINGLE WALL OVENS Configuration Sabbath Mode (Star-K® Certified) Single Yes Control Panel Features Wave-Touch™ Electronic Oven Control Yes...be used beneath Electrolux gas cooktop models EW30GC55G and EW36GC55G; Luxury-Design™ Lighting Our ramp-...
...Microwaves Single Wall Ovens EW30EW55G S, EW30EW55G W, EW30EW55G B Featuring Wave-Touch™ Electronic Controls Luxury-Glide™ Oven Racks With a ball bearing system, oven racks ...09706-0 Specifications Oven Cavity Dimensions - Shipping Weight 218 Lbs. *Single Wall Oven is as beautiful as it . 30" ELECTRIC SINGLE WALL OVENS Configuration Sabbath Mode (Star-K® Certified) Single Yes Control Panel Features Wave-Touch™ Electronic Oven Control Yes...be used beneath Electrolux gas cooktop models EW30GC55G and EW36GC55G; Luxury-Design™ Lighting Our ramp-...
Product Specifications Sheet (English)
Page 2
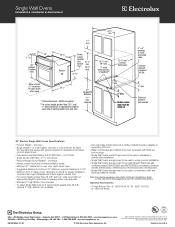
MUST be used beneath Electrolux gas cooktop models EW30GC55G and EW36GC55G; Electrical junction box location 30" Electric Single Wall Ovens Specifications • Product Weight - 200 Lbs. • Single phase 3- and electric cooktop models EW30EC55G, EW36EC55G, EW30CC55G and EW36CC55G. • Single Wall Ovens are approved to improve our products. Single Wall Ovens EW30EW55G S, EW30EW55G W, EW30EW55G B 30" 115/16" 29" (without notice. required 2" min. Printed in combination with any Electrolux Warmer Drawer. rear) 28 5/8" max...
MUST be used beneath Electrolux gas cooktop models EW30GC55G and EW36GC55G; Electrical junction box location 30" Electric Single Wall Ovens Specifications • Product Weight - 200 Lbs. • Single phase 3- and electric cooktop models EW30EC55G, EW36EC55G, EW30CC55G and EW36CC55G. • Single Wall Ovens are approved to improve our products. Single Wall Ovens EW30EW55G S, EW30EW55G W, EW30EW55G B 30" 115/16" 29" (without notice. required 2" min. Printed in combination with any Electrolux Warmer Drawer. rear) 28 5/8" max...
Complete Owner's Guide (English)
Page 2
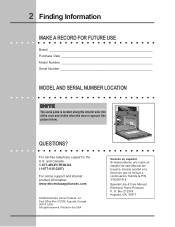
...318205141E. 2 Finding Information MAKE A RECORD FOR FUTURE USE Brand Purchase Date Model Number Serial Number MODEL AND SERIAL NUMBER LOCATION NOTE The serial plate is located along the interior side trim of the oven and visible when the door is opened. QUESTIONS? Post Office Box 212378,... Augusta, Georgia 30917, USA All rights reserved. and Canada: 1-877-4ELECTROLUX (1-877-435-3287) For online support and internet product information: www.electroluxappliances.com ©2008 Electrolux Home Products...
...318205141E. 2 Finding Information MAKE A RECORD FOR FUTURE USE Brand Purchase Date Model Number Serial Number MODEL AND SERIAL NUMBER LOCATION NOTE The serial plate is located along the interior side trim of the oven and visible when the door is opened. QUESTIONS? Post Office Box 212378,... Augusta, Georgia 30917, USA All rights reserved. and Canada: 1-877-4ELECTROLUX (1-877-435-3287) For online support and internet product information: www.electroluxappliances.com ©2008 Electrolux Home Products...
Complete Owner's Guide (English)
Page 3
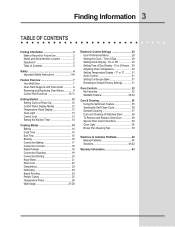
...30 Adjusting Oven Temperature 30 Setting Temperature Display - °F or °C ......... 31 Audio Control 31 Setting Continuous Bake 31 Resetting to Common Problems 40 Baking Problems 40 Solutions 41-42 Warranty Information 43 Finding Information 3 TABLE OF CONTENTS Finding Information 2 Make a Record for Future Use 2 Model...and Cleaning of Contents 3 Safety 4 Important Safety Instructions 4-6 Feature Overview 7 Your Wall Oven 7 Oven Rack Supports and Oven Vents 8 Removing and Replacing Oven Racks 9 Control Pad Functions 10-11 Getting Started 12 Setting Clock at Power Up...
...30 Adjusting Oven Temperature 30 Setting Temperature Display - °F or °C ......... 31 Audio Control 31 Setting Continuous Bake 31 Resetting to Common Problems 40 Baking Problems 40 Solutions 41-42 Warranty Information 43 Finding Information 3 TABLE OF CONTENTS Finding Information 2 Make a Record for Future Use 2 Model...and Cleaning of Contents 3 Safety 4 Important Safety Instructions 4-6 Feature Overview 7 Your Wall Oven 7 Oven Rack Supports and Oven Vents 8 Removing and Replacing Oven Racks 9 Control Pad Functions 10-11 Getting Started 12 Setting Clock at Power Up...
Complete Owner's Guide (English)
Page 4
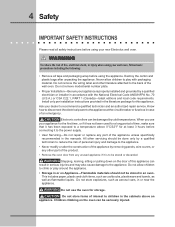
...period of time, make sure that it has been exposed to the back of an emergency. Do not remove model/serial number plate. • Proper Installation-Be sure your appliance is to be damaged by removing panels, wire ...remove the wiring label and other part of the product. • Remove the oven door from any part of fire, electrical shock, or injury when using your wall oven, follow basic precautions including the following: • Remove all safety instructions before using... SAFETY INSTRUCTIONS Please read all tape and packaging wrap before using your new Electrolux wall oven. !
...period of time, make sure that it has been exposed to the back of an emergency. Do not remove model/serial number plate. • Proper Installation-Be sure your appliance is to be damaged by removing panels, wire ...remove the wiring label and other part of the product. • Remove the oven door from any part of fire, electrical shock, or injury when using your wall oven, follow basic precautions including the following: • Remove all safety instructions before using... SAFETY INSTRUCTIONS Please read all tape and packaging wrap before using your new Electrolux wall oven. !
Complete Owner's Guide (English)
Page 5
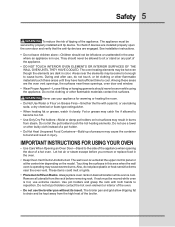
... operating may result in the area where an appliance is vented at the upper control panel or at the center trim depending on the model. Use pot holders and grasp the rack with a pan lid, or use baking soda, a dry chemical or foam-type extinguisher. • When heating fat or ... or heating the room. • Do Not Use Water or Flour on any part of the appliance. • DO NOT TOUCH INTERIOR OVEN ELEMENTS OR INTERIOR SURFACES OF THE WALL OVEN UNTIL THEY HAVE COOLED. Do not use . Do not let clothing or other bulky cloth instead of a pot holder. • Do Not...
... operating may result in the area where an appliance is vented at the upper control panel or at the center trim depending on the model. Use pot holders and grasp the rack with a pan lid, or use baking soda, a dry chemical or foam-type extinguisher. • When heating fat or ... or heating the room. • Do Not Use Water or Flour on any part of the appliance. • DO NOT TOUCH INTERIOR OVEN ELEMENTS OR INTERIOR SURFACES OF THE WALL OVEN UNTIL THEY HAVE COOLED. Do not use . Do not let clothing or other bulky cloth instead of a pot holder. • Do Not...

Complete Owner's Guide (English)
Page 34
...pad to adjust the temperature and then press START TWICE (for the Sabbath and the food may be safely removed from the display and the oven may be turned back on automatically. hi lo pads for the Sabbath feature. 8. SAb will shut off. Press and hold both the HI... hi lo will turn back on until after the Sabbath. The oven may change the oven temperature once baking has started. Press BAKE , the HI + or LO - For further assistance, guidelines for proper usage, and a complete list of models with all normal functions. To turn OFF the Sabbath feature. SF...
...pad to adjust the temperature and then press START TWICE (for the Sabbath and the food may be safely removed from the display and the oven may be turned back on automatically. hi lo pads for the Sabbath feature. 8. SAb will shut off. Press and hold both the HI... hi lo will turn back on until after the Sabbath. The oven may change the oven temperature once baking has started. Press BAKE , the HI + or LO - For further assistance, guidelines for proper usage, and a complete list of models with all normal functions. To turn OFF the Sabbath feature. SF...


