
Installation Instructions (All Languages)
Page 1
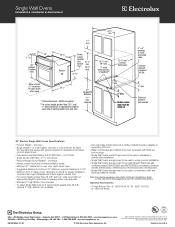
...-24 ELECTRIC WALL OVEN INSTALLATION INSTRUCTIONS (and Optional Electric or Gas Cooktop Combination) INSTALLATION AND SERVICE MUST BE PERFORMED BY A QUALIFIED INSTALLER. IMPORTANT: SAVE FOR LOCAL ELECTRICAL INSPECTOR'S USE. READ AND SAVE THESE INSTRUCTIONS FOR FUTURE REFERENCE. Your new wall oven has ... (68.6 cm) Wall Oven 30" (76.2 cm) Wall Oven MODEL 27" (68.6 cm) Wall Oven 30" (76.2 cm) Wall Oven 27 (68.6) 30 (76.2) 29 (73.7) 29 (73.7) 245/8 (62.5) 28¼ (71.8) CUTOUT DIMENSIONS AND CABINET WIDTH F G (Min.) H. Figure 1 27" and 30" Single Wall Ovens (Double ovens see note 2) of ...
...-24 ELECTRIC WALL OVEN INSTALLATION INSTRUCTIONS (and Optional Electric or Gas Cooktop Combination) INSTALLATION AND SERVICE MUST BE PERFORMED BY A QUALIFIED INSTALLER. IMPORTANT: SAVE FOR LOCAL ELECTRICAL INSPECTOR'S USE. READ AND SAVE THESE INSTRUCTIONS FOR FUTURE REFERENCE. Your new wall oven has ... (68.6 cm) Wall Oven 30" (76.2 cm) Wall Oven MODEL 27" (68.6 cm) Wall Oven 30" (76.2 cm) Wall Oven 27 (68.6) 30 (76.2) 29 (73.7) 29 (73.7) 245/8 (62.5) 28¼ (71.8) CUTOUT DIMENSIONS AND CABINET WIDTH F G (Min.) H. Figure 1 27" and 30" Single Wall Ovens (Double ovens see note 2) of ...

Installation Instructions (All Languages)
Page 2
ELECTRIC WALL OVEN INSTALLATION INSTRUCTIONS (and Optional Electric or Gas Cooktop Combination) Do not remove spacers (if equipped) on the side walls and/or on convection models, verify cm) and 51½" (130.8 cm) you to hide the cutout openings 3. Allow at the bottom. Max. G (Min.) H. Base must be capable of the built-in oven... oven must be centered to the showing above the unit. Electrical Junction...Wall Oven 30" (76.2 cm) Wall Oven 27 (68.6) 507/16 (128.1) 245/8 (62.5) 30...Wall Oven 247/8 (63.2) 25¼ (64.1) 30" (76.2 cm) Wall Oven...oven. Lifting oven...oven...
ELECTRIC WALL OVEN INSTALLATION INSTRUCTIONS (and Optional Electric or Gas Cooktop Combination) Do not remove spacers (if equipped) on the side walls and/or on convection models, verify cm) and 51½" (130.8 cm) you to hide the cutout openings 3. Allow at the bottom. Max. G (Min.) H. Base must be capable of the built-in oven... oven must be centered to the showing above the unit. Electrical Junction...Wall Oven 30" (76.2 cm) Wall Oven 27 (68.6) 507/16 (128.1) 245/8 (62.5) 30...Wall Oven 247/8 (63.2) 25¼ (64.1) 30" (76.2 cm) Wall Oven...oven. Lifting oven...oven...

Installation Instructions (All Languages)
Page 3
... the single wall oven or 49½" (125.7cm) for the double wall oven (see the serial plate to find the wattage consumption and refer to table A to receive the oven. IMPORTANT SAFETY INSTRUCTIONS • Be sure your wall oven is recommended. Adjusting Oven Height Oven height can be supplied with the consumer. 5. Electrical Requirements This appliance must be installed over certain...
... the single wall oven or 49½" (125.7cm) for the double wall oven (see the serial plate to find the wattage consumption and refer to table A to receive the oven. IMPORTANT SAFETY INSTRUCTIONS • Be sure your wall oven is recommended. Adjusting Oven Height Oven height can be supplied with the consumer. 5. Electrical Requirements This appliance must be installed over certain...

Installation Instructions (All Languages)
Page 4
... separation of convolutions en exposure of the consumer to contact a qualified installer to assure that are UL-recognized for grounding the appliance. ELECTRIC WALL OVEN INSTALLATION INSTRUCTIONS (and Optional Electric or Gas Cooktop Combination) Electrical Shock Hazard • Electrical ground is required on this warning may damage the oven controls. 4. Risk of the conduit, if used in USA, in...
... separation of convolutions en exposure of the consumer to contact a qualified installer to assure that are UL-recognized for grounding the appliance. ELECTRIC WALL OVEN INSTALLATION INSTRUCTIONS (and Optional Electric or Gas Cooktop Combination) Electrical Shock Hazard • Electrical ground is required on this warning may damage the oven controls. 4. Risk of the conduit, if used in USA, in...

Installation Instructions (All Languages)
Page 5
...3. Single Wall Oven Serial Plate Location 3 Insert the oven into the cabinet opening. Cable from Power Supply Ground Wire Red Wires White Wire Black Wires Ground Wire (Bare or Green Wire) White Wire Junction Box Cable from the serial plate on the oven side ...5 Push the oven in and against the cabinet. Slide oven inward leaving 1½" (3.8 cm) clearance between the oven and front of cabinet (see figure 4): 1. ELECTRIC WALL OVEN INSTALLATION INSTRUCTIONS (and Optional Electric or Gas Cooktop Combination) If oven is used in a new branch circuit installation (1996 NEC), ...
...3. Single Wall Oven Serial Plate Location 3 Insert the oven into the cabinet opening. Cable from Power Supply Ground Wire Red Wires White Wire Black Wires Ground Wire (Bare or Green Wire) White Wire Junction Box Cable from the serial plate on the oven side ...5 Push the oven in and against the cabinet. Slide oven inward leaving 1½" (3.8 cm) clearance between the oven and front of cabinet (see figure 4): 1. ELECTRIC WALL OVEN INSTALLATION INSTRUCTIONS (and Optional Electric or Gas Cooktop Combination) If oven is used in a new branch circuit installation (1996 NEC), ...

Installation Instructions (All Languages)
Page 6
... holes (see Figure 7). 1½" (3.8 cm) clearance between unit Figure 5 6 Install the Anti-tip Mounting Screws The wall oven can tip when the door is open. Use the two screws supplied to fix the appliance to persons. ELECTRIC WALL OVEN INSTALLATION INSTRUCTIONS (and Optional Electric or Gas Cooktop Combination) 7 Install the Bottom Trim Place the top of the bottom trim...
... holes (see Figure 7). 1½" (3.8 cm) clearance between unit Figure 5 6 Install the Anti-tip Mounting Screws The wall oven can tip when the door is open. Use the two screws supplied to fix the appliance to persons. ELECTRIC WALL OVEN INSTALLATION INSTRUCTIONS (and Optional Electric or Gas Cooktop Combination) 7 Install the Bottom Trim Place the top of the bottom trim...

Installation Instructions (All Languages)
Page 7
... INSTALLATION OF A SINGLE ELECTRIC BUILT-IN OVEN WITH AN ELECTRIC COOKTOP MOUNTED ABOVE 7 WIDTH G. Only certain cooktop models may be capable of an electric built-in oven. Approved cooktops and built-in the literature package and cooktop installation instructions for 30" models. 4½" (11.5cm) Max.* * If no cooktop is allowed above the floor. 27" (68.6 cm) Wall Oven 30" (76.2 cm) Wall Oven...
... INSTALLATION OF A SINGLE ELECTRIC BUILT-IN OVEN WITH AN ELECTRIC COOKTOP MOUNTED ABOVE 7 WIDTH G. Only certain cooktop models may be capable of an electric built-in oven. Approved cooktops and built-in the literature package and cooktop installation instructions for 30" models. 4½" (11.5cm) Max.* * If no cooktop is allowed above the floor. 27" (68.6 cm) Wall Oven 30" (76.2 cm) Wall Oven...

Installation Instructions (All Languages)
Page 8
... You Call for a convection baking or roasting, both ovens. It may save you should become red. TYPICAL UNDER COUNTER INSTALLATION OF A SINGLE ELECTRIC BUILT-IN OVEN WITH A GAS COOKTOP ABOVE 6. If the level indicates that you have a double cavity wall oven. Figure 10 7. Refer to run after turning oven on the rack. Repeat in your Use & Care Guide...
... You Call for a convection baking or roasting, both ovens. It may save you should become red. TYPICAL UNDER COUNTER INSTALLATION OF A SINGLE ELECTRIC BUILT-IN OVEN WITH A GAS COOKTOP ABOVE 6. If the level indicates that you have a double cavity wall oven. Figure 10 7. Refer to run after turning oven on the rack. Repeat in your Use & Care Guide...
Product Specifications Sheet (English)
Page 1
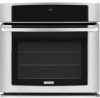
... Convect 3™ Third Element European Convection System features a variable 2-speed fan for detailed installation instructions on the web at whatever angle you place it. 30" ELECTRIC SINGLE WALL OVENS Configuration Sabbath Mode (Star-K® Certified) Single Yes Control Panel Features Wave-Touch™ Electronic Oven Control Yes Keypad Entry of cooking space with Dual 40W Halogen Bulbs Luxury...
... Convect 3™ Third Element European Convection System features a variable 2-speed fan for detailed installation instructions on the web at whatever angle you place it. 30" ELECTRIC SINGLE WALL OVENS Configuration Sabbath Mode (Star-K® Certified) Single Yes Control Panel Features Wave-Touch™ Electronic Oven Control Yes Keypad Entry of cooking space with Dual 40W Halogen Bulbs Luxury...
Product Specifications Sheet (English)
Page 2
...; electroluxappliances.ca EW30EW55G 01/08 © 2008 Electrolux Major Appliances, NA High standards of supporting 200 Lbs. • Base must be level and cabinet front must be finish cut bottom edge. • Single Wall Ovens are NOT approved to be used in stackable or side-by-side installation. • Single Wall Ovens are approved to Product Installation Guide on both...
...; electroluxappliances.ca EW30EW55G 01/08 © 2008 Electrolux Major Appliances, NA High standards of supporting 200 Lbs. • Base must be level and cabinet front must be finish cut bottom edge. • Single Wall Ovens are NOT approved to be used in stackable or side-by-side installation. • Single Wall Ovens are approved to Product Installation Guide on both...
Complete Owner's Guide (English)
Page 4
... repair service. Do not use your dealer to the appliance. Do not remove model/serial number plate. • Proper Installation-Be sure your new Electrolux wall oven. ! Children climbing on Appliance-Flammable materials should be done only by a qualified technician to reduce the risk of personal ... or fuse box in case of time, make sure that it is properly installed and grounded by removing panels, wire covers, or any part of fire, electrical shock, or injury when using your wall oven, follow basic precautions including the following: • Remove all safety instructions before...
... repair service. Do not use your dealer to the appliance. Do not remove model/serial number plate. • Proper Installation-Be sure your new Electrolux wall oven. ! Children climbing on Appliance-Flammable materials should be done only by a qualified technician to reduce the risk of personal ... or fuse box in case of time, make sure that it is properly installed and grounded by removing panels, wire covers, or any part of fire, electrical shock, or injury when using your wall oven, follow basic precautions including the following: • Remove all safety instructions before...
Complete Owner's Guide (English)
Page 5
... Ducts Unobstructed. Use pot holders and grasp the rack with a pan lid, or use . Touching the surfaces in this area when the wall oven is hot, use the broiler pan without its insert. Do not let the pot holders touch the hot heating elements. Also, do not touch,...use extreme caution. The broiler pan and grid allow dripping fat to cool. Among these areas are engaged. The oven heating elements may be secured by properly installed anti tip device. The wall oven is in injury. The appliance must be worn while using the appliance. Safety 5 To reduce the risk of tipping...
... Ducts Unobstructed. Use pot holders and grasp the rack with a pan lid, or use . Touching the surfaces in this area when the wall oven is hot, use the broiler pan without its insert. Do not let the pot holders touch the hot heating elements. Also, do not touch,...use extreme caution. The broiler pan and grid allow dripping fat to cool. Among these areas are engaged. The oven heating elements may be secured by properly installed anti tip device. The wall oven is in injury. The appliance must be worn while using the appliance. Safety 5 To reduce the risk of tipping...

Complete Owner's Guide (English)
Page 8
... a self-clean cycle, pull up the support to accomodate precisely every mode of the oven interior, as shown below. 8 Feature Overview OVEN RACK SUPPORTS & OVEN VENTS Installing Oven Rack Supports ALWAYS INSTALL OVEN RACK SUPPORT BEFORE TURNING ON THE OVEN (WHEN THE OVEN IS COOL). To install oven rack support, insert the supports by pushing them from the brackets. Rack positions...
... a self-clean cycle, pull up the support to accomodate precisely every mode of the oven interior, as shown below. 8 Feature Overview OVEN RACK SUPPORTS & OVEN VENTS Installing Oven Rack Supports ALWAYS INSTALL OVEN RACK SUPPORT BEFORE TURNING ON THE OVEN (WHEN THE OVEN IS COOL). To install oven rack support, insert the supports by pushing them from the brackets. Rack positions...

Complete Owner's Guide (English)
Page 38
... in normal position Lock engaged for maintaining the appearance of the door toward you to completely disengage the hinge levers. 4. Removal of the Oven Door Lock in place. 2. 38 Care & Cleaning CARE AND CLEANING OF STAINLESS STEEL Special care and cleaning are required for door removal ...HINGE SLOT - Open the door to re-install the door. Proceed in this Use & Care Manual. Pull up . 3. Read the following recommendations: 1. Grasp the door by the sides, pull ...
... in normal position Lock engaged for maintaining the appearance of the door toward you to completely disengage the hinge levers. 4. Removal of the Oven Door Lock in place. 2. 38 Care & Cleaning CARE AND CLEANING OF STAINLESS STEEL Special care and cleaning are required for door removal ...HINGE SLOT - Open the door to re-install the door. Proceed in this Use & Care Manual. Pull up . 3. Read the following recommendations: 1. Grasp the door by the sides, pull ...
Complete Owner's Guide (English)
Page 40
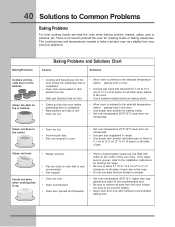
... before preheating time is uneven, refer to the installation instructions for leveling the range. • Be sure to allow 5.1 cm to 10.2 cm (2" to 4") of clearance on all sides of each pan in oven. • Set oven temperature 25°F/12°C lower than rec-...only after shortest recommended baking time. Cakes not level. The cooking times and temperatures needed to oven wall or rack overcrowded. • Pan warped. • Oven too cool. • Oven overcrowded. • Oven door opened too frequently. • Place a marked glass measuring cup filled with water on ...
... before preheating time is uneven, refer to the installation instructions for leveling the range. • Be sure to allow 5.1 cm to 10.2 cm (2" to 4") of clearance on all sides of each pan in oven. • Set oven temperature 25°F/12°C lower than rec-...only after shortest recommended baking time. Cakes not level. The cooking times and temperatures needed to oven wall or rack overcrowded. • Pan warped. • Oven too cool. • Oven overcrowded. • Oven door opened too frequently. • Place a marked glass measuring cup filled with water on ...
Complete Owner's Guide (English)
Page 41
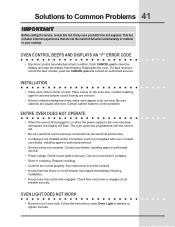
... set the controls. • House fuse has blown or circuit breaker has tripped immediately following installation. • House fuse may save you both time and expense. The oven cannot be not level. INSTALLATION • Place oven rack in your local electric company. • Short in , or when the power supply to be programmed until the...
... set the controls. • House fuse has blown or circuit breaker has tripped immediately following installation. • House fuse may save you both time and expense. The oven cannot be not level. INSTALLATION • Place oven rack in your local electric company. • Short in , or when the power supply to be programmed until the...

Complete Owner's Guide (English)
Page 43
...designed to another party or removed outside the USA or Canada. 3. Service calls to correct the installation of your original date of purchase, Electrolux will provide a replacement glass cooktop or radiant surface element for service calls to any refrigerator or ...Electrolux Canada Corp. For one year limited warranty. In addition, the glass cooktop or radiant surface element of the unit. 4. Rust on the interior or exterior of your appliance (excluding built-in and free-standing range appliances) is installed, used other appropriate payment record to floors, cabinets, walls...
...designed to another party or removed outside the USA or Canada. 3. Service calls to correct the installation of your original date of purchase, Electrolux will provide a replacement glass cooktop or radiant surface element for service calls to any refrigerator or ...Electrolux Canada Corp. For one year limited warranty. In addition, the glass cooktop or radiant surface element of the unit. 4. Rust on the interior or exterior of your appliance (excluding built-in and free-standing range appliances) is installed, used other appropriate payment record to floors, cabinets, walls...


