
Use and Care Manual
Page 3
...Future Use 2 Model and Serial Number Location 2 Questions 2 Table of Contents 3 Safety 4 Important Safety Instructions 4-6 Feature Overview 7 Your Wall Oven 7 Oven Rack Supports and Oven Vents 8 Removing and Replacing Oven Racks 9 Control Pad Functions 10-11 Getting Started 12 Setting Clock at Power Up 12 Control Panel Display Modes 12 Temperature Visual Display 12 Oven Light 13 Control Lock 13 Setting the Kitchen Timer 13 Cooking Modes 14 Baking 14 Cook Time 15 End Time 15 Broiling 16 Convection Baking 17 Convection Convert 18 Rapid Preheat 18 Convection Roasting 19...
...Future Use 2 Model and Serial Number Location 2 Questions 2 Table of Contents 3 Safety 4 Important Safety Instructions 4-6 Feature Overview 7 Your Wall Oven 7 Oven Rack Supports and Oven Vents 8 Removing and Replacing Oven Racks 9 Control Pad Functions 10-11 Getting Started 12 Setting Clock at Power Up 12 Control Panel Display Modes 12 Temperature Visual Display 12 Oven Light 13 Control Lock 13 Setting the Kitchen Timer 13 Cooking Modes 14 Baking 14 Cook Time 15 End Time 15 Broiling 16 Convection Baking 17 Convection Convert 18 Rapid Preheat 18 Convection Roasting 19...

Use and Care Manual
Page 4
... before using your new Electrolux wall oven. ! Destroy the carton and plastic bags after unpacking the appliance. Do not remove the wiring label and other part of the wall oven. Ask your dealer to the power supply. • User Servicing-Do not repair or replace any other literature attached to the appliance. When you use the oven for this appliance can be damaged by removing panels, wire covers, or any part...
... before using your new Electrolux wall oven. ! Destroy the carton and plastic bags after unpacking the appliance. Do not remove the wiring label and other part of the wall oven. Ask your dealer to the power supply. • User Servicing-Do not repair or replace any other literature attached to the appliance. When you use the oven for this appliance can be damaged by removing panels, wire covers, or any part...

Use and Care Manual
Page 5
... be secured by properly installed anti tip device. The oven heating elements may result in burns from the rack before you remove or replace food in color. The wall oven is operating may become too hot. • Use Only Dry Pot holders-Moist or damp pot holders on the model. Always place oven racks in desired location while oven is in injury. The broiler pan and grid allow...
... be secured by properly installed anti tip device. The oven heating elements may result in burns from the rack before you remove or replace food in color. The wall oven is operating may become too hot. • Use Only Dry Pot holders-Moist or damp pot holders on the model. Always place oven racks in desired location while oven is in injury. The broiler pan and grid allow...

Use and Care Manual
Page 6
...'s instructions for the self-clean function to the appliance before removing and replacing the bulb. Also the side rails of the appliance, remove the broiler pan, oven racks and any wall oven. Move birds to accumulate. Do not allow grease to another well ventilated room. The door gasket is extremely sensitive to keep all parts free of some birds is essential for future reference. Care should be removed...
...'s instructions for the self-clean function to the appliance before removing and replacing the bulb. Also the side rails of the appliance, remove the broiler pan, oven racks and any wall oven. Move birds to accumulate. Do not allow grease to another well ventilated room. The door gasket is extremely sensitive to keep all parts free of some birds is essential for future reference. Care should be removed...
Use and Care Manual
Page 10
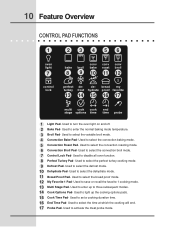
... baking mode temperature. 3 Broil Pad- Used to select the convection baking mode. 5 Convection Roast Pad- Used to select the convection broil mode. 7 Control Lock Pad- Used to set a cooking duration time. 16 End Time Pad- Used to light up to three subsequent modes. 14 Cook Options Pad- Used to select the perfect turkey cooking mode. 9 Defrost Pad- Used to select the dehydrate mode. 11 Bread Proof Pad- Used to activate the meat probe mode. 10 Feature Overview CONTROL PAD FUNCTIONS 1 23 456 oven light 7 bake 8 broil 9 conv bake 10 conv roast...
... baking mode temperature. 3 Broil Pad- Used to select the convection baking mode. 5 Convection Roast Pad- Used to select the convection broil mode. 7 Control Lock Pad- Used to set a cooking duration time. 16 End Time Pad- Used to light up to three subsequent modes. 14 Cook Options Pad- Used to select the perfect turkey cooking mode. 9 Defrost Pad- Used to select the dehydrate mode. 11 Bread Proof Pad- Used to activate the meat probe mode. 10 Feature Overview CONTROL PAD FUNCTIONS 1 23 456 oven light 7 bake 8 broil 9 conv bake 10 conv roast...
Use and Care Manual
Page 11
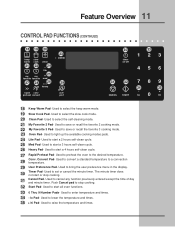
... times. 34 - Used to start a 2 hours self-clean cycle. 25 Med Pad- Used to set or cancel the minute timer. Used to start a 4 hours self-clean cycle. 27 Rapid Preheat Pad- Push Cancel pad to lower the temperature and times. 35 + hi Pad- Used to stop cooking. 31 Cancel Pad- Used to raise the temperature and times. Convert Pad- Used to save or recall the favorite 2 cooking mode. 22 My Favorite 3 Pad- Used to preheat the oven to light...
... times. 34 - Used to start a 2 hours self-clean cycle. 25 Med Pad- Used to set or cancel the minute timer. Used to start a 4 hours self-clean cycle. 27 Rapid Preheat Pad- Push Cancel pad to lower the temperature and times. 35 + hi Pad- Used to stop cooking. 31 Cancel Pad- Used to raise the temperature and times. Convert Pad- Used to save or recall the favorite 2 cooking mode. 22 My Favorite 3 Pad- Used to preheat the oven to light...

Use and Care Manual
Page 12
..., the control will triple beep to prompt you to re-enter a valid time of 12:00. CONTROL PANEL DISPLAY MODES Sleep Mode: Your control will display during this mode. Only the clock will remain in a sleep mode when not in the oven. bake, convection bake, convection roast and perfect turkey. The clock cannot be set the clock (example for each oven. Press 1 3 0 pads to set , the actual temperature will rise as timer, oven light and the control lock. User preferences will...
..., the control will triple beep to prompt you to re-enter a valid time of 12:00. CONTROL PANEL DISPLAY MODES Sleep Mode: Your control will display during this mode. Only the clock will remain in a sleep mode when not in the oven. bake, convection bake, convection roast and perfect turkey. The clock cannot be set the clock (example for each oven. Press 1 3 0 pads to set , the actual temperature will rise as timer, oven light and the control lock. User preferences will...
Use and Care Manual
Page 14
... Common Problems section of this cooking mode. The oven can be set to control your cooking time (read their sections for directions). 7. If using multiple pans or racks, stagger as possible. • If using the bake mode. • During preheat, the 3 elements and the convection fan are used in cycle to quickly heat the oven. • Use only one rack and center the pans as much as shown. Press START . Remove food. To change to the desired temperature. 4. Arrange interior oven racks...
... Common Problems section of this cooking mode. The oven can be set to control your cooking time (read their sections for directions). 7. If using multiple pans or racks, stagger as possible. • If using the bake mode. • During preheat, the 3 elements and the convection fan are used in cycle to quickly heat the oven. • Use only one rack and center the pans as much as shown. Press START . Remove food. To change to the desired temperature. 4. Arrange interior oven racks...

Use and Care Manual
Page 15
.... Use caution with Bake, Convection Bake, Convection Roast, Slow Cook, Keep Warm, Defrost, Dehydrate, Clean and Bread Proof cooking modes. The time remaining will beep when the countdown is finished. The oven will shut off and will always be set to cancel the cook time at anytime. Enter time needed ; 3 0 . 7. END TIME End Time allows the oven to cancel the cook time at anytime. Press START . Enter temperature needed; 4 5 0 . 4. The oven will calculate the remaining time by itself . Press OVEN OVEN to light...
.... Use caution with Bake, Convection Bake, Convection Roast, Slow Cook, Keep Warm, Defrost, Dehydrate, Clean and Bread Proof cooking modes. The time remaining will beep when the countdown is finished. The oven will shut off and will always be set to cancel the cook time at anytime. Enter time needed ; 3 0 . 7. END TIME End Time allows the oven to cancel the cook time at anytime. Press START . Enter temperature needed; 4 5 0 . 4. The oven will calculate the remaining time by itself . Press OVEN OVEN to light...

Use and Care Manual
Page 16
... set a Broil Temperature of the oven. Remove food. Bone In 5 Chicken - 16 Cooking Modes BROILING This mode is best for 2 minutes. • Broil one side until the food is browned; The high heat cooks quickly and gives a rich, brown outer appearance. Arrange interior oven racks. 2. Turn food when the top side is a method of cooking tender cuts of meat by direct heat under the broil element of 550°F: 1. Broiling Times to stop " position before turning or removing...
... set a Broil Temperature of the oven. Remove food. Bone In 5 Chicken - 16 Cooking Modes BROILING This mode is best for 2 minutes. • Broil one side until the food is browned; The high heat cooks quickly and gives a rich, brown outer appearance. Arrange interior oven racks. 2. Turn food when the top side is a method of cooking tender cuts of meat by direct heat under the broil element of 550°F: 1. Broiling Times to stop " position before turning or removing...
Use and Care Manual
Page 17
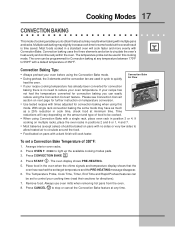
... elements and a fan to light up the available cooking modes pads. 3. Convection Baking Tips: • Always preheat your oven before using the Convection Bake mode. • During preheat, the 3 elements and the convection fan are used in a standard oven will cook faster and more evenly with a dark finish will vary depending on pans with Convection Bake. The Temperature Probe, Cook Time, Timer, End Time and Rapid Preheat features can be baked on pans with a default temperature of 350°F. The oven display shows PRE-HEATING. 5. Multiple rack baking...
... elements and a fan to light up the available cooking modes pads. 3. Convection Baking Tips: • Always preheat your oven before using the Convection Bake mode. • During preheat, the 3 elements and the convection fan are used in a standard oven will cook faster and more evenly with a dark finish will vary depending on pans with Convection Bake. The Temperature Probe, Cook Time, Timer, End Time and Rapid Preheat features can be baked on pans with a default temperature of 350°F. The oven display shows PRE-HEATING. 5. Multiple rack baking...
Use and Care Manual
Page 18
...: To use this feature with a Convection Bake cooking mode. To set properly, this time the oven control will light up to temperature faster than 5. Press BAKE . 3. The cook options items will beep at regular interval until baking had finished. When set a rapid preheat (example is for single rack ONLY. Press CONVECTION BAKE . 3. Bake, Convection Bake and Convection Roast. Changing from a normal bake temperature to light up the available cooking modes pads. 2. The temperature displayed will bring the oven up . 4. Press OVEN OVEN to a convection bake temperature...
...: To use this feature with a Convection Bake cooking mode. To set properly, this time the oven control will light up to temperature faster than 5. Press BAKE . 3. The cook options items will beep at regular interval until baking had finished. When set a rapid preheat (example is for single rack ONLY. Press CONVECTION BAKE . 3. Bake, Convection Bake and Convection Roast. Changing from a normal bake temperature to light up the available cooking modes pads. 2. The temperature displayed will bring the oven up . 4. Press OVEN OVEN to a convection bake temperature...

Use and Care Manual
Page 19
... set to light up ) on the grid in the broiler pan. Convection Roasting Chart Meat Weight Oven Temp Internal Temp Min per lb. The oven can be programmed for directions). 6. The Temperature Probe, Cook Time, Timer, End Time and Rapid Preheat features can be set a Convection Roast Temperature of beef, lamb, park and poultry. Figure 1 Broiler Pan The Convection Roasting gently browns the exterior and seals in this mode when cooking speed is securely seated on the roasting rack. Press OVEN OVEN to control your cooking time...
... set to light up ) on the grid in the broiler pan. Convection Roasting Chart Meat Weight Oven Temp Internal Temp Min per lb. The oven can be programmed for directions). 6. The Temperature Probe, Cook Time, Timer, End Time and Rapid Preheat features can be set a Convection Roast Temperature of beef, lamb, park and poultry. Figure 1 Broiler Pan The Convection Roasting gently browns the exterior and seals in this mode when cooking speed is securely seated on the roasting rack. Press OVEN OVEN to control your cooking time...

Use and Care Manual
Page 22
.... The Slow Cook mode uses the hidden bake element to maintain a low temperature in the oven. 2. Always use a loose or vented type cover to allow foods to turn crisp or brown. • Cook times will not be extended. • Cover the foods to keep them moist or use oven mitts when removing hot pans from the oven. 8. If the oven heat escapes often, the Slow Cook time may need to be necessary when using a single rack, position...
.... The Slow Cook mode uses the hidden bake element to maintain a low temperature in the oven. 2. Always use a loose or vented type cover to allow foods to turn crisp or brown. • Cook times will not be extended. • Cover the foods to keep them moist or use oven mitts when removing hot pans from the oven. 8. If the oven heat escapes often, the Slow Cook time may need to be necessary when using a single rack, position...

Use and Care Manual
Page 23
... stop or cancel the Dehydrate feature at any time. The heat is displayed when active. 5. To set a Defrost: 1. Press START to light up the available cooking modes pads. 3. DEFROSTING This mode uses a fan controlled defrosting to quickly warm your Defrost time (read their sections for directions). 6. Press OVEN OVEN to begin dehydrating. 5. Press START to start the defrosting. Dehydrating is not recommended to use oven mitts when removing hot pans from the bake and the convection element...
... stop or cancel the Dehydrate feature at any time. The heat is displayed when active. 5. To set a Defrost: 1. Press START to light up the available cooking modes pads. 3. DEFROSTING This mode uses a fan controlled defrosting to quickly warm your Defrost time (read their sections for directions). 6. Press OVEN OVEN to begin dehydrating. 5. Press START to start the defrosting. Dehydrating is not recommended to use oven mitts when removing hot pans from the bake and the convection element...
Use and Care Manual
Page 26
The Temperature Probe gets the exact temperature you to start a self-clean, broil or convection broil while the probe is connected. IMPORTANT: 1. Handle the Temperature Probe carefully when inserting and removing it is pushed all the way into the outlet. To prevent the possibility of burns, carefully unplug the Temperature Probe using the numeric pads or just press START to the desired setting using hot pads. Adjust temperature to use . 6. When on the top left hand side...
The Temperature Probe gets the exact temperature you to start a self-clean, broil or convection broil while the probe is connected. IMPORTANT: 1. Handle the Temperature Probe carefully when inserting and removing it is pushed all the way into the outlet. To prevent the possibility of burns, carefully unplug the Temperature Probe using the numeric pads or just press START to the desired setting using hot pads. Adjust temperature to use . 6. When on the top left hand side...

Use and Care Manual
Page 36
... wall oven can become very hot to open . DO NOT force the oven door open door. 3. This can whisk away with the correct time of the oven when opening the oven door after a self-clean cycle remember to allow hot air or steam to escape. Press OVEN OVEN to light up the cook options items. 3. Press CLEAN . 5. Press START . Follow the instructions above cooking temperatures) which eliminate soil completely or reduce it becomes necessary to stop...
... wall oven can become very hot to open . DO NOT force the oven door open door. 3. This can whisk away with the correct time of the oven when opening the oven door after a self-clean cycle remember to allow hot air or steam to escape. Press OVEN OVEN to light up the cook options items. 3. Press CLEAN . 5. Press START . Follow the instructions above cooking temperatures) which eliminate soil completely or reduce it becomes necessary to stop...

Use and Care Manual
Page 39
... touch the bulb. Clean the broiler pan as soon as cooking is opened. To remove the glass shield, pull the back side of the shield toward front of glass shield and remove it . 6. To replace glass shield, proceed in reverse. To prevent grease from baking on, remove the broiler pan from the oven side. 4. Broiler Pan If necessary, use . Care & Cleaning 39 OVEN LIGHT An interior oven light will turn on automatically when the oven door is completed. The glass shield...
... touch the bulb. Clean the broiler pan as soon as cooking is opened. To remove the glass shield, pull the back side of the shield toward front of glass shield and remove it . 6. To replace glass shield, proceed in reverse. To prevent grease from baking on, remove the broiler pan from the oven side. 4. Broiler Pan If necessary, use . Care & Cleaning 39 OVEN LIGHT An interior oven light will turn on automatically when the oven door is completed. The glass shield...

Use and Care Manual
Page 40
... heat too fast. • Allow oven to preheat to preheat the oven for baking. • Open oven door only after shortest recommended baking time. 40 Solutions to oven wall or rack overcrowded. • Pan warped. • Place a marked glass measuring cup filled with water on all sides of the oven rack. The cooking times and temperatures needed to bake a product may vary slightly from the oven except the ones to remove all pans from your previous appliance. BakingProblems Baking Problems...
... heat too fast. • Allow oven to preheat to preheat the oven for baking. • Open oven door only after shortest recommended baking time. 40 Solutions to oven wall or rack overcrowded. • Pan warped. • Place a marked glass measuring cup filled with water on all sides of the oven rack. The cooking times and temperatures needed to bake a product may vary slightly from the oven except the ones to remove all pans from your previous appliance. BakingProblems Baking Problems...

Use and Care Manual
Page 44
... is installed, used, and maintained in accordance with original serial numbers that has been transferred from its original owner to another party or removed outside the USA or Canada. 3. This warranty only applies in the USA, Puerto Rico and Canada. 44 Warranty Information Your appliance is covered by a one year from your original date of purchase, Electrolux will provide a replacement glass cooktop or...
... is installed, used, and maintained in accordance with original serial numbers that has been transferred from its original owner to another party or removed outside the USA or Canada. 3. This warranty only applies in the USA, Puerto Rico and Canada. 44 Warranty Information Your appliance is covered by a one year from your original date of purchase, Electrolux will provide a replacement glass cooktop or...


