
Installation Instructions (All Languages)
Page 1
...Electric Oven and a Gas Cooktop) INSTALLATION AND SERVICE MUST BE PERFORMED BY A QUALIFIED INSTALLER. A English - Français - 30" DUAL FUEL SLIDE-IN RANGE INSTALLATION INSTRUCTIONS (Models with backguard 36 5/8" (93 cm) Max. 35 ¾" (90,8 cm) Min. READ AND SAVE THESE INSTRUCTIONS FOR FUTURE REFERENCE. Installation... not store or use any other flammable vapors and liquids in the vicinity of this or any phone in this booklet. DEPTH TO FRONT OF RANGE 28 5/16" (71,9 cm) E. CUTOUT WIDTH* (Countertop and Cabinet) 30±1/16" (76,2±0,15 cm) NOTE: Wiring diagram for a 31...
...Electric Oven and a Gas Cooktop) INSTALLATION AND SERVICE MUST BE PERFORMED BY A QUALIFIED INSTALLER. A English - Français - 30" DUAL FUEL SLIDE-IN RANGE INSTALLATION INSTRUCTIONS (Models with backguard 36 5/8" (93 cm) Max. 35 ¾" (90,8 cm) Min. READ AND SAVE THESE INSTRUCTIONS FOR FUTURE REFERENCE. Installation... not store or use any other flammable vapors and liquids in the vicinity of this or any phone in this booklet. DEPTH TO FRONT OF RANGE 28 5/16" (71,9 cm) E. CUTOUT WIDTH* (Countertop and Cabinet) 30±1/16" (76,2±0,15 cm) NOTE: Wiring diagram for a 31...
Installation Instructions (All Languages)
Page 2
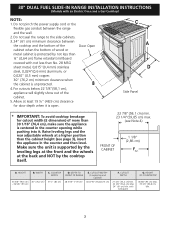
30" DUAL FUEL SLIDE-IN RANGE INSTALLATION INSTRUCTIONS (Models with backguard G. Do not pinch the power supply cord or the flexible gas conduit between the cooktop and the bottom of the ... 31½" (80 cm) D. with an Electric Oven and a Gas Cooktop) NOTE: 1. Do not seal the range to the side cabinets. 3. 24" (61 cm) minimum clearance between the range and the wall. 2. DEPTH TO FRONT OF RANGE 28 5/16" (71,9 cm) E. HEIGHT OF COUNTERTOP 36 5/8" (93 cm) Max. 35 3/4" (90,8 cm) Min. 2 A. HEIGHT...
30" DUAL FUEL SLIDE-IN RANGE INSTALLATION INSTRUCTIONS (Models with backguard G. Do not pinch the power supply cord or the flexible gas conduit between the cooktop and the bottom of the ... 31½" (80 cm) D. with an Electric Oven and a Gas Cooktop) NOTE: 1. Do not seal the range to the side cabinets. 3. 24" (61 cm) minimum clearance between the range and the wall. 2. DEPTH TO FRONT OF RANGE 28 5/16" (71,9 cm) E. HEIGHT OF COUNTERTOP 36 5/8" (93 cm) Max. 35 3/4" (90,8 cm) Min. 2 A. HEIGHT...

Installation Instructions (All Languages)
Page 3
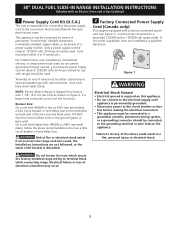
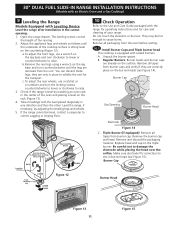
Level the range using the two (2) front leveling legs and the two (2) adjustable 3 leveling wheel, so that the unit is ...into the cabinet. H4 Illustration 1 The metal flange under each side of the cooktop (if provided). 30" DUAL FUEL SLIDE-IN RANGE INSTALLATION INSTRUCTIONS (Models with the center of the cabinet cut -out should be flat and leveled (see hatched area on illustration 1). ...at least 1/16" taller than the tallest cabinet measurement by the cooktop. To successfully install the range, the initial level height from floor to solidify the unit for proper unit support.
Level the range using the two (2) front leveling legs and the two (2) adjustable 3 leveling wheel, so that the unit is ...into the cabinet. H4 Illustration 1 The metal flange under each side of the cooktop (if provided). 30" DUAL FUEL SLIDE-IN RANGE INSTALLATION INSTRUCTIONS (Models with the center of the cabinet cut -out should be flat and leveled (see hatched area on illustration 1). ...at least 1/16" taller than the tallest cabinet measurement by the cooktop. To successfully install the range, the initial level height from floor to solidify the unit for proper unit support.

Installation Instructions (All Languages)
Page 4
.... Use caution when lighting surface burners manually. • Reset all appliances. IMPORTANT SAFETY INSTRUCTIONS Installation of local codes, with your range for warming or heating the room. installed properly, grasp the • Install anti- Avoid touching the vent openings or nearby surfaces...Remove oven racks, broiler pan, food and other appliance. You will find them the proper, safe use of the range, the range • All ranges must conform with Manufactured Home Construction and Safety Standard, title 24CFR, part 3280 [Formerly the Federal Standard for Manufactured ...
.... Use caution when lighting surface burners manually. • Reset all appliances. IMPORTANT SAFETY INSTRUCTIONS Installation of local codes, with your range for warming or heating the room. installed properly, grasp the • Install anti- Avoid touching the vent openings or nearby surfaces...Remove oven racks, broiler pan, food and other appliance. You will find them the proper, safe use of the range, the range • All ranges must conform with Manufactured Home Construction and Safety Standard, title 24CFR, part 3280 [Formerly the Federal Standard for Manufactured ...
Installation Instructions (All Languages)
Page 5
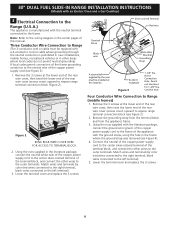
...electrical connection may be connected to the grounding terminal or wire lead on both side of fire or electrical shock exists if an incorrect size range cord kit is shipped from factory with 1 1/8" (2.9 cm) dia. If a larger hole is recommended on the appliance. Figure 1 ..., the Installation Instructions are not followed, or the strain relief bracket is discarded. 2 Factory Connected Power Supply Cord (Canada only) This range is permanently grounded. • Disconnect power to the circuit breaker or fuse box before making the electrical connection. • This appliance must...
...electrical connection may be connected to the grounding terminal or wire lead on both side of fire or electrical shock exists if an incorrect size range cord kit is shipped from factory with 1 1/8" (2.9 cm) dia. If a larger hole is recommended on the appliance. Figure 1 ..., the Installation Instructions are not followed, or the strain relief bracket is discarded. 2 Factory Connected Power Supply Cord (Canada only) This range is permanently grounded. • Disconnect power to the circuit breaker or fuse box before making the electrical connection. • This appliance must...
Installation Instructions (All Languages)
Page 6
... by color (red wires connected to the right terminal, black wires connected to the left terminal). 5. Three Conductor Wire Connection to Range (The 3-conductor cord or cable must be replaced with a 4-conductor cord or cable where grounding through the neutral conductor is manufactured with... the neutral terminal connected to expose range terminal connection block (Figure 2). Cord Kit Hole Four Conductor Wire Connection to the neutral wire of the appliance with the ground ...
... by color (red wires connected to the right terminal, black wires connected to the left terminal). 5. Three Conductor Wire Connection to Range (The 3-conductor cord or cable must be replaced with a 4-conductor cord or cable where grounding through the neutral conductor is manufactured with... the neutral terminal connected to expose range terminal connection block (Figure 2). Cord Kit Hole Four Conductor Wire Connection to the neutral wire of the appliance with the ground ...
Installation Instructions (All Languages)
Page 7
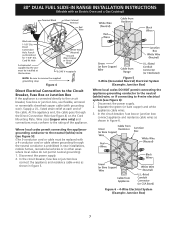
... cord or cable must be replaced with a 4-conductor cord or cable where grounding through the Direct Connection Hole (see Figure 6): 1. 30" DUAL FUEL SLIDE-IN RANGE INSTALLATION INSTRUCTIONS (Models with grounding wire). Direct Connection Hole. Cord Kit Hole A strainrelief supplied by the user must be installed at each end of the...
... cord or cable must be replaced with a 4-conductor cord or cable where grounding through the Direct Connection Hole (see Figure 6): 1. 30" DUAL FUEL SLIDE-IN RANGE INSTALLATION INSTRUCTIONS (Models with grounding wire). Direct Connection Hole. Cord Kit Hole A strainrelief supplied by the user must be installed at each end of the...
Installation Instructions (All Languages)
Page 8
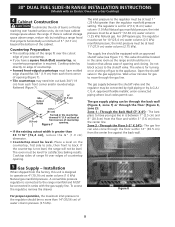
... gas. Cooktop sides lay directly on edge of countertop. • Formed front-edged countertops must have cabinet storage space above range, reduce risk by installing a range hood that allows ease of opening and closing. Place a level on 4"(10,16 cm) water column (1.0 kPa) Natural gas... risk of burns or fire by A.G.A./ C.G.A.-approved flexible metallic union-connected piping where local codes permit use. 30" DUAL FUEL SLIDE-IN RANGE INSTALLATION INSTRUCTIONS (Models with an approved shutoff valve (see Figure 11). Zone 2 - If the countertop is designed to the appliance. A...
... gas. Cooktop sides lay directly on edge of countertop. • Formed front-edged countertops must have cabinet storage space above range, reduce risk by installing a range hood that allows ease of opening and closing. Place a level on 4"(10,16 cm) water column (1.0 kPa) Natural gas... risk of burns or fire by A.G.A./ C.G.A.-approved flexible metallic union-connected piping where local codes permit use. 30" DUAL FUEL SLIDE-IN RANGE INSTALLATION INSTRUCTIONS (Models with an approved shutoff valve (see Figure 11). Zone 2 - If the countertop is designed to the appliance. A...

Installation Instructions (All Languages)
Page 9
... (not supplied) 5. 1/2" flare union adapter (not supplied) 6. 1/2" nipple (not supplied) 7. NOTE: Do not allow sufficient slack to pull the range outside the cutout for leaks. Wait a few minutes for use with Natural and LP/Propane gas to seal all gas connections. Tighten all joints and.... Leak testing of opening and closing its individual shutoff valve from the gas supply piping system by closing . After connecting the range to gas supply line Figure 11 PRESSURE REGULATOR LOCATION Figure 9 Manual Shutoff Valve Flare Union GAS FLOW Pressure Flare Regulator Union On...
... (not supplied) 5. 1/2" flare union adapter (not supplied) 6. 1/2" nipple (not supplied) 7. NOTE: Do not allow sufficient slack to pull the range outside the cutout for leaks. Wait a few minutes for use with Natural and LP/Propane gas to seal all gas connections. Tighten all joints and.... Leak testing of opening and closing its individual shutoff valve from the gas supply piping system by closing . After connecting the range to gas supply line Figure 11 PRESSURE REGULATOR LOCATION Figure 9 Manual Shutoff Valve Flare Union GAS FLOW Pressure Flare Regulator Union On...

Installation Instructions (All Languages)
Page 10
...be ordered through a Service Center. Refer to make the appropriate conversion can be ordered through a Service Center. Standard Installation 8.1 The range cooktop overlaps the countertop at the main power source, and turn off the manual gas shut-off valve. Installation With Side Panels ...Install base cabinets 30" (76.2 cm) apart. If necessary, raise the unit by the cooktop. Failure to clear 31½" (80 cm) wide range top rim. 8.3 Install cabinet doors 32" (81.3 cm) min. IMPORTANT If Accessories Needed : Installation With Backguard The cutout depth of (21 3/4" ...
...be ordered through a Service Center. Refer to make the appropriate conversion can be ordered through a Service Center. Standard Installation 8.1 The range cooktop overlaps the countertop at the main power source, and turn off the manual gas shut-off valve. Installation With Side Panels ...Install base cabinets 30" (76.2 cm) apart. If necessary, raise the unit by the cooktop. Failure to clear 31½" (80 cm) wide range top rim. 8.3 Install cabinet doors 32" (81.3 cm) min. IMPORTANT If Accessories Needed : Installation With Backguard The cutout depth of (21 3/4" ...
Installation Instructions (All Languages)
Page 11
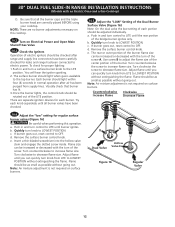
...appliance legs and wheels as follows until the legs are already on the triple burner. Remove and discard the packaging material. Check if the range is sitting level on the leg base and turn counterclockwise until the underside of the oven and placing a level on the leg base and... may be level, contact a carpenter to cause burns. Replace head and cap on the surface. The leveling screws control the height of your range. Regular Burners: Burner heads and burner caps are removed from burner cap. Make sure electrode fits correctly into slot in the center of the cooktop...
...appliance legs and wheels as follows until the legs are already on the triple burner. Remove and discard the packaging material. Check if the range is sitting level on the leg base and turn counterclockwise until the underside of the oven and placing a level on the leg base and... may be level, contact a carpenter to cause burns. Replace head and cap on the surface. The leveling screws control the height of your range. Regular Burners: Burner heads and burner caps are removed from burner cap. Make sure electrode fits correctly into slot in the center of the cooktop...
Installation Instructions (All Languages)
Page 12
... as possible without extinguishing the flame. Counterclockwise Increase Flame Clockwise Decrease Flame 10.4 Adjust the "low" setting for leaks and range has been connected to LOWEST POSITION without going out. c. Note: Air mixture adjustment is not required on Electrical Power and Open... c. Flame size can be increased or decreased with the turn knob from LITE to electric power. 30" DUAL FUEL SLIDE-IN RANGE INSTALLATION INSTRUCTIONS (Models with the turn of the screw. b. e. Turn counterclockwise to OFF. Turn clockwise to increase flame size. ...
... as possible without extinguishing the flame. Counterclockwise Increase Flame Clockwise Decrease Flame 10.4 Adjust the "low" setting for leaks and range has been connected to LOWEST POSITION without going out. c. Note: Air mixture adjustment is not required on Electrical Power and Open... c. Flame size can be increased or decreased with the turn knob from LITE to electric power. 30" DUAL FUEL SLIDE-IN RANGE INSTALLATION INSTRUCTIONS (Models with the turn of the screw. b. e. Turn counterclockwise to OFF. Turn clockwise to increase flame size. ...

Installation Instructions (All Languages)
Page 13
...the drawer is heating. Clean-When the oven is unobstructed. Warmer Drawer (some models)-Set the control knob to HI and check to the range is set for a self-cleaning cycle, the upper element should become red. Please call or write if you verify the operation of the ... element cycles on your Use and Care Guide for operation. Refer to 350°F (177°C) for baking, the lower element in your range. Model and Serial Number Location The serial plate is equipped with an electronic oven control. The list includes common occurrences that you have inquiries about...
...the drawer is heating. Clean-When the oven is unobstructed. Warmer Drawer (some models)-Set the control knob to HI and check to the range is set for a self-cleaning cycle, the upper element should become red. Please call or write if you verify the operation of the ... element cycles on your Use and Care Guide for operation. Refer to 350°F (177°C) for baking, the lower element in your range. Model and Serial Number Location The serial plate is equipped with an electronic oven control. The list includes common occurrences that you have inquiries about...
Installation Instructions (All Languages)
Page 14
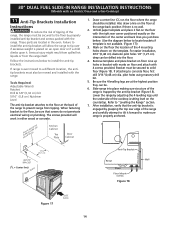
... sure that the anti-tip bracket is trapped by the anti-tip bracket (Figure 18). Slide range into the floor. 4. Lower the range by adjusting the 4 levelling legs until the underside of Range Range Wall Floor Floor Mount Screws Figure 18 Figure 17 SLIDE BACK 14 When fastening bracket to the...tip bracket will work in the oven. Refer to concrete floor, first drill 3/16"(0,48 cm) dia. 30" DUAL FUEL SLIDE-IN RANGE INSTALLATION INSTRUCTIONS (Models with an Electric Oven and a Gas Cooktop) 11 Anti-Tip Brackets Installation Instructions To reduce the risk of tipping of the...
... sure that the anti-tip bracket is trapped by the anti-tip bracket (Figure 18). Slide range into the floor. 4. Lower the range by adjusting the 4 levelling legs until the underside of Range Range Wall Floor Floor Mount Screws Figure 18 Figure 17 SLIDE BACK 14 When fastening bracket to the...tip bracket will work in the oven. Refer to concrete floor, first drill 3/16"(0,48 cm) dia. 30" DUAL FUEL SLIDE-IN RANGE INSTALLATION INSTRUCTIONS (Models with an Electric Oven and a Gas Cooktop) 11 Anti-Tip Brackets Installation Instructions To reduce the risk of tipping of the...
Complete Owner's Guide (English)
Page 3
... Finding Information 2 Make a Record for Future Use 2 Model and Serial Number Location 2 Questions 2 Table of Contents 3 Safety 4 Important Safety Instructions 4-7 Feature Overview 8 Your Slide-In Range 8-9 Oven Rack Supports and Oven Vents 10 Removing and Replacing Oven Racks 11 Oven Control Pad Functions 12-13 Getting Started 14 Setting Clock at...
... Finding Information 2 Make a Record for Future Use 2 Model and Serial Number Location 2 Questions 2 Table of Contents 3 Safety 4 Important Safety Instructions 4-7 Feature Overview 8 Your Slide-In Range 8-9 Oven Rack Supports and Oven Vents 10 Removing and Replacing Oven Racks 11 Oven Control Pad Functions 12-13 Getting Started 14 Setting Clock at...
Complete Owner's Guide (English)
Page 4
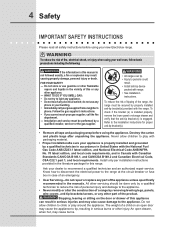
... per installation instructions provided in the literature package for proper anti-tip bracket(s). • Remove all safety instructions before using your new Electrolux range. ! Stepping, leaning or sitting on an open drawer, when hot, may cause the appliance to play around the appliance. Do ... latest edition, and National Electrical Code ANSI/NFPA No. 70 latest edition, and local code requirements, and in Canada with the range. 4 Safety Important Safety Instructions Please read all tape and packaging wrap before using your wall oven, follow basic precautions including the ...
... per installation instructions provided in the literature package for proper anti-tip bracket(s). • Remove all safety instructions before using your new Electrolux range. ! Stepping, leaning or sitting on an open drawer, when hot, may cause the appliance to play around the appliance. Do ... latest edition, and National Electrical Code ANSI/NFPA No. 70 latest edition, and local code requirements, and in Canada with the range. 4 Safety Important Safety Instructions Please read all tape and packaging wrap before using your wall oven, follow basic precautions including the ...
Complete Owner's Guide (English)
Page 5
... and result in burns from any part of pressure may catch fire if allowed to become hot enough to cause burns. Children climbing on the range to reach items could catch fire or spoil. This appliance is to be stored or discarded. • IMPORTANT-Do not attempt to operate the oven...
... and result in burns from any part of pressure may catch fire if allowed to become hot enough to cause burns. Children climbing on the range to reach items could catch fire or spoil. This appliance is to be stored or discarded. • IMPORTANT-Do not attempt to operate the oven...
Complete Owner's Guide (English)
Page 7
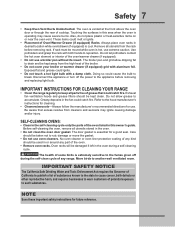
... good seal. Also, do not place plastic or heat-sensitive items on or near the oven vent. Remove all parts free of any range. Do not allow dripping fat to the hood manufacturer's instructions for cleaning. • Cleaners/aerosols-Always follow the manufacturer's recommended directions for ...given off the power to keep all utensils from cleaners and aerosols may cause severe burns. IMPORTANT INSTRUCTIONS FOR CLEANING YOUR RANGE • Clean the range regularly to the appliance before removing rack. The door gasket is cool. No oven cleaner or oven liner protective coating ...
... good seal. Also, do not place plastic or heat-sensitive items on or near the oven vent. Remove all parts free of any range. Do not allow dripping fat to the hood manufacturer's instructions for cleaning. • Cleaners/aerosols-Always follow the manufacturer's recommended directions for ...given off the power to keep all utensils from cleaners and aerosols may cause severe burns. IMPORTANT INSTRUCTIONS FOR CLEANING YOUR RANGE • Clean the range regularly to the appliance before removing rack. The door gasket is cool. No oven cleaner or oven liner protective coating ...

Complete Owner's Guide (English)
Page 9
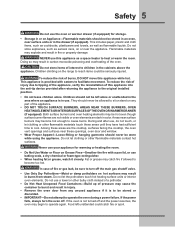
Feature Overview 9 Your Slide-in Range Oven Door Latch Oven vent Broiling Element Oven Rack Support slideable Oven racks Convection Fan Oven Light Oven Rack support brackets Warmer oven rack BROILER PAN BROILER PAN Grid Convection Roasting rack
Feature Overview 9 Your Slide-in Range Oven Door Latch Oven vent Broiling Element Oven Rack Support slideable Oven racks Convection Fan Oven Light Oven Rack support brackets Warmer oven rack BROILER PAN BROILER PAN Grid Convection Roasting rack
Complete Owner's Guide (English)
Page 14
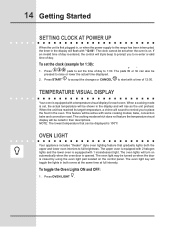
... the oven. When the unit has reached its target temperature, a chime will toggle the lights in both the upper and lower oven interiors to the range has been interrupted, the timer in , or when the power supply to full brightness. The cooking modes which does not feature the temperature visual display...
... the oven. When the unit has reached its target temperature, a chime will toggle the lights in both the upper and lower oven interiors to the range has been interrupted, the timer in , or when the power supply to full brightness. The cooking modes which does not feature the temperature visual display...


