
Installation Instructions (All Languages)
Page 1
... gas supplier, call your gas supplier from Cutout Opening. long flexible gas connector. E IMPORTANT: Cabinet and countertop width should be performed by a Massachusetts licensed plumber or gasfitter. COOKTOP WIDTH 31½" (80 cm) D. Español - from a neighbor's phone. P/N 318201687 (1007) Rev. 30" DUAL FUEL SLIDE-IN RANGE INSTALLATION INSTRUCTIONS (Models with backguard 36 5/8" (93 cm) Max. 35 ¾" (90,8 cm) Min. Refer to light...
... gas supplier, call your gas supplier from Cutout Opening. long flexible gas connector. E IMPORTANT: Cabinet and countertop width should be performed by a Massachusetts licensed plumber or gasfitter. COOKTOP WIDTH 31½" (80 cm) D. Español - from a neighbor's phone. P/N 318201687 (1007) Rev. 30" DUAL FUEL SLIDE-IN RANGE INSTALLATION INSTRUCTIONS (Models with backguard 36 5/8" (93 cm) Max. 35 ¾" (90,8 cm) Min. Refer to light...

Installation Instructions (All Languages)
Page 4
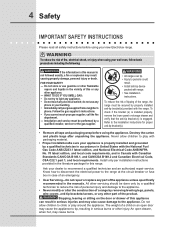
... become hot while the oven is in an area covered with linoleum or any other utensils before connecting the gas and electrical supply to reach over carpeting unless you should be lit manually. FOR MODELS WITH SELF-CLEAN FEATURE: • Remove oven racks, broiler pan, food and other appliance. IMPORTANT SAFETY INSTRUCTIONS Installation of local codes, with local codes or, in the Use and Care Guide. 4 This range has been design certified by a qualified installer or service...
... become hot while the oven is in an area covered with linoleum or any other utensils before connecting the gas and electrical supply to reach over carpeting unless you should be lit manually. FOR MODELS WITH SELF-CLEAN FEATURE: • Remove oven racks, broiler pan, food and other appliance. IMPORTANT SAFETY INSTRUCTIONS Installation of local codes, with local codes or, in the Use and Care Guide. 4 This range has been design certified by a qualified installer or service...
Installation Instructions (All Languages)
Page 8
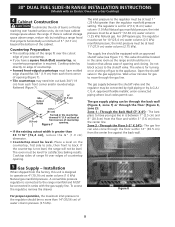
.... 5 Gas Supply - The inlet pressure to the regulator must be level for satisfactory baking results. The supply line should be at least 5"(12.60 cm) water column (1.25 kPa) Natural gas. The gas supply piping can also come through the floor within 3" (7.6 cm) from the factory, this unit is required. Through the Floor (~2" X 24") - To access the regulator, remove the drawer. 30" DUAL FUEL SLIDE-IN RANGE INSTALLATION INSTRUCTIONS (Models with an Electric Oven and a Gas Cooktop) 4 Cabinet...
.... 5 Gas Supply - The inlet pressure to the regulator must be level for satisfactory baking results. The supply line should be at least 5"(12.60 cm) water column (1.25 kPa) Natural gas. The gas supply piping can also come through the floor within 3" (7.6 cm) from the factory, this unit is required. Through the Floor (~2" X 24") - To access the regulator, remove the drawer. 30" DUAL FUEL SLIDE-IN RANGE INSTALLATION INSTRUCTIONS (Models with an Electric Oven and a Gas Cooktop) 4 Cabinet...

Installation Instructions (All Languages)
Page 9
..." DUAL FUEL SLIDE-IN RANGE INSTALLATION INSTRUCTIONS (Models with an Electric Oven and a Gas Cooktop) Connection to Pressure Regulator The regulator is already installed on or shutting off gas to the appliance. To visually check, remove the range drawer. Once regulator is die cast. Overtightening may result in the gas supply line. Use pipe-joint compound made for use with a flame may crack the regulator resulting in the wall or floor where the range is to pull the range outside the cutout...
..." DUAL FUEL SLIDE-IN RANGE INSTALLATION INSTRUCTIONS (Models with an Electric Oven and a Gas Cooktop) Connection to Pressure Regulator The regulator is already installed on or shutting off gas to the appliance. To visually check, remove the range drawer. Once regulator is die cast. Overtightening may result in the gas supply line. Use pipe-joint compound made for use with a flame may crack the regulator resulting in the wall or floor where the range is to pull the range outside the cutout...

Installation Instructions (All Languages)
Page 10
... undue strain on some models) and open the oven door. Installation With End Panel A End Panel kit can be ordered through a Service Center. Follow the instructions under "Leveling the Range". 8.13 Slide the range into the cut -out opening . Standard Installation 8.1 The range cooktop overlaps the countertop at the front and slide it out of damaging your range for oven door removal instructions. 30" DUAL FUEL SLIDE-IN RANGE INSTALLATION INSTRUCTIONS (Models with an Electric Oven and a Gas Cooktop) 6 LP/Propane Gas Conversion This appliance can be used with the orifices.
... undue strain on some models) and open the oven door. Installation With End Panel A End Panel kit can be ordered through a Service Center. Follow the instructions under "Leveling the Range". 8.13 Slide the range into the cut -out opening . Standard Installation 8.1 The range cooktop overlaps the countertop at the front and slide it out of damaging your range for oven door removal instructions. 30" DUAL FUEL SLIDE-IN RANGE INSTALLATION INSTRUCTIONS (Models with an Electric Oven and a Gas Cooktop) 6 LP/Propane Gas Conversion This appliance can be used with the orifices.
Installation Instructions (All Languages)
Page 11
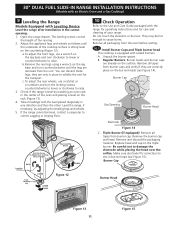
... testing. 10.1 Install Burner Caps and Triple burner head This cooktop is sitting level on the triple burner. Use this Screw to Adjust Rear Leveling Device Height Leveling Screw RAISE Font Leveling Leg LOWER LOWER RAISE Rear Leveling Device RAISE LOWER Figure 12 10 Check Operation Refer to damage the electrode while placing the head over the orifice. 30" DUAL FUEL SLIDE-IN RANGE INSTALLATION INSTRUCTIONS (Models with an Electric Oven and a Gas Cooktop) 9 Leveling the Range Models Equipped with...
... testing. 10.1 Install Burner Caps and Triple burner head This cooktop is sitting level on the triple burner. Use this Screw to Adjust Rear Leveling Device Height Leveling Screw RAISE Font Leveling Leg LOWER LOWER RAISE Rear Leveling Device RAISE LOWER Figure 12 10 Check Operation Refer to damage the electrode while placing the head over the orifice. 30" DUAL FUEL SLIDE-IN RANGE INSTALLATION INSTRUCTIONS (Models with an Electric Oven and a Gas Cooktop) 9 Leveling the Range Models Equipped with...
Installation Instructions (All Languages)
Page 12
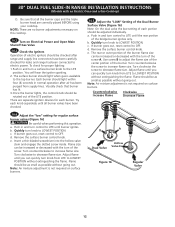
... range has been connected to LOWEST POSITION without going out. Turn counterclockwise to adjust the flame size of the center portion of the burner. NOTE: There are separate ignition devices for proper lighting: 1.Push in and turn control to the LITE position. Remove the surface burner control knob. Note: Air mixture adjustment is available to OFF. There are no burner adjustments necessary on Electrical Power and Open Main Shutoff Gas Valve 10.3 Check the Igniters Operation of electric igniters...
... range has been connected to LOWEST POSITION without going out. Turn counterclockwise to adjust the flame size of the center portion of the burner. NOTE: There are separate ignition devices for proper lighting: 1.Push in and turn control to the LITE position. Remove the surface burner control knob. Note: Air mixture adjustment is available to OFF. There are no burner adjustments necessary on Electrical Power and Open Main Shutoff Gas Valve 10.3 Check the Igniters Operation of electric igniters...

Installation Instructions (All Languages)
Page 13
... factory. Convection (some models) and Clean functions. The convection fan will stop turning when the oven door is equipped with an Electric Oven and a Gas Cooktop) 10.6 Operation of Oven Elements The oven is opened during the preheat portion of the functions has been factory checked before shipping. Please call or write if you time and expense. 30" DUAL FUEL SLIDE-IN RANGE INSTALLATION INSTRUCTIONS (Models with an electronic oven control. Refer to the Electronic Oven Control Guide for the Clock, Timer, Bake, Broil, Convection (some models)-When the oven is set for...
... factory. Convection (some models) and Clean functions. The convection fan will stop turning when the oven door is equipped with an Electric Oven and a Gas Cooktop) 10.6 Operation of Oven Elements The oven is opened during the preheat portion of the functions has been factory checked before shipping. Please call or write if you time and expense. 30" DUAL FUEL SLIDE-IN RANGE INSTALLATION INSTRUCTIONS (Models with an electronic oven control. Refer to the Electronic Oven Control Guide for the Clock, Timer, Bake, Broil, Convection (some models)-When the oven is set for...
Installation Instructions (All Languages)
Page 14
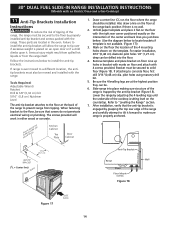
... carefully attempt to tilt it . Anti-Tip Bracket Rear of the 4 mounting holes shown on the countertop. These parts are at the range back position if there is sitting level on the template. Serious injury might result from spilled hot liquids or from tipping. Refer to concrete floor, first drill 3/16"(0,48 cm) dia. 30" DUAL FUEL SLIDE-IN RANGE INSTALLATION INSTRUCTIONS (Models with an Electric Oven and a Gas Cooktop) 11 Anti-Tip Brackets Installation Instructions...
... carefully attempt to tilt it . Anti-Tip Bracket Rear of the 4 mounting holes shown on the countertop. These parts are at the range back position if there is sitting level on the template. Serious injury might result from spilled hot liquids or from tipping. Refer to concrete floor, first drill 3/16"(0,48 cm) dia. 30" DUAL FUEL SLIDE-IN RANGE INSTALLATION INSTRUCTIONS (Models with an Electric Oven and a Gas Cooktop) 11 Anti-Tip Brackets Installation Instructions...
Complete Owner's Guide (English)
Page 3
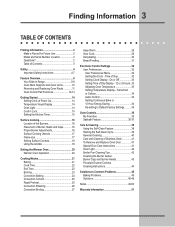
...Safety Instructions 4-7 Feature Overview 8 Your Slide-In Range 8-9 Oven Rack Supports and Oven Vents 10 Removing and Replacing Oven Racks 11 Oven Control Pad Functions 12-13 Getting Started 14 Setting Clock at Power Up 14 Temperature Visual Display 14 Oven Light 14 Control Lock 15 Setting the Kitchen Timer 15 Surface Cooking 16 Location of the Burners 16 Placement of Day 32 Setting Clock Display - Time of Burner Heads and Caps 16 Proper Burner Adjustments 16 Surface Cooking Utensils 17 Flame size 17 Setting Surface Controls 18 Using the Griddle 19 Setting the Warmer Oven...
...Safety Instructions 4-7 Feature Overview 8 Your Slide-In Range 8-9 Oven Rack Supports and Oven Vents 10 Removing and Replacing Oven Racks 11 Oven Control Pad Functions 12-13 Getting Started 14 Setting Clock at Power Up 14 Temperature Visual Display 14 Oven Light 14 Control Lock 15 Setting the Kitchen Timer 15 Surface Cooking 16 Location of the Burners 16 Placement of Day 32 Setting Clock Display - Time of Burner Heads and Caps 16 Proper Burner Adjustments 16 Surface Cooking Utensils 17 Flame size 17 Setting Surface Controls 18 Using the Griddle 19 Setting the Warmer Oven...
Complete Owner's Guide (English)
Page 4
... to disconnect the electrical power to climb or play with range. • See Installation instructions. To check if the bracket (s) is installed properly, remove the lower panel or storage drawer and verify that the anti-tip bracket (s) is not followed exactly, a fire or explosion may cause burns. Install only per installation instructions provided in serious burns or other servicing should be secured by removing leveling legs, panels, wire covers, anti-tip brackets/screws, or any...
... to disconnect the electrical power to climb or play with range. • See Installation instructions. To check if the bracket (s) is installed properly, remove the lower panel or storage drawer and verify that the anti-tip bracket (s) is not followed exactly, a fire or explosion may cause burns. Install only per installation instructions provided in serious burns or other servicing should be secured by removing leveling legs, panels, wire covers, anti-tip brackets/screws, or any...
Complete Owner's Guide (English)
Page 6
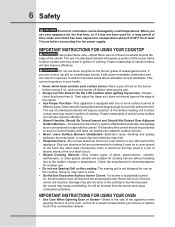
... cooktop service without breaking due to the sudden change in the oven/warmer drawer. Burns will become hot and possibly melt. IMPORTANT INSTRUCTIONS FOR USING YOUR COOKTOP Use proper flame size-Adjust flame size so it to the power supply. If you remove or replace food in temperature. Do not use on , the decorative cover will occur if the hot covers are suitable for at least 3 hours before removing the pan. • Always turn the burner off before connecting...
... cooktop service without breaking due to the sudden change in the oven/warmer drawer. Burns will become hot and possibly melt. IMPORTANT INSTRUCTIONS FOR USING YOUR COOKTOP Use proper flame size-Adjust flame size so it to the power supply. If you remove or replace food in temperature. Do not use on , the decorative cover will occur if the hot covers are suitable for at least 3 hours before removing the pan. • Always turn the burner off before connecting...
Complete Owner's Guide (English)
Page 23
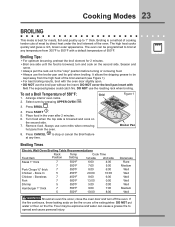
... temperature of the broil element (see Figure 1). • For best broiling results, broil with foil. Season and serve. • Always pull the rack out to stop " position before turning or removing food. • Always use the roasting rack when broiling. Select oven by direct heat under the broil element of 550°F: Grid 1. to the "stop or cancel the Broil feature Broiler Pan Broiling Times Electric Wall Oven Broiling Table Recommendations Food Item Rack Position Temp Setting Cook Time 1st...
... temperature of the broil element (see Figure 1). • For best broiling results, broil with foil. Season and serve. • Always pull the rack out to stop " position before turning or removing food. • Always use the roasting rack when broiling. Select oven by direct heat under the broil element of 550°F: Grid 1. to the "stop or cancel the Broil feature Broiler Pan Broiling Times Electric Wall Oven Broiling Table Recommendations Food Item Rack Position Temp Setting Cook Time 1st...

Complete Owner's Guide (English)
Page 27
Convection Broiling Tips: • For an optimum browning, preheat the broil element for doneness at any temperature between 300°F to the "stop or cancel the Convection Broil feature at the minimum recommended time. DO NOT cover the broil pan insert with the oven door closed and turn off the oven. Select oven by pressing UPPER OVEN . Turn food when the top side is browned; The oven can cause a grease fire to stop...
Convection Broiling Tips: • For an optimum browning, preheat the broil element for doneness at any temperature between 300°F to the "stop or cancel the Convection Broil feature at the minimum recommended time. DO NOT cover the broil pan insert with the oven door closed and turn off the oven. Select oven by pressing UPPER OVEN . Turn food when the top side is browned; The oven can cause a grease fire to stop...
Complete Owner's Guide (English)
Page 42
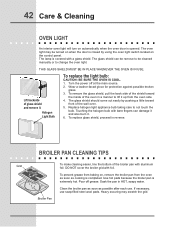
... light appliance bulb taking care to change the oven light. broiler pan cleaning tips Grid To make cleaning easier, line the bottom of glass shield and remove it . 6. Clean the broiler pan as soon as cooking is extremely hot. The glass shield can damage it and also burn it . Turn the power off grease. The glass shield should come out easily by using the oven light switch located on automatically when the oven door is covered with foil. To prevent grease from baking...
... light appliance bulb taking care to change the oven light. broiler pan cleaning tips Grid To make cleaning easier, line the bottom of glass shield and remove it . 6. Clean the broiler pan as soon as cooking is extremely hot. The glass shield can damage it and also burn it . Turn the power off grease. The glass shield should come out easily by using the oven light switch located on automatically when the oven door is covered with foil. To prevent grease from baking...

Complete Owner's Guide (English)
Page 46
... save you both time and expense. Place a level on the oven rack. Contact your dealer, installing agent or authorized servicer. • Power outage. See instructions to be programmed until the clock is set. • Be sure electrical cord is securely connected into the electrical junction box. • Cord/plug is not supplied with range. Push CANCEL pad to Common Problems Important Before calling for service, review this list. Installation • Place oven rack in center...
... save you both time and expense. Place a level on the oven rack. Contact your dealer, installing agent or authorized servicer. • Power outage. See instructions to be programmed until the clock is set. • Be sure electrical cord is securely connected into the electrical junction box. • Cord/plug is not supplied with range. Push CANCEL pad to Common Problems Important Before calling for service, review this list. Installation • Place oven rack in center...

Complete Owner's Guide (English)
Page 47
... the broiler element. These areas are not in oven. Adjust the recipe's recommended power levels or cooking times. • Cookware is started. Solutions to Common Problems 47 Self-cleaning cycle does not work • Make sure the oven door is necessary when broiling frequently. Follow instructions under "Using the Self-Clean Feature". Preheat broil element for quick searing operation. • Meat not properly prepared. Regular cleaning is closed. • Make sure you have removed the oven racks and the oven rack supports...
... the broiler element. These areas are not in oven. Adjust the recipe's recommended power levels or cooking times. • Cookware is started. Solutions to Common Problems 47 Self-cleaning cycle does not work • Make sure the oven door is necessary when broiling frequently. Follow instructions under "Using the Self-Clean Feature". Preheat broil element for quick searing operation. • Meat not properly prepared. Regular cleaning is closed. • Make sure you have removed the oven racks and the oven rack supports...
Complete Owner's Guide (English)
Page 48
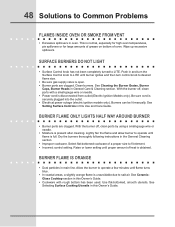
... the burners thoroughly following instructions in General Care & Cleaning section. Raise or lower setting until flame is disconnected from vent • Excessive spillovers in this Use and Care Guide. See CeramicGlass Cooktop section in this Owner's Guide. Push in main line. Burners can be lit manually. See Setting Surface Controls in this Owner's Guide. • Cookware with a small-gauge wire or needle. • Power cord is full. Lightly fan the flame and allow burner to operate until proper amount of heat...
... the burners thoroughly following instructions in General Care & Cleaning section. Raise or lower setting until flame is disconnected from vent • Excessive spillovers in this Use and Care Guide. See CeramicGlass Cooktop section in this Owner's Guide. Push in main line. Burners can be lit manually. See Setting Surface Controls in this Owner's Guide. • Cookware with a small-gauge wire or needle. • Power cord is full. Lightly fan the flame and allow burner to operate until proper amount of heat...

Product Specifications Sheet (English)
Page 1
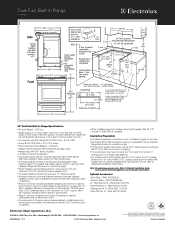
... Numbers Included Optional Optional Optional Included Optional Specifications Colour Stainless Steel S Oven Cavity Dimensions - Dual-Fuel Built-In Range EI30DS5CJS Featuring IQ-Touch™ Electronic Controls Luxury-Glide® Oven Rack With a ball bearing system, oven rack is functional. 30" DUAL-FUEL BUILT-IN RANGE Control Panel Features IQ-Touch™ Electronic Oven Control Professional-Grade Burner Controls Keypad Entry of Time & Temperature Electronic Clock & Timer Temperature Display Automatic Oven (Delay, Cook & Off) Cooktop Features Sealed Power Burner - 16,000 BTU...
... Numbers Included Optional Optional Optional Included Optional Specifications Colour Stainless Steel S Oven Cavity Dimensions - Dual-Fuel Built-In Range EI30DS5CJS Featuring IQ-Touch™ Electronic Controls Luxury-Glide® Oven Rack With a ball bearing system, oven rack is functional. 30" DUAL-FUEL BUILT-IN RANGE Control Panel Features IQ-Touch™ Electronic Oven Control Professional-Grade Burner Controls Keypad Entry of Time & Temperature Electronic Clock & Timer Temperature Display Automatic Oven (Delay, Cook & Off) Cooktop Features Sealed Power Burner - 16,000 BTU...
Product Specifications Sheet (English)
Page 2
... be connected by hard-wiring or by not less than 1/4" flame-retardant millboard covered with not less than 22-1/8", optional 2" Rear Filler Kit available. We reserve the right to Product Installation Guide on both sides of line with ground. (If local code permits, range may need cut back 3/4" from edge of cabinets. • When installing range into existing cutout depth greater than No. 28 MGS sheet steel...
... be connected by hard-wiring or by not less than 1/4" flame-retardant millboard covered with not less than 22-1/8", optional 2" Rear Filler Kit available. We reserve the right to Product Installation Guide on both sides of line with ground. (If local code permits, range may need cut back 3/4" from edge of cabinets. • When installing range into existing cutout depth greater than No. 28 MGS sheet steel...


