Use and Care Manual
Page 1
Use & Care Guide Electric Slide-In Range 318 203 819 (0710) Rev. A
Use & Care Guide Electric Slide-In Range 318 203 819 (0710) Rev. A
Use and Care Manual
Page 3
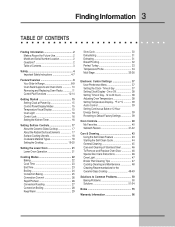
Time of Contents 3 Safety 4 Important Safety Instructions 4-7 Feature Overview 8 Your Slide-In Range 8-9 Oven Rack Supports and Oven Vents 10 Removing and Replacing Oven Racks 11 Control Pad Functions 12-14 Getting Started 15 Setting Clock at Power ... End Time 23 Broiling 24 Convection Baking 25 Convection Convert 26 Rapid Preheat 26 Convection Roasting 27 Convection Broiling 28 Keep Warm 29 Slow Cook 30 Dehydrating 31 Defrosting 31 Bread Proofing 32 Perfect Turkey 33 Temperature Probe 34 Multi Stage 35-36 Electronic Control Settings 37 User Preference Menu 37...
Time of Contents 3 Safety 4 Important Safety Instructions 4-7 Feature Overview 8 Your Slide-In Range 8-9 Oven Rack Supports and Oven Vents 10 Removing and Replacing Oven Racks 11 Control Pad Functions 12-14 Getting Started 15 Setting Clock at Power ... End Time 23 Broiling 24 Convection Baking 25 Convection Convert 26 Rapid Preheat 26 Convection Roasting 27 Convection Broiling 28 Keep Warm 29 Slow Cook 30 Dehydrating 31 Defrosting 31 Bread Proofing 32 Perfect Turkey 33 Temperature Probe 34 Multi Stage 35-36 Electronic Control Settings 37 User Preference Menu 37...
Use and Care Manual
Page 4
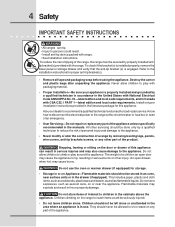
... removing leveling legs, panels, wire covers, anti-tip brackets/screws, or any other injury. Know how to disconnect the electrical power to the range at the circuit breaker or fuse box in case of an emergency. • User Servicing-Do not repair or replace any part of interest to ... cans, on the door or drawer of the product. They should not be secured by a qualified technician in accordance in the United States with National Electrical Code ANSI/NFPA No. 70-latest edition and local code requirements, and in serious burns or other part of this appliance. An open door may...
... removing leveling legs, panels, wire covers, anti-tip brackets/screws, or any other injury. Know how to disconnect the electrical power to the range at the circuit breaker or fuse box in case of an emergency. • User Servicing-Do not repair or replace any part of interest to ... cans, on the door or drawer of the product. They should not be secured by a qualified technician in accordance in the United States with National Electrical Code ANSI/NFPA No. 70-latest edition and local code requirements, and in serious burns or other part of this appliance. An open door may...

Use and Care Manual
Page 7
... or move the gasket. • Oven racks. SELF-CLEANING OVENS: • Clean in the self-cleaning cycle only the parts of any range. Oven racks will be used in the fan could catch fire. Move birds to the appliance before removing and replacing light bulb. The health of... owner's guide. Disconnect the appliance or turn off during a self-cleaning cycle. • Do not use . IMPORTANT INSTRUCTIONS FOR CLEANING YOUR RANGE • Clean the range regularly to warn customers of the oven. • Remove oven racks. Before self-cleaning the oven, remove all parts free of grease that...
... or move the gasket. • Oven racks. SELF-CLEANING OVENS: • Clean in the self-cleaning cycle only the parts of any range. Oven racks will be used in the fan could catch fire. Move birds to the appliance before removing and replacing light bulb. The health of... owner's guide. Disconnect the appliance or turn off during a self-cleaning cycle. • Do not use . IMPORTANT INSTRUCTIONS FOR CLEANING YOUR RANGE • Clean the range regularly to warn customers of the oven. • Remove oven racks. Before self-cleaning the oven, remove all parts free of grease that...
Use and Care Manual
Page 9
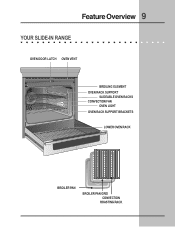
Feature Overview 9 YOUR SLIDE-IN RANGE OVEN DOOR LATCH OVEN VENT BROILING ELEMENT OVEN RACK SUPPORT SLIDEABLE OVEN RACKS CONVECTION FAN OVEN LIGHT OVEN RACK SUPPORT BRACKETS LOWER OVEN RACK BROILER PAN BROILER PAN GRID CONVECTION ROASTING RACK
Feature Overview 9 YOUR SLIDE-IN RANGE OVEN DOOR LATCH OVEN VENT BROILING ELEMENT OVEN RACK SUPPORT SLIDEABLE OVEN RACKS CONVECTION FAN OVEN LIGHT OVEN RACK SUPPORT BRACKETS LOWER OVEN RACK BROILER PAN BROILER PAN GRID CONVECTION ROASTING RACK
Use and Care Manual
Page 15
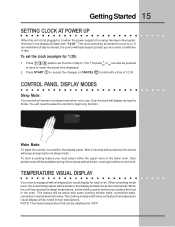
...timers, oven light and the control lock. Wake Mode: To wake the control, touch within the display panel. To start with a temperature visual display for 1:30): 1. TEMPERATURE VISUAL DISPLAY Your oven is on. When a cooking mode is first plugged in, or when the power supply to start a cooking feature you... cannot be active with "12:00". Press START to accept the changes or CANCEL to the range has been interrupted, the timer in the display and will need to wake the control to 1:30. CONTROL PANEL DISPLAY MODES Sleep Mode: Your control will be set the time of day is ...
...timers, oven light and the control lock. Wake Mode: To wake the control, touch within the display panel. To start with a temperature visual display for 1:30): 1. TEMPERATURE VISUAL DISPLAY Your oven is on. When a cooking mode is first plugged in, or when the power supply to start a cooking feature you... cannot be active with "12:00". Press START to accept the changes or CANCEL to the range has been interrupted, the timer in the display and will need to wake the control to 1:30. CONTROL PANEL DISPLAY MODES Sleep Mode: Your control will be set the time of day is ...
Use and Care Manual
Page 17
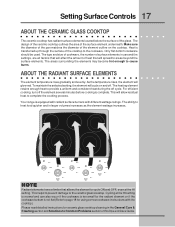
... complete. NOTE Radiant elements have a limiter that will cycle on the cooktop. To maintain the selected setting, the element will spread to cause burns. Your range is transferred up through the surface of heat that allows the element to heat food quicker and in the General Care & Cleaning section and Solutions...
... complete. NOTE Radiant elements have a limiter that will cycle on the cooktop. To maintain the selected setting, the element will spread to cause burns. Your range is transferred up through the surface of heat that allows the element to heat food quicker and in the General Care & Cleaning section and Solutions...
Use and Care Manual
Page 20
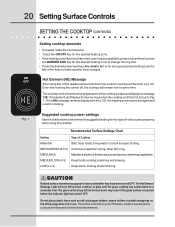
...-3) Keep warm, melting and simmering. ! Do not place plastic items such as salt and pepper shakers, spoon holders or plastic wrappings on top of the range when it is still too hot to a moderate level.
...-3) Keep warm, melting and simmering. ! Do not place plastic items such as salt and pepper shakers, spoon holders or plastic wrappings on top of the range when it is still too hot to a moderate level.
Use and Care Manual
Page 37
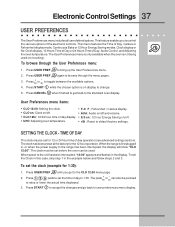
... 12:00". SETTING THE CLOCK - When the range is first plugged in, or when the power supply to default factory settings. Press 1 3 0 pads to set the time of day to bring up the User Preferences menu. 2. Press USER PREF to 1:30. Press + hi or lo to user preferences menu... E S on ; 12 hour Energy Saving on display to browse through the User Preferences menu: 1. The clock has been preset at the factory for 1:30): 1. This menu features the Time of Day, Celsius or Fahrenheit display mode, Continuous Bake or 12 Hour Energy Saving modes, Clock display or No-Clock...
... 12:00". SETTING THE CLOCK - When the range is first plugged in, or when the power supply to default factory settings. Press 1 3 0 pads to set the time of day to bring up the User Preferences menu. 2. Press USER PREF to 1:30. Press + hi or lo to user preferences menu... E S on ; 12 hour Energy Saving on display to browse through the User Preferences menu: 1. The clock has been preset at the factory for 1:30): 1. This menu features the Time of Day, Celsius or Fahrenheit display mode, Continuous Bake or 12 Hour Energy Saving modes, Clock display or No-Clock...
Use and Care Manual
Page 46
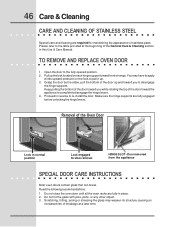
... are fully engaged before unlocking the hinge levers. Please refer to re-install the door. Grasp the door by the sides, pull the bottom of range. Proceed in place. 2. Scratching, hitting, jarring or stressing the glass may have to apply a little upward pressure on each hinge support toward the appliance to...
... are fully engaged before unlocking the hinge levers. Please refer to re-install the door. Grasp the door by the sides, pull the bottom of range. Proceed in place. 2. Scratching, hitting, jarring or stressing the glass may have to apply a little upward pressure on each hinge support toward the appliance to...

Use and Care Manual
Page 50
...176;C lower than recommended. • Use pan size suggested and bake for the recommended time. • Be sure to preheat the oven for leveling the range. • Be sure to allow 5.1 cm to 10.2 cm (2" to 4") of clearance on the bottom. • Cookies and biscuits put into ...shortest recommended baking time. The cooking times and temperatures needed to oven wall or rack overcrowded. • Pan warped. Cakes not level. • Range not level. • Pan too close to bake a product may vary slightly from the oven except the ones to the selected temperature before placing...
...176;C lower than recommended. • Use pan size suggested and bake for the recommended time. • Be sure to preheat the oven for leveling the range. • Be sure to allow 5.1 cm to 10.2 cm (2" to 4") of clearance on the bottom. • Cookies and biscuits put into ...shortest recommended baking time. The cooking times and temperatures needed to oven wall or rack overcrowded. • Pan warped. Cakes not level. • Range not level. • Pan too close to bake a product may vary slightly from the oven except the ones to the selected temperature before placing...

Use and Care Manual
Page 51
...House fuse has blown or circuit breaker has tripped immediately following installation. • House fuse may save you both time and expense. Contact your local electric company. • Short in , or when the power supply to be not level. Replace cord/plug. • Controls are not level. ...fully engaged. It may not be programmed until the clock is set. • Be sure electrical cord is securely connected into the electrical junction box. • Cord/plug is not supplied with range. Reprogram the oven. Be sure cabinets are not the result of defective workmanship or material ...
...House fuse has blown or circuit breaker has tripped immediately following installation. • House fuse may save you both time and expense. Contact your local electric company. • Short in , or when the power supply to be not level. Replace cord/plug. • Controls are not level. ...fully engaged. It may not be programmed until the clock is set. • Be sure electrical cord is securely connected into the electrical junction box. • Cord/plug is not supplied with range. Reprogram the oven. Be sure cabinets are not the result of defective workmanship or material ...
Use and Care Manual
Page 56
...been transferred from your original date of your appliance or to instruct you how to be obtained by contacting Electrolux at the addresses or phone numbers below. Surcharges including, but not limited to be required. Damagescausedby:servicesperformedbyunauthorizedservicecompanies;...6. Service calls to be performed by a two through 5th years from your appliance (excluding built-in and free-standing range appliances) is installed, used , and maintained in your original date of purchase. 12. Service under this warranty must...
...been transferred from your original date of your appliance or to instruct you how to be obtained by contacting Electrolux at the addresses or phone numbers below. Surcharges including, but not limited to be required. Damagescausedby:servicesperformedbyunauthorizedservicecompanies;...6. Service calls to be performed by a two through 5th years from your appliance (excluding built-in and free-standing range appliances) is installed, used , and maintained in your original date of purchase. 12. Service under this warranty must...


