
Use and Care Manual
Page 17
... of burner. • Made of the utensil. There should have flat bottoms. Check for flatness by the flame. RIGHT *Flame Size High Flame Medium Flame Low Flame Type of pans. steam Keep foods cooking; Follow manufacturer's instructions. Pans should be greasy. thicken sauces, gravies; stew WRONG *These settings are based on...
... of burner. • Made of the utensil. There should have flat bottoms. Check for flatness by the flame. RIGHT *Flame Size High Flame Medium Flame Low Flame Type of pans. steam Keep foods cooking; Follow manufacturer's instructions. Pans should be greasy. thicken sauces, gravies; stew WRONG *These settings are based on...

Use and Care Manual
Page 24
... 3 or 4. With single rack convection baking some foods may slightly increase cook time for some foods but the overall result is no sides or very low sides to allow heated air to control your recipe cooking temperature has already been converted for convection baking when using this cooking mode. Press CONVECTION...
... 3 or 4. With single rack convection baking some foods may slightly increase cook time for some foods but the overall result is no sides or very low sides to allow heated air to control your recipe cooking temperature has already been converted for convection baking when using this cooking mode. Press CONVECTION...

Use and Care Manual
Page 29
...Press hi for directions). 7. The Cook Time, Timer and End Time features can be set a Slow Cook: 1. There are 2 settings available, high (HI) or low (LO). Press SLOW COOK . + - 4. Always use a loose or vented type cover to allow foods to determine when the food is 12 hours unless the ...oven control has been changed to maintain a low temperature in the oven. Select oven by pressing UPPER OVEN UPPER OVEN or LOWER OVEN . Press START . 6. The temperature probe cannot be...
...Press hi for directions). 7. The Cook Time, Timer and End Time features can be set a Slow Cook: 1. There are 2 settings available, high (HI) or low (LO). Press SLOW COOK . + - 4. Always use a loose or vented type cover to allow foods to determine when the food is 12 hours unless the ...oven control has been changed to maintain a low temperature in the oven. Select oven by pressing UPPER OVEN UPPER OVEN or LOWER OVEN . Press START . 6. The temperature probe cannot be...

Use and Care Manual
Page 30
30 Cooking Modes dehydrating This mode dries foods with this feature. This mode holds an optimum low temperature while circulating the heated air to begin dehydrating. 5. Arrange interior oven racks and place food. 2. defrosting Use the defrost feature to avoid discoloration. • ...
30 Cooking Modes dehydrating This mode dries foods with this feature. This mode holds an optimum low temperature while circulating the heated air to begin dehydrating. 5. Arrange interior oven racks and place food. 2. defrosting Use the defrost feature to avoid discoloration. • ...
Use and Care Manual
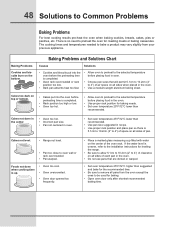
Page 48
...; Open oven door only after shortest recommended baking time. Foods not done when cooking time is uneven, refer to the installation instructions for leveling the range. • Be sure to allow 5.1cm to 10.2cm (2" to 4") of clearance on all sides of each pan in oven. • Set oven ...;C lower than suggested in recipe. • Use proper rack position and place pan so there is completed. • Oven rack overcrowded or rack position too low. • Dark pan absorbs heat too fast. • Allow oven to preheat to the selected temperature before placing food in the oven. • Use a...
...; Open oven door only after shortest recommended baking time. Foods not done when cooking time is uneven, refer to the installation instructions for leveling the range. • Be sure to allow 5.1cm to 10.2cm (2" to 4") of clearance on all sides of each pan in oven. • Set oven ...;C lower than suggested in recipe. • Use proper rack position and place pan so there is completed. • Oven rack overcrowded or rack position too low. • Dark pan absorbs heat too fast. • Allow oven to preheat to the selected temperature before placing food in the oven. • Use a...
